Fall 2020
This is the course homepage for EN.601.280 Full-Stack JavaScript.
These lecture notes are dedicated to the memory of my student Bradlee LaMontagne. His journey as a Full-Stack developer was cut way too short.
Quick Links
-
Campuswire: Q/A, Chat, Live Sessions (Lectures & Office Hours)
-
Codegrade: Homework submission, Exams, Feedback & Grades
-
Panopto: Recorded lectures for asynchronous viewing
Resources
-
Syllabus: Course Syllabus & Policies
-
Schedule: Tentative Schedule of Topics and Events
-
Logistics: Tools we use to survive remote teaching!
Open the sidebar to access course notes. The Appendix contains a listing of lectures (with links to recorded videos and mapping to note sections).
Preface
Welcome to EN.601.280 Full-Stack JavaScript!
A full-stack JavaScript developer is a person who can build modern software applications using primarily the JavaScript programming language. Creating a modern software application involves integrating many technologies - from creating the user interface to saving information in a database and everything else in between and beyond.
A full-stack developer is not an expert in everything. Rather, s/he is someone who is familiar with various (software application) frameworks and the ability to take a concept and turn it into a finished product.
This course is designed to provide a solid introduction to the JavaScript language. In particular, we will explore the features of JavaScript (such as asynchronous programming) that are not familiar to many students who are introduced to programming with languages such as Java, C++ or python.
After exploring the core programming concepts, the class lectures and homework assignments will introduce how JavaScript is used as a popular technology for software development. In particular, we will explore Web development with the MERN stack (MongoDB with Mongoose.js, Express.js, React, Node.js).
In the process, you will also learn about the engineering of modern software applications, emphasizing: object-oriented design, decomposition, encapsulation, abstraction, testing, and good programming style.
Instructional Approach
When it comes to learning a new programming languages for those who already know programming, there are two general type of audience: those who prefer to learn by doing, and those who prefer learning concepts from the ground up. This course is designed to serve both groups.
We alternate between step-by-step tutorial lessons where we learn by doing (building applications), and concept-focused lessons where we dissect a part of the language and learn all there is to learn about it.
For instance, in this lecture we will build a very simple web app (learn by doing). In the next lecture, we will learn about JavaScript basics (how to declare variables, what are the data types, ...).
JavaScript History
- Created in 1995 by Brendan Eich as LiveScript to enhance web pages in Netscape 2.0
- Renamed to JavaScript as a marketing ploy to capitalize on Java's popularity (despite the two had very little in common).
- Standardized as ECMAScript since 1997.
- ECMAScript 6 (2015) introduced a great many useful addition (Object-Oriented support, Modules, Strict mode, ...)
- Old JavaScript: Some good ideas, lots of cruft.
- Modern JavaScript (ECMAScript 6 and beyond): Good ideas alive and kicking, cruft (is gone/can be avoided).
- Today, it is one of the most popular programming languages. (E.g, see StackOverflow 2020 Developer Survey, PYPL Index, IEEE Spectrum Top Programming Languages 2020)
In 2001, Paul Graham wrote1:
I would not even use JavaScript, if I were you... Most of the JavaScript I see on the Web isn't necessary, and much of it breaks.
In 2007, Jeff Atwood coined Atwood's law2:
Any application that can be written in JavaScript will eventually be written in JavaScript.
This video summaries it:
A revised version of the essay can be found at http://paulgraham.com/road.html. The original quote can be found in the book Hackers & Painters.
Why Learn JavaScript?
JavaScript was originally developed to add functionality to web pages but it's now used for much more!
- JavaScript is great for software prototyping and agile development.
- JavaScript runs on pretty much any platform from web pages, to server backends and even hardware.
- There are some great build and deployment tools and frameworks written in JavaScript that are useful in many applications.
- It's a great introduction to software construction and multi-paradigm programming concepts.
- JavaScript is easy to learn. But beware - it's hard to master!
SleepTime App
We will build a simple web application similar to sleepyti.me but limited to suggesting "wake up" times based on calculating sleep cycles.
- A sleep cycle lasts about 90 minutes and a good night's sleep consists of 5-6 sleep cycles.
- If you wake up in the middle of a sleep cycle, you will feel groggy even if you've completed several cycles prior to waking up.
We do this with the full knowledge that you (most likely) have never done anything like this before. There is going to be many new encounters: syntax, terminology, etc. Don't worry! You are not expected to learn it all in one tutorial. We will revisit every unfamiliar topic again and again throughout the course. In the end, you will look back and find this example an astonishingly easy one! So, buckle up for the ride, and when you face something you don't know about, take it in your stride.
Step 1
-
The browser understands Hyper Text Markup Language, or HTML.
-
Create an empty file and call it
index.html -
Open the file in your favorite text editor!
The extension of your file must be
html. The name,index, is just a convention for naming the landing page of websites.
- HTML document is essentially a text file organized into sections. Each section is contained within
<tagname>...</tagname>and is called an HTML element. Here is the minimal structure:
<html>
  <head>
    <!-- meta data about the page -->
  </head>
  <body>
    <!-- content of the page -->
  </body>
</html>
- Note that HTML elements can be nested.
HTML is fairly easy and you will pick it up as we progress through the course. Please see the Appendix for more information.
- Copy the following to your
index.html
<html>
  <head>
    <title>SleepTime App</title>
  </head>
  <body>
    <p>Hello world!</p>
  </body>
</html>
- Open
index.htmlin your favorite browser.
Step 2
- Add the following to the
<body>element.
<p>If you go to bed NOW, you should wake up at...</p>
<button>zzz</button>
- Add the response which we want to see after clicking on
zzzbutton, after<button>zzz</button>
<p>It takes the average human fourteen minutes to fall asleep.</p>
<p>If you head to bed right now, you should try to wake up at one of the following times:</p>
<p>11:44 PM or 1:14 AM or 2:44 AM or 4:14 AM or 5:44 AM or 7:14 AM</p>
<p>A good night's sleep consists of 5-6 complete sleep cycles.</p>
The wake up times are calculated for someone going to bed at 10:00 PM, and hard-coded here. We will make our app calculate these times dynamically when the
zzzbutton is clicked.
Step 3
The onclick event
-
When we click on the
zzzbutton we want something to happen! -
Update the
buttontag and add the followingonclickattribute:
<button onclick="window.alert('buzz!');">zzz</button>
HTML attributes provide additional information about HTML elements. They are always specified in the start tag, usually in name/value pairs like:
name="value".
- Save the
index.htmlfile; refresh theindexpage in the browser. Then, click on thezzzbutton. You must see a pop-up alert window sayingbuzz!
The
window.alert('buzz!');is a JavaScript statement. Thewindowobject represents an open window in a browser.
- Let's add another statement to
onclickevent of thezzzbutton.
<button onclick="window.alert('buzz!');console.log('fizz!');">
-
Save the
index.htmlfile; refresh theindexpage in the browser. -
In your browser, open "Developer Tools" (typically, you can do this by a right click and selecting "Inspect") and find the "Console" tab.
-
Now, click on the
zzzbutton. In addition to a pop-up alert window with the messagebuzz!, you must see the messagefizz!printed to the console.
console.log()provides access to the browser's debugging console.
The <script> tag
-
It will be difficult to read more than a few (JavaScript) statements for the
onclickattribute of thezzzbutton. It is not advisable to write event handlers (JavaScript statements that are executed in response to an event) using attributes of button (or other HTML) elements. The HTML document will soon become unwieldy. -
A better approach is putting all JavaScript statements (code) in a dedicated section, perhaps group the statements (pertaining to handling an event) in a function and call that function in the
onclickevent. -
Add the following section to the end of the
<body>element (right before the closing</body>tag):
<script>
  function handleOnClickEvent() {
    window.alert('buzz!');
    console.log('fizz!');
  }
</script>
The
<script>element is used to include JavaScript in HTML.
- Update the
onclickattribute of thezzzbutton:
<button onclick="handleOnClickEvent();">zzz</button>
- Save the
index.htmlfile; refresh theindexpage in the browser. Then, click on thezzzbutton; it must work as before (producing alert window and console message).
Step 4
- Let's change the presentation of content by aligning to center! Add the following
styleattribute to the<body>tag.
<body style="text-align: center;">
- We can further change the text and background colors.
<body style="text-align: center;
    color: #7FDBFF;
    background-color:#001f3f;"
>
- Save the
index.htmlfile; refresh theindexpage in the browser. Notice the changes to the presentation of content.
#7FDBFFand#001f3fare hexadecimal values representing colors. I selected these by inspecting the elements on sleepyti.me website. This sort of inspection can be done using your browser's developer tools. You can also use various HTML color picker tools for such purposes.
The <style> element
-
Suppose we write elaborate styling for a commonly used HTML element like the
<p>element (which represents a paragraph). We many have several dozens<p>elements. We would have to rewrite the same elaborate (lengthly) style attribute for each<p>element. This way of writing styles can easily become unwieldy. -
A better way is to collect all the inline styles into what is called an internal Cascading Style Sheets or CSS using a
<style>element. -
Add the following to the end of
<head>element (right before the closing tag</head>):
<style>
    body {
        text-align: center;
        color: #7FDBFF;
        background-color: #001f3f;
    }
</style>
More styling!
-
Let's put a border around the "output" (the stuff we shall display once the
zzzbutton is clicked). -
Wrap the content after
zzzbutton in a<div></div>tag:
<div>
    <p>It takes the average human fourteen minutes to fall asleep.</p>
    <p>If you head to bed right now, you should try to wake up at one of the following times:</p>
    <p>11:44 PM or 1:14 AM or 2:44 AM or 4:14 AM or 5:44 AM or 7:14 AM</p>
    <p>A good night's sleep consists of 5-6 complete sleep cycles.</p>
</div>
HTML
<div>tag defines a division or a section in an HTML document. You can think of it as a container for other HTML elements - which is then styled with CSS or manipulated with JavaScript.
- Now add the following to the end of
<style>section (right before the closing tag</style>):
div {
    margin: 1em 5em 1em 5em;
    border: 3px solid white;
}
-
The
borderproperty is descriptive; you may want to look up the CSS margin property and CSS units. -
Save the
index.htmlfile; refresh theindexpage in the browser.
The
<div>is a common element. If we were to expand this web app in the future, we would likely have many moredivelements. The above styling will be applied to alldivelements. It would be forward thinking to ensure the styling is applied only to thedivthat contains the "output".
- Add the following class attribute to the
<div>element.
<div class="output">
- Update the
divCSS selector to.output
.output {
    margin: 1em 5em 1em 5em;
    border: 3px solid white;
}
Classes allow CSS (and Javascript) to select and access specific elements. Note the style selector for a class starts with a dot as in
.output.
- Save the
index.htmlfile; refresh theindexpage in the browser.
Step 5
-
Preferably we want the "output" to be hidden until we click on the
zzzbutton. -
Hiding the output is simple; add the following
displayproperty to the style selector for output.
.output {
    margin: 1em 5em 1em 5em;
    border: 3px solid white;
    display: none;
}
-
Save the
index.htmlfile; refresh theindexpage in the browser. -
Update the
handleOnClickEventfunction as follows:
<script>
  function handleOnClickEvent() {
    let output = document.querySelector('.output');
    output.style.display = 'block';
  }
</script>
The
documentobject is the root node of the HTML document. When an HTML document is loaded into a browser, it becomes adocumentobject. Thedocumentobject is also called the DOM (Document Object Model).The
querySelector()method returns the first element of DOM that matches a specified CSS selector in the document.
- Save the
index.htmlfile; refresh theindexpage in the browser. Notice the output is hidden until you click on thezzzbutton.
Step 6
-
We must calculate and display the wake up hours when user clicks on the
zzzbutton. Let's focus on the second part: displaying the hours. -
At the moment, there is a
<p>element that holds the hours:
<p>11:44 PM or 1:14 AM or 2:44 AM or 4:14 AM or 5:44 AM or 7:14 AM</p>
- Here is a sample code to access and update the content of this
<p>element:
let hours = // get the <p> element
hours.innerText = // string containing hours
- Similar to how we accessed the output
<div>, we can access this<p>element by giving it a class attribute such as<p class="hours">
let hours = document.querySelector('.hours');
hours.innerText = "placeholder for hours!";
- We can, alternatively, give it an ID attribute
<p id="hours">:
let hours = document.getElementById('hours');
hours.innerText = "placeholder for hours!";
- The ID attribute specifies a unique id for an HTML element.
The ID must be unique within the HTML document, although your webpage will still work if you use the same ID for multiple elements!
- The
getElementById()method returns the element that has the ID attribute with the specified value.
- Let's use ID attribute on the
<p>element; update thehandleOnClickEventfunction as follows:
<script>
  function handleOnClickEvent() {
    let output = document.querySelector('.output');
    output.style.display = 'block';

    let hours = document.getElementById('hours');
    hours.innerText = "placeholder for hours!";
  }
</script>
Instead of
getElementById('hours')we could usequerySelector('#hours'). The difference between the two is not important to us now, but if you are interested, see this stack-overflow query
- Save the
index.htmlfile; refresh theindexpage in the browser. Notice when you click onzzzbutton, the output is displayed but the hours are now replaced withplaceholder for hours!
Step 7
We are content with the content and styling (pun intended!). Let's focus on the algorithm:
- When the
zzzbutton is clicked we want to record the current time - Allow 14 minutes to fall sleep
- Create 6 cycles of 90 minutes each
- Display the cycles as suggested wake up times.
The date object
- Let's see how we can get the current time (date and time); click on the
playbutton below and "run" the code snippet
let time = Date.now();
console.log(time);
- Note the output is an integer! Let's find out what this value is; Google: MDN JavaScript Date. Follow the first suggested result and read the docs!
JavaScript Date objects represent a single moment in time in a platform-independent format. Date objects contain a number that represents milliseconds since 1/1/1970 UTC.
Further notice the following methods:
Date.now()
Returns the numeric value corresponding to the current time; the number of milliseconds elapsed since 1/1/1970 00:00:00 UTC, with leap seconds ignored.
Date.prototype.toLocaleTimeString()
Returns a string with a locality-sensitive representation of the time portion of this date, based on system settings.
The keyword
prototypeindicatestoLocaleTimeString()is an instance method (unlikenow()which is a static method).
- Let's try the code below
let today = new Date();
console.log(today.toLocaleTimeString());
- So we can get the current time and print it out! Next we will write JavaScript code to implement our algorithm.
Step 8
Take a moment and read through the code below; feel free to create a play-ground (click on play button) and experiment with it. I expect that you understand the code (since you've done programming in Java/C++).
let now = Date.now();
let minute = 60 * 1000; // milliseconds

let hours = "";
now += 14 * minute; // fall sleep
// compute sleep cycles
for (let c = 1; c <= 6; c++) {
    now += 90 * minute;
    let cycle = new Date(now);
    hours += cycle.toLocaleTimeString();
    if (c < 6) {
        hours += " or ";
    }
}

console.log(hours);
We need to plug this code into the <script> element:
<script>
function handleOnClickEvent() {
    let output = document.querySelector('.output');
    output.style.display = 'block';

    let now = Date.now();
    let minute = 60 * 1000; // miliseconds

    let hours = "";
    now += 14 * minute; // fall sleep
    // compute sleep cycles
    for (let c = 1; c <= 6; c++) {
        now += 90 * minute;
        let cycle = new Date(now);
        hours += cycle.toLocaleTimeString();
        if (c < 6) {
            hours += " or ";
        }
    }

    let hoursElm = document.getElementById('hours');
    hoursElm.innerText = hours;
}
</script>
- Save the
index.htmlfile; refresh theindexpage in the browser. You must now have a working application.
Step 9
There are best practices and coding convention when it comes to authoring HTML documents. A good starting point is given on W3School's HTML Style Guide. You can search online for more resources. (You will find many).
We've already followed many of the points made in W3School's HTML Style Guide. We will polish our work by incorporating a few which we've left out.
HTML <!DOCTYPE> Declaration
- Add to the very top of
index.html
<!DOCTYPE html>
The
<!DOCTYPE>declaration is not an HTML tag. It is an "information" to the browser about what document type to expect.
Add the lang Attribute and Character Encoding
- Add to
langattribute to the<html>tag:
<html lang="en-us">
- Use the
<meta>tag to declare the character encoding used in your HTML document. (Place it right after the<head>opening tag.)
<meta charset="UTF-8">
To ensure proper interpretation and correct search engine indexing, both the language and the character encoding should be defined as early as possible in an HTML document.
Setting The Viewport
- We can use the
<meta>tag for setting the viewport.
<meta name="viewport" content="width=device-width, initial-scale=1.0">
The viewport gives the browser instructions on how to control the page's dimensions and scaling. It is needed for responsive web design which aims to make your web page look good on all devices.
Separate the "style" from "content"
It is considered a good practice to separate style from content. This means using <style> element instead of inline style attributes. It is considered a better practice to take this a level further and move all the styling into a separate file.
-
Create a
style.cssfile (in the same folder whereindex.htmlis). -
Move everything inside the
<style></style>tag tostyle.css. -
Delete the
styleelement fromindex.html -
Add the following where
<style>element used to be:
<link rel="stylesheet" href="style.css">
Separate JavaScript from HTML
We can make a similar argument to that made earlier about separating style from the content, for separating "scripts" from the content.
-
Create a
script.jsfile (in the same folder whereindex.htmlis). -
Move everything inside the
<script></script>tag toscript.js. -
Update the
<script>element
<script src="script.js"></script>
Exercise 1
Visit sleepyti.me and click on the zzz button; notice the wake up hours are color coded. Create the same effect in our app (use the same colors).
Solution
We can wrap each wake up hour in a <span></span> tag with a unique ID for each cycle:
<p id="hours">
    <span id="cycle-1">11:44 PM</span> or
    <span id="cycle-2">1:14 AM</span> or
    <span id="cycle-3">2:44 AM</span> or
    <span id="cycle-4">4:14 AM</span> or
    <span id="cycle-5">5:44 AM</span> or
    <span id="cycle-6">7:14 AM</span>
</p>
The
<span>tag is much like the<div>element, but<div>is a block-level element and<span>is an inline element.
We can then update our style.css file to assign the desired colors to each "cycle":
#cycle-1 {
  color: rgb(168, 39, 254);
}

#cycle-2 {
  color: rgb(154, 3, 254);
}

#cycle-3 {
  color: rgb(150, 105, 254);
}

#cycle-4 {
  color: rgb(140, 140, 255);
}

#cycle-5 {
  color: rgb(187, 187, 255);
}

#cycle-6 {
  color: rgb(143, 254, 221);
}
- Note CSS ID selector starts with
#- Moreover, notice we can specify colors by their
rgbvalues.
I picked up the values by inspecting the output on sleepyti.me.
To generate this output programmatically, we need to update our JavaScript code:
function handleOnClickEvent() {
  let output = document.querySelector('.output');
  output.style.display = 'block';

  let now = Date.now();
  let minute = 60 * 1000; // miliseconds

  let hours = document.getElementById('hours');
  hours.innerText = ""; // cleanup exisitng content
  now += 14 * minute; // fall sleep
  // compute sleep cycles
  for (let c = 1; c <= 6; c++) {
      now += 90 * minute;
      let cycle = new Date(now);
      let span = document.createElement("span");
      span.id = "cycle-" + c;
      span.innerText = cycle.toLocaleTimeString();
      hours.appendChild(span);
      if (c < 6) {
        let or = document.createTextNode(" or ");
        hours.appendChild(or);
      }
  }
}
- The createElement() method creates an HTML Element Node with the specified name.
- The createTextNode() method creates a Text Node with the specified text.
- The appendChild() method appends a node as the last child of a node.
Exercise 2
Visit sleepyti.me and notice the calculate button which comes after "I plan to FALL ASLEEP at..." clause. Give it a try and understand the functionality. Then, try to reproduce it.
Solution
We need to make some changes to the content:
<p>I plan to fall sleep at...</p>

<select id="hh">
    <option>(hour)</option>
    <option>1</option>
    <option>2</option>
    <option>3</option>
    <option>4</option>
    <option>5</option>
    <option>6</option>
    <option>7</option>
    <option>8</option>
    <option>9</option>
    <option>10</option>
    <option>11</option>
    <option>12</option>
</select>

<select id="mm">
    <option>(minute)</option>
    <option>00</option>
    <option>05</option>
    <option>10</option>
    <option>15</option>
    <option>20</option>
    <option>25</option>
    <option>30</option>
    <option>35</option>
    <option>40</option>
    <option>45</option>
    <option>50</option>
    <option>55</option>
</select>

<select id="ampm">
    <option>PM</option>
    <option>AM</option>
</select>

<br>
<br>

<button onclick="handleOnClickEvent();">CALCULATE</button>
The
<select>element is used to create a drop-down list.The
<br>tag inserts a single line break
We further need to adjust the output content:
<div class="output">
    <p>If you fall sleep at the specified time above, you should try to wake up at one of the following times:</p>
    <p id="hours">11:44 PM or 1:14 AM or 2:44 AM or 4:14 AM or 5:44 AM or 7:14 AM</p>
    <p>A good night's sleep consists of 5-6 complete sleep cycles.</p>
</div>
Now, we must update our JavaScript code to base its sleep cycle calculation on the time specified by the user (using the drop-down lists). So, take out the following statement:
let now = Date.now();
and replace it with the following:
let hh = document.getElementById("hh").value;
let mm = document.getElementById("mm").value;
let ampm = document.getElementById("ampm").value;
hh = ampm === "PM" ? hh + 12 : hh;
let now = new Date();
now.setHours(hh);
now.setMinutes(mm);
now = now.valueOf();
The
valueproperty sets or returns the value of the selected option in a drop-down list.The
valueOf()method returns the primitive value of a Date object.
Finally, we must adjust our JavaScript code to not take into account the "14 minutes" to fall sleep since the assumption is that the user falls sleep at the specified time. So, comment out the following line:
now += 14 * minute;
There is a bug 🐛 in the solution provided here. We will revisit this in future lectures as an opportunity to work with the built-in debugger in Chrome/FireFox Developer Tools.
JavaScript Basics
In this chapter, we will explore JavaScript values and variables!
There are a few different ways to run JavaScript code. The easiest to get started is to use the browser console; open the development tools and the console tab.
Console
When creating a web application, you can use console.* to output information to the browser console.
Console is a very handy tool for quickly debugging problems.
Interestingly, there is no specification for how console.* methods behave in ECMAScript. Each browser (environment) adds its own methods and behavior. However, almost all environments support the following:
-
Logging information such as printing out a message or the current value of a variable
console.log("This is my message"); -
Sending a warning to the console.
console.warn("Resource not changed") -
Sending an error message to the console.
console.error("File not found!")
You should not include any
console.*methods in production code.
Variables
In JavaScript, variables must be declared to be used. Here is an example:
let firstName; // declare
firstName = "Ali"; // initialize
console.log(firstName); // use

let lastName = "Madooei"; // declare and initialize
console.log(lastName); // use
Unlike in languages like Java and C++ where you declare a variable by indicating its type, in JavaScript you must use a variable declaration keyword:
letconstvar
JavaScript is a dynamically-typed language which means a variable is assigned a type at runtime based on the variable's value at the time.
Dynamic typing means you can also change a variable's type at any time:
let num;
num = 2; // num is a Number
num = "two"; // now num is a String
num = { value: 2 }; // now num is an Object!
If you declare a variable but not give it a value, it's type and value are undefined
let num;
console.log(num);
console.log(typeof num);
You can use the
typeofoperator to check the type of a value.
let
A variable declared with let behaves for most part the way you expect; for example:
- It throws an error if you use it before it is declared:
console.log(num); let num = 2; - It throws an error if you redefine it:
let num = 2; let num = "two"; console.log(num); - It has a block scope:
for (let num = 1; num < 10; num++) {
  // do something with num
}
console.log(num);
const
Declares a read-only named constant.
let firstName = "Ali";
firstName = "John"; // Ok

const lastName = "Madooei";
lastName = "Doe"; // Error!
Constants are block-scoped, like variables defined using the let keyword. The value of a constant can't be changed through reassignment, and it can't be redeclared.
An initializer for a constant is required.
const lastName; // Error!
lastName = "Madooei";
The const declaration creates a read-only reference to a value. It does not mean the value it holds is immutable (just that the variable identifier cannot be reassigned).
const numbers = [1, 2, 7, 9];
numbers[2] = 4; // Ok
Prefer
constoverlet: it provides an extra layer of protection against accidentally reassigning your variables.
var
The variable declaration keywords let and const are relatively new additions to JavaScript. The old way of declaring a variable in JavaScript is using var:
var firstName = "Ali";
Variables declared with var are not block scoped (although they are function scoped). Also, no error is thrown if you declare the same variable twice using var.
Don't use
var!
Undeclared Variables!
Technically, you can declare a variable in JavaScript without using a variable declaration keyword. Variables defined as such become global variables. This is another cruft from the early days of JavaScript and it must be avoided.
firstName = "Ali";
console.log(window.firstName);
Using an undeclared variable throws ReferenceError under JavaScript's "strict mode", introduced in ECMAScript 5.
Resources
Syntax
Semicolon
Statements in JavaScript must end in a ;. However, JavaScript has Automatic Semicolon Insertion (ASI) which means that, if you omit a semicolon, JavaScript will automatically add it where it thinks it should go.
In this class, we always remember to insert semicolons.
Why?
Because omitting a semicolon in certain situations can cause problems.
Here is a completely contrived example:
x
++
y
should it be interpreted as:
x;
++y;
or:
x++;
y;
Depending on the implementation of ASI, it might be interpreted as the first or the second one.
Thus, it's recommended to insert the ; where it is intended. Most JavaScript linters such as Prettier insert semicolons to your code.
ASI bites you even if you conscientiously put all semicolons! For instance if you accidentally hit enter after return:
return  // Semicolon inserted here
  someComplicatedExpression;
Identifier naming rules
Identifiers (names of any function, property or variable) may contains letters (only ASCII letters), numbers, dollar signs or underscores.
The first character must not be a number.
Why?
It is also recommended to not use
$or_as the first character of your variables.
Why?
For clarity mainly! Some popular JavaScript libraries (such as jQuery, UnderscoreJS, Lodash) use these characters as their identifiers.
Keep in mind JavaScript is case sensitive.
In this course we use camelCase naming conventions (so name your function calcTax not calc_tax). Refer to Google JavaScript Style Guide for more information.
Reserved words cannot be used as identifiers.
Like most programming languages, there are a number of reserved words in JavaScript that you cannot use to name your functions and variables (e.g. var, let, new). For a complete list, refer to MDN web docs; JavaScript reference: Keywords.
Comments
Comments in JavaScript are similar to Java and C++:
// I am a single line comment!

/*
I am a block comment,
  and I can be expanded over several lines!
*/

let /* hourly */ payRate = 12.5; // dollars
Types
There are two data types in JavaScript: primitives and objects. The following are the primitive types:
booleanstringnumberundefinednullsymbol
Primitive vs. Object
Primitive values are atomic data that are passed by value and compared by value. Objects, on the other hand, are compound pieces of data that are passed by reference and compared by reference.
typeof operator
You can check the type of a value by using the typeof operator
console.log(typeof "two");
console.log(typeof 2);
console.log(typeof true);
console.log(typeof undeclaredVariable);
console.log(typeof { value: 2 });
See typeof on MDN web docs for more details.
boolean
The Boolean type is similar to most other programming languages with two options: true or false.
let isRequired = true;
let isOptional = false;
See Boolean on MDN web docs for more details.
string
To be discussed shortly.
number
To be discussed shortly.
Primitive types and their Wrappers
The three primitive types string, number and boolean have corresponding types whose instances are objects: String, Number, Boolean.
const name = "Ali";
const firstname = new String("Ali");

console.log(name);
console.log(firstname);

console.log(typeof name);
console.log(typeof firstname);

console.log(name instanceof String);
console.log(firstname instanceof String);
You can use the
instanceofoperator to check the type of an object.
undefined and null
JavaScript has two "bottom" values!
-
An uninitialized variable is
undefined. -
The
nullvalue denotes an "intentionally" absent value.
Although you can, but don't deliberately set a value to
undefined
JavaScript has lots of quirks and a bunch of them are around null and undefined (and how they behave, relate and differ). We will see some of these in later sections. For now, enjoy this!
console.log(typeof undefined);
console.log(typeof null);
For more details, Brandon Morelli has a nice article: JavaScript — Null vs. Undefined.
For a complete reference, visit null and undefined on MDN web docs.
Symbol
Symbol is a new addition to the JavaScript language which enables Metaprogramming. It is beyond the scope of this course. You can consult the following resources if you are interested to learn more.
- Metaprogramming in ES6: Symbols and why they're awesome
- JavaScript Symbols: An easy to follow tutorial to understand JavaScript Symbols
- freeCodeCamp: A quick overview of JavaScript symbols
- Symbols on MDN web docs
String
Strings in JavaScript are sequences of Unicode (UTF-16) characters.
const greeting = "Hello 🌐";
console.log( greeting);
There isn't a separate type for representing characters in JavaScript. If you want to represent a single character, just use a string consisting of a sing
Delimiters are single or double quotes:
const greeting = "Hello 🌐";
const congrats = 'Congratulation 🎉';
You can also use template literals, using the backtick character `.
const greeting = `Hello 🌐`;
Backtick delimiters are useful for multiline strings and embedded expressions:
const name = "Ali";
const greeting = `**********
Hello ${name}!
**********`;
console.log(greeting);
You can call methods and properties available in String wrapper object directly on a primitive string value.
const name = "Ali";
console.log(name.length);
console.log(name.charAt(1));
console.log(name.toUpperCase());
The statements above work because JavaScript secretly converts the primitive string to its wrapper object type String.
Since ECMAScript 2015, you can access string characters similar to accessing array elements (using square bracket notation):
const animal = "cat";
console.log(animal[0], animal[1], animal[2]);
But you cannot use the square bracket notation to modify the string:
const animal = "cat";
animal[0] = "b";
console.log(animal);
See String on MDN web docs for more details.
Number
JavaScript has only one type of number and that is a 64-bit floating point number.
- Unlike languages like Java and C++, there is no distinction between whole numbers (integers) and real values (numbers with decimals).
- JavaScript always stores numbers as double precision floating point, following the international IEEE 754 standard.
let num;
num = 3.14159265;
console.log(typeof num);
num = 3;
console.log(typeof num);
So, an apparent integer is in fact implicitly a float!
const num = 1 / 2;
console.log(num);
There is, like in most programming languages, unavoidable round-off errors:
console.log(0.1 + 0.2);
Number literals
- Decimal numbers:
42,0.42 - Exponential notation:
4.2e-10 - Hexadecimal:
0x2A - Binary:
0b101010 - Octal:
0o52
// Try any of the above
let num = 42;
console.log(num);
Special Values
JavaScript has the special values Infinity and -Infinity:
console.log(1 / 0);
console.log(-1 / 0);
console.log(10 * Number.MAX_VALUE);
There is also NaN which means "Not a Number". You get this when e.g. number cannot be parsed from a string, or when a Math operation result is not a real number.
console.log(parseInt("blahblah"));
console.log(Math.sqrt(-1));
You also get NaN when you do weird stuff!
console.log(0 * Infinity);
console.log("JavaScript" / 2);
For a reference, visit MDN web docs on Infinity and NaN.
Number Wrapper object
You can borrow many useful methods defined in Number object. For instance, there is a toString method with optional base argument (between 2 and 36):
const num = 42;
console.log(num.toString(2));
The toPrecision and toExponential can be used for formatting:
const num = 3.14159265;
console.log(num.toPrecision(2));
const val = 1000000;
console.log(val.toExponential());
The Number object has several useful static method and constants as well. For example, there is parseInt method with optional base argument (between 2 and 36):
const num = "0x2A";
console.log(Number.parseInt(num, 16));
There is parseFloat method to convert floating point to number:
const num = "0.001";
console.log(Number.parseFloat(num) * 2);
There are several methods for type checking:
console.log(Number.isFinite(-1 / 0));
console.log(Number.isNaN(1 / 0));
console.log(Number.isInteger(2.1));
And many useful constants:
console.log(Number.MAX_VALUE);
console.log(Number.MIN_VALUE);
console.log(Number.MAX_SAFE_INTEGER);
console.log(Number.MIN_SAFE_INTEGER);
console.log(Number.POSITIVE_INFINITY);
console.log(Number.NEGATIVE_INFINITY);
For a reference, visit Number on MDN web docs.
Big Integer!
JavaScript number type cannot represent integers bigger than 253-1 (Number.MAX_SAFE_INTEGER constant). For integers larger than that limit, you can use a special built-in object, BigInt.
BigIntcan be used to represent arbitrary large integers.
BigInt literal have suffix n:
const num = 18889465931478580854784n;
console.log(typeof num);
console.log(num * num);
You can also create BigInt by calling BigInt() function:
const num = Number.MAX_SAFE_INTEGER;
console.log(BigInt(num * num));
You cannot mix BigInt with other numbers
const num = 18889465931478580854784n;
console.log(num + 1);
For a reference, visit BigInt on MDN web docs.
Arithmetics
In JavaScript, you have the usual arithmetics operators:
1 + 2;  // add
9 / 3;  // divide
1 * 5;  // multiply
9 - 5;  // subtract
10 % 4; // modulus (division remainder)
- The
/operator yields a floating-point result.
console.log(9 / 3);
console.log(1 / 2);
- The
%operator works with both integer and non-integer numbers.
console.log(42 % 10);
console.log(1.1 % 0.3);
- There is
**operator (similar to Python) that raises to a power.
console.log(2 ** 10);
console.log(2 ** 0.5);
- If an operand is
NaN, so is the result
console.log(2 + NaN);
Combine operator and assignment
Similar to Java, C++ and many other programming languages, you can write:
let counter = 1;
counter += 10;
console.log(counter);
Increment and decrement operators:
Similar to Java, C++ and many other programming languages, you can write:
let counter = 1;
console.log(counter++);
console.log(counter);
console.log(++counter);
console.log(--counter);
Type Conversions
Type Coercion is another term for type conversion. The former is more commonly used by the JavaScript community.
What do you think is the output?
console.log("3" - 2);
Explanation
Here, the non-number argument is converted to number.
What do you think is the output?
console.log("3" + 2);
Explanation
Here, + concatenates strings: the non-string argument is converted to string.
Don't mix types!
JavaScript does not say no when you mix up types in expressions. No matter how complex the expression is and what types it involves, JavaScript will evaluate it. The outcome will be surprising and unexpected in many cases. So, never mix types!
I recommend reading freeCodeCamp's article: JavaScript type coercion explained
Math
Math is a built-in object that with many useful methods that implement various mathematical functions. Here is a list of more frequently used ones for your reference.
Math.abs(x), Returns the absolute value of x.Math.sign(x), Returns the sign of the x, indicating whether x is positive, negative, or zero.Math.min, Returns the smallest of its arguments.Math.max, Returns the largest of its arguments.
Note:
minandmaxtake in any number of arguments.
Math.random(), Returns a pseudo-random number between 0 and 1.Math.round(x), Returns the value of the number x rounded to the nearest integer.Math.trunc(x), Returns the integer portion of x, removing any fractional digits.Math.floor(x), Returns the largest integer less than or equal to x.Math.ceil(x), Returns the smallest integer greater than or equal to x.Math.fround(x), Returns the nearest single precision float representation of x.
Caution: be careful with negative arguments to functions like
ceilandfloor
console.log(Math.ceil(7.004));
console.log(Math.ceil(-7.004));
console.log(Math.floor(5.05));
console.log(Math.floor(-5.05));
Math.pow(x, y), Returns base x to the exponent power y.Math.exp(x), Returns Ex, where x is the argument, and E is Euler's constant (2.718..., the base of the natural logarithm).Math.log(x), Returns the natural logarithm of x.Math.log2(x), Returns the base-2 logarithm of x.Math.log10(x), Returns the base-10 logarithm of x.Math.sqrt(x), Returns the positive square root of x.
There are many useful constants built into Math object as well:
console.log(Math.E);
console.log(Math.PI);
console.log(Math.SQRT2);
console.log(Math.SQRT1_2);
console.log(Math.LN10);
console.log(Math.LOG2E);
console.log(Math.LOG10E);
The Math objects includes many other static methods and properties. Please consult the MDN Reference page on Standard built-in Objects -> Math
Caution:
- Many
Mathfunctions have a precision that's implementation-dependent.Mathfunctions do not work withBigInt.
Objects
We've already seen some special objects built into JavaScrip, such as the Wrapper objects (Number, String, Boolean), Math, and BigInt objects. There are also Date and RegExp, and others.
Although these objects look like objects in Java/C++, the true nature of objects in JavaScript is far from objects in Object-Oriented programming! JavaScript objects are more similar to Dictionaries in Python (or HashMap in Java/Hash Tables in C++).
JavaScript objects are, in a nutshell, a collection of key-value pairs.
const user = { name: "John", age: 21 };
console.log(typeof user);
console.log(user);
Each key-value pair is called a "property"
Syntax
- Key must be string; you can drop the single/double quotes when key is a valid identifier.
- Value could be anything; any primitives or objects.
- A key-value is paired by colon.
- Properties are separated by commas. It is okay to have a trailing comma!
const user = {
    name: {
        first: "John",
        last: "Smith"
    },
    age: 21,
    "Job Title": "Teacher",
};
You can access property value with dot notation or square bracket notation:
const user = { name: "John", age: 21 };
console.log(user.name);
console.log(user["age"]);
You can modify property value the same way:
const user = { name: "John", age: 21 };
user["name"] = "Jane";
user.age = 30;
console.log(user.name, user.age);
You can even add new properties the same way:
const user = { name: "John", age: 21 };
user.lastname = "Smith";
user["member since"] = 2007;
console.log(user);
And, you can remove properties:
const user = { name: "John", age: 21 };
delete user.age;
console.log(user.age);
Accessing a nonexistent property yields
undefined
You can create an empty object and then add properties to it:
const user = {};
user.name = "John";
console.log(user);
Object constructor syntax
You can make an empty object using object constructor syntax:
const obj = new Object();
But it is more common to use the object literal syntax instead:
const obj = {};
We can use square brackets in an object literal, when creating an object. That’s called computed properties.
const key = "age";
const value = 21;
const user = { [key]: value };
console.log(user);
A common pattern you will see:
const age = 21;
const user = { name: "John", age };
console.log(user);
Explanation
If variable is used as above, a key-value pair is created where key is the variable name and value is the variable value.
It is same as:
const age = 21;
const user = { name: "John", age: age };
Destructuring Objects
Convenient syntax for fetching multiple elements:
const user = { name: "John", age: 21 };
let { name, age } = user;
console.log(name, age);
You can rename the properties
const user = { name: "John", age: 21 };
let { name: userName, age: userAge } = user;
console.log(userName, userAge);
You can even do this:
const user = { firstname: "John", lastname: "Smith", age: 21 };
let { age, ...rest } = user;
console.log(age, rest);
JSON
JSON (JavaScript object notation) is a standard text-based format for representing structured data based on JavaScript object syntax. It was popularized by Douglas Crockford. It is commonly used for transmitting data in web applications (e.g., sending some data from the server to the client, so it can be displayed on a web page, or vice versa).
JSON closely resembles JavaScript object literal syntax except:
- Property names (keys) must be enclosed in double quotes.
- Property values are numbers, strings,
true,false,null, arrays, and objects. - Trailing commas, skipped elements (inside arrays) or
undefinedvalues not allowed.
The special built-in JSON object JavaScript contains methods for parsing JSON and converting values to JSON. For a reference, visit the documentation on MDN website.
Arrays
Arrays in JavaScript are a special type of object. They resemble Python Lists (a collection which is ordered and changeable; allows duplicate members and members of different types).
const numbers = [1, 2, 2, "three", 4];
console.log(numbers);
console.log(typeof numbers);
You can use the bracket notation to access and modify the array elements.
const numbers = [1, 2, 3, 4];
for (let i = 1; i < numbers.length; i++) {
  numbers[i] = numbers[i] + numbers[i - 1];
}
console.log(numbers);
You can create an empty array and then add values to it:
const numbers = [];
numbers[0] = 10;
numbers[1] = 11;
numbers.push(12);
numbers.pop();
numbers.push(13);
console.log(numbers);
Array constructor syntax
You can make an empty array using array constructor syntax:
const numbers = new Array();
But it is more common to use the array literal syntax instead:
const numbers = [];
Madness: In an array, you can leave some elements undefined!
const numbers = [, 2, , 4, ];
for (let i = 0; i < numbers.length; i++) {
  console.log(numbers[i]);
}
Note how trailing comma does not denote an
undefinedelement!
Allowing undefined elements leads to more maddening behaviors.
const numbers = [];
numbers[99] = "hundred";
console.log(numbers.length);
console.log(numbers[0]);
console.log(numbers[99]);
console.log(numbers[100]);
lengthis calculated as one more than the highest index!
And the craziest thing is that you can overwrite length property!
const numbers = [1, 2, 3, 4];
numbers.length = 0;
console.log(numbers[0]);
console.log(numbers[1]);
Destructuring Arrays
Convenient syntax for fetching multiple elements:
const numbers = [10, 20, 30, 40];
// let first = numbers[0];
// let second = numbers[1];
let [first, second] = numbers;
console.log(first, second);
You can even do this:
const numbers = [10, 20, 30, 40];
let [first, second, ...others] = numbers;
console.log(first, second, others);
Multi-dimensional arrays
Use arrays of arrays for multi-dimensional arrays:
const magicSquare = [
  [16, 3, 2, 13],
  [5, 10, 11, 8],
  [9, 6, 7, 12],
  [4, 15, 14, 1]
];

// Use two bracket pairs to access an element:
console.log(magicSquare[1][2]);
Array object comes with many useful built-in operations. We will explore some of these in future lectures. For the impatient, please visit Array on MDN web docs
Date
Date is another built-in object in JavaScript. We used it in development of SleepTime App. Here is a summary of its operations. For a more detailed reference, visit MDN web docs.
Constructing Dates
- Date measured in "milliseconds" (adjusted for leap seconds) since the "epoch" (midnight of January 1, 1970 UTC).
let now = new Date(); // yields current date/time.
console.log(now);
- You can pass milliseconds to the constructor; valid range ±100,000,000 days from epoch.
// new Date(milliseconds) constructs Date from milliseconds.
console.log(new Date(10**12));
Caution: Dates are converted to numbers in arithmetic expressions.
-
You can pass the following parameters to
Date()constructor to create a specific date:year,zeroBasedMonth,day,hours,minutes,seconds,milliseconds
-
The parameters must be provided in order, and everything starting from "day" are optional.
const brendanEichsBirthday = new Date(1961, 6 /* July */, 4);
console.log(brendanEichsBirthday);
Caution: Out-of-range zeroBasedMonth, day, hours, etc. silently roll.
const invalidDate = new Date(2019, 13, -2); // 2020-01-28
console.log(invalidDate);
- For UTC, construct with date string in format YYYY-MM-DDTHH:mm:ss.sssZ (with literal T, Z):
const firstMillennialUTCnoon = new Date('2000-01-01T12:00:00.000Z');
console.log(firstMillennialUTCnoon);
Caution: Other string formats may be accepted by the constructor, but their format is not standardized.
Caution:
Date(...)withoutnewconstructs string (in non-standard format).
const now = Date();
console.log(now);
Static Date Functions
Date.now()is current date/time but it yields milliseconds, not Date object.
const now = Date.now();
console.log(now);
- A very useful static function is
Date.parse(dateString). It also yields milliseconds but you can pass that to Data constructor to get a Date object.
let aliBirthday = Date.parse("May 9, 1985");
console.log(aliBirthday);

aliBirthday = new Date(aliBirthday);
console.log(aliBirthday);
Caution: support for
dateStringinYYYY-MM-DDTHH:mm:ss.sssZformat is guaranteed. Support for other formats are implementation-dependent.
- Another useful static function is
Date.UTC(year, zeroBasedMonth, day, hours, minutes, seconds, milliseconds)where arguments afteryearare optional.
Getters and Setters
- The Date object has traditional getter/setter methods
getHours/setHours.
const now = new Date();
console.log(now.getFullYear());
console.log(now.getMonth());  // 0-11
console.log(now.getDate());   // 1-31
console.log(now.getHours());  // 0-23
console.log(now.getMinutes());
console.log(now.getSeconds());
console.log(now.getMilliseconds());
let aliBirthday = new Date();
aliBirthday.setYear(1985);
aliBirthday.setMonth(4);    // May
aliBirthday.setDate(9);
console.log(aliBirthday);
- For UTC, there are UTC variants
getUTCFullYear,setUTCFullYear,getUTCMonth,setUTCMonth, and so on.
Date Formatting
toISOStringyields string inYYYY-MM-DDTHH:mm:ss.sssZformat.
let now = new Date();
console.log(now.toISOString());
toString,toDateString,toTimeStringyield "humanly readable" string in local time zone, or only the date/time portion:
let now = new Date();
console.log(now.toString());
console.log(now.toDateString());
console.log(now.toTimeString());
toUTCStringyields "humanly readable" string in UTC:
let now = new Date();
console.log(now.toUTCString());
toLocaleString,toLocaleDateString,toLocaleTimeStringyield localized string:
let now = new Date();
console.log(now.toLocaleTimeString("en-US"));
console.log(now.toLocaleTimeString("zh-Hans-CN-u-nu-hanidec"));
SleepTime App with Git
In this chapter, we will rebuild our SleepTime App! This time around, we do things a little differently. And more importantly, we will track changes using Git VCS.
VCS
Version Control System, or VCS, allows you to save a snapshot of your project at any time you want. It's like making a copy of your project for backup and safe keeping, except that VCS typically does this in a more efficient fashion. It also comes with facilities to restore to an earlier copy (version).
Git
Git is the world's most popular VCS. It can keep a complete history of the changes made to code, and revert back to old versions when needed. This feature comes handy when you want to make changes to code without losing the original.
Git also facilitates synchronizing code between different people, thus making collaboration in a team very easy. This feature leads to increases productivity in particular in large software project that involves many developers.
Every time you save a new version of your project, Git requires you to provide a short description of what was changed. This helps to understand how the project evolved between versions.
I use Git for almost all my coding project, even when the project is small and I am the only one working on it. I do this because the history of changes helps me understand what happened, when I visit the project later.
Install Git
Follow the instructions provided here to setup Git on your computer.
Checking if Git is installed
Open terminal in Linux or MacOS, or "Git Bash" on Windows. Then run the following command:
git --version
Configuring Git
Tell Git who you are
git config --global user.email "you@example.com"
git config --global user.name "Your Name"
GitHub
GitHub is a website that stores Git repositories on the internet to facilitate the collaboration that Git allows for. We will be using GitHub in this class. If you don't already have an account, please make one by visiting github.com/
Step 1
Create a folder where you want to store the files for today's lecture. I'm going to call this folder sleeptime-git.
Open the terminal, change directory to sleeptime-git. (Alternatively, open this folder in VSCode and then open the integrated terminal.)
In the terminal, run the following command.
git init
Git is now ready to track all changes within the folder sleeptime-git. In Git jargon, we created a (local) repository inside sleeptime-git folder.
A Git repository is a collection of files tracked by Git.
Create a new file README.md inside sleeptime-git folder. Next, run the following command in the terminal.
git status
You will get a list of untracked files.
The git status command displays the state of the Git repository.
Next, run the following command in the terminal.
git add README.md
Git now has taken a snapshot of the README.md. This is like pressing command + c to make a copy in the memory (but the copy is not completed until you press command + v). Copy is not a great analogy because what is contained in a snapshot is mostly only the changes made.
In Git's jargon, we say changes in
README.mdare staged to be committed.
You can run git status now to see the state of our repository. The README.md must appear in green color under "changes to be committed".
Next, run the following command in the terminal.
git commit -m "Create README file"
Git now has saved (committed) the snapshot you've created earlier using the add command. This is like pressing command + v (after having pressed command + c to make a copy). Commits are like versions of your repository where you can access at any future point. A commit is part of the history of your repository.
To see a log of your commits, you can run the following command in the terminal.
git log
On my computer, git log produced the following output:
commit f034c1ea747a6ab6726681d60a7bd5b097ff40b8 (HEAD -> master)
Author: Ali Madooei <madooei@jhu.edu>
Date:   Sat Sep 5 10:21:54 2020 -0400

    Create README file
The command git log lists the commits made in reverse chronological order. Each commit has a commit ID (a hash identifier), the author's name and email, the date written, and the commit message.
Step 2
Add this content to README.md:
# SleepTime App

A simple web application
similar to sleepyti.me but
limited to suggesting "wake up"
times based on calculating sleep cycles.

* A sleep cycle lasts about 90 minutes
and a good nights sleep consists of
5-6 sleep cycles.
* If you wake up in the middle of a
sleep cycle, you will feel groggy
even if you've completed several
cycles prior to waking up.
Save the file and then run the following command.
git status
Git should inform you that README.md has been modified, and that changes made to it has not been staged for commit.
Run the following command to stage the changes for commit:
git add README.md
And then, commit the changes:
git commit -m "Add description for this app"
Feel free to check the status (git status) and logs (git log) now.
More changes!
I want to make the following changes to the README.md file:
- Fix a type: change
a good nights sleeptoa good night's sleep - Link to sleepyti.me web page: change
sleepyti.meto[sleepyti.me](https://sleepyti.me/)
I can edit and then commit the changes in one go. I would prefer, however, to commit changes one by one. So, let's fix the type, and then commit the changes.
git commit -am "Fix typo"
Notice I skipped git add and instead used the flag -am with the commit command.
The flag
-asays to automatically stage files that have been modified and deleted, but new files you have not told Git about are not affected.
Next, let's link to sleepyti.me web page. Then, commit the changes.
git commit -am "Link to sleepyti.me URL"
Looking at the logs (using git log), I have the following history
commit 28bca5f1424cdeba23624db9deae765e4c97d793 (HEAD -> master)
Author: Ali Madooei <madooei@jhu.edu>
Date:   Sat Sep 5 11:36:56 2020 -0400

    Link to sleepyti.me URL

commit cb53f8da1ba1940486c4b5d2997929e6d7040b21
Author: Ali Madooei <madooei@jhu.edu>
Date:   Sat Sep 5 11:34:26 2020 -0400

    Fix typo

commit 79cbc98629aa98b11003c48b5a3a4cf79c78f292
Author: Ali Madooei <madooei@jhu.edu>
Date:   Sat Sep 5 11:15:49 2020 -0400

    Add description for this app

commit f034c1ea747a6ab6726681d60a7bd5b097ff40b8
Author: Ali Madooei <madooei@jhu.edu>
Date:   Sat Sep 5 10:21:54 2020 -0400

    Create README file
Step 3
The following command displays the history (logs) in a more compact format:
git log --pretty=oneline
On my computer, it produces the following output:
28bca5f1424cdeba23624db9deae765e4c97d793 (HEAD -> master) Link to sleepyti.me URL
cb53f8da1ba1940486c4b5d2997929e6d7040b21 Fix typo
79cbc98629aa98b11003c48b5a3a4cf79c78f292 Add description for this app
f034c1ea747a6ab6726681d60a7bd5b097ff40b8 Create README file
Git Diff
You can see the changes made from one to another commit, using the following syntax
git diff <commit> <commit>
where <commit> is a commit ID. (The first commit ID is typically pointing to a commit made earlier than the second commit ID.)
The result will be the changes made between the first and second commits (identified by their IDs in form of a diff file.
For example, here is the diff between the latest commit (Link to sleepyti.me URL) and the one where I added description for this app.
diff --git a/README.md b/README.md
index ccabd2e..7463b25 100644
--- a/README.md
+++ b/README.md
@@ -1,12 +1,12 @@
 # SleepTime App

 A simple web application
-similar to sleepyti.me but
+similar to [sleepyti.me](https://sleepyti.me/) but
 limited to suggesting "wake up"
 times based on calculating sleep cycles.

 * A sleep cycle lasts about 90 minutes
-and a good nights sleep consists of
+and a good night's sleep consists of
 5-6 sleep cycles.
 * If you wake up in the middle of a
 sleep cycle, you will feel groggy
To better understand the diff format, consult this guideline.
The
git diffcommand is a handy tool to quickly check the changes made since the last commit.
Example: Add the following sentence to the end of README.md
The SleepTime App is made using basic HTML, CSS, and JavaScript.
Save the file, and then run git diff in the terminal. This is the output on my computer:
diff --git a/README.md b/README.md
index 7463b25..a6cab69 100644
--- a/README.md
+++ b/README.md
@@ -11,4 +11,6 @@ and a good night's sleep consists of
 * If you wake up in the middle of a
 sleep cycle, you will feel groggy
 even if you've completed several
-cycles prior to waking up.
\ No newline at end of file
+cycles prior to waking up.
+
+The SleepTime App is made using basic HTML, CSS, and JavaScript.
\ No newline at end of file
Step 4
Revert Changes
You can use the following command to reset (revert back changes) to an earlier commit:
git reset --hard <commit>
where <commit> is a commit ID.
For example, I will reset my repository to the commit I've made after adding description of this app (before fixing the typo and linking to the sleepyti.me URL).
git reset --hard 79cbc98629aa98b11003c48b5a3a4cf79c78f292
Looking at the log (using git log --pretty=oneline), I get the following:
79cbc98629aa98b11003c48b5a3a4cf79c78f292 (HEAD -> master) Add description of the app
f034c1ea747a6ab6726681d60a7bd5b097ff40b8 Create README file
Also, looking at the README.md, the changes I've made (typo correction and URL addition) are gone! It is like I traveled back in time!
There are other commands, namely
git revertandgit checkout, that can be used to undo some kind of change in your repository. Consult this tutorial to learn more about each.
Commit Messages
Let's correct the typo and link to the sleepyti.me URL again. Let's also add that line about the technology used for building SleepTime App. Then, commit the changes:
git commit -am "Update description"
Look at the logs now:
03fefbc9cb2549b123cf16f9dc49eef3a19552d8 (HEAD -> master) Update description
79cbc98629aa98b11003c48b5a3a4cf79c78f292 Add description of the app
f034c1ea747a6ab6726681d60a7bd5b097ff40b8 Create README file
The last commit message is an example of a bad commit message! You should try to avoid using general descriptions like the one I just used and instead use more specific messages (like those I wrote earlier).
I recommend reading How to Write Good Commit Messages: A Practical Git Guide.
Step 5
Add a new file, index.html to sleeptime-git folder with the following content:
<!DOCTYPE html>
<html lang="en">
<head>
  <meta charset="UTF-8">
  <meta name="viewport" content="width=device-width, initial-scale=1.0">
  <title>SleepTime App</title>
</head>
<body>

</body>
</html>
Stage this file and commit the changes:
git add index.html
git commit -m "Add boilerplate html"
Staging multiple files
Add two more files to the working directory, style.css and script.js, with no content (empty files).
Link to these files in index.html:
<link rel="stylesheet" href="style.css">
<script src="script.js"></script>
I want to add these two files, as well as the changes I've made to the index.html, through a single commit. However, style.css and script.js are not yet staged for changes. I must explicitly add them using the git add command.
One way to add multiple files is to list them one by one (space separated):
git add style.css script.js
Another way, which is commonly used, is to use the following command (wildcard notion):
git add .
The git add . will add all changed and untracked files to the staging area (to be committed). You must be careful with this command as it will add "all" files, including those you probably don't intend to include (such as system files) to your Git repository. To avoid this, we will supply a .gitignore file first.
gitignore
A .gitignore file specifies intentionally untracked files that Git should ignore.
Create a file named .gitignore in sleeptime-git folder (notice the leading dot). I am going to add the following content to this file
.DS_Store
__MACOSX
My computer is a MacBook; the Mac OS generates system files .DS_Store and __MACOSX which are typically hidden (so you will not see them by default but Git will see and track them unless you tell it not to).
You can use this online tool to generate
gitignorefor different operating systems, project environments, etc.
Let's commit the .gitignore to our repository:
git add .gitignore
git commit -m "Add gitignore"
Now, add and commit the changes made to our project earlier!
git add .
git commit -m "Link to external CSS and script files"
Step 6
Create HTML elements with JavaScript!
Add the following div element inside the body of index.html
<div id="root"></div>
Add the following content to script.js
let root = document.getElementById("root");

let p = document.createElement("p");
p.innerText = "If you go to bed NOW, you should wake up at...";
root.append(p);

let zzz = document.createElement("button");
zzz.innerText = "zzz";
root.append(zzz);
Save the files and open index.html in your favorite browser.
Notice we are using JavaScript to create content!
I'm personally not a fan of using JavaScript in this capacity. However, many JavaScript frameworks for building front-end applications work this way.
Let's add more; open script.js and append it with the following content:
let output = document.createElement("div");
output.className = "output";
root.append(output);

output.innerHTML = `
<p>It takes the average human fourteen minutes to fall asleep.</p>
<p>If you head to bed right now, you should try to wake up at one of the following times:</p>
<p id="hours">11:44 PM or 1:14 AM or 2:44 AM or 4:14 AM or 5:44 AM or 7:14 AM</p>
<p>A good night's sleep consists of 5-6 complete sleep cycles.</p>`;
Commit the changes:
git commit -am "Add basic content"
We can even add styling using JavaScript, but that would be excessive for now!
Step 7
Styling
Add the following content to style.css:
body {
    text-align: center;
    background-color: #001f3f;
    color: #7fdbff;
    font-size: 150%;
}

.output {
    border: 1px solid white;
    margin: 20px;
    display: none;
}
Commit the changes:
git commit -am "Add basic styling"
Event Listener
Add the following to the end of script.js:
function zzzOnClick() {
  let output = document.querySelector(".output");
  output.style.display = "block";
  let hours = "";

  // get current time
  let now = Date.now(); // in milliseconds
  let minute = 60 * 1000;  // milliseconds
  let cycle = now;

  // allow 14 minutes to fall sleep
  cycle += 14 * minute;

  // calculate 6 sleep cycles (each 90 minutes)
  for(let i = 0; i < 6; i++) {
    cycle += 90 * minute;

    // append the sleep cycles to hours string
    hours += new Date(cycle).toLocaleTimeString([], { hour: '2-digit', minute: '2-digit' });

    if (i < 5) {
      hours += " OR ";
    }
  }

  // output hours
  let hoursElm = document.querySelector("#hours");
  hoursElm.innerText = hours;
}
The code above is what we've developed in previous lectures.
We must now add an event listener to the zzz button. You can add this anywhere after the zzz element is created, but perhaps it is best situated right before the zzz element is appended to root:
index 871b173..b98de79 100644
--- a/script.js
+++ b/script.js
@@ -6,6 +6,7 @@ root.append(p);

 let zzz = document.createElement("button");
 zzz.innerText = "zzz";
+zzz.addEventListener("click", zzzOnClick);
 root.append(zzz);
Commit changes:
git commit -am "Add event listener for zzz button"
And with that, we have completed the SleepTime App, once again! 🎉🎉
Step 8
GitHub
Let's put our SleepTime App on GitHub for the world to see! Go to GitHub, login, and then create a new repository:
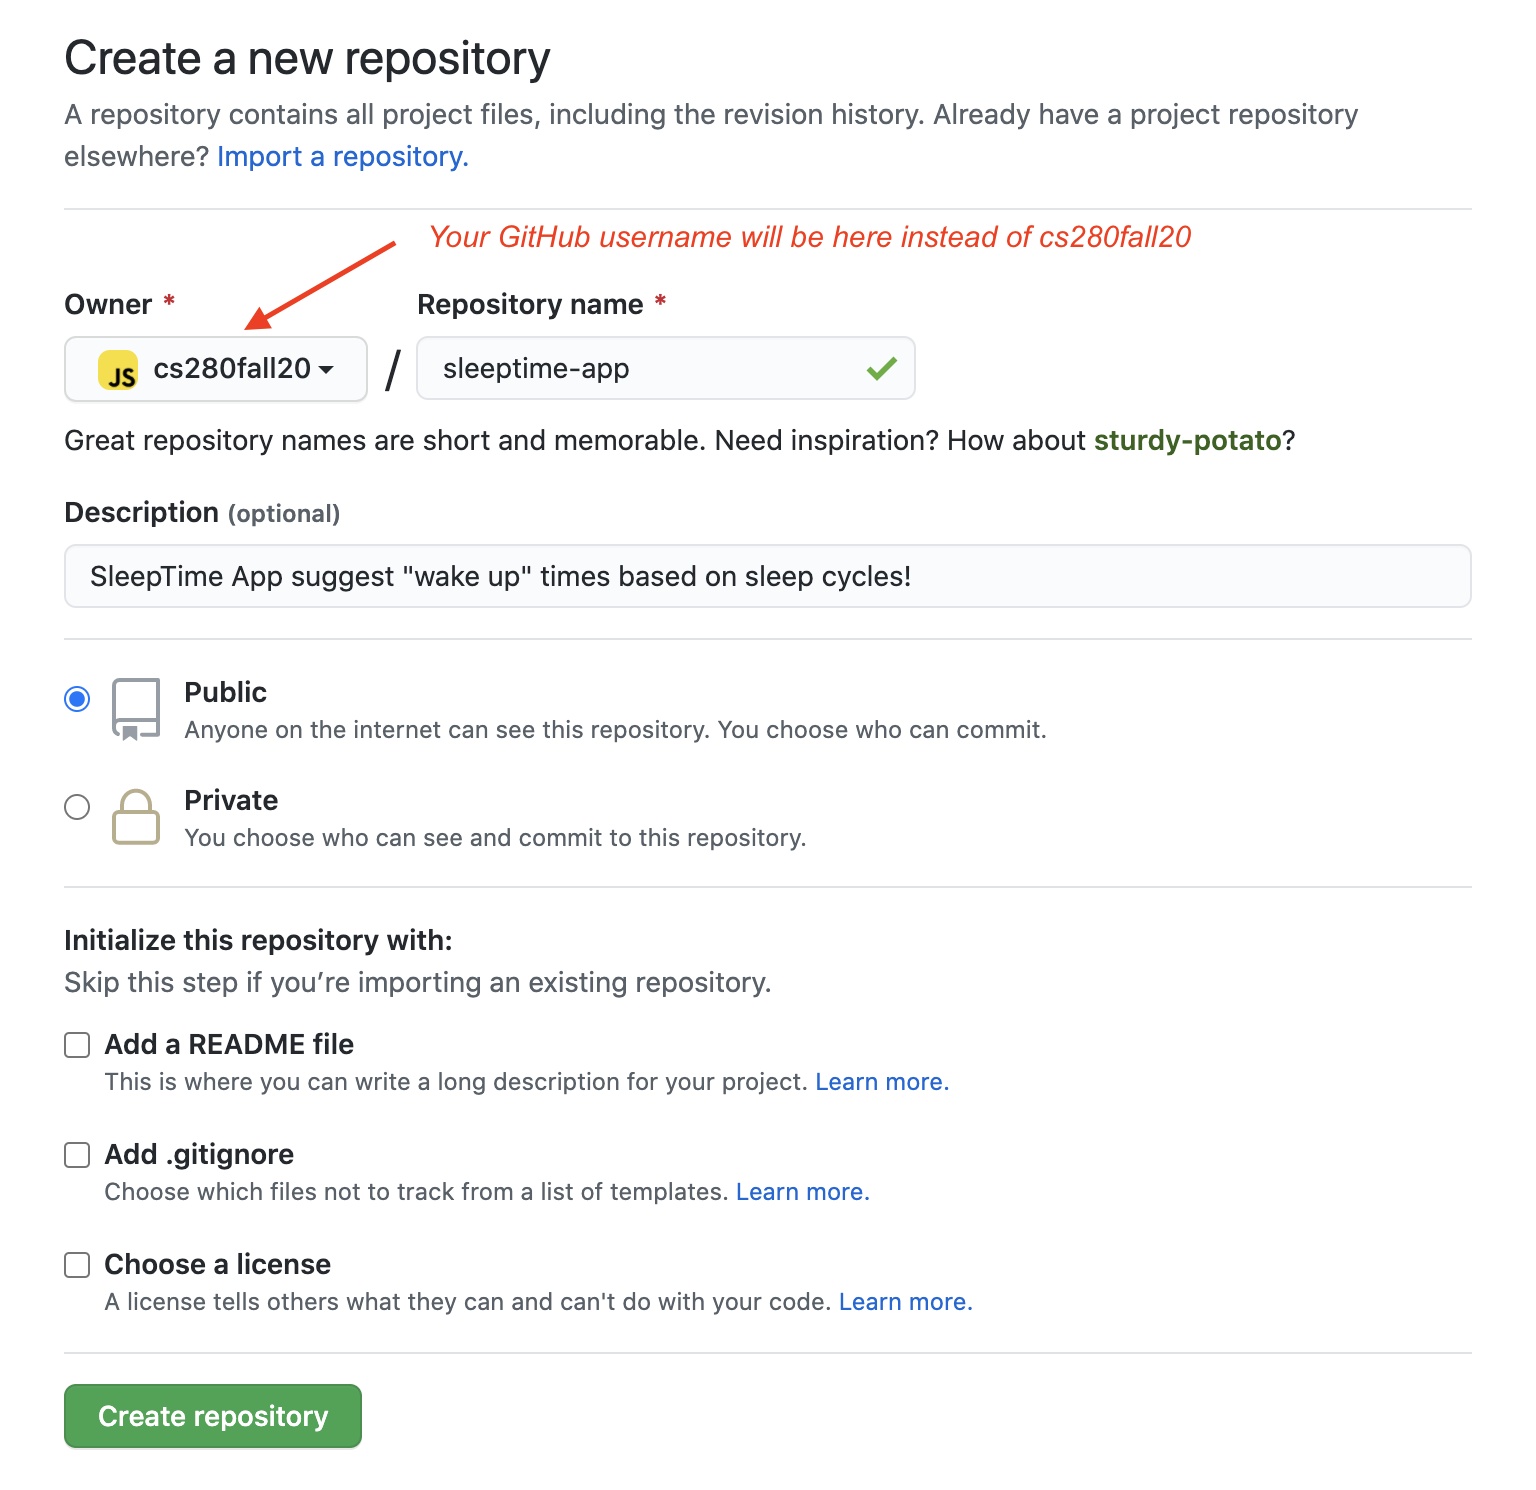
Once the repository is created, GitHub provides a few useful suggestions to start working with it.
![]()
Since we already have a local repository, we follow the instructions for "...or push an existing repository from the command line." For the repository I've created, this is the command I must use (the GitHub repo URL will be different for you):
git remote add origin https://github.com/cs280fall20/sleeptime-app.git
git branch -M master
git push -u origin master
Run the above commands (but use the ones generated for your repository) in the terminal. Make sure your current working directory is the sleeptime-git folder.
Next, refresh the page on GitHub. You must see the content of sleeptime-git folder uploaded to your GitHub repository.
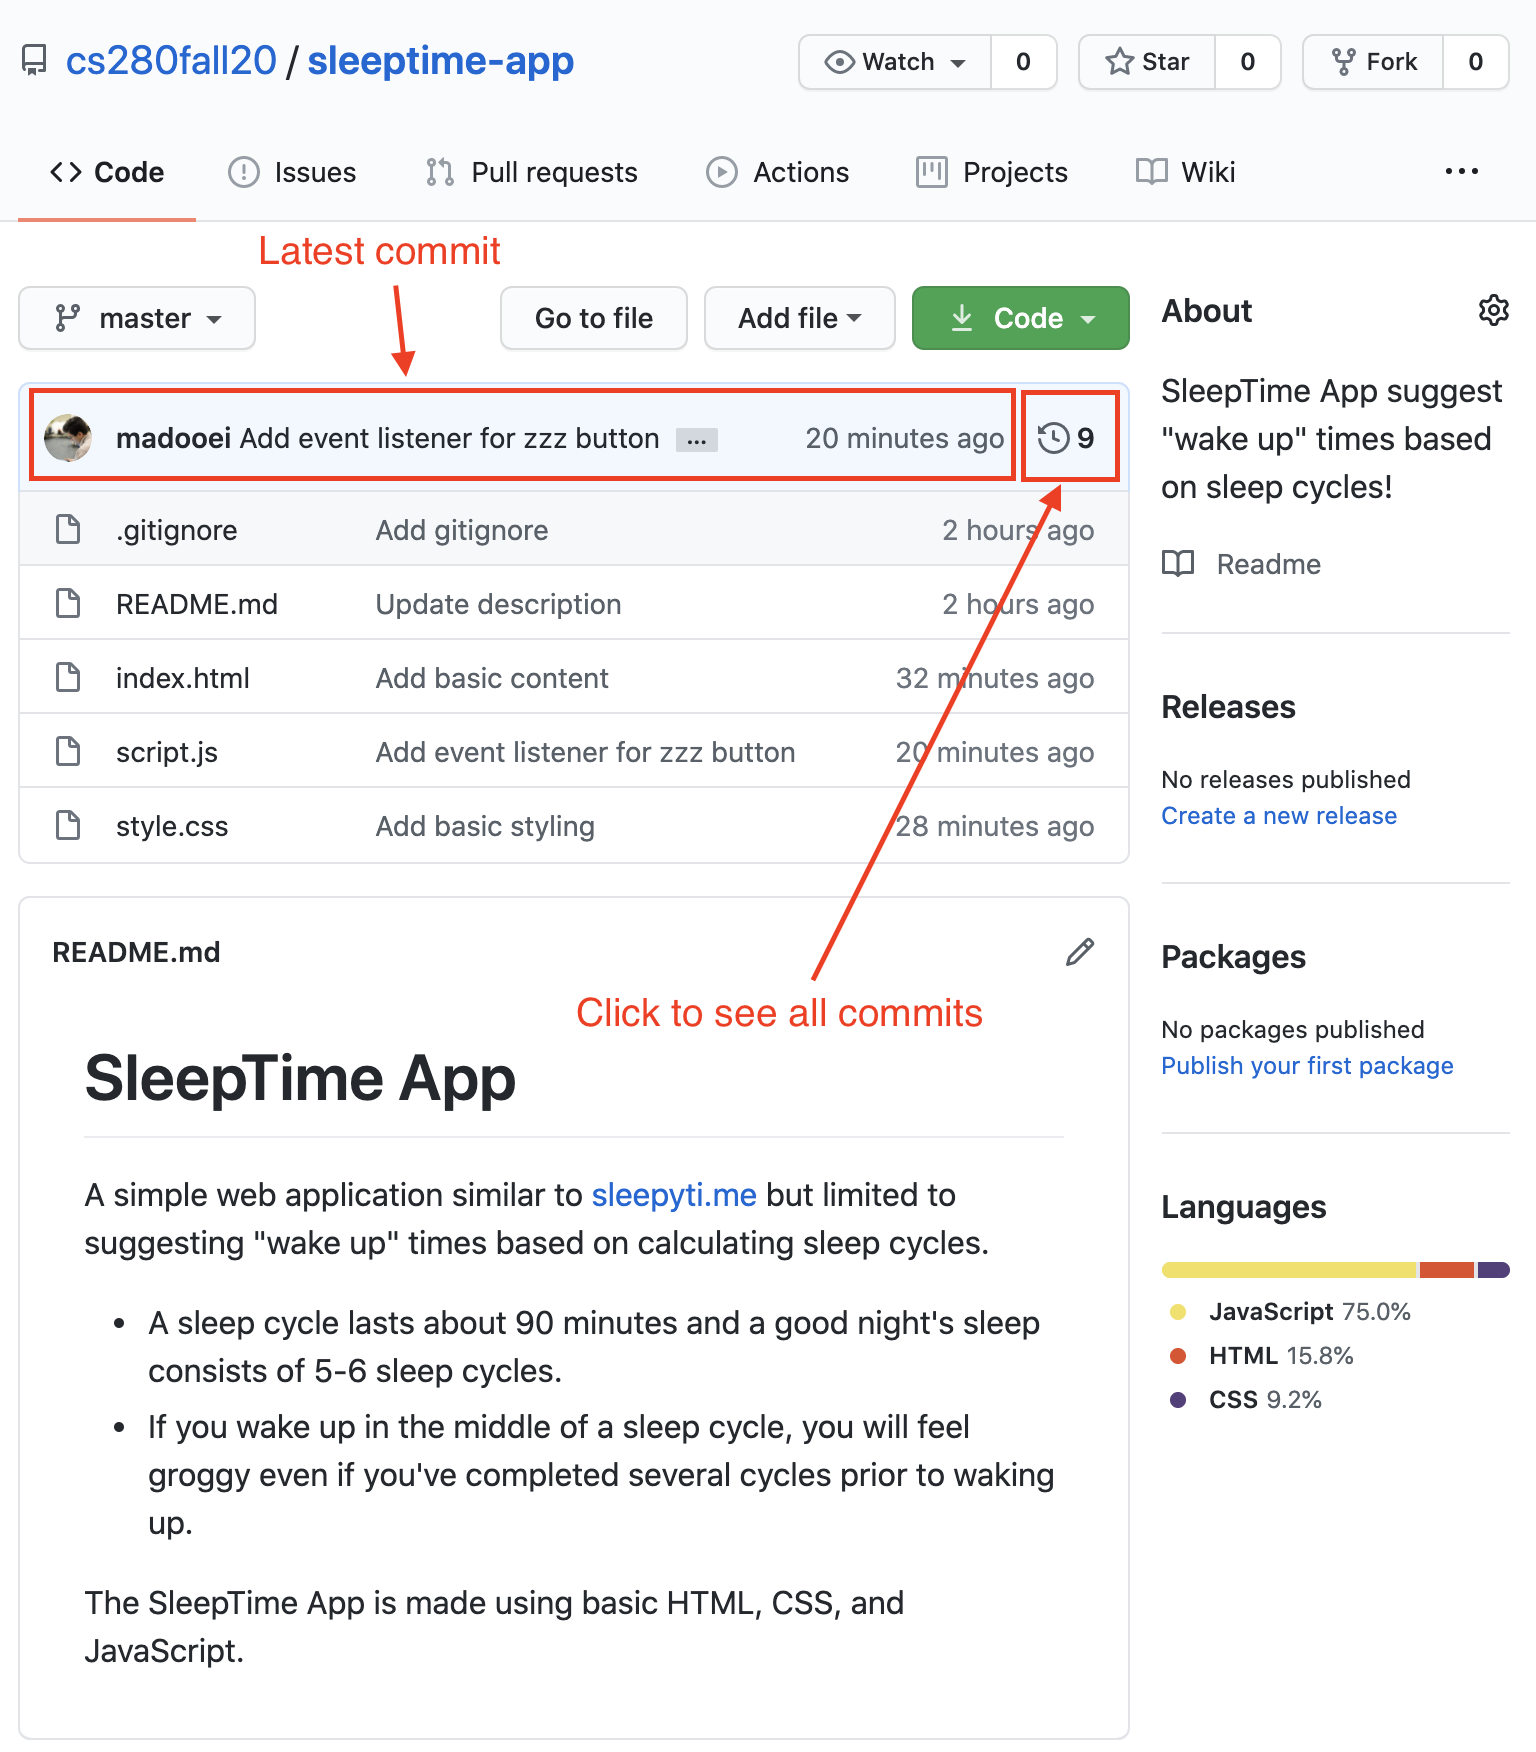
Notice how GitHub automatically loads the content of README.md as the description of your repository.
In your GitHub repository, you can click on any of the files to open it. There is even a built-in editor.
Moreover, there is a list of all commits (similar to git log but fancier!).
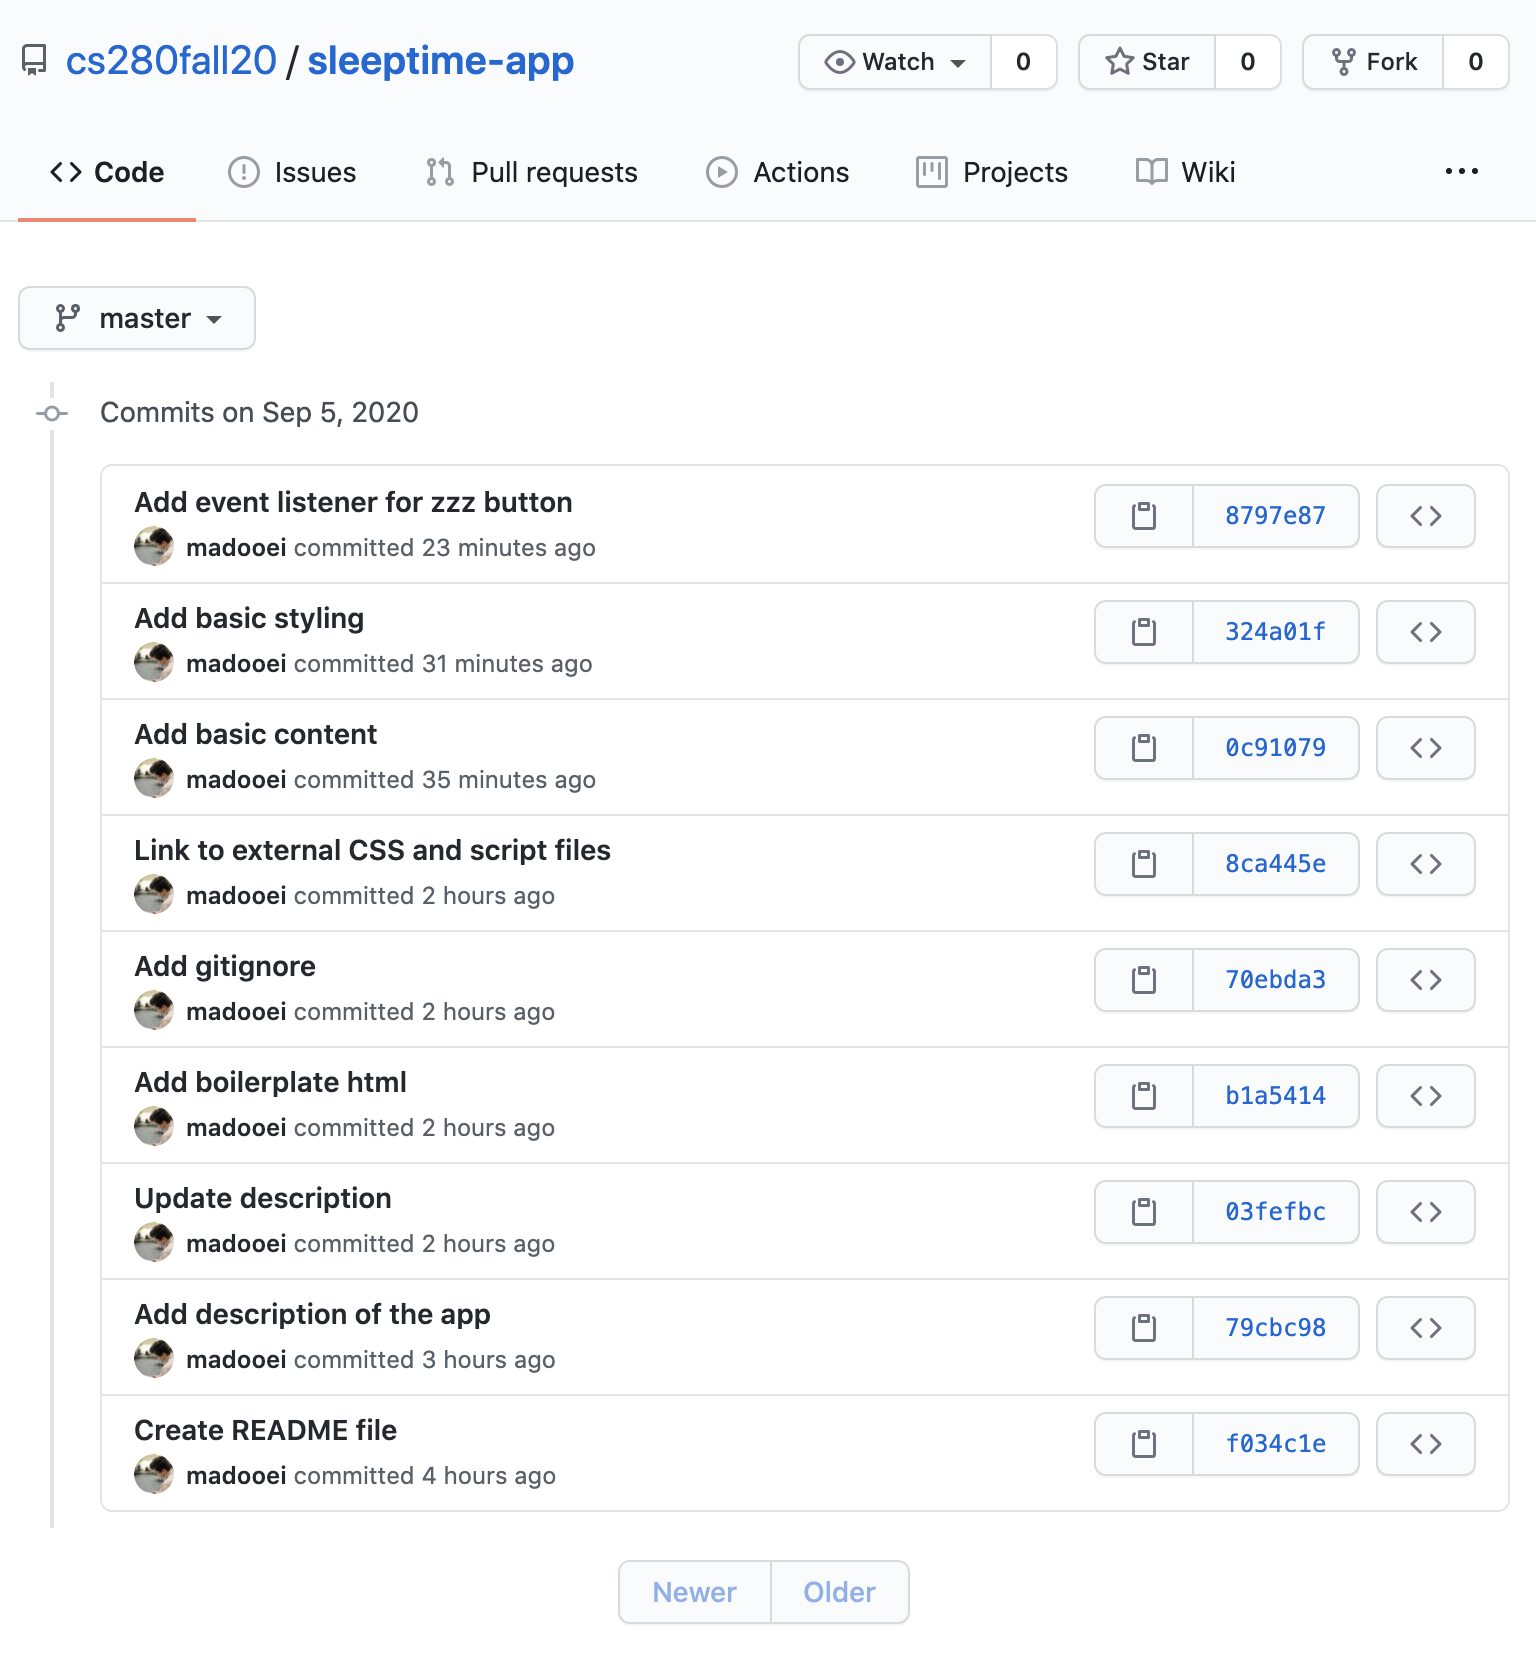
In the view above, you can click on any commit to see a list of diffs associated with it.
Step 9
Let me emphasize Git and GitHub are not the same! Git is a version control system, whereas GitHub is a repository hosting service and a collaboration platform. GitHub provides a lot of useful services for hosting software projects. We will explore some of these features in this course.
GitHub Pages
Let's start with a fun one! GitHub Pages allows you to host a website from your repository. By default, GitHub Pages uses a static site builder called Jekyll. We, however, already built our website. We don't need Jekyll! To let GitHub know that, we must add a .nojekyll file to our repository.
Go to your local repository (the sleeptime-git folder on your computer) and add the file .nojekyll. The file has a leading dot in its name and no content (it's empty).
Commit the changes:
git add .nojekyll
git commit -m "Add .nojekyll"
Although the changes are committed on your local repository, the remote repository on GitHub is behind your local repository.
To sync the local and the remote repositories, you need to push the latest local commits to the remote repository. You can do so simply by running the following command:
git push
Now go to GitHub, to your repository page. There must be a .nojekyll in there.
Next, open the "settings" tab in your GitHub repository. Find the section for "GitHub Pages" and set its source to the "master" branch as seen in the image below.
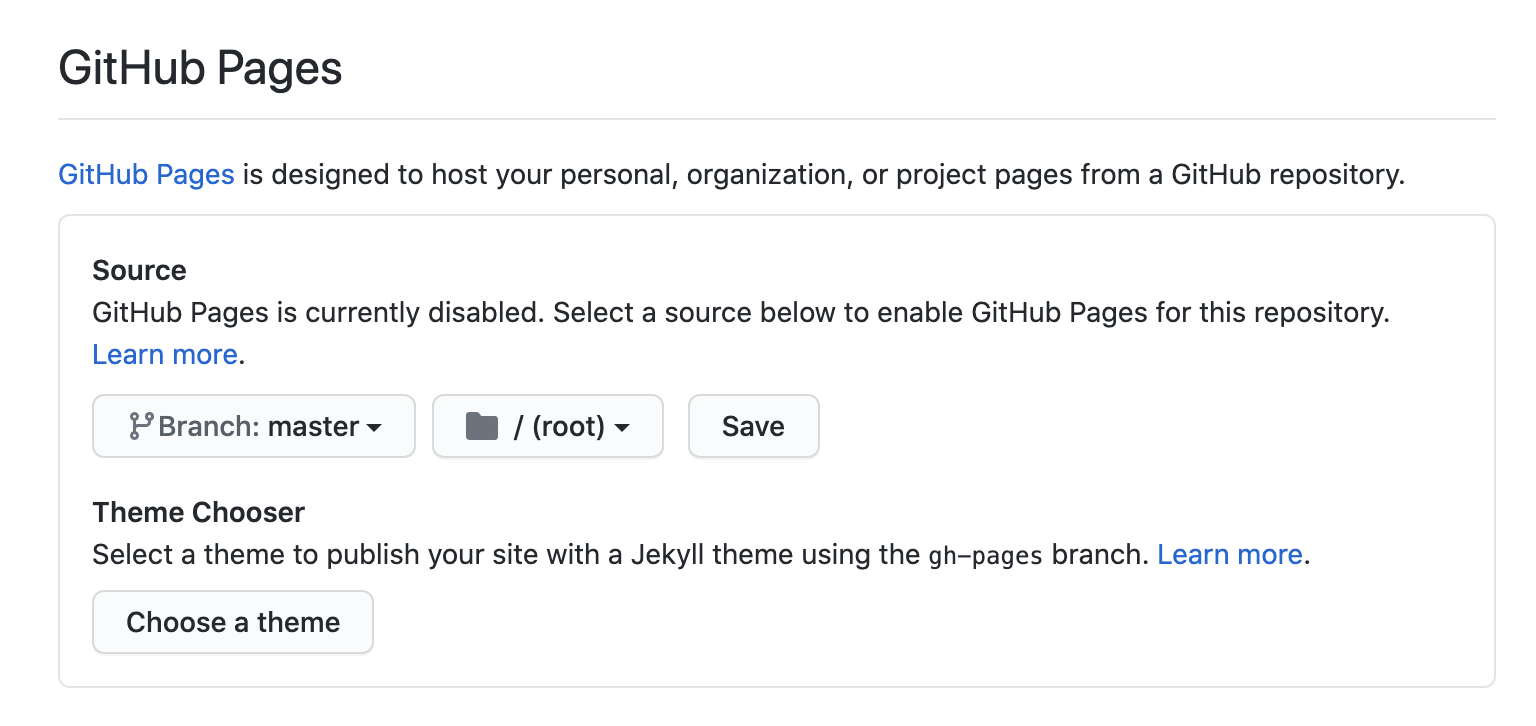
As soon as you save the changes, GitHub will show a message indicating "your site is published at ..."
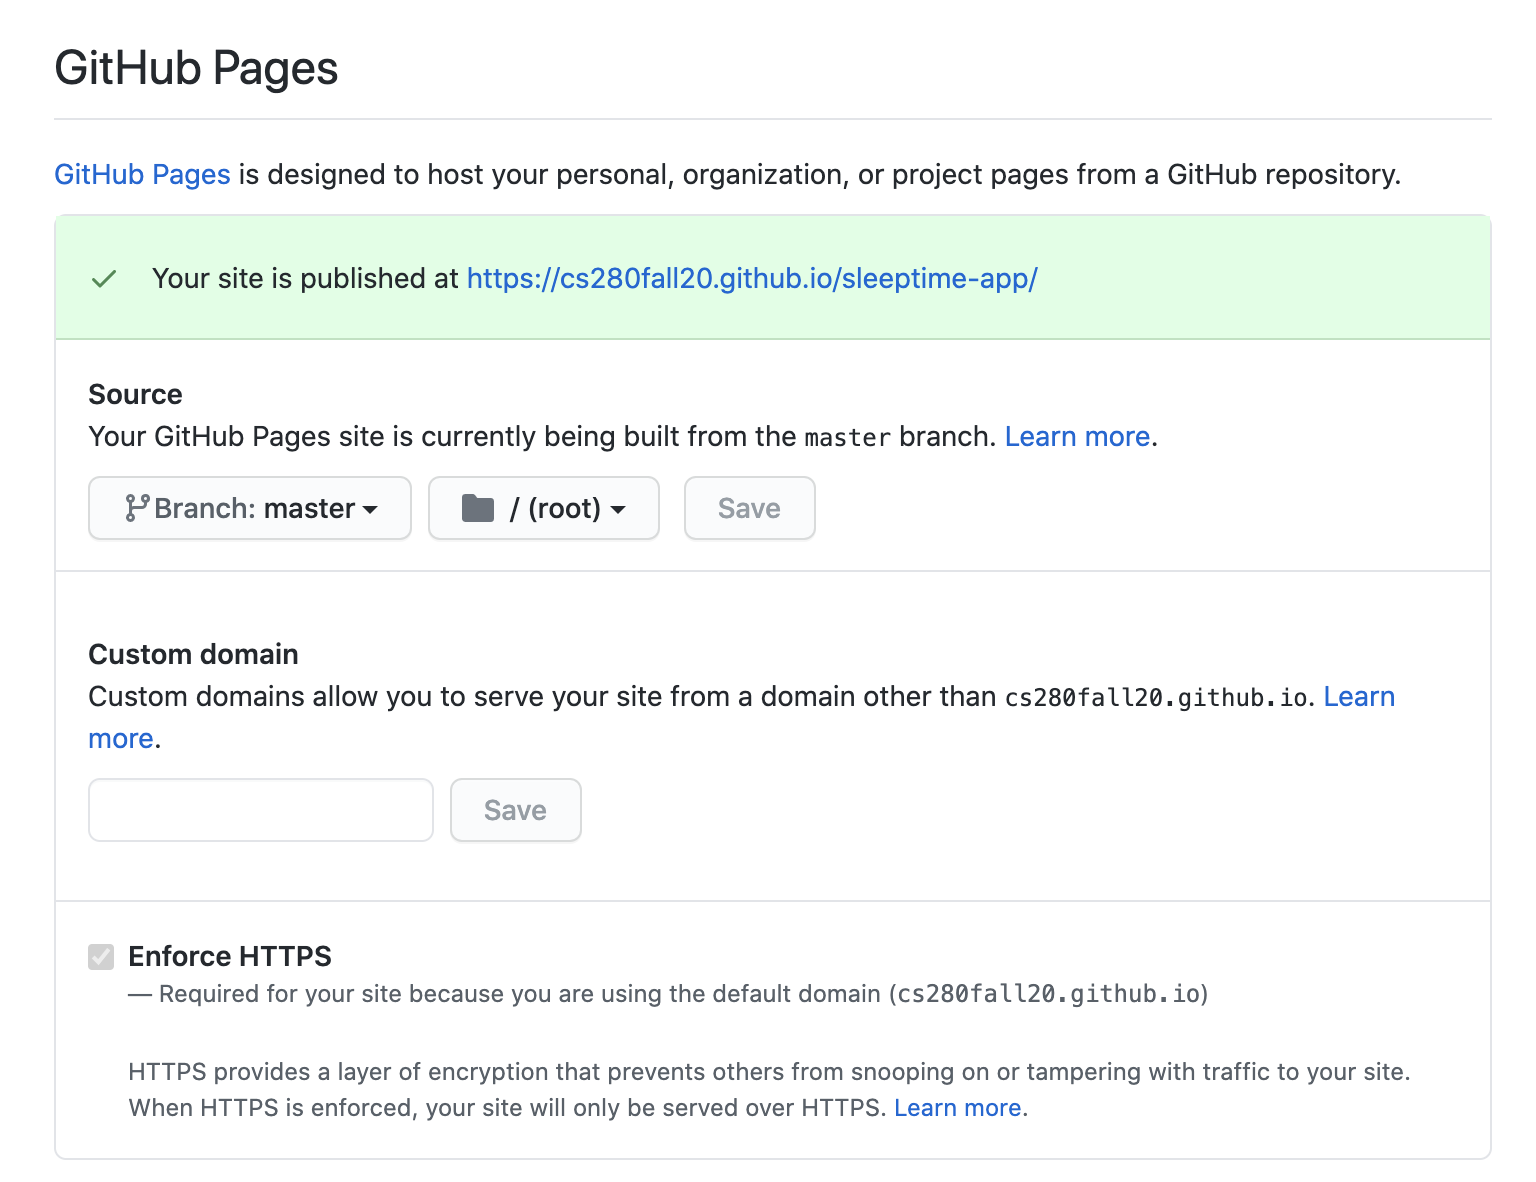
The GitHub Page I've created is available here. Go ahead and share yours with your friends!
Step 10
Clone a remote repository!
The nice thing about a GitHub repository is that you can link multiple local repositories to it (very useful to sync between multiple devices/developers). Let's simulate this by linking another local repository to the remote one on GitHub. For this, we are going to clone the GitHub repository into a new directory.
Open the terminal and make sure you are not in the sleeptime-git directory where you currently store your local SeepTime App. Then, run the following command:
git clone <repository>
where <repository> is the URL of your GitHub repository. For me, the URL is https://github.com/cs280fall20/sleeptime-app.
Open the new directory created by the clone command. (On my computer, this directory is sleeptime-app.) This is a clone (a copy) of the GitHub repository.
Push vs Pull
Let's make some changes in this new local repository! We are going to implement the solution to Exercise 1 from Lecture 1.
Update script.js according to the diff
diff --git a/script.js b/script.js
index b98de79..9babecb 100644
--- a/script.js
+++ b/script.js
@@ -23,7 +23,8 @@ output.innerHTML = `
 function zzzOnClick() {
     let output = document.querySelector(".output");
     output.style.display = "block";
-    let hours = "";
+    let hours = document.querySelector("#hours");
+    hours.innerText = ""; // cleanup existing content

     // get current time
     let now = Date.now(); // in milliseconds
@@ -38,14 +39,14 @@ function zzzOnClick() {
         cycle += 90 * minute;

         // append the sleep cycles to hours string
-        hours += new Date(cycle).toLocaleTimeString([], { hour: '2-digit', minute: '2-digit' });
+        let span = document.createElement("span");
+        span.id = "cycle-" + (i + 1);
+        span.innerText = new Date(cycle).toLocaleTimeString([], { hour: '2-digit', minute: '2-digit' });
+        hours.appendChild(span);

         if (i < 5) {
-            hours += " OR ";
+            let or = document.createTextNode(" OR ");
+            hours.appendChild(or);
         }
     }
-
-    // output hours
-    let hoursElm = document.querySelector("#hours");
-    hoursElm.innerText = hours;
 }
Append the style.css
#cycle-1 {
  color: rgb(168, 39, 254);
}

#cycle-2 {
  color: rgb(154, 3, 254);
}

#cycle-3 {
  color: rgb(150, 105, 254);
}

#cycle-4 {
  color: rgb(140, 140, 255);
}

#cycle-5 {
  color: rgb(187, 187, 255);
}

#cycle-6 {
  color: rgb(143, 254, 221);
}
Commit the changes:
git commit -am "color-code the wake up hours"
Now the changes are committed to this local repository. You must push them to the remote repository on GitHub.
git push
Go to the sleeptime-git folder (which we created earlier in this lecture). This folder contains a local repository that is behind the changes made to your remote (and the other local) repository. To update and sync it with remote, execute the following command:
git pull
The command above will "pull" (fetch and merge) the latest changes from the remote (GitHub) repository. You will see a message similar to the one below:
remote: Enumerating objects: 7, done.
remote: Counting objects: 100% (7/7), done.
remote: Compressing objects: 100% (2/2), done.
remote: Total 4 (delta 2), reused 4 (delta 2), pack-reused 0
Unpacking objects: 100% (4/4), done.
From https://github.com/cs280fall20/sleeptime-app
   3c9d384..6279f94  master     -> origin/master
Updating 3c9d384..6279f94
Fast-forward
 script.js | 15 ++++++++-------
 style.css | 25 +++++++++++++++++++++++++
 2 files changed, 33 insertions(+), 7 deletions(-)
By the way, visit your deployed GitHub Page; it must reflect the latest changes - if not, refresh the page (while holding down the shift button).
Step 11
Merge Conflict
A common issue when working on multiple copies (clones) of a repository is a "merge conflict".
A merge conflict can occur when combining different versions of code, e.g. using
git pull, if the different versions have different data in the same file.
Git will try to take care of merging automatically, but if two users edit, for example, the same file, a merge conflict will have to be manually resolved.
Let's simulate this! We have two local SleepTime App repositories. (On my computer, these are stored in folders sleeptime-git and sleeptime-app.) We will edit the style.css in both repositories!
In one of the repositories, open style.css and add the following property for body:
background-image: url("data:image/svg+xml,%3Csvg xmlns='http://www.w3.org/2000/svg' width='100' height='100' viewBox='0 0 100 100'%3E%3Cg fill-rule='evenodd'%3E%3Cg fill='%23006095' fill-opacity='0.4'%3E%3Cpath opacity='.5' d='M96 95h4v1h-4v4h-1v-4h-9v4h-1v-4h-9v4h-1v-4h-9v4h-1v-4h-9v4h-1v-4h-9v4h-1v-4h-9v4h-1v-4h-9v4h-1v-4h-9v4h-1v-4H0v-1h15v-9H0v-1h15v-9H0v-1h15v-9H0v-1h15v-9H0v-1h15v-9H0v-1h15v-9H0v-1h15v-9H0v-1h15v-9H0v-1h15V0h1v15h9V0h1v15h9V0h1v15h9V0h1v15h9V0h1v15h9V0h1v15h9V0h1v15h9V0h1v15h9V0h1v15h4v1h-4v9h4v1h-4v9h4v1h-4v9h4v1h-4v9h4v1h-4v9h4v1h-4v9h4v1h-4v9h4v1h-4v9zm-1 0v-9h-9v9h9zm-10 0v-9h-9v9h9zm-10 0v-9h-9v9h9zm-10 0v-9h-9v9h9zm-10 0v-9h-9v9h9zm-10 0v-9h-9v9h9zm-10 0v-9h-9v9h9zm-10 0v-9h-9v9h9zm-9-10h9v-9h-9v9zm10 0h9v-9h-9v9zm10 0h9v-9h-9v9zm10 0h9v-9h-9v9zm10 0h9v-9h-9v9zm10 0h9v-9h-9v9zm10 0h9v-9h-9v9zm10 0h9v-9h-9v9zm9-10v-9h-9v9h9zm-10 0v-9h-9v9h9zm-10 0v-9h-9v9h9zm-10 0v-9h-9v9h9zm-10 0v-9h-9v9h9zm-10 0v-9h-9v9h9zm-10 0v-9h-9v9h9zm-10 0v-9h-9v9h9zm-9-10h9v-9h-9v9zm10 0h9v-9h-9v9zm10 0h9v-9h-9v9zm10 0h9v-9h-9v9zm10 0h9v-9h-9v9zm10 0h9v-9h-9v9zm10 0h9v-9h-9v9zm10 0h9v-9h-9v9zm9-10v-9h-9v9h9zm-10 0v-9h-9v9h9zm-10 0v-9h-9v9h9zm-10 0v-9h-9v9h9zm-10 0v-9h-9v9h9zm-10 0v-9h-9v9h9zm-10 0v-9h-9v9h9zm-10 0v-9h-9v9h9zm-9-10h9v-9h-9v9zm10 0h9v-9h-9v9zm10 0h9v-9h-9v9zm10 0h9v-9h-9v9zm10 0h9v-9h-9v9zm10 0h9v-9h-9v9zm10 0h9v-9h-9v9zm10 0h9v-9h-9v9zm9-10v-9h-9v9h9zm-10 0v-9h-9v9h9zm-10 0v-9h-9v9h9zm-10 0v-9h-9v9h9zm-10 0v-9h-9v9h9zm-10 0v-9h-9v9h9zm-10 0v-9h-9v9h9zm-10 0v-9h-9v9h9zm-9-10h9v-9h-9v9zm10 0h9v-9h-9v9zm10 0h9v-9h-9v9zm10 0h9v-9h-9v9zm10 0h9v-9h-9v9zm10 0h9v-9h-9v9zm10 0h9v-9h-9v9zm10 0h9v-9h-9v9z'/%3E%3Cpath d='M6 5V0H5v5H0v1h5v94h1V6h94V5H6z'/%3E%3C/g%3E%3C/g%3E%3C/svg%3E");
The above
background-imageis a pattern in SVG format.
Commit and push the changes:
git commit -am "Add pattern to background"
git push
In the other local repository, open style.css and add the following:
button {
  padding: 20px;
  border-radius: 20px;
  text-transform: capitalize;
  color: #001f3f;
}
Commit and push the changes:
git commit -am "Style the Zzz button"
git push
The push command must be rejected with an error message similar to the following:
To https://github.com/cs280fall20/sleeptime-app
 ! [rejected]        master -> master (fetch first)
error: failed to push some refs to 'https://github.com/cs280fall20/sleeptime-app'
hint: Updates were rejected because the remote contains work that you do
hint: not have locally. This is usually caused by another repository pushing
hint: to the same ref. You may want to first integrate the remote changes
hint: (e.g., 'git pull ...') before pushing again.
hint: See the 'Note about fast-forwards' in 'git push --help' for details.
The message says, in a nutshell, "the remote contains work that you do not have locally." The "work we don't have" are changes we've made earlier to style.css. You must first pull those changes from the remote (GitHub) repository before pushing new changes! So, run the following command:
git pull
The pull command will result in a merge conflict:
remote: Enumerating objects: 5, done.
remote: Counting objects: 100% (5/5), done.
remote: Compressing objects: 100% (2/2), done.
remote: Total 3 (delta 1), reused 3 (delta 1), pack-reused 0
Unpacking objects: 100% (3/3), done.
From https://github.com/cs280fall20/sleeptime-app
   6279f94..ee19cbc  master     -> origin/master
Auto-merging style.css
CONFLICT (content): Merge conflict in style.css
Automatic merge failed; fix conflicts and then commit the result.
Resolving merge conflicts
To resolve a merge conflict, simply remove all lines and code that are not wanted and push the results.
Open style.css (in the local repository where merge conflict occurred). You should see the additions you've made to style.css are annotated in a fashion similar to this
<<<<<<< HEAD

button {
  padding: 20px;
  border-radius: 20px;
  text-transform: capitalize;
  color: #001f3f;
}
=======
>>>>>>> ee19cbce36c878c0cbfccb4be983eafbf595b23e
Simply remove the annotations, and then commit and push changes!
git commit -am "Resolve merge conflic"
git push
When working in a team, it is the responsibility of the person who pushed their code last (and thus triggered the conflict) to resolve merge conflicts.
Step 12
Branching
Branching is a feature of Git that allows a project to move in multiple different directions simultaneously. There is one master branch that is always usable, but any number of new branches can be created to develop new features. Once ready, these branches can then be merged back into master.
When working in a Git repository,
HEADrefers to the current branch being worked on. When a different branch is "checked out", theHEADchanges to indicate the new working branch.
As an example, we will implement the solution to Exercise 2 from Lecture 1 in a new branch.
Open the terminal and go to sleeptime-git folder. Run the following command:
git branch
The
git branchcommand lists all the branches currently in a repository.
Let's create a new branch
git branch exercise-2
Switch current working branch to exercise-2
git checkout exercise-2
Update index.html
diff --git a/index.html b/index.html
index 45b3e44..845ef6c 100644
--- a/index.html
+++ b/index.html
@@ -7,7 +7,58 @@
     <link rel="stylesheet" href="style.css">
 </head>
 <body>
-    <div id="root"></div>
+
+  <p>I plan to fall sleep at...</p>
+
+  <select id="hh">
+      <option>(hour)</option>
+      <option>1</option>
+      <option>2</option>
+      <option>3</option>
+      <option>4</option>
+      <option>5</option>
+      <option>6</option>
+      <option>7</option>
+      <option>8</option>
+      <option>9</option>
+      <option>10</option>
+      <option>11</option>
+      <option>12</option>
+  </select>
+
+  <select id="mm">
+      <option>(minute)</option>
+      <option>00</option>
+      <option>05</option>
+      <option>10</option>
+      <option>15</option>
+      <option>20</option>
+      <option>25</option>
+      <option>30</option>
+      <option>35</option>
+      <option>40</option>
+      <option>45</option>
+      <option>50</option>
+      <option>55</option>
+  </select>
+
+  <select id="ampm">
+      <option>PM</option>
+      <option>AM</option>
+  </select>
+
+  <br>
+  <br>
+
+  <button onclick="calcOnClick();">CALCULATE</button>
+
+
+  <div class="output">
+      <p>If you fall sleep at the specified time above, you should try to wake up at one of the following times:</p>
+      <p id="hours">11:44 PM or 1:14 AM or 2:44 AM or 4:14 AM or 5:44 AM or 7:14 AM</p>
+      <p>A good night's sleep consists of 5-6 complete sleep cycles.</p>
+  </div>
+
     <script src="script.js"></script>
 </body>
-</html>
\ No newline at end of file
+</html>
Update script.js
diff --git a/script.js b/script.js
index a396733..26a44eb 100644
--- a/script.js
+++ b/script.js
@@ -1,39 +1,23 @@
-let root = document.getElementById("root");
-
-let p = document.createElement("p");
-p.innerText = "If you go to bed NOW, you should wake up at...";
-root.append(p);
-
-let zzz = document.createElement("button");
-zzz.innerText = "zzz";
-zzz.addEventListener("click", zzzOnClick);
-root.append(zzz);
-
-let output = document.createElement("div");
-output.className = "output";
-root.append(output);
-
-output.innerHTML = `
-<p>It takes the average human fourteen minutes to fall asleep.</p>
-<p>If you head to bed right now, you should try to wake up at one of the following times:</p>
-<p id="hours">11:44 PM or 1:14 AM or 2:44 AM or 4:14 AM or 5:44 AM or 7:14 AM</p>
-<p>A good night's sleep consists of 5-6 complete sleep cycles.</p>`;
-
-
-function zzzOnClick() {
+function calcOnClick() {
     let output = document.querySelector(".output");
     output.style.display = "block";
     let hours = document.querySelector("#hours");
     hours.innerText = ""; // cleanup existing content

     // get current time
-    let now = Date.now(); // in milliseconds
+    let hh = document.getElementById("hh").value;
+    let mm = document.getElementById("mm").value;
+    let ampm = document.getElementById("ampm").value;
+    hh = ampm === "PM" ? hh + 12 : hh;
+
+    let now = new Date();
+    now.setHours(hh);
+    now.setMinutes(mm);
+    now = now.valueOf();
+
     let minute = 60 * 1000;  // milliseconds
     let cycle = now;

-    // allow 14 minutes to fall sleep
-    cycle += 14 * minute;
-
     // calculate 6 sleep cycles (each 90 minutes)
     for(let i = 0; i < 6; i++) {
         cycle += 90 * minute;
@@ -49,4 +33,4 @@ function zzzOnClick() {
             hours.appendChild(or);
         }
     }
-}
\ No newline at end of file
+}
Run the application and check if it works correctly!
There is a bug 🐛 in the solution provided here. In class, we will use the built-in debugger in Chrome/FireFox Developer Tools to debug it.
Debug
The bug is in script.js. Here is a fix:
-    hh = ampm === "PM" ? hh + 12 : hh;
+    hh = ampm === "PM" ? Number.parseInt(hh) + 12 : hh;
Commit the changes:
git commit -a -m "Let user specify sleep time" -m "Solution to Exercise 2"
Notice we can supply two messages to the
commitcommand:git commit -m "what I changed" -m "why I changed it"
Push the changes
git push
You will get an error message similar to the following:
fatal: The current branch exercise-2 has no upstream branch.
To push the current branch and set the remote as upstream, use

    git push --set-upstream origin exercise-2
It says, in a nutshell, the local branch exercise-2 does not exist on GitHub (the remote repository). It also tells you how to "properly push" to fix the issue:
git push --set-upstream origin exercise-2
Visit your GitHub repository; you must have two branches now!

Use the branch dropdown to select the branch you would like to view:
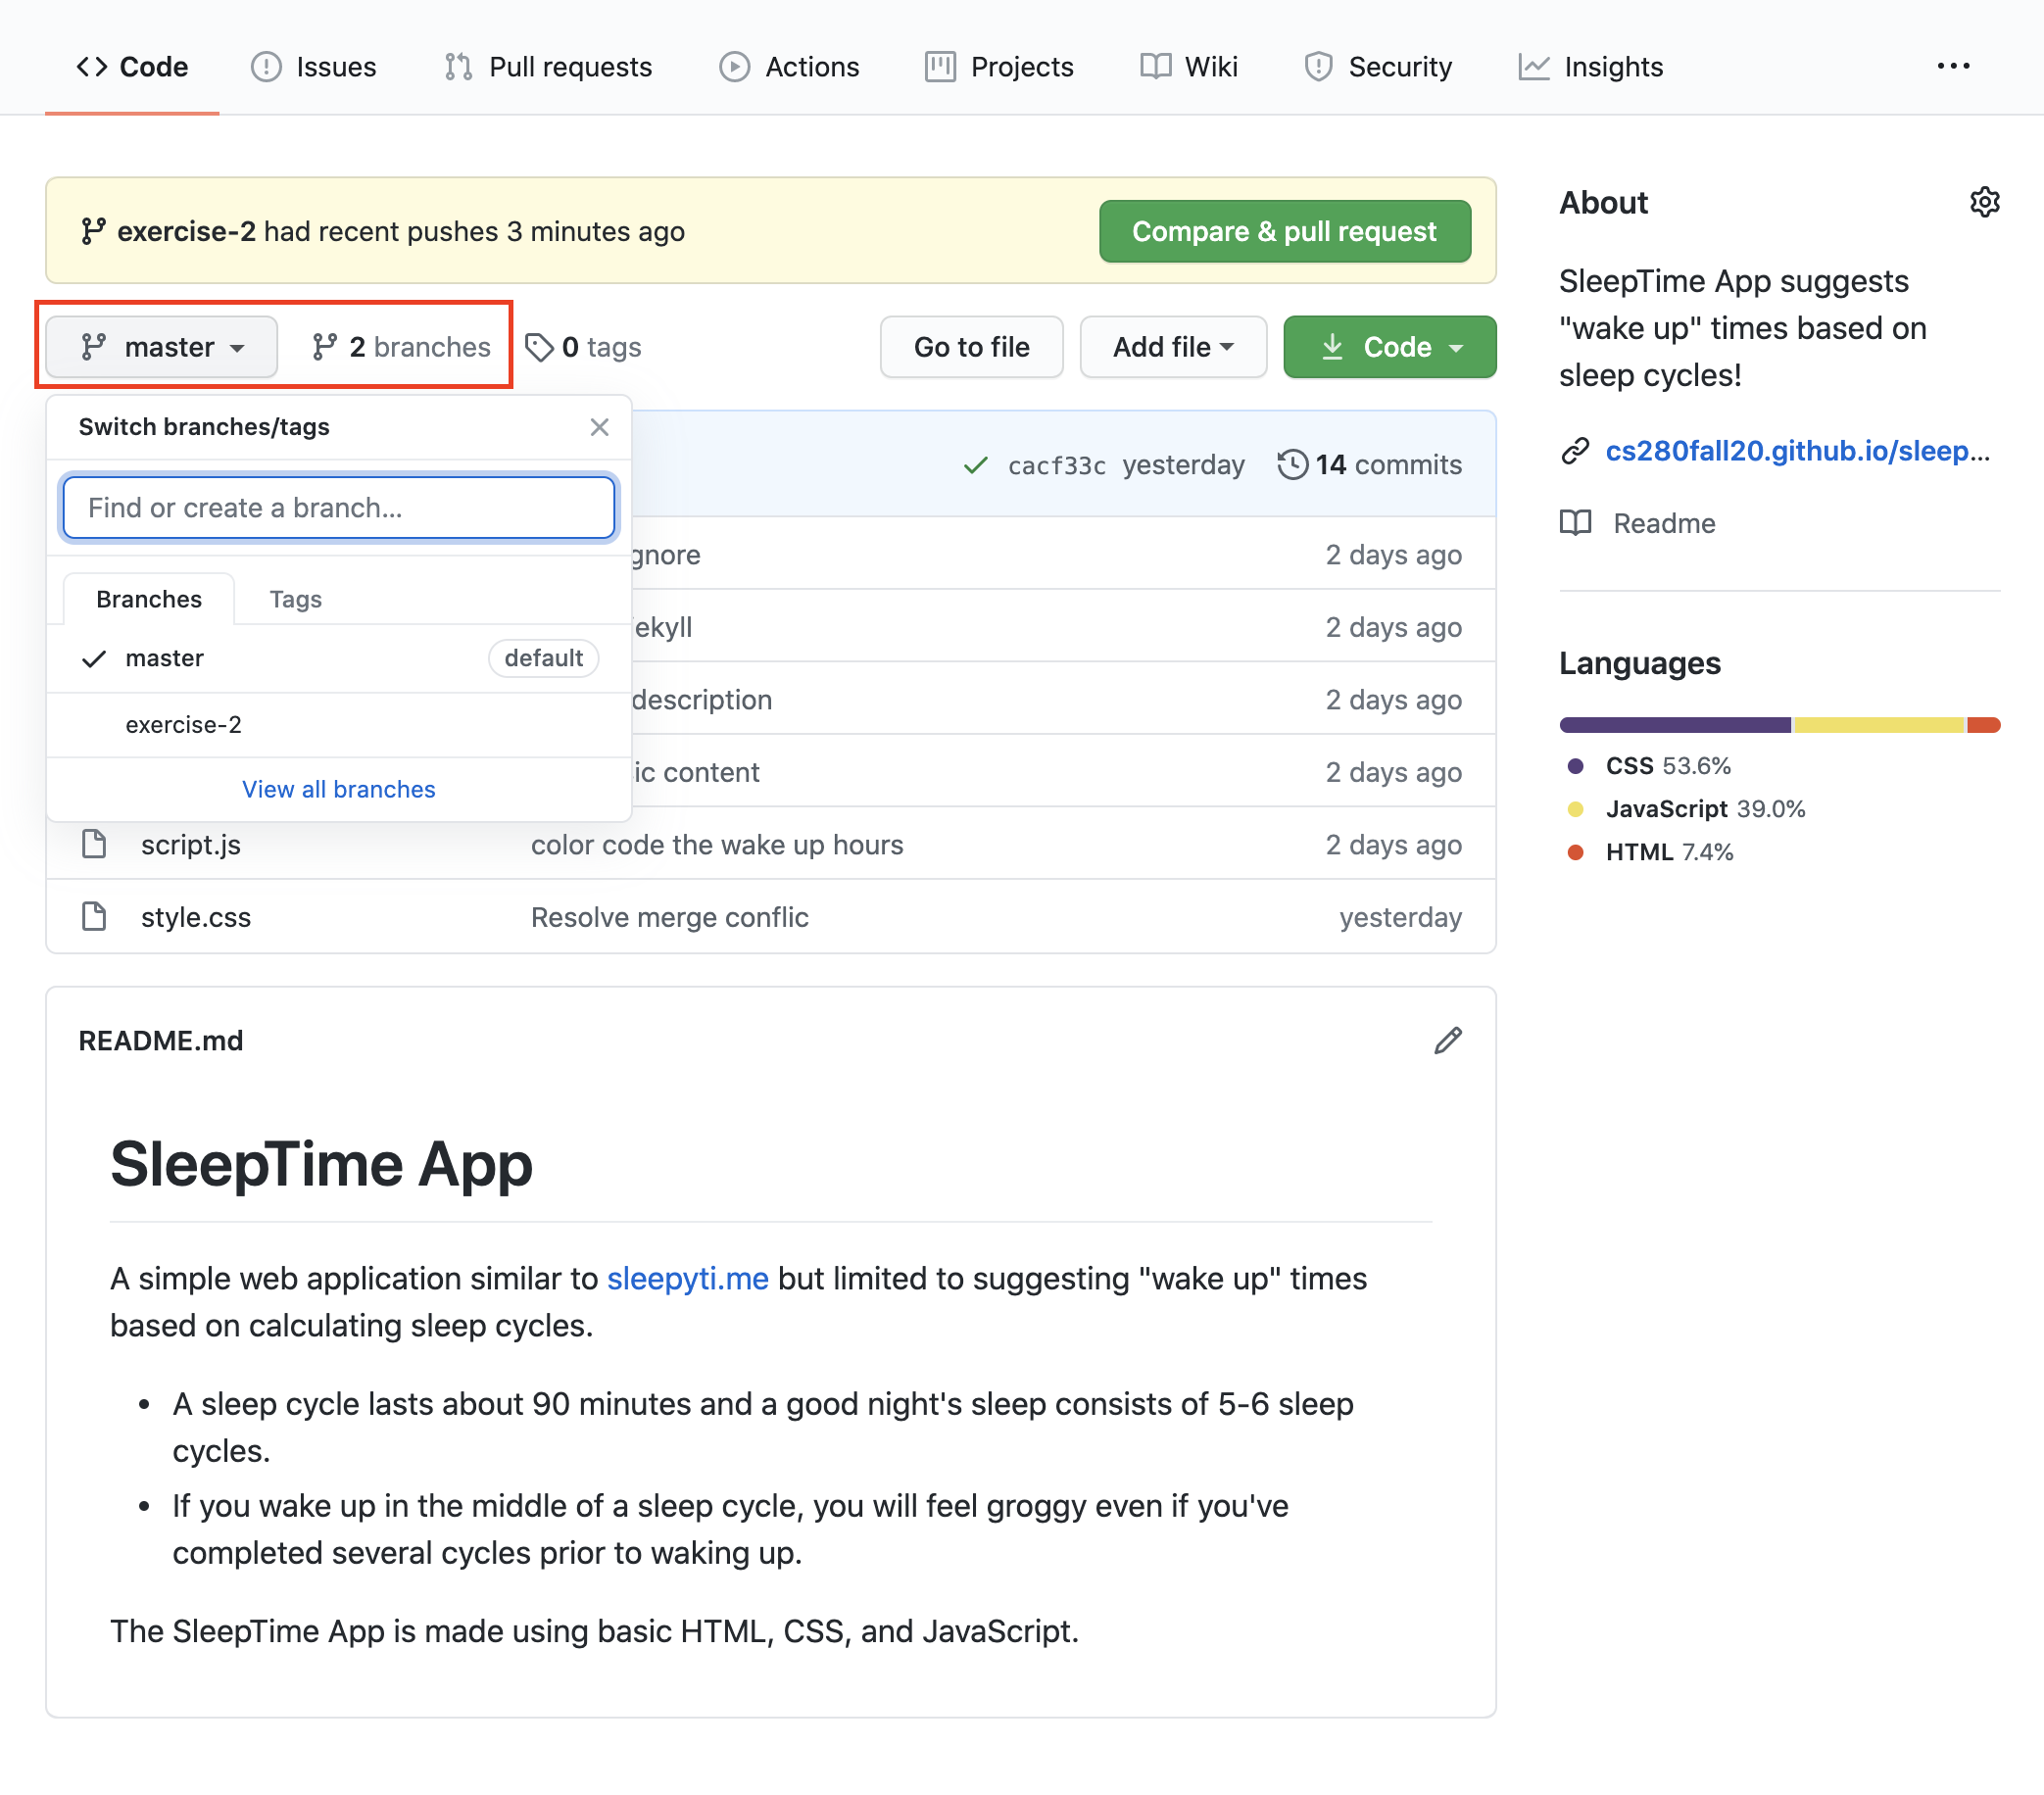
Switch between branches
Locally, you can switch between branches using the git checkout command. For example, switch back to the master branch:
git checkout master
Note how the mater branch is at the state where you have left it (see the content of index.html and script.js).
Checkout a remote branch
Open the other local repository of SleepTime App. Run the following command in the terminal:
git branch
The output must be
* master
In order to check out the new remote branch, you must run the following commands:
git fetch origin
git checkout exercise-2
Clone a specific branch
You can clone a specific branch with the following command
git clone -b <branch> <remote_repo>
where <branch> is the specific branch name and <remote_repo> is the URL of the remote repository. For example, to checkout the branch exercise-2 form my SleepTime App GitHub repository, you run the following command:
git clone -b exercise-2 https://github.com/cs280fall20/sleeptime-app
Step 13
GitHub Issues
Most software projects have a bug tracker of some kind. GitHub's tracker is called Issues, and has its own section in every repository.
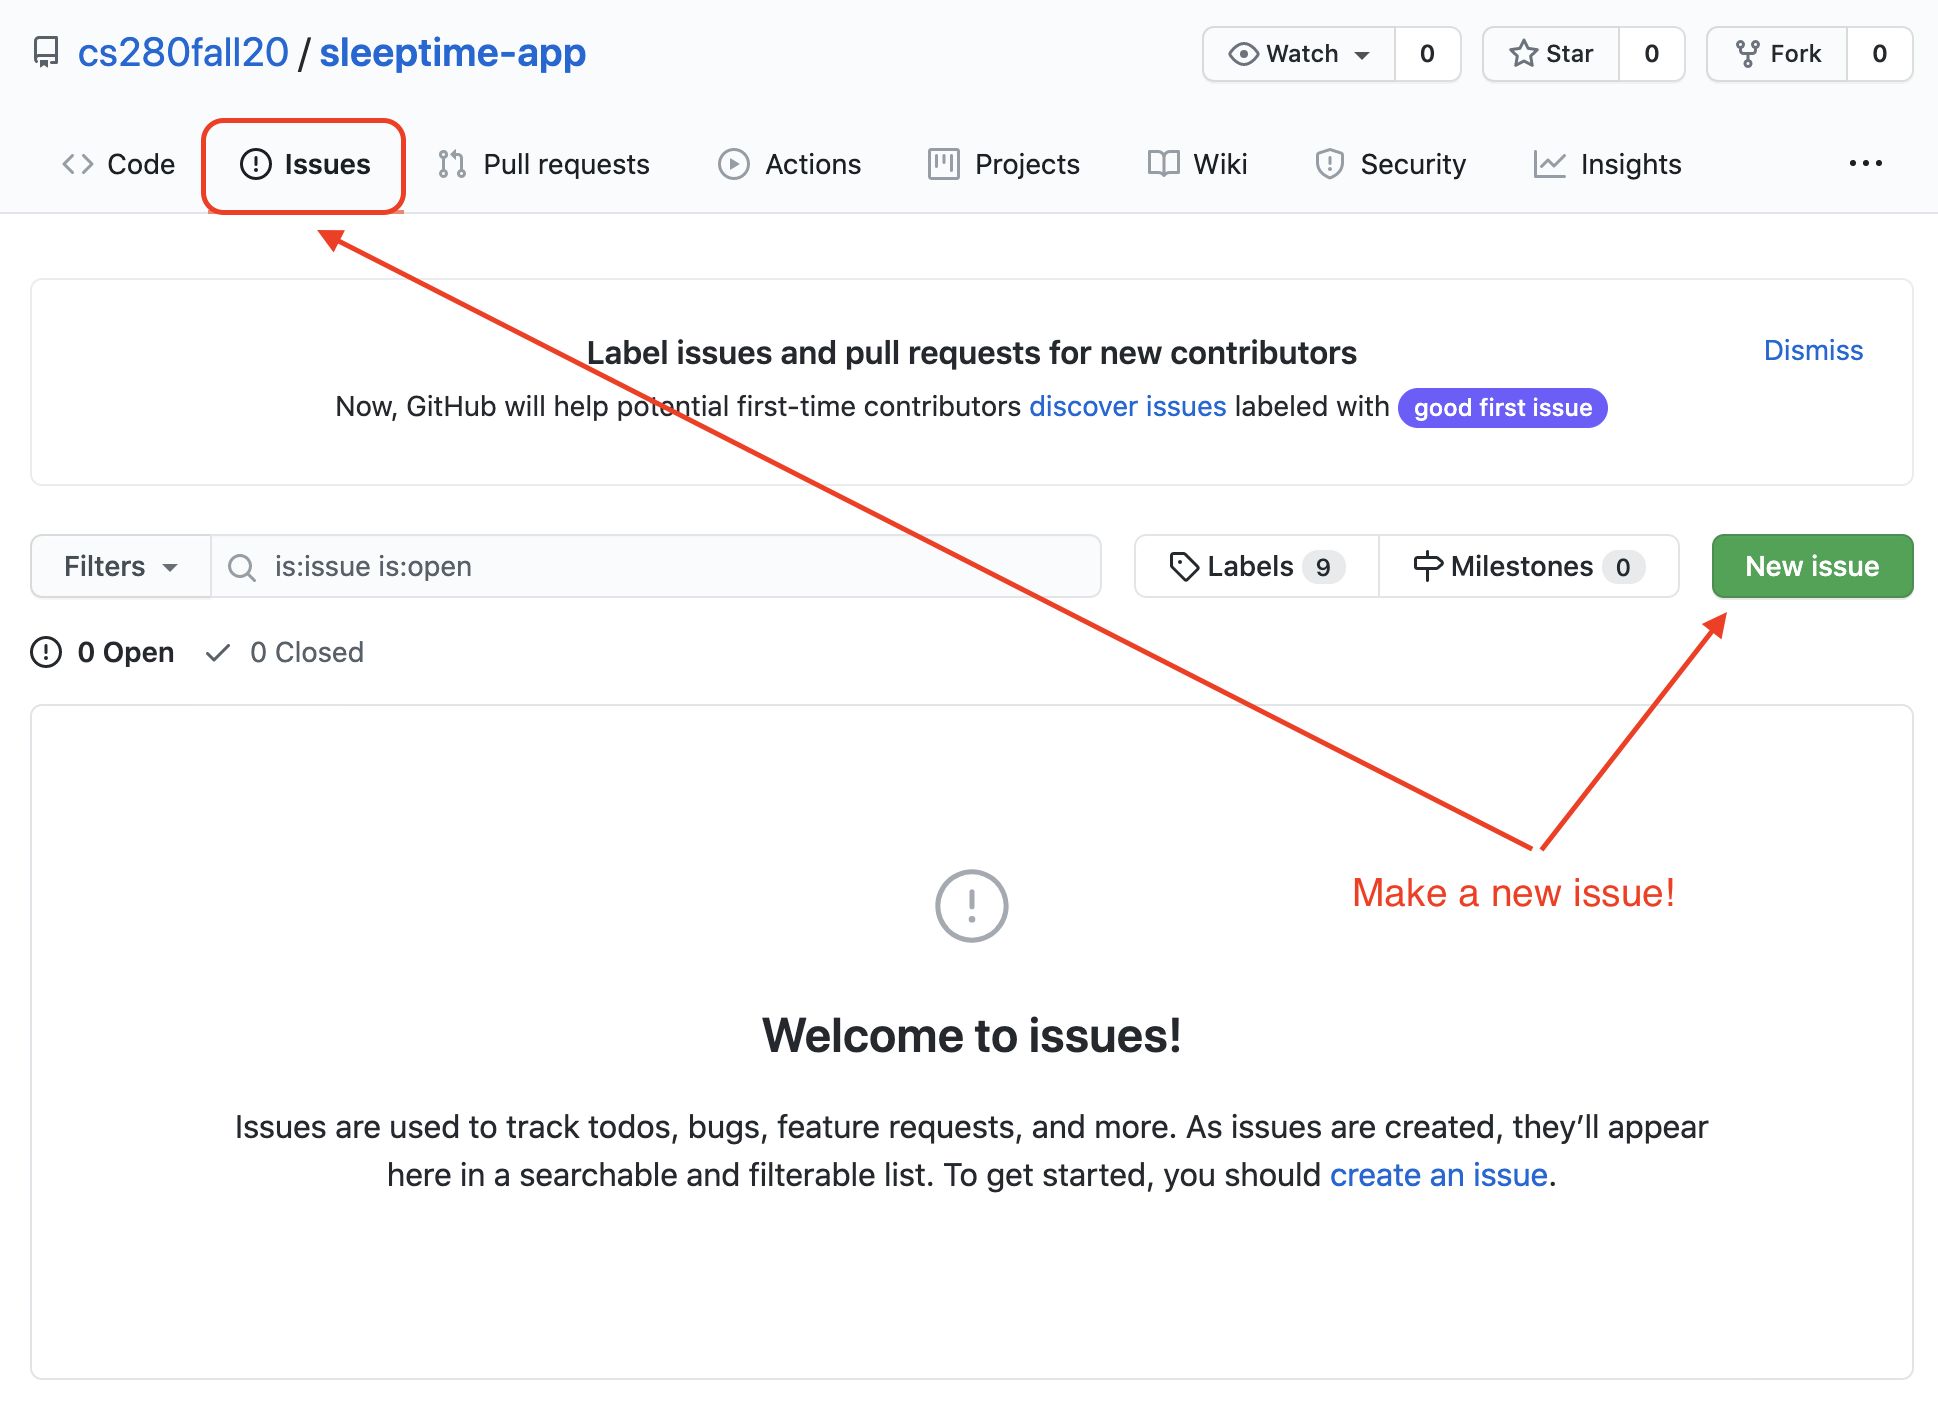
Although it was originally intended to track bugs, Issues are now used to keep track of enhancements, product road-map, for planning, feature requests, etc.
Issues is at the heart of GitHub and acts as a kind of chatroom/forum/email where all members of your team can communicate about your software project.
GitHub Collaborators
Go to the "settings" of your GitHub repository! Click on "Manage access".
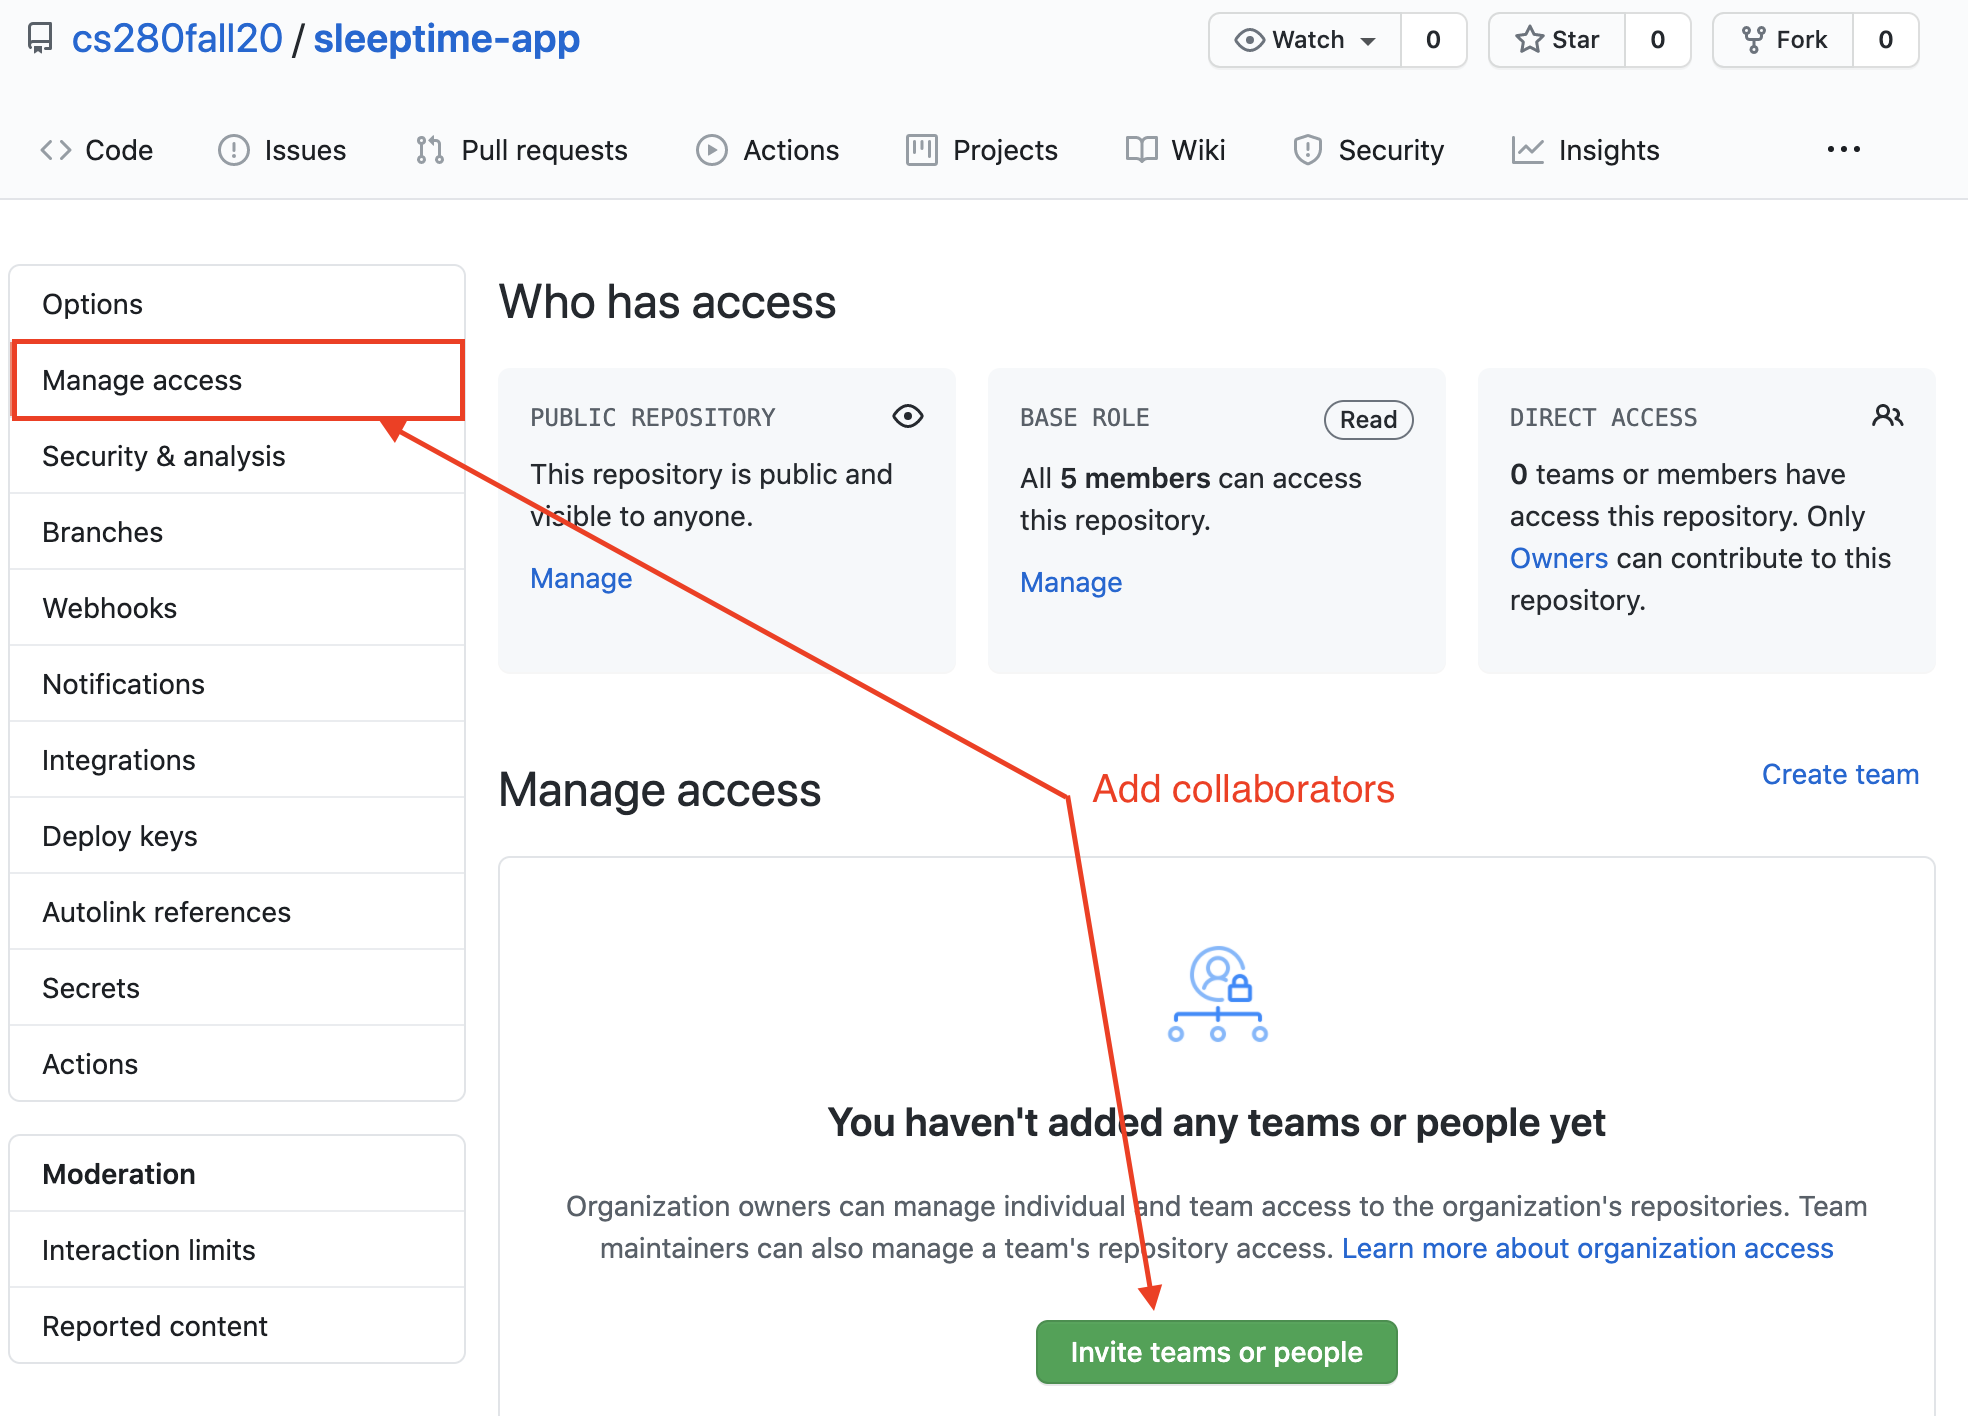
Here you can invite other GitHub members to collaborate with you.
I have a second account on GitHub, ali-the-student; I've invited myself as a collaborator here!
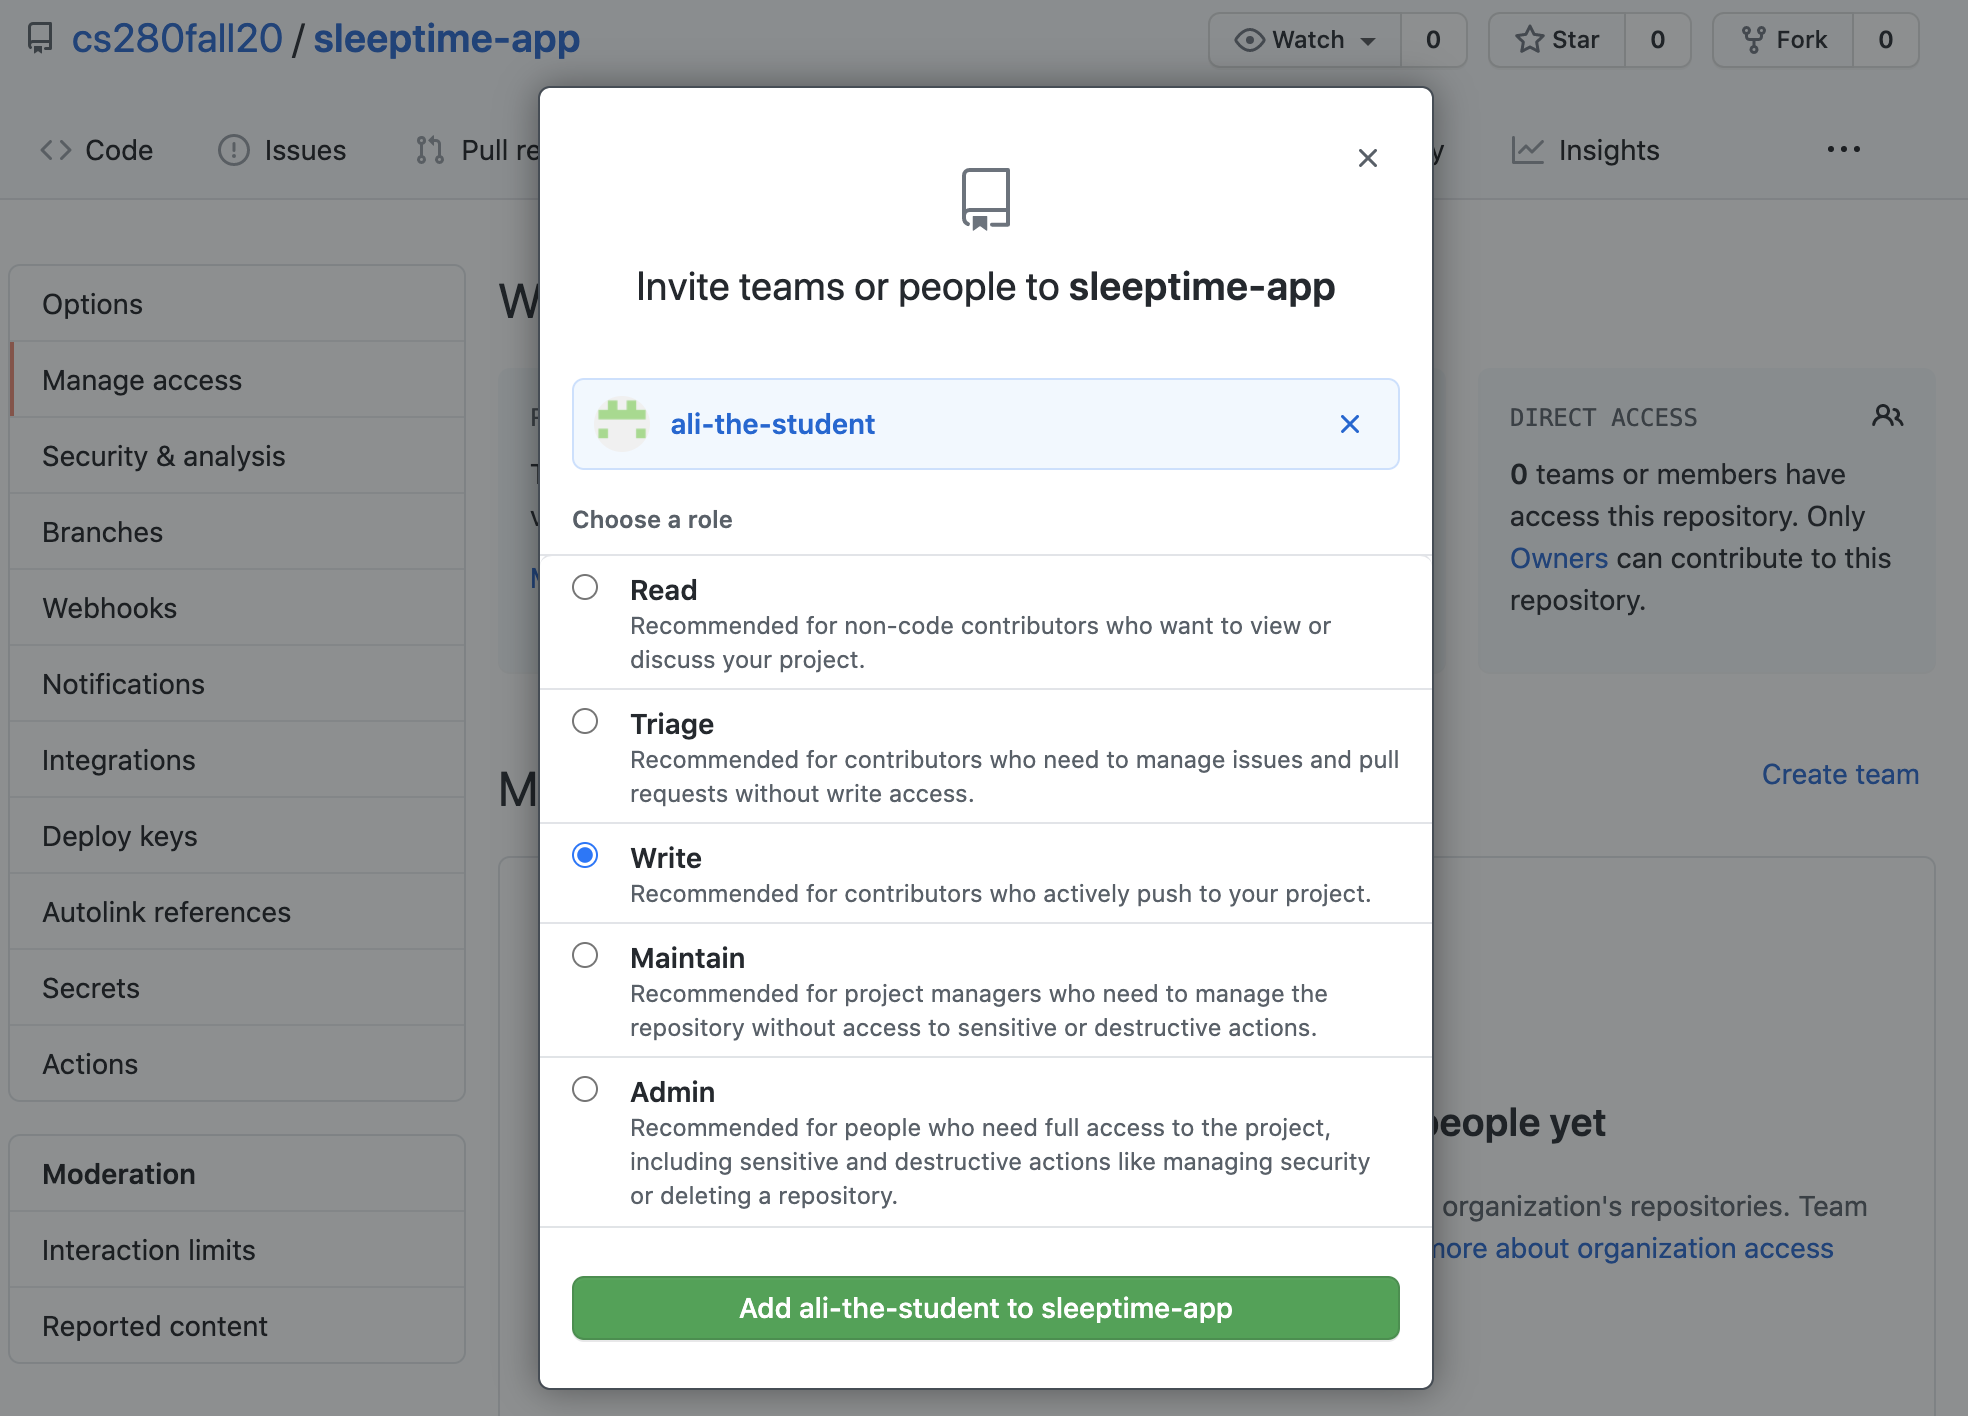
GitHub Pull Request
A pull request can be made to merge a branch of a repository with another branch of the same repository (or even a different repository). Pull requests are a good way to get feedback on changes from collaborators on the same project.
Let's create a pull request. Go to GitHub, to your SleepTime App repository. Go to the "Pull request" tab and click on "New pull request".
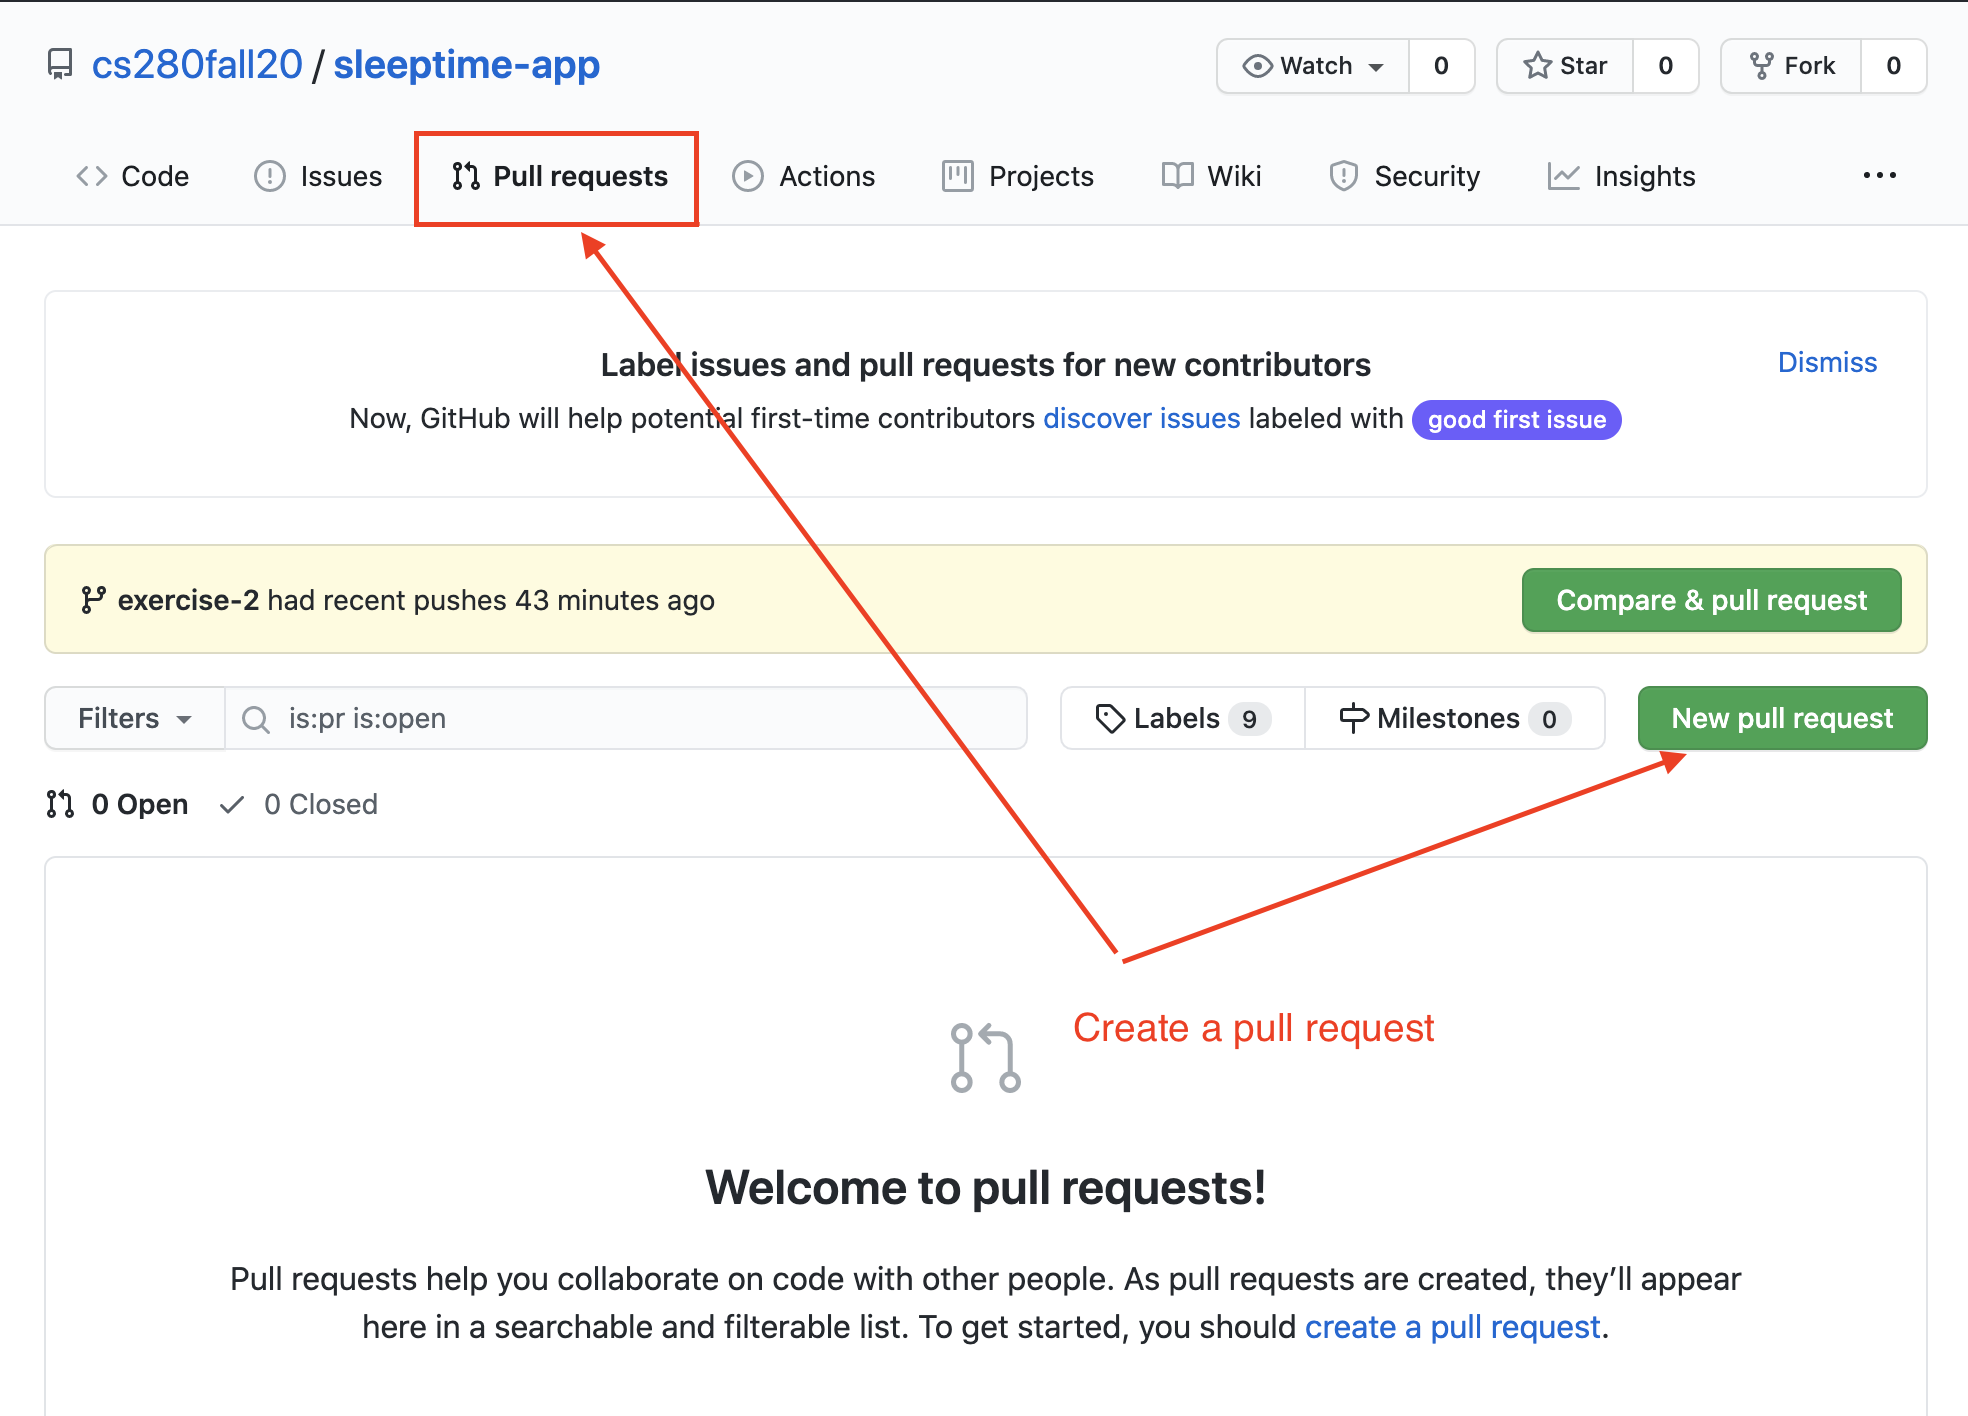
Create a pull request from exercise-2 branch to the master branch:
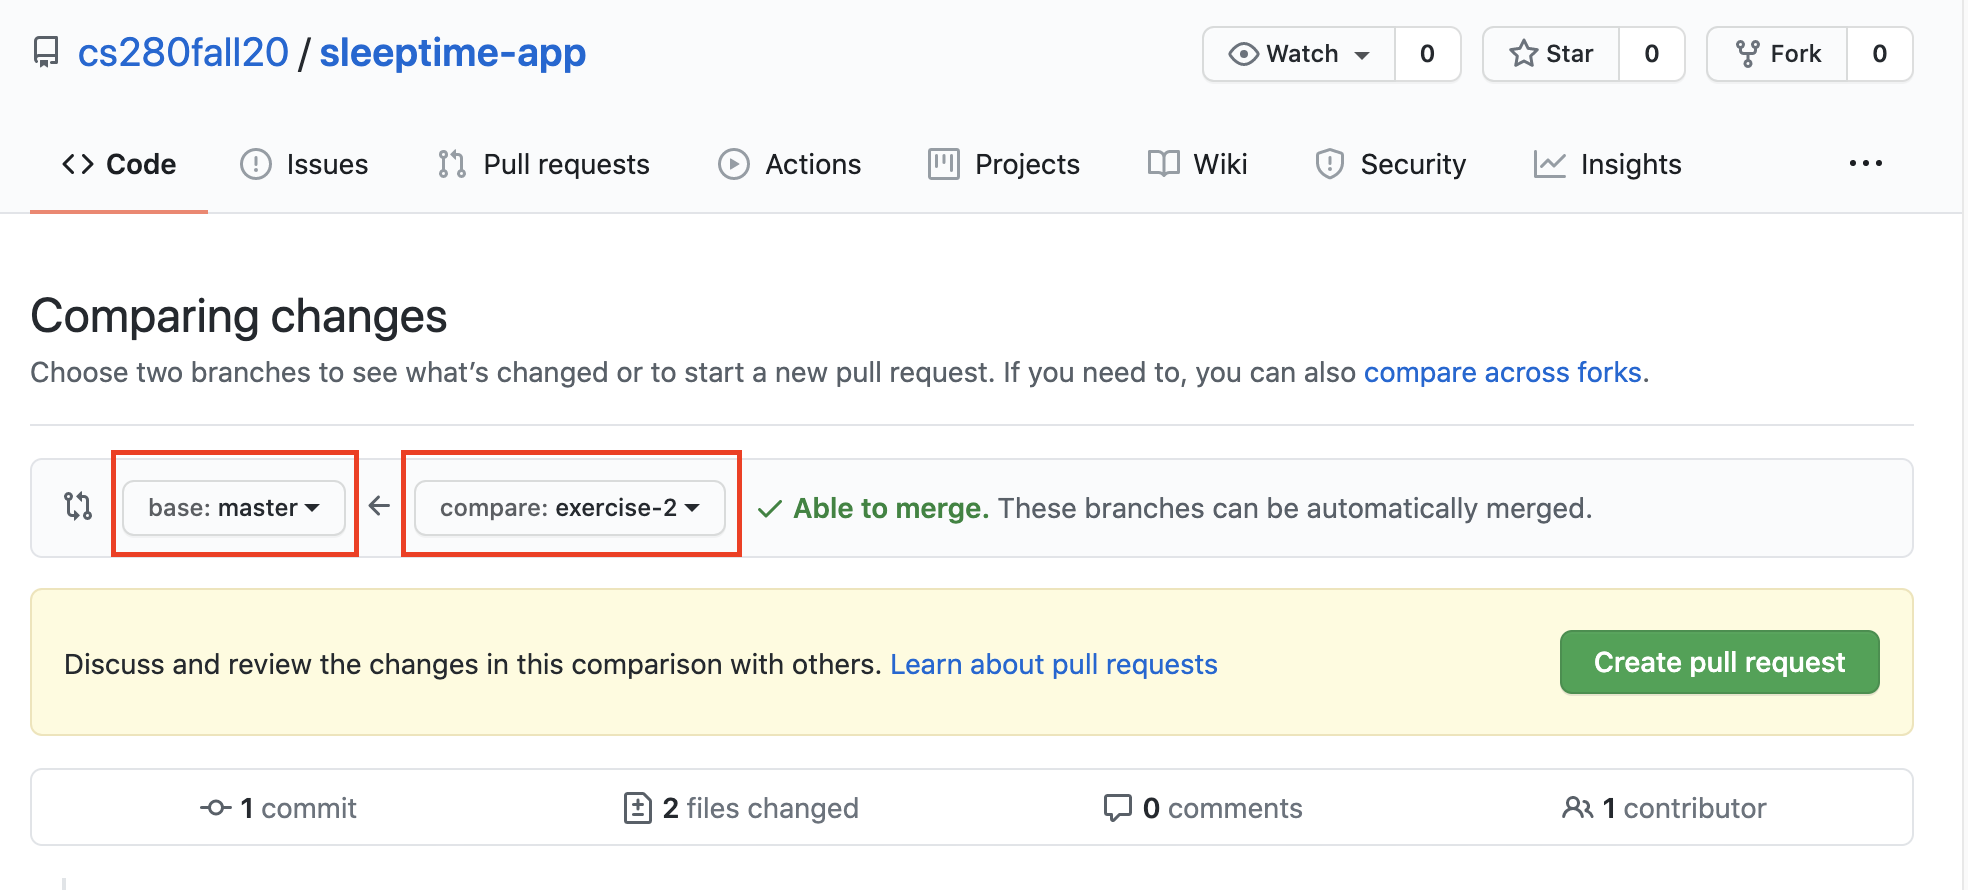
You can assign collaborators to code review and approve the pull request. We will show you how this works in class.
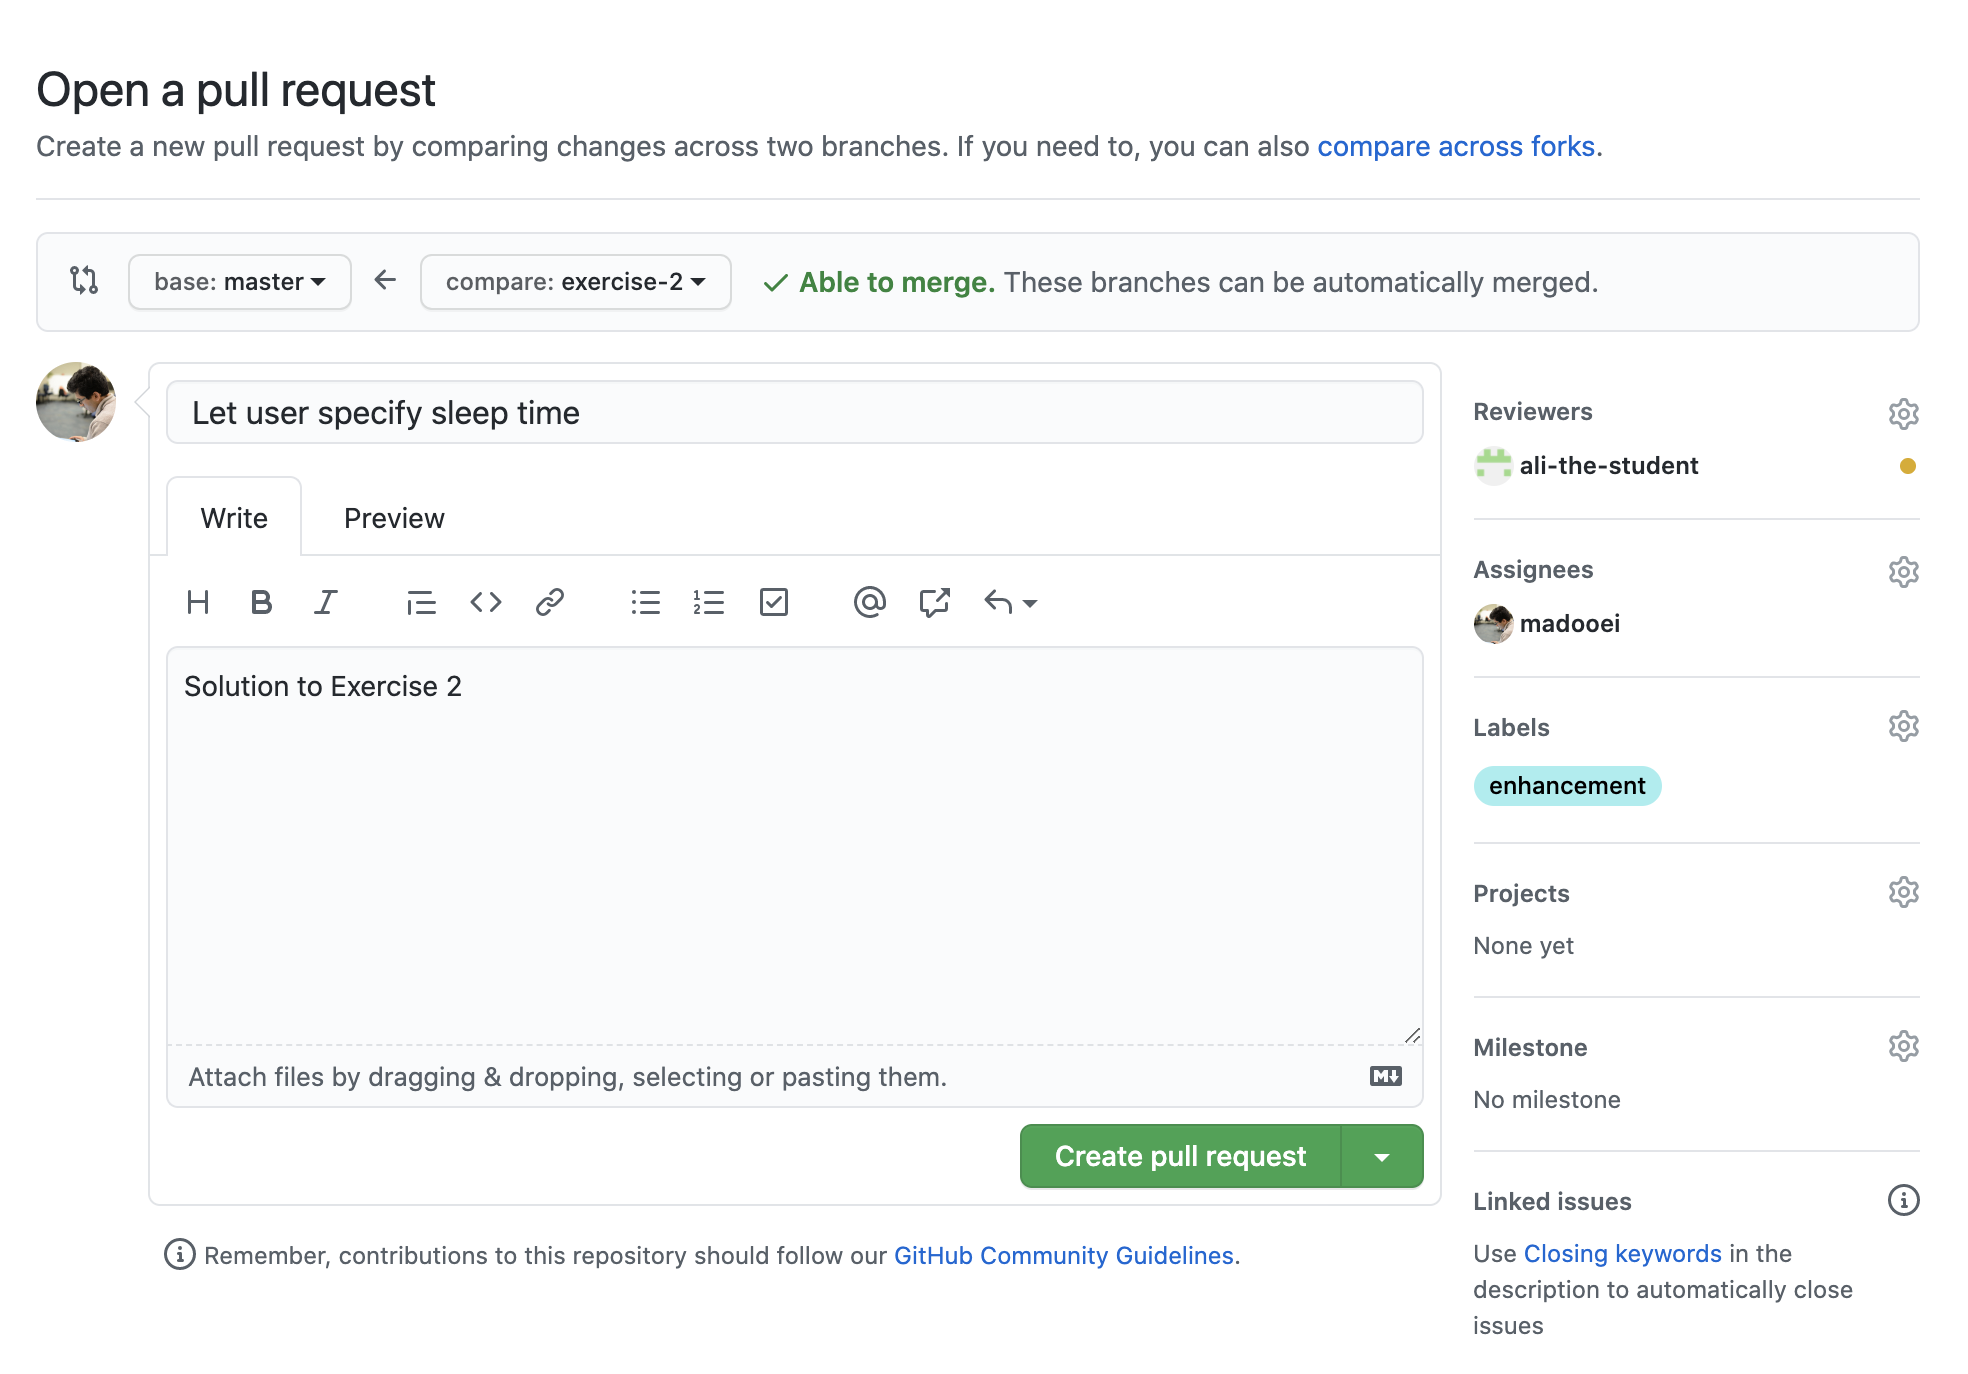
After the request has been approved by reviewers, and if there is no merge conflict, you can "Merge pull request".
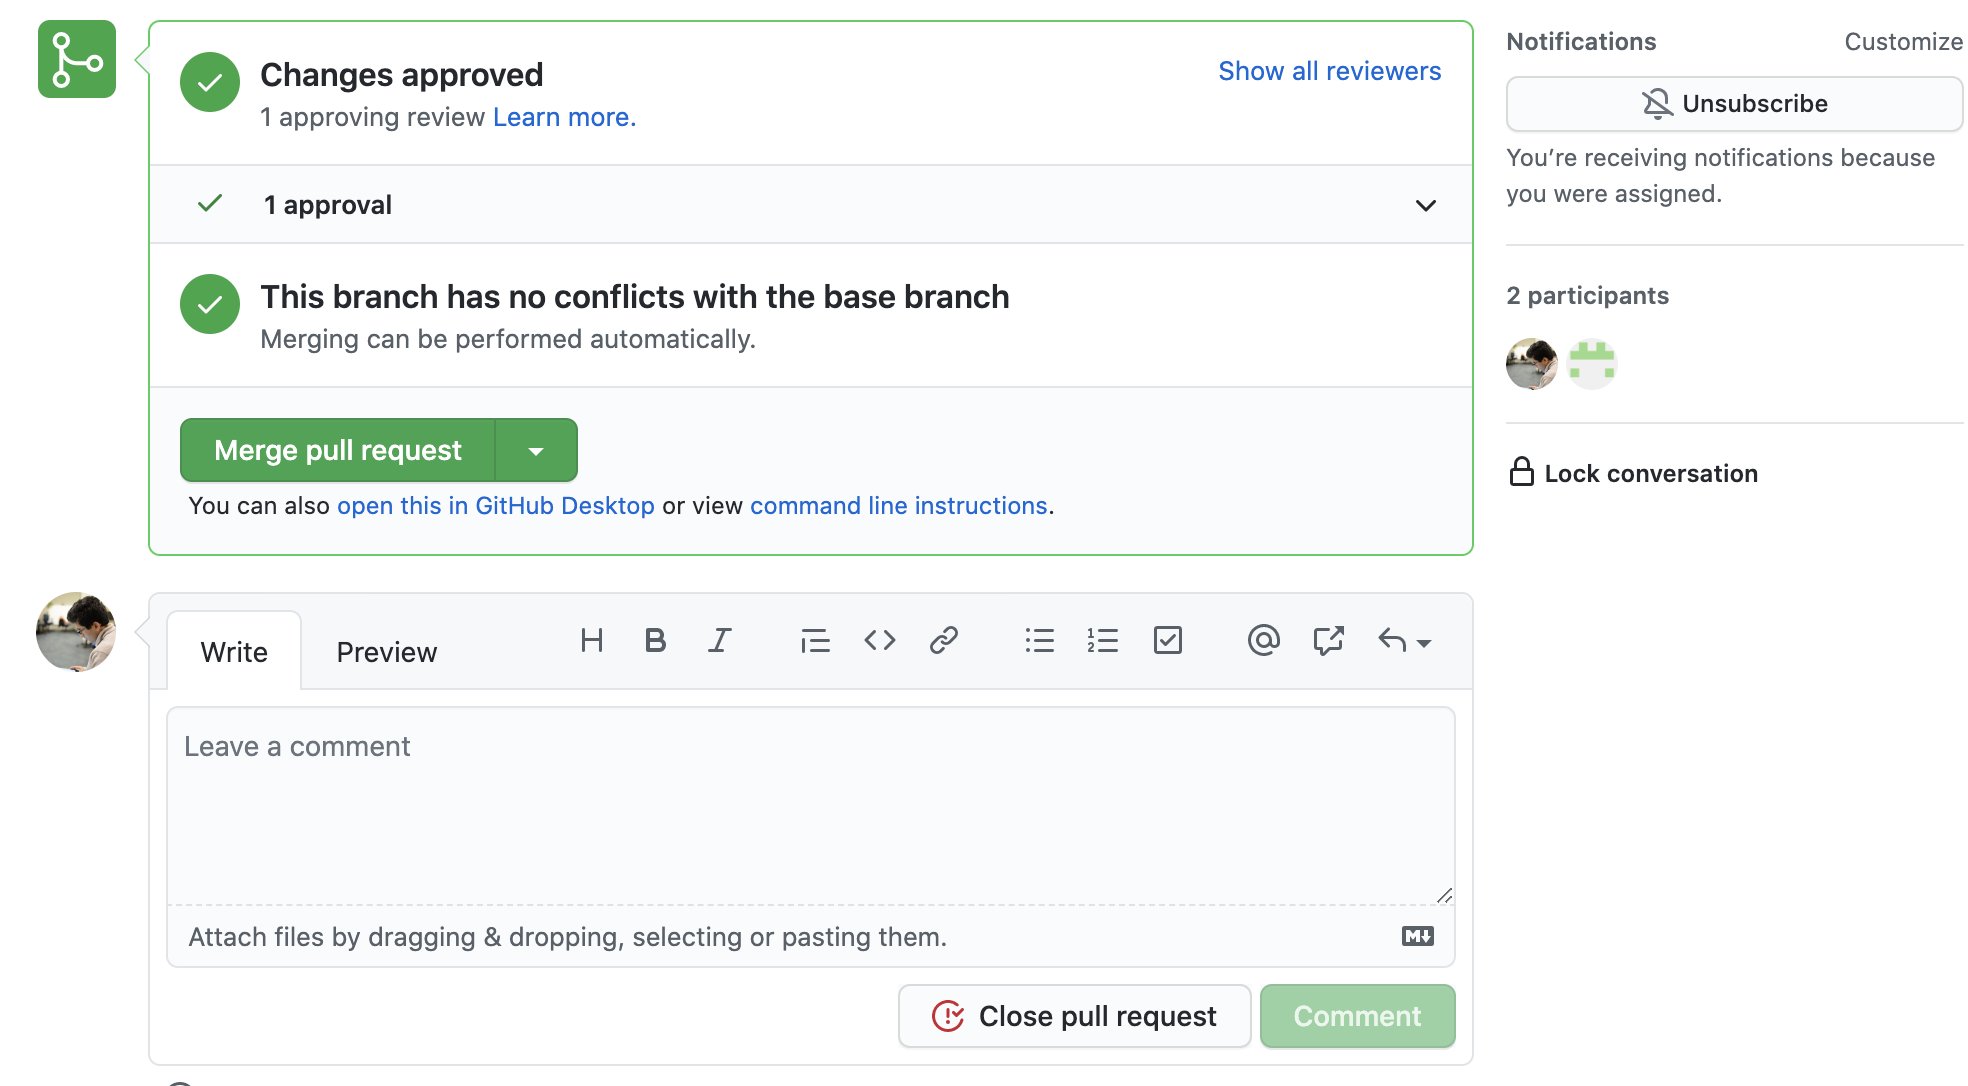
Now the master branch has the latest updates from the exercise-2 branch.
GitHub Flow
The following workflow is known as the GitHub flow:
- Communicating using GitHub Issues
- Creating Git branches (for fixing bugs, adding/updating features, etc)
- Using GitHub Pull request to introduce changes
- Merging changes
You are expected to follow this workflow for homework.
Here is a poster that summarizes GitHub Flow.
GitHub Forks
A "fork" of a repository is an entirely separate repository which is copy of the original repository. A forked repository can be managed and modified like any other, all without affecting the original copy.
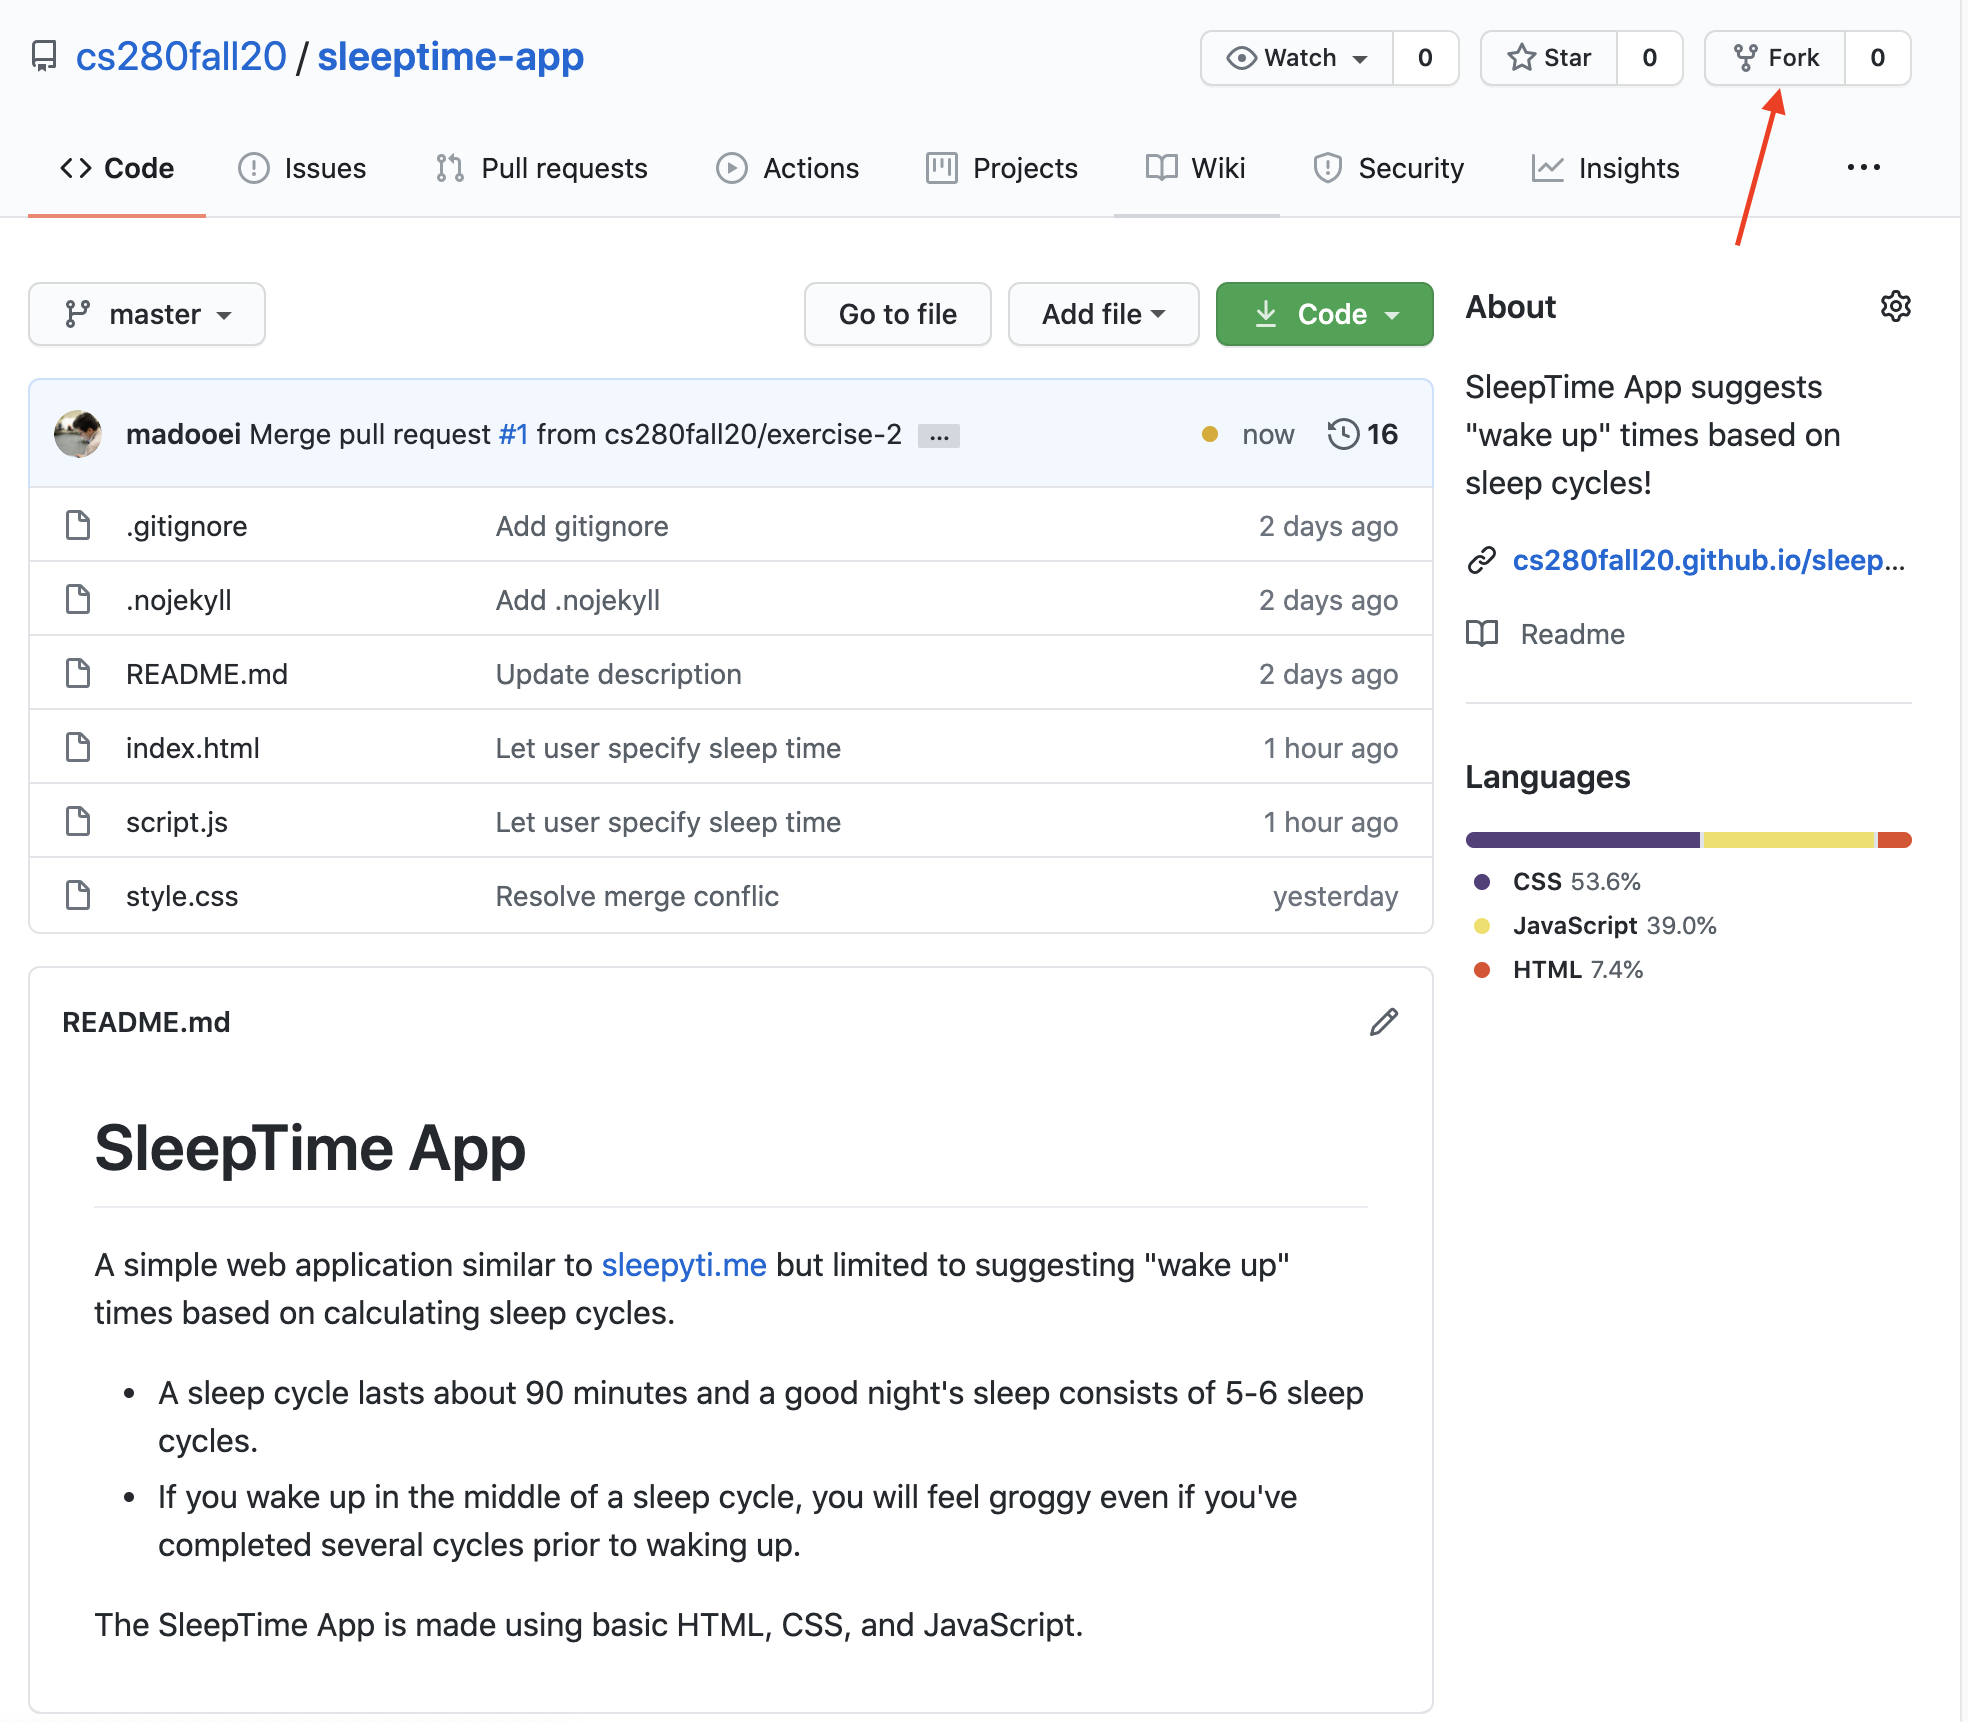
Feel free to fork the repository for this lecture at: https://github.com/cs280fall20/sleeptime-app
Open source projects are often developed using forks. There will be one central version of the software which contributors will fork and improve on, and when they want these changes to be merged into the central repository, they submit a "pull request".
Control Flow
In this chapter, we will explore JavaScript control structures.

Equality Operators
JavaScript has two types of equality/inequality operators: the strict and the abstract equality operators.
Abstract Equality
The operator looks similar to that used in languages like Java and C++:
console.log(2 == 2);
console.log(1 == 2);
console.log(3 != 2);
The problem is, when the operands are of different types, the abstract equality operator converts the types first!
console.log("2" == 2);
console.log(1 == true);
console.log(0 == false);
console.log("" == false);
console.log("0" == false); // both are converted to 0
Type conversion before checking for equality is more error prune that it can possibly be desired.
Do not use the "abstract equality" operators
==and!=.
Strict Equality
The strict equality uses an extra equal sign, and performs the equality comparison in a more exact identify sort of matching.
When the operands have the same type, their value is compared:
console.log(2 === 2);
console.log(1 === 2);
console.log(3 !== 2);
If the operands don't have the same type, then they are considered unequal:
console.log("2" === 2);
console.log(1 === true);
console.log(0 === false);
console.log("" === false);
console.log("0" === false);
While numbers, boolean values and strings compared by value, object/array references are strictly equal if they refer to the same object in memory:
const student = { name: "John Doe" };
const courseAssistant = { name: "John Doe" };
const headAssistant = courseAssistant;

console.log(student === courseAssistant);        // false
console.log(headAssistant === courseAssistant);  // true
A good read: Object equality in Javascript.
Nuances
Note that undefined and null only equal to themselves (unless using abstract equality).
console.log(undefined === undefined);
console.log(null === null);
console.log(undefined === null);  // false
console.log(undefined == null);   // true
Here is a bit of madness, NaN is not equal to NaN no matter what equality operator you use
console.log(NaN == NaN);
console.log(NaN === NaN);
So JavaScript's equality operator is not an equivalence relation (since it is not reflexive).
If you want to check if a variable is NaN, you should try one of the following static methods:
let num = NaN;
console.log(Number.isNaN(num));
console.log(Object.is(num, NaN));
Object.is is a new addition to JavaScript which works similar to strict equality except for NaN and +0/-0.
console.log(+0 === -0);
console.log(Object.is(-0, +0));
JavaScript Object.is is designed to have the properties of an equivalence relation (it is reflexive, symmetric, and trasitive).
MDN Wed Docs has a great article on JavaScripts "Equality comparisons and sameness" available at this link.
Comparison Operators
Javascript has the following comparison operators:
<less than<=less than or equal>greater than>=greater than or equal
Use these to compare numbers with numbers or strings with strings.
Strings are compared lexicographically:
console.log("Hello" < "Goodbye");
console.log("Hello" < "Hi");
There are not "strict" version of comparison operations. So, if you mix types, JavaScript will go about converting types!
console.log("42" < 5);    // "42" is converted to the number 42
console.log("" < 5);      // "" is converted to the number 0
console.log("Hello" < 5); // "Hello" is converted to NaN
console.log([2] < 5);     // [2] is converted to the number 2
console.log([1, 2] < 5);  // [1, 2] is converted to "1,2"
console.log(true > 2);    // true is converted to the number 1
More madness:
console.log(NaN < 1);
console.log(NaN > 1);
console.log(undefined < 1);
console.log(undefined > 1);
console.log(null < 1);
console.log(null > 1);
The logic(!) behind the madness:
- When one operand is a string and the other is a number, the string is converted to a number before comparison.
- When the string is non-numeric, numeric conversion returns
NaN. Comparing withNaNalways returns false.- However,
null,false, and empty string convert to the number 0. And,trueconverts to the number 1.
- However,
- When one operand is an object and the other is a number, the object is converted to a number before comparison.
Avoid mixed-type comparisons!
Logical Operators
Javascript has the following comparison operators:
&&and||or!not
The logical operators work normally when their operands are boolean expressions, that is, for instance, x && y will return true if both x and y evaluate to true. It will also employ short-circuiting and will not evaluate y if x evaluates to false.
const isCitizen = true;
const age = 28;
console.log(isCitizen && age > 64);
Let's revisit the earlier statement:
The logical operators work normally when their operands are boolean expressions.
What if their operands are not boolean expressions? Hmm, you may be thinking the operands are probably converted to boolean and then ... let me stop you right there. Embrace yourself for madness!
JavaScript && and || operators actually don't return a boolean!! They always return one of their operands! If the operands happened to be booleans, then it looks like everything works normally. But things get weird when one or more operand are not boolean!
Here is what really happens:
x && y: Ifxcan be converted to true, returnsy; else, returnsx
console.log(true && "Ali");
console.log(false && "Ali");
x || y: Ifxcan be converted to true, returnsx; else, returnsy
console.log(true || "Ali");
console.log(false || "Ali");
The JavaScript community has (perhaps unfortunately) embraced these features. You will find expressions such as
DEBUG && console.log("Some debugging message");
which is a short form of
if (DEBUG) {
  console.log("Some debugging message");
}
The variable DEBUG is presumably a boolean value but it does not have to be. (See the next section!)
For a more in-dept consideration of logical operators, read Aashni's "Lazy Evaluations and Short Circuit Logic in Javascript"
Boolean-ish
So what is the output here?
console.log("to be" || "not to be");
Explanation
The value "to be" is evaluated to "true". The OR logical operator returns the first operant if that operand is evaluated to true.
Boolean-ish: truthy or falsy values!
- If a value can be converted to true, the value is so-called truthy.
- If a value can be converted to false, the value is so-called falsy.
0,NaN,null,undefined, empty string (""or''or``) are all falsy.- All other values are truthy.
Logical operators (as well as if/loop conditions) embrace Boolean-ish!
console.log(null && "Ali");      // null evaluates to false
console.log(undefined || "Ali"); // undefined evaluates to false
console.log(!"Ali");             // "Ali" evaluates to true
The Boolean-ish is embraced by the JavaScript community too. For instance, it is very common to see code like this
if (user) { // Skipped if user is undefined or null

}
Which can easily be converted to
if (user !== undefined && user !== null) {

}
Another common use is to set a default value to a function argument.
function calcWage (hoursWorked, hourlyPayRate) {
  hourlyPayRate = hourlyPayRate || 12.5;
  // calculate the wages!
}

calcWage(40);     // uses default hourly pay rate.
calcWage(35, 15);
Which can easily be avoided by using default function parameters! (We will properly cover functions in a future lecture.)
function calWage (hoursWorked, hourlyPayRate = 12.5) {
  // calculate the wages!
}
My advice is to avoid tricky or hacky expressions! Code what you mean! Especially when it is not much more work to do so.
There are cases where it might be more work; for example, the following expression
query = query && query.trim() || "";
does the job of the code below:
if (query !== undefined && query !== null) {
  query = query.trim(); // removes whitespace from both ends
} else {
  query = "";
}
Here is another one:
denominator = denominator || 1;
which does the job of the following code:
if (
  denominator === undefined ||
  denominator === null ||
  Number.isNaN(denominator) ||
  denominator === 0
) {
  denominator = 1;
}
if statement
JavaScript has a if statement similar to languages like Java and C++, except that the condition of an if statement can be anything that can be coerced to a boolean value (see the previous section on Boolean-ish values)
if (condition) {
	// statements
}
The statements inside an if block can contain other control structures, including other if statements (nested if statements).
const age = 17;

if (age >= 13) {
	if (age <= 19) {
		console.log("You are a teenager!");
	}
}
An if condition can be expanded with an else block
const num = 37;

if (num % 2 === 0) { // check if num is even
	console.log(num + " is even!");
} else {
	console.log(num + " is odd!");
}
If you have only one statement, the braces around that statement are optional. Consider it good practice to always include braces.
const age = 12;

if (age >= 13)
	if (age <= 19)
		console.log("You are a teenager!");
else
	console.log("You are NOT a teenager!");

// The else is paired with the nearest if
// unless you enclose the second if in brackets.
You can chain several if statements:
const score = 73;

// Convert score to letter grade
if (score >= 85) {
	console.log("Grade: A");
} else if (score >= 70) {
	console.log("Grade: B");
} else if (score >= 55) {
	console.log("Grade: C");
} else {
	console.log("Grade: F");
}
The if-else-if ladder exits at the first success. If the conditions overlap, the first criteria occurring in the flow of execution is executed.
Ternary operator
Consider the following expression that uses the ternary operator ?:
let max = a > b ? a : b;
which is the same as
let max;
if (a > b) {
	max = a;
} else {
	max = b;
}
switch statement
When needing to do a lot of comparisons for a single value, instead of using many if-else-if statements, you can use the switch statement:
const letter = "B-";
let gpa;

switch (letter) {
  case "A+":
  case "A":
    gpa = 4.0;
    break;
  case "A-":
    gpa = 3.7;
    break;
  case "B+":
    gpa = 3.3;
    break;
  case "B":
    gpa = 3.0;
    break;
  case "B-":
    gpa = 2.7;
    break;
  case "C+":
    gpa = 2.3;
    break;
  case "C":
    gpa = 2.0;
    break;
  case "C-":
    gpa = 1.7;
    break;
  case "D+":
    gpa = 1.3;
    break;
  case "D":
    gpa = 1.0;
    break;
  case "D-":
    gpa = 0.7;
    break;
  case "F":
    gpa = 0.0;
    break;
  default:
    gpa = null;
}

if (gpa !== null) {
  console.log("Your GPA is " + gpa);
} else {
  console.error(letter + " cannot be converted to GPA value");
}
-
The
defaultcase in aswitchstatement is like the lastelsein anif-else-ifchain. It will be reached if none of the previously tested conditions aretrue. -
The
breakstatement is needed to break out of theswitchstatement. In case you omitbreak,switchwill run all the following cases until it encountersbreakor exits. This can be useful for grouping cases.
Keep in mind that JavaScript uses strict equality for
switchstatements.
Loops
JavaScript supports the standard loop constructs you have seen in other programming languages:
let counter = 0;
while (counter < 10) {
	console.log(counter);
	counter++;
}
In a do-while loop, the body of the loop is executed once and then, if the condition holds, the program returns to the top of the block.
let counter = 10;
do {
	console.log(counter);
	counter++;
} while (counter < 10);
When it comes to counter-controlled loops (when we know exactly how many iterations we need, e.g. when we go over the elements of an array), the for loop provides a more compact syntax:
for (let counter = 0; counter < 10; counter++) {
	console.log(counter);
}
You can cram in multiple variables, update expressions:
const arr = [10, 20, 30, 40, 50];

for (let i = 0, j = arr.length - 1; i < j; i++, j--) {
  const temp = arr[i]
  arr[i] = arr[j]
  arr[j] = temp
}

console.log(arr);
The while and do-while loops are best for event-controlled loops (when the number of iteration is unknown before runtime, e.g. when we read data from file and we don't know how many lines — or how many values are there).
break & continue
The break statement exits out of a loop, while the continue statement will skip to the next iteration:
const arr = [10, 20, 30, 40, 50];
const target = 40;

let index = -1;
for (let i = 0; i < arr.length; i++) {
  if (arr[i] === target) {
    index = i;
    break; // stop early!
  }
}

console.log(index);
const arr = [10, , 30, , 50];
let count = 0;
let sum = 0;

for (let i = 0; i < arr.length; i++) {
  if (arr[i] === undefined) {
    continue; // ignore missing data!
  }
  count++
  sum += arr[i]
}

const avg = count === 0 ? 0 : sum / count;
console.log(avg);
for..of loop
The for..of loops are used for looping through iterable objects such as arrays:
let arr = [10, 20, 30];

for (let item of arr) {
   console.log(item);
}
It also works with strings:
const greeting = "Hello!"
for (const ch of greeting) {
  console.log(ch);
}
for..in loop
The for..in loop allows you to iterate over keys of enumerable object properties.
const user = {
   firstName: "Ali",
   lastName: "Madooei"
};

for (const key in user) {
   console.log(key, user[key]);
}
It works with strings and arrays too, but iterates over the indices:
const arr = [10, 11, 12];
for (const key in arr) {
  // console.log(key);
  console.log(arr[key]);
}
const greeting = "Hello!"
for (const key in greeting) {
  // console.log(key);
  console.log(greeting[key]);
}
Tic Tac Toe
We are going to implement a two-player Tic-Tac-Toe game similar to (but simpler than) http://playtictactoe.org/.

Tic-Tac-Toe is a paper-and-pencil game for two players, X and O, who take turns marking the spaces in a n x n grid (usually 3 x 3). The player who succeeds in placing n of their marks in a horizontal, vertical, or diagonal row wins the game.
Step 1
Clone the starter code:
git clone -b starter https://github.com/cs280fall20/tic-tac-toe.git
This lesson is designed as a coding exercise. It provides you with an opportunity to practice what we've covered so far, in particular JavaScript Control flow. Moreover, the implementation exhibits a modular structure that uses JavaScript functions. The latter will be covered in detail in the next module.
If you are lucky, you make mistakes and will have a chance to use the debugger as well!
The starter code contains three files:
index.htmlstyle.cssscript.js
We will review each in the following sections.
Step 2
The index.html is mostly boilerplate code. The following piece is responsible for structuring the game board.
<div class="game board">
  <div class="row">
    <div class="cell" id="0"></div>
    <div class="cell" id="1"></div>
    <div class="cell" id="2"></div>
  </div>
  <div class="row">
    <div class="cell" id="3"></div>
    <div class="cell" id="4"></div>
    <div class="cell" id="5"></div>
  </div>
  <div class="row">
    <div class="cell" id="6"></div>
    <div class="cell" id="7"></div>
    <div class="cell" id="8"></div>
  </div>
</div>
Step 3
The style.css is not of interest to us except to note we use CSS selectors x and o to style a cell which is marked by the cross or the naught marker. That is, when a cell is marked by a player, you must add the class name x or o to its class attribute. Let's make a concrete example to better understand this.
- Open
index.htmlin your favorite browser (Chrome is recommended). - Open the browser console (Developer Tools).
- Run the following command to mark the first cell with a cross:
let cell = document.getElementById("0");
cell.classList.add("x");
Exercise: mark the board's middle cell with a naught.
Solution
cell = document.getElementById("4");
cell.classList.add("o");
Step 4
The script.js contains a partial implementation of the Tic-Tac-Toe game. Your task is to complete the code.
But first, let's explore the content of script.js. Here are the first few lines:
let cells = document.querySelectorAll(".cell");
cells.forEach(function (cell) {
  cell.addEventListener("click", game);
});
The querySelectorAll returns an array of all HTML elements with the class name of "cell".
The forEach() method executes a provided function once for each array element. For clarity, let's rewrite the second statement:
cells.forEach(runGameOnClick);

function runGameOnClick(element) {
  element.addEventListener("click", game);
}
In JavaScript, we can pass a function as a parameter to another function!
The original statement declares an anonymous function.
An anonymous function is a function without a name.
One common use for anonymous functions is as arguments to other functions.
cells.forEach(function (cell) {
  cell.addEventListener("click", game);
});
Another way of writing anonymous functions is using arrow functions:
cells.forEach( (cell) => {
  cell.addEventListener("click", game);
});
We will explore these alternative syntaxes to function declaration at a later time.
So, the first few lines are simply saying that the game function must be called every time a user clicks on any of the cells (of the game board).
Note the addEventListener method takes two arguments:
- A (case-sensitive) string representing the event type to listen for
- A function that will be called whenever the specified event is delivered to the target element.
In our solution, the addEventListener will call the game function when a user clicks on a cell. It will pass an object, event to the game function. The event object contains many properties about the specified event, including a reference to the target element (cell) which the event occurred.
So, when a user clicks on a cell, you can access that cell and e.g. its id attribute as follows:
function game(event) {
  let cell = event.target;
  console.log(cell.id);
}
Feel free to experiment with the above simplistic implementation of game; every time user clicks on a cell, its id attribute will be printed to the console.
Step 5
Note the following variables are used to hold the state of the game:
const numRows = 3;
const numCols = 3;
let numEmptyCells = numRows * numCols;
const board = new Array(numEmptyCells);
const markers = ["x", "o"];
let player = 0;
let gameIsOver = false;
The variables above are declared in the script.js (outside of any functions) and therefore have a global scope. It is generally not a good practice to declare globally scoped variables; we leave it at that for now and return to the topic in later modules.
The remainder of script.js contains several function definitions. These functions are defined in standard form using a function keyword, followed by the function name, parameters (if any), and the function body.
Note a JavaScript function can return a value (using the return statement). Unlike functions in Java and C++, functions in JavaScript have no parameter/return types.
Let's look at the function definition of toLinearIndex as an example:
// return the linear index corresponding to the row and column subscripts
function toLinearIndex(row, col) {
  return row * numRows + col;
}
Notice numRows is defined globally and the function has access to it.
The game board is a 3 x 3 grid:

However, we store this board in a 1D array (board):

The toLinearIndex function, as the name suggests, returns the linear index into board corresponding to the row and column subscripts of the game board.
Step 6
The code for any application, even as simple as the Tic-Tac-Toe game, can quickly get out of hand unless we take a modular approach and break the problem down into smaller tasks, each of which can be coded with one or more functions. Here's a modular structure chart for the provided (partial) implementation:
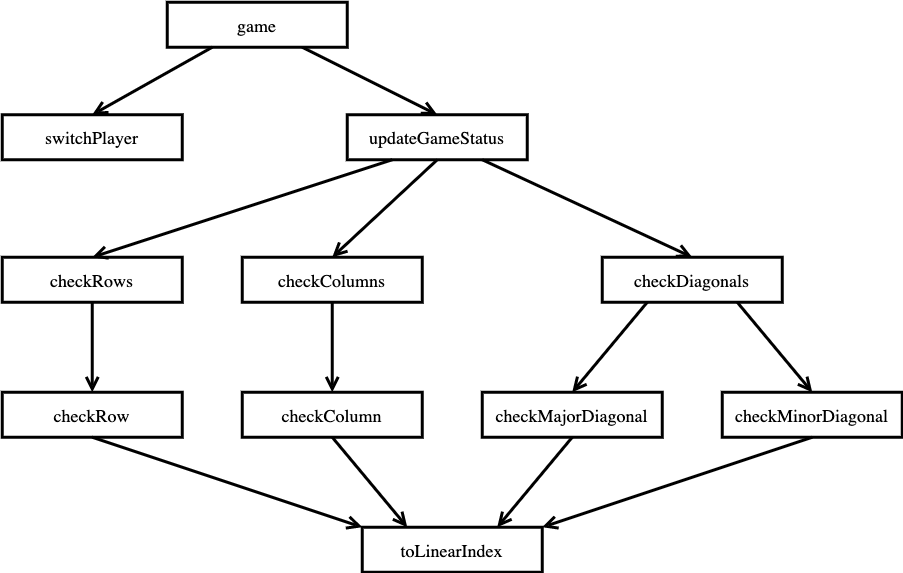
You must carefully study the modular structure and the description of each function before completing the code. I recommend working through the exercise in the following order:
- Implement
switchPlayer - Implement
checkRow - Implement
checkColumns - Implement
checkColumn - Implement
checkMajorDiagonal - Implement
checkMinorDiagonal - Complete the implementation of
game
We are taking a top-down approach to design step-wise refinement to the implementation of this game.
In this approach, it may not be possible to run the application to test the correctness of your implementation as you progress through (because at any point, some of the functions are not implemented yet). You can use the debugger to step through the code to inspect its implementation. Ideally, we must perform unit testing. For now, to keep things simple, we let go of writing tests (but we will do it later in this course). Luckily, each function is small in scope and the application (game) is simple as a whole. It will not be difficult to get the code working correctly with a few attempts.
Step 7
Here are the solutions. Don't use a solution here until you've finished implementing all the missing pieces and debugged your implementation.
-
Implement
switchPlayerSolution
// switches the player value from 0 to 1 and vice versa function switchPlayer() { player = player === 0 ? 1 : 0; } -
Implement
checkRowSolution
// returns true if all cells in the given row // are marked with the same marker, otherwise returns false function checkRow(row) { for (let col = 0; col < numCols; col++) { let index = toLinearIndex(row, col); if (board[index] !== markers[player]) return false; } return true; } -
Implement
checkColumnsSolution
// returns true if all cells in a column // are marked with the same marker, otherwise returns false function checkColumns() { for (let col = 0; col < numCols; col++) { if (checkColumn(col)) return true; } return false; } -
Implement
checkColumnSolution
// returns true if all cells in the given column // are marked with the same marker, otherwise returns false function checkColumn(col) { for (let row = 0; row < numRows; row++) { let index = toLinearIndex(row, col); if (board[index] !== markers[player]) return false; } return true; } -
Implement
checkMajorDiagonalSolution
// returns true if all cells in the major diagonal // are marked with the same marker, otherwise returns false function checkMajorDiagonal() { for (let row = 0; row < numRows; row++) { let index = toLinearIndex(row, row); if (board[index] !== markers[player]) return false; } return true; } -
Implement
checkMinorDiagonalSolution
// returns true if all cells in the minor diagonal // are marked with the same marker, otherwise returns false function checkMinorDiagonal() { for (let row = 0; row < numRows; row++) { let index = toLinearIndex(row, numCols - row - 1); if (board[index] !== markers[player]) return false; } return true; } -
Complete the implementation of
gameSolution
// the main event listener and the controller for the game function game(event) { if (gameIsOver) return window.alert( "This game has ended. Refresh the page for a new game!" ); let cell = event.target; let index = cell.id; if (board[index]) return window.alert("This cell has already been marked!"); // update the board board[index] = markers[player]; cell.classList.add(markers[player]); numEmptyCells--; updateGameStatus(); switchPlayer(); }
The app must be working now! Enjoy playing the Tic-Tac-Toe game 🎉
You can download the complete implementation from https://github.com/cs280fall20/tic-tac-toe.git.
Step 8
The implementation of checkRow, checkColumn, checkMajorDiagonal and checkMinorDiagonal are fairly similar. Can you refactor the code and extract a function that factors the common behavior?
Solution
It is possible to do this, in particular for checkRow, checkColumn, as follows:
- Add the following function
function checkCells(rowFirst, rowLast, colFirst, colLast) { for (let row = rowFirst; row < rowLast; row++) { for (let col = colFirst; col < colLast; col++) { let index = toLinearIndex(row, col); if (board[index] !== markers[player]) return false; } } return true; } ``` - Update
checkRowfunction checkRow(row) { return checkCells(row, row + 1, 0, numCols); } - Update
checkColfunction checkColumn(col) { return checkCells(0, numRows, col, col + 1); }
To use checkCells for checking major/minor diagonal, we need to employ a more complex (and convoluted) logic.
The changes already make for a less readable code and a more complex and convoluted checkCells will change this situation for the worse. My preference would be keeping the code as is (without using checkCells at all).
Functions
Functions are a core construct in many programming languages. In JavaScript, they are first-class citizens which means that you can treat them like other values:
- Store functions in variables
- Pass functions to other functions
- Return functions from functions
- and more!
We will go over many of these features in this module.
Defining Functions
Here is a JavaScript function:
function total(x, y) {
return x + y;
}
It is, in many ways, similar to functions in languages like Java and C++:
- A function can take zero or more named parameters.
- A function groups several statements (in the function body).
- A function creates scope: variables declared in a function are local to that function (even when declared with the
varkeyword). - A function can return a value (using the return statement).
- A return statement terminates the function immediately.
JavaScript functions are different in several ways from functions in Java and C++. The most visible difference (besides the use of the function keyword) is the lack of types; there are no parameter/return types.
Moreover, JavaScript functions always return a value! If a function terminates without explicitly returning a value, it returns undefined.
The most important difference, however, is that JavaScript functions are values (well, actually, they are [special] objects). You can store functions in variables. You can also pass them as arguments to other functions or return a function from another function.
Terminology: A higher order function is a function that takes a function as an argument (or returns a function).
In contrast, first order functions don't take a function as an argument (nor they return a function as output).
JavaScript supports both first and higher order functions.
Calling Functions
To invoke a JavaScript function, call its name followed by a pair of parentheses with zero or more arguments.
const result = add(2, 1);
When using a function as a value, use its name without parentheses/arguments.
const sum = add;
// you can use sum as an alias to add
// e.g. const result = sum (2, 1)
Function Expression
The function keyword can be used to define a function inside an expression.
const sum = function total(x, y) {
return x + y;
};
You will not be able to call the function using its name total. Instead, you must use the alias sum to invoke the function. In fact, in a function expression, the function name can be omitted to create anonymous functions.
const sum = function (x, y) {
return x + y;
};
In anonymous functions, you will not be able to refer to the function within itself, e.g. for recursion.
Anonymous Functions
An anonymous function is one without a name after the function keyword:
const mean = function (x, y) {
return (x + y) / 2;
};
In contrast, a named function is one that has a name after the function keyword.
A common use for anonymous functions is as arguments to other functions.
const numbers = [1, 2, 3, 4, 5, 6, 7]; const evens = numbers.filter(function (x) { return x % 2 === 0; }); console.log(evens);
Arrow Function Expressions
Relatively new addition to the language, they provide a more compact form for anonymous functions:
const mean = (x, y) => {
return (x + y) / 2;
};
Notes on the syntax:
- Function parameters are provided in parentheses proceeding the fat arrow (
=>)- Parentheses are optional for a single parameter.
- Use empty parentheses if no parameters.
- Function body is contained within curly brackets following the fat arrow (
=>)- Curly brackets are optional when the function body is made up of a single statement.
- If that single statement is a return statement, you can eliminate the
returnkeyword, too. - If the single return statement involves returning an object, to avoid confusion between curly brackets for object literal with curly brackets for the function body, surround the object literal in parentheses.
is the same asconst user = username => ({ username });const user = (username) => { return { username }; };
Arrow functions are commonly used for declaring functions as arguments to other functions:
const numbers = [1, 2, 3, 4, 5, 6, 7]; const evens = numbers.filter(x => x % 2 === 0); console.log(evens);
Arrow functions do not exhibit all behaviors of normal (named or anonymous) JavaScript functions. We will explore some of their limitations in later sections.
Hoisting
You can use (call) a function before it is defined!
const result = add(2, 1); console.log(result); function add(a, b) { return a + b; }
The observed phenomenon is due to hoisting.
Hoisting is a JavaScript mechanism where variables (declared with
varkeyword) and function declarations are moved to the top of their scope before code execution.
The caveat is when using function expressions; they are not hoisted!
const result = add(2, 1); console.log(result); const add = function (a, b) { return a + b; }
Here is a clever example that uses (mutual) recursion and hoisting:
function isEven(n) { return n == 0 ? true : isOdd(n - 1); } function isOdd(n) { return n == 0 ? false : isEven(n - 1); } const n = 3; // feel free to change this value! console.log(`isEven(${n}) -> ${isEven(n)}`); console.log(`isOdd(${n}) -> ${isOdd(n)}`);
Step-by-step execution
Here is a tricky example of hoisting: what does this snippet print?
var num = 1; print(); function print() { console.log(num); var num = 2; }
Explanation
The answer is undefined because the num variable inside the print function is hoisted to the top of its scope (which is the top of the print function).
The following snippet shows, roughly, how the hoisting works for the given example:
var num;
num = 1;
function print() {
var num;
console.log(num);
num = 2;
}
print();
Arguments
You can call JavaScript functions with fewer or more arguments than the number they expect!
Fewer Arguments
Missing argument? Parameter is undefined:
function myfunction (x, y) { console.log(x, y); } myfunction(2);
This feature can be used to create optional parameters; check for undefined parameters and assign them a default value.
In modern JavaScript, you can use default parameter values by assigning a value to a parameter in the function signature.
function average(x, y = x) {
return (x + y) / 2;
}
Multiple default arguments ok:
function average(x = 0, y = x) { return (x + y) / 2; } console.log(average(2,3)); console.log(average(2)); console.log(average());
More Arguments
If you provide a function with more arguments than it expects, it will ignore the extra ones!
function myfunction (x, y) { console.log(x, y); } myfunction(1, 2, 3, 4, 5, 6);
Rest Parameters/Spread Operator
We've seen the "rest parameters" in the destructuring assignment with arrays and objects. You can use the same pattern to capture a variable number of arguments:
function total(...args) { let sum = 0; for (x of args) sum += x; return sum; } console.log(total(1)); console.log(total(1, 2)); console.log(total(1, 2, 3)); console.log(total(1, 2, 3, 4));
JavaScript has a "spear operator" which looks identical to the "rest operator" but its purpose is to expand (spread out) the elements of an iterable object.
const numbers = [3, 4, 5]
const result = total(...numbers);
You can create a function that takes both named parameters and rest parameter but in that case the rest parameter must be the last parameter.
function myFunction (arg1, arg2, ...rest) { /* do something awesome with all the arguments! */ }
Arguments Object
If you are puzzled by how functions can be called with fewer/more arguments, here is an explanation. It turns out, the named parameters of a function are more like guidelines than anything else. Every function has access to an array-like object called arguments. This object holds all of the values passed to the function.
function myfunction () { for (let i = 0; i < arguments.length; i++) { console.log(arguments[i]); } } myfunction(1, 2, 3, 4);
If you declare a function with \(n\) named parameters, JavaScript will assign the first \(n\) elements of arguments to those parameters, in order.
Caution: Arrow function do no have
argumnetsobject.
Function Scoping
When you define a function, it creates a lexical scope.
A lexical scope or static scope in JavaScript refers to the accessibility of the variables, functions, and objects based on their physical location in the source code.
Any value defined within the function will not be accessible by code outside the function.
function myFunction () { var num = 4; } console.log(num);
Inner Functions
JavaScript functions can be declared inside other functions! Each function creates its scope.
function outer() { let a = 1; function inner() { let a = 2; let b = 3; console.log(a); console.log(b); } inner(); console.log(a); console.log(b); } outer();
The inner functions have access to the variables in their parent function.
function outer() { let num = 1; function inner() { num++; } console.log(num); inner(); console.log(num); } outer();
When one should use inner functions? If a function relies on a few other functions that are not useful to any other part of your code, you can nest those helper functions inside it.
Functional Encapsulation
The fact functions create scope and they can be nested allow us to achieve Object-Oriented Programming (OOP)like encapsulation and information hiding:
A function can bundle several related functions and allow them share variables declared in the parent function. (Similar to what a class does in OOP.)
Recall the implementation of Tic-Tac-Toe: we had a handful of globally-scoped variables. We could wrap the entire content of script.js into a function and then call that function to put its content in action.
function tictactoe() {
// copy over the content of script.js
}
tictactoe();
We can also use a Self-Executing Anonymous Function (also known as Immediately Invoked Function Expression, or IIFE):
(function () {
// copy over the content of script.js
})();
This strategy used to be a very common pattern employed by JavaScript programmers to create OOP-like encapsulation and prevent polluting the global scope.
IIFE
An IIFE (Immediately Invoked Function Expression) is a JavaScript function that runs as soon as it is defined.
(function () {
// statements
})();
It contains two major parts:
- The anonymous function enclosed within the Grouping Operator
(). - The following
()which creates the immediately invoked function expression.
In Modern JavaScript, you should use Modules and Classes instead of IFFEs.
JavaScript Modules and Classes will be explored in near future.
Currying and Closure
Consider this function:
function makeSundae(base, topping) { return `Here is your ${base} ice cream with ${topping}!`; } const sundae = makeSundae("vanilla", "hot fudge"); console.log(sundae);
The fact functions are values enable us to make a function that returns a function. This can be used in interesting ways!
function makeSundae(base) { return function (topping) { return `Here is your ${base} ice cream with ${topping}!`; } } const vanillaSundae = makeSundae("vanilla"); const chocolateSundae = makeSundae("chocolate"); console.log(chocolateSundae("hot fudge")); console.log(vanillaSundae("chocolate syrup"));
What we have done with makeSundae is called currying in functional programming.
Currying is converting a function that takes \(n\) arguments to return a chain of functions that each take one argument.
Here is a more useful example
function makeLog(base) { return function(value) { return Math.log(value) / Math.log(base); } } const log10 = makeLog(10); const log2 = makeLog(2); console.log(log10(100)); console.log(log2(8));
Notice the returned inner function retains access to the variables defined in the parent function even after the parent is out of scope. (Since the parent function has returned, our expectation demands that its local variables no longer exist. But, they do still exist!) This, in functional programming, is called closure.
Closure is when a function remembers and continues to access variables from outside of its scope.
function counter(step = 1) { let count = 0; return function increaseCount () { count += step; return count; } } const incBy1 = counter(); const incBy10 = counter(10); console.log(incBy1()); console.log(incBy1()); console.log(incBy10()); console.log(incBy10());
For more examples, refer the examples on MDN web docs, Closure.
If interested, freeCodeCamp has a good article "JavaScript Closures Explained by Mailing a Package".
Mimic OOP
Closures let you save state. We can use closure with JavaScript objects to mimic objects in Object-Oriented programming (encapsulation: private state + behavior). Here is an example:
function createAccount(initialBalance = 0) { let balance = initialBalance; return { deposit: function(amount) { balance += amount; }, withdraw: function(amount){ balance -= amount; }, getBalance: function() { return balance; } } } // Create any number of accounts const checking = createAccount(); const saving = createAccount(1000); saving.withdraw(200); checking.deposit(200); console.log(checking.getBalance()); console.log(saving.getBalance());
Modern JavaScript has Classes (to create objects) similar to Java and C++. JavaScript Classes are in fact functions. The process shown above is the underlying mechanics used by JavaScript to mimic Object-Oriented Programming.
Functions are Objects
The typeof operator declares functions as a type.
function add (x, y) { return x + y; } console.log(typeof add)
However, functions are in fact objects (well, they are special Function objects that you can invoke). That is where the "functions are values" comes from. The fact that functions are objects enable you to treat them like other values (store them in variables, pass them to functions, etc).
You can go so far as to create a function using an object constructor notation!
const multiply = new Function("x", "y", "return x * y;"); console.log(typeof multiply); console.log(multiply(2, 3));
Functions, like other built-in objects, have instance properties and methods!
function add (x, y) { return x + y; } console.log(add.name); console.log(add.length); // number of parameters console.log(add.toString());
Methods
Since functions are values, we can assign them to object property names. This is the closest thing to "methods" in Object-Oriented languages that JavaScript offers. You can even use the this keyword to access other object properties:
const account = { balance: 100, deposit: function(amount) { this.balance += amount; }, withdraw: function(amount) { this.balance -= amount; } } account.deposit(50); account.withdraw(20); console.log(account.balance);
The difference between account object and createAccount function from the earlier section on closure is that balance is "publicly" accessible in account object. In createAccount function, we used closure and lexical scoping to hide balance.
Yet another function syntax
Starting with ECMAScript 2015, a syntactic sugar can be used to declare "methods" which looks more like method syntax in Object-Oriented programming languages.
const account = { balance: 100, deposit(amount) { this.balance += amount; }, withdraw(amount) { this.balance -= amount; } } account.deposit(50); account.withdraw(20); console.log(account.balance);
this and Arrow Functions
Arrow functions does not have their own bindings to this and should not be used as methods.
const account = { balance: 100, deposit: (amount) => { this.balance += amount; }, withdraw: (amount) => { this.balance -= amount; } } account.deposit(50); account.withdraw(20); console.log(account.balance);
Function Context
Each function has an execution context which is exposed to the function via this keyword. You can use Function Instance methods](https://developer.mozilla.org/en-US/docs/Web/JavaScript/Reference/Global_Objects/Function) call, apply and bind to provide the execution context.
const account = { balance: 100, } function displayBalance () { console.log(this.balance); } displayBalance(); displayBalance.bind(account)();
The
bind()method creates a new function that, when called, has itsthiskeyword set to the provided value.
function greet() { console.log(`Welcome to ${this.name}`); } const cs280 = { name: "Full-Stack JavaScript" }; const cs226 = { name: "Data Structures" }; const greet280 = greet.bind(cs280); const greet226 = greet.bind(cs226); greet280(); greet226();
The
calls()method calls a function and sets its this to the provided value. If the function takes in arguments, those arguments can be passed (in order) following thethisargument.
const account = { balance: 100, } function deposit (amount) { this.balance += amount; } function withdraw (amount) { this.balance -= amount; } deposit.call(account, 50); withdraw.call(account, 20); console.log(account.balance);
The
apply()method calls a function with a given this value, and the function arguments are provided as an array (or an array-like object).
const stats = { max: Number.MIN_SAFE_INTEGER, min: Number.MAX_SAFE_INTEGER } function max(...args) { for(let i = 0; i < args.length; i++) { if (this.max < args[i]) { this.max = args[i]; } } } function min(...args) { for(let i = 0; i < args.length; i++) { if (this.min > args[i]) { this.min = args[i]; } } } const numbers = [5, 6, 2, 3, 7]; max.apply(stats, numbers); min.call(stats, ...numbers); console.log(stats);
Arrow functions are not suitable for
call,applyandbindmethods, which generally rely on establishing a scope.
Exercise
Implement a function, pick, that takes in a JavaScript object and zero or more property names. It must return a copy of the given object that contains only the given property names.
const user = { name: "Ali", lastname: "Madooei", affiliation: "JHU", username: "amadooe1" }; // TODO Implement the pick function const result = pick(user, "name", "lastname"); console.log(result); // -> {"name":"Ali","lastname":"Madooei"}
Solution
function pick(object, ...keys) {
let result = {};
for (let i = 0; i < keys.length; i++) {
result[keys[i]] = object[keys[i]];
}
return result;
}
Here is another version which uses function expression and it is (technically) a single statement!
const pick = (object, ...keys) => Object.keys(object)
.filter(key => keys.includes(key))
.reduce((result, key) => ({...result, [key]:object[key]}), {});
Brick Breaker
We are going to develop a Game called Brick Breaker based on a tutorial on MDN website. Unlike the original tutorial, we will take an Object-Oriented approach to the design and implementation of the game.
You will find a demo of the original tutorial here. Feel free to play the game and inspect the source code.
This module serves as an exposition to OOP in JavaScript. It also introduces you to the HTML Canvas element which is the backbone of Web-based (JavaScript based) Animations and Games.
We will not be able to finish this module in one lecture. We'll cover the initial steps and the remaining ones will be left to you as an exercise.
A Logistical Issue!
In this tutorial, we will link our JavaScript classes using the syntax of ES6 modules. Linking to ES6 modules in the browser, while you open the we app locally, is blocked by CORS policy. There are several ways to get around this issue. The one which I recommend, for now, is running your web app in a "local host".
If you are using VSCode, please install live server plugin and open your
index.htmlfile using the live server.
Almost every editor and IDE has a similar plugin, and in some cases like JetBrain's Webstorm IDE, the feature is built into the application
Step 1
Clone the starter code
git clone -b starter https://github.com/cs280fall20/brick-breaker.git
The starter code contains a minimal scaffolding to get us started.
The entry point for this tutorial is to animate an object (make it move around) in an HTML page. There are several different ways to achieve this. In its simplest form, we can create an HTML element and set its position with absolute values. Then, we can use JavaScript (or even just CSS) to update the position over the time. Therefore, effectively, the element will move around the HTML page and appears as being animated.
A better approach is to use HTML Canvas. You will find the following line in the index.html file (part of the starter package).
<canvas id="myCanvas" width="480" height="320"></canvas>
A <canvas> is an HTML element which can be used to draw graphics via scripting (usually JavaScript). It was first introduced in WebKit by Apple for the OS X Dashboard, <canvas> has since been implemented in browsers. Today, all major browsers support it.
We will be using the <canvas> at a rudimentary level. There is a lot that can be done with it. You will find a detailed tutorial and documentation for Canvas API on MDN wed docs.
Step 2
Let's draw on the canvas! Copy the following code to script.js and load the index.html file in your favorite browser (Chrome is recommended) to see the outcome.
const canvas = document.getElementById("myCanvas");
const ctx = canvas.getContext("2d");
ctx.beginPath();
ctx.rect(20, 40, 50, 50); // x, y, width, height
ctx.fillStyle = "#FF0000";
ctx.fill();
ctx.closePath();
The fist two lines gets hold of the <canvas> element and creates the ctx variable to store the 2D rendering context — the actual tool we can use to paint on the Canvas.
The instructions that followed draw a rectangle on canvas with the specified coordinates and fill color.
The canvas is a coordinate space where origin is the top left corner.
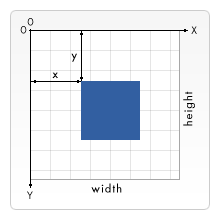
Step 3
Let's make animation! Add the following snippet to script.js file:
function draw() {
// drawing code
}
setInterval(draw, 10);
The setInterval is a function built into JavaScript. The code above calls the draw() function every 10 milliseconds (forever, or until we stop it).
Aside: requestAnimationFrame
An alternative approach to running the draw method is using the window.requestAnimationFrame. This methods tells the browser that you wish to perform an animation and requests that the browser call a specified function to update an animation before the next repaint. Here is how it will look like:
function draw() {
// drawing code
window.requestAnimationFrame(draw);
}
draw();
The requestAnimationFrame is a more common approach to work with canvas for animations and games. To learn more about it, please refer to MDN web docs tutorial on Animation Basics.
Add the following to the draw function:
ctx.beginPath();
ctx.rect(canvas.width / 2, canvas.height - 30, 10, 10);
ctx.fillStyle = "#0095DD";
ctx.fill();
ctx.closePath();
You won't notice the rectangles being repainted constantly at the moment, as they're not moving. We can make them move by changing their coordinates.
Let's refactor the code and introduce the following variables outside of the draw function:
let x = canvas.width / 2;
let y = canvas.height - 30;
const dx = 2;
const dy = -2;
Update the command to draw a rectangle inside the draw function:
ctx.rect(x, y, 10, 10);
Finally, update the values of x and y coordinates inside the draw function:
x += dx;
y += dy;
Save your code again and try it in your browser. This works ok, although it appears that the moving object is leaving a trail behind it:

The apparent trail is there because we're painting a new rectangle on every frame without removing the previous one. Put the following statement as the first line inside the draw` method to take care of this issue.
ctx.clearRect(0, 0, canvas.width, canvas.height);
To slow down the movement and better observe it, feel free to update the time interval (set it to 100 milliseconds for instance). Notice the moving object eventually exits the canvas! We will take care of this issue later.
Step 4
In Computer Graphics, Animation, and Game Development, there are two kinds of objects: blocks and sprites.
Sprite is a computer graphic which may be moved on-screen and otherwise manipulated as a single entity.
A block on the other hand does not move!
We will create an abstraction for each of these.
- Create a folder
modelin the root of your project. - Create a
Block.jsand aSprite.jsfile in themodelfolder.
We will start with the Block.js file. Add the following code to it:
class Block {
constructor(x, y, width, height, color) {
this.x = x;
this.y = y;
this.height = height;
this.width = width;
this.color = color;
}
draw(ctx) {
ctx.beginPath();
ctx.rect(this.x, this.y, this.width, this.height);
ctx.fillStyle = this.color;
ctx.fill();
ctx.closePath();
}
}
Block is a class 🎉 Notice the syntax:
- We use the
classkeyword to declare it. - There is a special function called
constructorwhich, not surprisingly, is the class constructor! - The attributes of the class are initialized in the constructor using the
thiskeyword. Unlike Java/C++, you don't declare fields. The syntax here is similar to Python's class definition. (Python classes are constructed through a special method called__init__()which uses theselfparameter-instead ofthis- to reference to the current instance of the class) - Methods are declared with the method declaration syntax (which was explored when we were talking about functions).
- There are no commas between method definitions.
Step 5
Let's use our Block class to create objects.
Open the script.js file and add the following import statement at the very top of the file.
import Block from "./model/Block.js";
For this import statement to work, we need provisions:
- Update the
Block.jsfile by appending the followingexportstatement to the end of it.export default Block; - The
scripttag inindex.htmlmust include atypeattribute as follows. This was already done for you in the starter code.<script type="module" src="script.js"></script>
In script.js file, remove the following code:
ctx.beginPath();
ctx.rect(20, 40, 50, 50); // x, y, width, height
ctx.fillStyle = "#FF0000";
ctx.fill();
ctx.closePath();
and instead place this statement
const redBlock = new Block(20, 40, 50, 50, "#FF0000");
Notice the use of new keyword to create an instance of the Block class. This must be familiar to you coming from Java/C++.
Inside the draw function, after "clearing the canvas", add the following statement:
redBlock.draw(ctx);
Save your code again and try it in your browser.
Step 6
Let's implement the Sprite class:
import Block from "./Block.js";
class Sprite extends Block {
constructor(x, y, width, height, color) {
super(x, y, width, height, color);
}
move(dx, dy) {
this.x += dx;
this.y += dy;
}
}
export default Sprite;
Notice the use of extends keyword to use Inheritance. Also take note of the use of the keyword super to invoke the constructor of the parent class.
The constructor of Sprite is not needed; if we eliminate it, the constructor of the parent class is inherited. This is different from e.g. Java where you must explicitly declare (non-default) constructors.
Step 7
Let's use our Sprite class to create objects.
Open the script.js file and add the following import statement at the very top of the file.
import Sprite from "./model/Sprite.js";
In script.js file, remove the following code:
let x = canvas.width / 2;
let y = canvas.height - 30;
const dx = 2;
const dy = -2;
and instead place this statement
const blueSprite = new Sprite(
canvas.width / 2,
canvas.height - 30,
10,
10,
"#0095DD"
);
Inside the draw function, remove the following statement:
ctx.beginPath();
ctx.rect(x, y, 10, 10);
ctx.fillStyle = "#0095DD";
ctx.fill();
ctx.closePath();
x += dx;
y += dy;
and instead place this statements:
blueSprite.draw(ctx);
blueSprite.move(2, -2);
Save your code again and try it in your browser.
Step 8
Let's make a Ball object that bounces off the edges of canvas!
Create a new file model/Ball.js with the following content:
import Sprite from "./Sprite.js";
class Ball extends Sprite {
constructor(x, y, width, height, color) {
super(x, y, width, height, color);
}
bounce(canvasWidth, canvasHeight) {
}
}
export default Ball;
Update the bouce method:
bounce(canvasWidth, canvasHeight) {
if (this.x < 0) {
// bounce off the left edge
} else if (this.x > canvasWidth) {
// bounce off the right edge
}
if (this.y < 0) {
// bounce off the top edge
} else if (this.y > canvasHeight) {
// bounce off the bottom edge
}
}
To bounce off the edges of the canvas, we need to change the speed vector of the object.
bounce(canvasWidth, canvasHeight) {
if (this.x < 0) {
// bounce off the left edge
this.dx *= -1; // switch direction
} else if (this.x > canvasWidth) {
// bounce off the right edge
this.dx *= -1;
}
if (this.y < 0) {
// bounce off the top edge
this.dy *= -1; // switch direction
} else if (this.y > canvasHeight) {
// bounce off the bottom edge
this.dy *= -1;
}
}
We need to store the speed of the ball and allow it to be changed. (I'm using the term speed in a loose sense.)
class Ball extends Sprite {
constructor(x, y, width, height, color) {
super(x, y, width, height, color);
this.dx = 0;
this.dy = 0;
}
updateSpeed(dx, dy) {
this.dx = dx;
this.dy = dy;
}
move(canvasWidth, canvasHeight) { /* overriding the move method */
super.move(this.dx, this.dy);
this.bounce(canvasWidth, canvasHeight);
}
// bounce method not shown to save space!
}
Open script.js and get rid off redBlock and blueSprite! Then, add a ball object:
import Ball from "./model/Ball.js";
const canvas = document.getElementById("myCanvas");
const ctx = canvas.getContext("2d");
const ball = new Ball(canvas.width / 2, canvas.height - 30, 10, 10, "#0095DD");
ball.updateSpeed(2, -2);
function draw() {
ctx.clearRect(0, 0, canvas.width, canvas.height);
ball.draw(ctx);
ball.move(canvas.width, canvas.height);
}
setInterval(draw, 10);
Save your code again and try it in your browser.
Step 9
Let's refactor tune Ball.bounce:
bounce(canvasWidth, canvasHeight) {
if (this.x < 0 || this.x > canvasWidth) {
// bounce off the left/right edges
this.dx *= -1; // switch direction
}
if (this.y < 0 || this.y > canvasHeight) {
// bounce off the top/bottom edge
this.dy *= -1; // switch direction
}
}
Notice when the ball hits each edge it sinks into it slightly before changing direction. This is because we're calculating the collision point of the edge and the top left corner of the ball (Sprite). So, let's refactor!
bounce(canvasWidth, canvasHeight) {
if (this.x < 0 || this.x + this.width > canvasWidth) {
// bounce off the left/right edges
this.dx *= -1; // switch direction
}
if (this.y < 0 || this.y + this.height > canvasHeight) {
// bounce off the top/bottom edge
this.dy *= -1; // switch direction
}
}
Save your code again and try it in your browser.
Step 10
Let's build a paddle so we can hit the ball with! First, however, we'll make it so we can move it around with the arrow- keys on the keyboard.
Create a file model/Paddle.js which the following content:
import Sprite from "./Sprite.js";
class Paddle extends Sprite {
constructor(x, y, width, height, color) {
super(x, y, width, height, color);
this.dx = 0;
document.addEventListener("keydown", this.keyDownHandler.bind(this));
document.addEventListener("keyup", this.keyUpHandler.bind(this));
}
keyDownHandler(e) {
if (e.key === "Right" || e.key === "ArrowRight") {
this.dx = 7;
} else if (e.key === "Left" || e.key === "ArrowLeft") {
this.dx = -7;
}
}
keyUpHandler(e) {
if (e.key === "Right" || e.key === "ArrowRight") {
this.dx = 0;
} else if (e.key === "Left" || e.key === "ArrowLeft") {
this.dx = 0;
}
}
move() { /* overriding the move method */
super.move(this.dx, 0);
}
}
export default Paddle;
Note how I used event listeners to move the paddle around when a user presses the left/right arrow keys.
Update the script.js:
- Import
Paddle.jsimport Paddle from "./model/Paddle.js"; - Create a Paddle
const paddle = new Paddle( (canvas.width - 10) / 2, canvas.height - 10, 75, 10, "#0095DD" ); - Draw and move it in the
drawmethod:paddle.draw(ctx); paddle.move();
Save your code again and try it in your browser.
Exercise: remove bind(this) inside addEventListener statements. Save your code again and try it in your browser. What happens and why?
Solution
The methods keyDownHandler and keyUpHandler make use of the this keyword to update the properties of Paddle. However, when they are called by addEventListener, their execution context is not the Paddle object anymore (it is the execution context of addEventListener). We need to explicitly bind their this keyword to the Paddle object when we pass them as argument to addEventListener.
This point is much harder to figure out on your own, had I not told you about it 😜.
Step 11
We must update the Paddle so it does not run off the sides of the canvas.
Add the following method to Paddle.js
handleBoundary(canvasWidth) {
if (this.x < 0) {
this.x = 0;
} else if (this.x + this.width > canvasWidth) {
this.x = canvasWidth - this.width;
}
}
Update Paddle.move
move(canvasWidth) {
super.move(this.dx, 0);
this.handleBoundary(canvasWidth);
}
Update script.js where it calls paddle.move()
paddle.move(canvas.width);
Save your code again and try it in your browser.
Step 12
Let's implement a kind of collision detection between the ball and the paddle, so it can bounce off it and get back into the play area.
Collision detection is a very common task for game development. We will likely need this between other objects in the game. So, let's implement it at a higher level of abstraction. Add the following method to the Block.js.
// assume other has {x, y, width, height}
intersects(other) {
let tw = this.width;
let th = this.height;
let rw = other.width;
let rh = other.height;
if (rw <= 0 || rh <= 0 || tw <= 0 || th <= 0) {
return false;
}
let tx = this.x;
let ty = this.y;
let rx = other.x;
let ry = other.y;
rw += rx;
rh += ry;
tw += tx;
th += ty;
// overflow || intersect
return (
(rw < rx || rw > tx) &&
(rh < ry || rh > ty) &&
(tw < tx || tw > rx) &&
(th < ty || th > ry)
);
}
The method above detects if two rectangles intersect. This is a common strategy to collision detection (there are other strategies, see e.g. Collision Detection in Javascript or Collision Detection and Physics).
Now add the following method to Ball.js
colides(paddle) {
if (this.intersects(paddle)) {
this.dy *= -1; // switch direction
}
}
Finally, update the script.js file by adding this line to the draw method:
ball.colides(paddle);
Save your code again and try it in your browser. You may not notice the ball is bouncing off the paddle as it also bounces off the bottom edge of the canvas. We are going to change that behavior in the next step though.
Step 13
Let's try to implement "game over" in our game.
We will adjust the behavior of the ball so it bounces off the three sides of the canvas but not the bottom edge. When the ball hits the bottom edge, we will end the game!
Open the Ball.js file and add this declaration before the class declaration:
const gameOver = new CustomEvent("gameover");
Update the Ball.bounce method to dispatch the gameOver event when the ball hits the bottom side of the canvas:
bounce(canvasWidth, canvasHeight) {
if (this.x < 0 || this.x + this.width > canvasWidth) {
// bounce off the left/right edges
this.dx *= -1; // switch direction
}
if (this.y < 0) {
// bounce off the top edge
this.dy *= -1; // switch direction
} else if (this.y + this.height > canvasHeight) {
// dispatch Game Over signal!
document.dispatchEvent(gameOver);
}
}
Open script.js and add an event listener for the custom "game over" event we have created earlier!
document.addEventListener("gameover", (e) => {
window.alert("Game Over!");
});
We can also stop the animation by clearing the setInterval function. For that, you need to store the interval ID retuned by the setInterval function first:
const interval = setInterval(draw, 10);
Then update the event listener for gameover:
document.addEventListener("gameover", (_e) => {
clearInterval(interval);
window.alert("Game Over!");
});
Save your code again and try it in your browser.
Step 14
The final piece for this game is to add several layers of bricks. When the ball hits the bricks, it breaks them. The game is about breaking all the bricks without letting the ball drop on the ground (hit the bottom of the canvas)!
Create a new file model/Brick.js with the following content:
import Block from "./Block.js";
class Brick extends Block {
constructor(x, y, width, height, color) {
super(x, y, width, height, color);
this.visible = true;
}
draw(ctx) {
if (this.visible) {
super.draw(ctx);
}
}
colides(ball) {
if (this.visible && this.intersects(ball)) {
this.visible = false;
ball.colides(this); // causes the ball to bounce off
}
}
}
export default Brick;
Note how I have used a boolean flag (this.visible) to make a brick disappear when it is collided with a ball.
In the next step, we will add several bricks to the canvas.
Step 15
Add the following to the script.js somewhere before the draw function.
const brickRowCount = 3;
const brickColumnCount = 5;
const bricks = [];
const brickWidth = 75;
const brickHeight = 20;
const brickPadding = 10;
const brickOffsetTop = 30;
const brickOffsetLeft = 30;
for (let c = 0; c < brickColumnCount; c++) {
for (let r = 0; r < brickRowCount; r++) {
let brickX = c * (brickWidth + brickPadding) + brickOffsetLeft;
let brickY = r * (brickHeight + brickPadding) + brickOffsetTop;
bricks.push(new Brick(brickX, brickY, brickWidth, brickHeight, "#0095DD"));
}
}
Don't forget to import the Brick class:
import Brick from "./model/Brick.js";
Finally, add the following to the draw function:
bricks.forEach((brick) => {
brick.draw(ctx);
brick.colides(ball);
});
Save your code again and try it in your browser.
Step 16
We are technically done with this game. Let's count score and display it.
Open script.js and declare a score variable outside of the draw function:
let score = 0;
Add the following three lines somewhere inside the draw function to display the score:
ctx.font = "16px Arial";
ctx.fillStyle = "#0095DD";
ctx.fillText("Score: " + score, 8, 20);
Finally, we must increment the score when a brick is hit. Update the Brick.colide method to return a boolean!
colides(ball) {
if (this.visible && this.intersects(ball)) {
this.visible = false;
ball.colides(this); // causes the ball to bounce off
return true;
}
return false;
}
Now update the draw method where the brick.collide is called:
bricks.forEach((brick) => {
brick.draw(ctx);
score += brick.colides(ball);
});
Save your code again and try it in your browser.
Step 17
You can add some final touches to this game. For instance, you can randomize the initial position of the ball and its movement direction. You can keep score and when all bricks are broken, show a message indicating user won the game. You can add difficulty levels by e.g. arranging bricks in a more sparse fashion, etc. I will leave that to you!
Here is the complete application: GitHub.
Classes
Classes are the primary construct which we organize our code in Object-Oriented Programming (OOP) languages. In this module we will overview how classes work in JavaScript.
JavaScript introduced the class keyword in 2015 with the release of ES6. Class syntax unifies constructor function and prototype methods.
We will focus on the modern JavaScript and ignore its traditional ways of mimicking OOP. An interested reader may refer to the following resources for more information:
- A Guide to Object-Oriented Programming in JavaScript
- Object Oriented Programming in JavaScript – Explained with Examples
- A Beginner's Guide to JavaScript's Prototype
Class Syntax
We use the class construct to define a type and create encapsulation.
class Note {
constructor(content) {
this.text = content;
}
print() {
console.log(this.text);
}
}
- A class is declared using the
classkeyword. - By convention, the class name is capitalized.
- A class has a special constructor method that is named
constructor. - Think of the
constructorthe same way you thought of them in Java/C++. That is, use them to initialize the state (attributes) of your objects. - Unlike Java/C++, in JavaScript, a class can only have one constructor.
- Methods can be declared using a syntax that resembles methods in Java/C++.
- Inside a class declaration, there are no commas between method definitions.
- Aside: Classes are not hoisted.
A class encapsulates state (data) and behavior (operations). In the example of Page, the data is a string of text stored in a this.text member property. The behavior is print(), a method that dumps the text to the console.
Instantiate Classes
Here is the Note class again:
class Note { constructor(content) { this.text = content; } print() { console.log(this.text); } } const myNote = new Note("This is my first note!"); console.log(typeof Note); console.log(typeof myNote); console.log(myNote instanceof Note); console.log(myNote);
Notice the typeof Note specifies that Note is a function! JavaScript's class is a syntactic sugar; under the hood it is a well crafted function that generates objects for us. To create objects that you can use in the program, a class must be instantiated (with the new keyword) one or more times.
Accessing properties, Invoking behaviors
Here is the Note class again:
class Note { constructor(content) { this.text = content; } print() { console.log(this.text); } } const myNote = new Note("This is my first note!"); console.log(myNote.text); // myNote["text"] works too! myNote.print();
You must use the (familiar) dot notation to access a property or invoke a method on an object instantiated off a class.
The this keyword
You must use the keyword this inside a class to define/access properties (except for defining methods).
class Publication { setTitle(title) { this.title = title; } setAuthor(author) { this.author = author; } getTitle() { return this.title; } getAuthor() { return this.author; } print() { console.log(this.getTitle() + " by " + this.getAuthor()); } } const publication = new Publication(); publication.setTitle("CS280 Notes"); publication.setAuthor("Ali Madooei"); publication.print();
Unlike Java/C++, you don't declare fields. And, you are not bounded to declare the attributes inside the constructor. However, for improved readability, I suggest that you always initialize your class attribute inside the constructor.
The JavaScript
classsyntax is more similar to php/python's class definition. (Python classes, for instance, are constructed through a special method called__init__()which uses theselfparameter-instead ofthis- to reference to the current instance of the class)
The this keyword, again!
Be careful when you use this in nested functions!
class MyClass { constructor() { this.value = 10; } myMethod1() { return function () { console.log(this); }; } myMethod2() { return () => { console.log(this); }; } } const obj = new MyClass(); obj.myMethod1()(); obj.myMethod2()();
Information Hiding
Let's reiterate that, at the time of writing, JavaScript class syntax does not allow for declaring fields. It is, however, being proposed to do it using a syntax like this:
class Account {
balance = 0;
deposit(amount) {
this.balance += amount
}
}
Transpilers
There are applications (called transpiler), like Babel that allow you write your source code using proposed sysntaxes (such as the one above). You can then transpile your source code to the standard JavaScript. When we use React to build front-end application, it comes packed in with one of these transpilers.
There is no notion of visibility modifier in JavaScript class syntax. You cannot make a property (attribute/method) private. There are, however, ways to mimic this behavior which typically involves clever use of scopes such as closures.
class Account { constructor(balance){ this.getBalance = function() { return balance } this.deposit = function (amount) { balance += amount } } } const checking = new Account(100); checking.deposit(20); console.log(checking.getBalance()); console.log(checking.balance);
There is also a proposal to declare private fields in (future) JavaScript as follows:
class BankAccount {
#balance = 0;
deposit(amount) {
this.#balance += amount
}
}
You may find some programmers employ a convention similar to that in Python which "signals" a property is private by prefixing its name with an underscore.
class BankAccount {
constructor(balance){
this._balance = balance;
}
deposit(amount) {
this._balance += amount
}
}
This doesn't protect the property in any way; it merely signals to the outside: "You don't need to know about this property."
Setters & Getters
JavaScript has a special syntax for making getter methods
class Person { constructor(first, last) { this.first = first; this.last = last; } get fullName() { return `${this.first} ${this.last}`; } } const teacher = new Person('Ali', 'Madooei'); console.log(teacher.fullName);
- A getter method is a method with no parameters, declared with keyword
get. - It can also be used in object literal.
- Call getters without parentheses!
- Think of a getter as a dynamically computed property.
Likewise, there is a special syntax for setter methods.
class Person { get fullName() { return `${this.first} ${this.last}`; } set fullName(value) { const parts = value.split(" "); this.first = parts[0]; this.last = parts[1]; } } const teacher = new Person(); teacher.fullname = "Ali Madooei"; console.log(teacher.fullname);
- A setter method is a method with one parameter, declared with keyword
set. - It can also be used in object literal.
- Setters are invoked through assignment to property.
Getters/setters look like fields, act like methods.
I don't see a great value in having a special setter and getter methods. In particular since properties can not be made private, it seems redundant to use setters/getters.
Static Fields and Methods
It is possible to create static fields and methods in JavaScript classes.
class Math { static PI = 3.14; static max(...args) { let max = Number.MIN_SAFE_INTEGER; args.forEach( arg => max = max < arg ? arg : max ); return max; } } console.log(Math.PI); console.log(Math.max(3, 0, 5));
Static fields/method in JavaScript, like in Java/C++, are class members and not instance members. So, you access/invoke them using the class name (not the instantiated object).
A class is technically a function! A function is technically an object, so a class is an object!! You can add value/function properties outside of class definition. Those will be added as static members.
class Person { constructor(name) { this.name = name; } } Person.genus = "homosapien"; const person = new Person("Ali"); console.log(person); console.log(Person.genus)
Inheritance
JavaScript now supports inheritance with a syntax that is very similar to that in Java/C++.
class Student { constructor(name, email) { this.name = name; this.email = email; } } class GradStudent extends Student { constructor(name, email, advisor) { super(name, email); this.advisor = advisor; } } const john = new Student ("John Doe", "john@email.com"); const jane = new GradStudent ("Jane Doe", "jane@email.com", "Prof. Smith"); console.log(john instanceof Student); console.log(jane instanceof Student); console.log(john instanceof GradStudent); console.log(jane instanceof GradStudent); console.log(john); console.log(jane);
- Notice the use of
extendskeyword to declareGradStudentis a subclass ofStudent. - Also note the use of the keyword
superto invoke the constructor of the parent class. - The
super(..)delegates to the parent class’s constructor for its initialization work. - Unlike in Java/C++, constructors are also inherited in JavaScript. You don't need to explicitly define one if all it does is a
super(..)call to the parent constructor.
Inheritance is a powerful tool for creating type hierarchies and reusing code (sharing between parent and subclasses).
Polymorphism
You can override an inherited method which opens the door to polymorphism.
class CourseAssistant { getBaseSalary() { return 500.0; //dollars } getHourlyPayRate() { return 15.0; // dollars } } class ExperiencedCourseAssistant extends CourseAssistant { /* overrides */ getHourlyPayRate() { return 1.1 * super.getHourlyPayRate(); } } function calcPayment(courseAssistant, hoursWorked) { let wages = courseAssistant.getBaseSalary() + hoursWorked * courseAssistant.getHourlyPayRate(); /* dynamic dispatch */ console.log(wages); } const tom = new CourseAssistant(); const mona = new ExperiencedCourseAssistant(); calcPayment(tom, 10); calcPayment(mona, 10);
In the example above, getHourlyPayRate() is dispatched based on the actual "type" of the courseAssistant argument. It will decide on dispatching the overloaded getHourlyPayRate() during runtime which is a (dynamic) polymorphic behavior.
Method overriding in JavaScript simply means that you can have methods with the same name in parent and subclasses.
Aside: JavaScript does not method overloading since the number of arguments to a method can be fewer/more than declared parameters.
Class Expression
You can use class declaration in an expression!
const Student = class Person { constructor(name) { this.name = name; } } const tom = new Student("Tom"); console.log(typeof Student); console.log(tom instanceof Student); console.log(tom);
You will not be able to use Person as a class (constructor function). You must use Student, instead. In fact, in a class expression, the class name can be omitted to create anonymous class.
const Student = class { constructor(name) { this.name = name; } } const tom = new Student("Tom"); console.log(typeof Student); console.log(tom instanceof Student); console.log(tom);
Class Search using the SIS API
In this module, we will build a simplified version of John's Hopkins Class Search web application which makes use of the SIS API.
In order to follow along, you need to:
- Go to https://sis.jhu.edu/api and register your email to obtain an API Access Key. Scroll to the bottom of the page to find the registration form.
- Download and install Postman.
- Install Chrome's Allow-Control-Allow-Origin plugin.
You can access the completed application at https://github.com/cs280fall20/course-search-sis-api.
Step 1
We'll start by creating an empty HTML project; create index.html, style.css, and script.js files.
Add the following to the index.html file:
<!DOCTYPE html>
<html lang="en">
<head>
<meta charset="UTF-8" />
<meta name="viewport" content="width=device-width, initial-scale=1.0" />
<title>SIS API Search</title>
<link rel="stylesheet" href="style.css" />
</head>
<body>
<script src="script.js"></script>
</body>
</html>
We'll add minimal styling to style.css:
body {
margin: 2em;
text-align: center;
line-height: 1.5;
font-size: 1.1em;
}
Step 2
Let's update the index.html with elements to allow a user:
- select a school
- select a term
- enter a course name
- search courses offered by the school for the selected term that match the provided course name.
<label for="schools">Choose a school:</label>
<select name="schools" id="schools">
<option value="all">All</option>
</select>
<br />
<label for="terms">Choose a term:</label>
<select name="terms" id="terms">
<option value="all">All</option>
</select>
<br />
<label for="query">Course name:</label>
<textarea id="query" name="query" rows="1" cols="20"></textarea>
<br />
<button id="searchBtn">Search</button>
<br />
<br />
<div class="result"></div>
Your web page should look like this now:
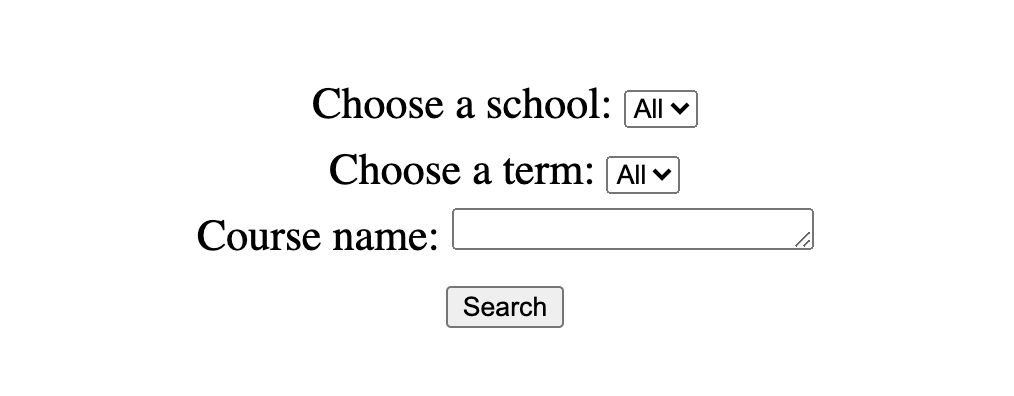
We will use the SIS API to populate the options for "school" and "term". We will use the SIS API again to search for a course, given a user's selections/entry for "course name".
Step 3
Before working with the SIS API, let's put in place the mechanics of working with SIS data.
It is often the case that software APIs document their data objects among other things so you can plan on consuming their data before connecting to the API.
Add the following objects to script.js
// sample schools
schools = [
{
Name: "School of Medicine",
},
{
Name: "Whiting School of Engineering",
},
];
// sample terms
terms = [
{
Name: "Fall 2020",
},
{
Name: "Summer 2020",
},
{
Name: "Spring 2020",
},
];
// sample courses
// (SIS returns provides several other properties for a course)
courses = [
{
OfferingName: "EN.601.226",
SectionName: "01",
Title: "Data Structures",
Instructors: "A. Madooei",
},
{
OfferingName: "EN.601.226",
SectionName: "02",
Title: "Data Structures",
Instructors: "A. Madooei",
},
{
OfferingName: "EN.601.280",
SectionName: "01",
Title: "Full-Stack JavaScript",
Instructors: "A. Madooei",
},
{
OfferingName: "EN.601.280",
SectionName: "02",
Title: "Full-Stack JavaScript",
Instructors: "A. Madooei",
},
];
The sample data more or less resembles the data returned by the SIS API. I know that because I worked with the API but the data attributes for a course object for instance is (somewhat) documented here https://sis.jhu.edu/api too.
Step 4
Let's populate the corresponding drop-down selectors with "schools" and "terms" data.
Add the following to script.js
function populateSelector(selectElmId, data) {
const select = document.getElementById(selectElmId);
select.innerHTML = "";
let item = null;
for (let i = 0; i < data.length; i++) {
item = document.createElement("option");
item.value = data[i]["Name"];
item.innerText = data[i]["Name"];
select.appendChild(item);
}
}
populateSelector("schools", schools);
populateSelector("terms", terms);
The populateSelector function gets a corresponding selector element (given using it id attribute) and populates its options based on the given data object. Note how for each "option" element, I've set both the value attribute and their inner text to the data Name property.
Save your files and check the webpage in your favorite browser. The drop down elements corresponding to "Choose a school" and "Choose a term" must now have the schools and terms data.
Step 5
Let's put in place the process for conducting a search.
Add the following to script.js
function search() {
const query = document.getElementById("query").value.trim();
const school = document.getElementById("schools").value;
const term = document.getElementById("terms").value;
console.log(`search for ${query} in the ${school} during ${term}`);
}
document.getElementById("searchBtn").addEventListener("click", search);
The search function gets the data it needs (namely the selected "school", "term", and search query) and as of now it simply prints them out to the console. We will later update this function to send a request to SIS API and return its response.
Notice the search function is called when the search button is clicked.
Step 6
Let's put in place a process to display search results. For now, since the search function is not really performing a search, we will simply display the entire courses data object.
Add the following function to script.js
function showSearchResults(data) {
const resultDiv = document.querySelector(".result");
resultDiv.innerHTML = "";
const list = document.createElement("ul");
for (let i = 0; i < data.length; i++) {
const item = document.createElement("li");
item.innerText = `${data[i]["OfferingName"]} (${data[i]["SectionName"]}) ${data[i]["Title"]}`;
list.append(item);
}
resultDiv.append(list);
}
Let's have the search method call showSearchResults:
function search() {
const query = document.getElementById("query").value.trim();
const school = document.getElementById("schools").value;
const term = document.getElementById("terms").value;
console.log(`search for ${query} in the ${school} during ${term}`);
+ showSearchResults(courses);
}
As you run the application and perform a search, the UI should look like this:
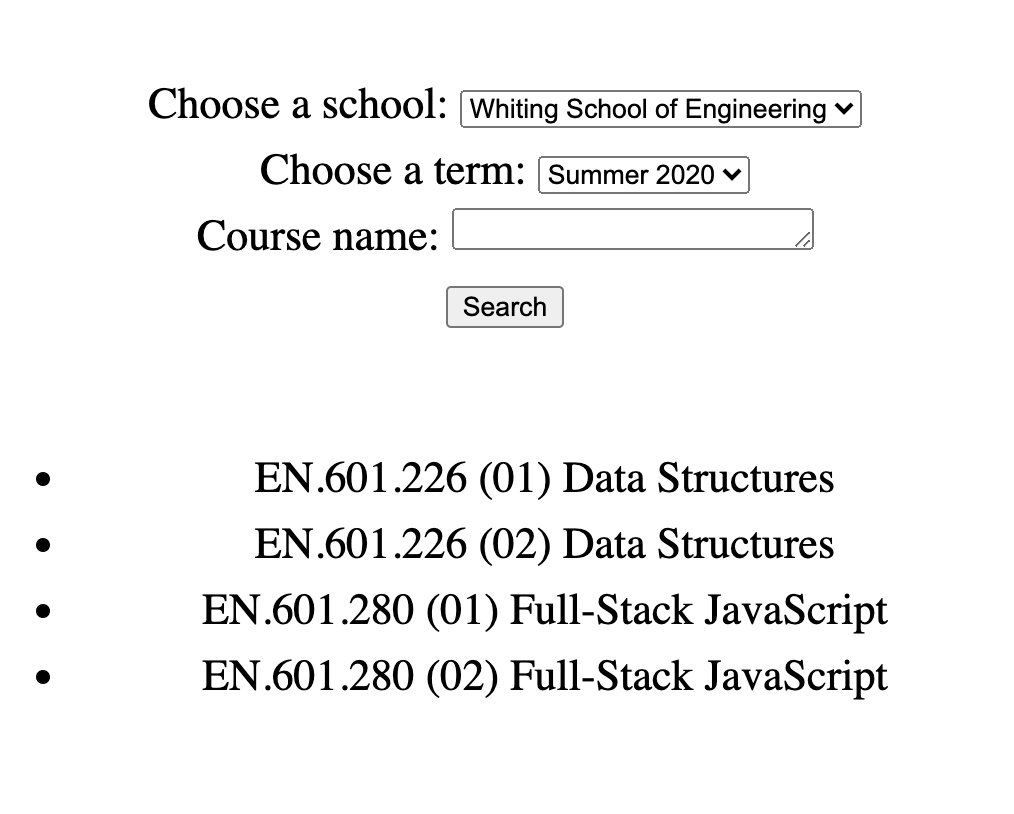
Step 7
We've got all the bits and pieces in place with the exception of the main ingredient: connecting to and using the SIS API. There is, additionally, an issue with the presentation of the app: it looks like the Internet in its early years!
It will not be difficult to make the app visually more appealing. I, however, want to take this as an opportunity to tell you about CSS libraries. There are several libraries out there which you can use, for free, by including a few fils to your project. These libraries will make it easy for you to design slick and professional looking applications.
Here are some of the popular CSS libraries:
- bootstrap
- Semantic-UI
- material-ui
- bulma
- pure
- Flat-UI
- and many more!
I will use a library called bootswatch which is based off bootstrap. There are several ready made themes; you can select one that you like and download the CSS file for it.
I downloaded the CSS file for the Litera theme: bootstrap.css and added the file to the project directory.
You must now update the link to the CSS file from inside the index.html:
- <link rel="stylesheet" href="style.css" />
+ <link rel="stylesheet" href="bootstrap.css" />
To have the styling attributes affect the html elements, we must assign class attributes corresponding to the CSS selectors to our elements. One approach to figure out what class attributes can be used is to inspect the "preview" page for the Litera theme. For example, I learned by inspecting, that I must add the following class attribute to the search button to make it look slick!
- <button id="searchBtn">Search</button>
+ <button class="btn btn-primary" id="searchBtn">Search</button>
Step 8
After careful inspection of the "preview" page for the Litera theme, I've updated the index.html file:
<!DOCTYPE html>
<html lang="en">
<head>
<meta charset="UTF-8" />
<meta name="viewport" content="width=device-width, initial-scale=1.0" />
<title>SIS API Search</title>
<link rel="stylesheet" href="bootstrap.css" />
</head>
<body>
<div class="container">
<h2>Search JHU SIS API</h2>
<br />
<label for="schools">Choose a school:</label>
<select class="form-control" name="schools" id="schools">
<option value="all">All</option>
</select>
<br />
<label for="terms">Choose a term:</label>
<select class="form-control" name="terms" id="terms">
<option value="all">All</option>
</select>
<br />
<label for="query">Course name or id:</label>
<textarea
class="form-control"
id="query"
name="query"
rows="1"
cols="50"
></textarea>
<br />
<button class="btn btn-primary" id="searchBtn">Search</button>
<br />
<br />
<div class="result"></div>
</div>
<script src="script.js"></script>
</body>
</html>
Notice how the entire content in wrapped inside a <div class="container"></div> element.
Moreover, when we show the search results, we must add the css selectors as class attributes to the generated html elements, so update the showSearchResults:
function showSearchResults(data) {
const resultDiv = document.querySelector(".result");
resultDiv.innerHTML = "";
const list = document.createElement("ul");
+ list.className = "list-group";
for (let i = 0; i < data.length; i++) {
const item = document.createElement("li");
+ item.className = "list-group-item";
item.innerText = `${data[i]["OfferingName"]} (${data[i]["SectionName"]}) ${data[i]["Title"]}`;
list.append(item);
}
resultDiv.append(list);
}
Here is what the outcome should look like:
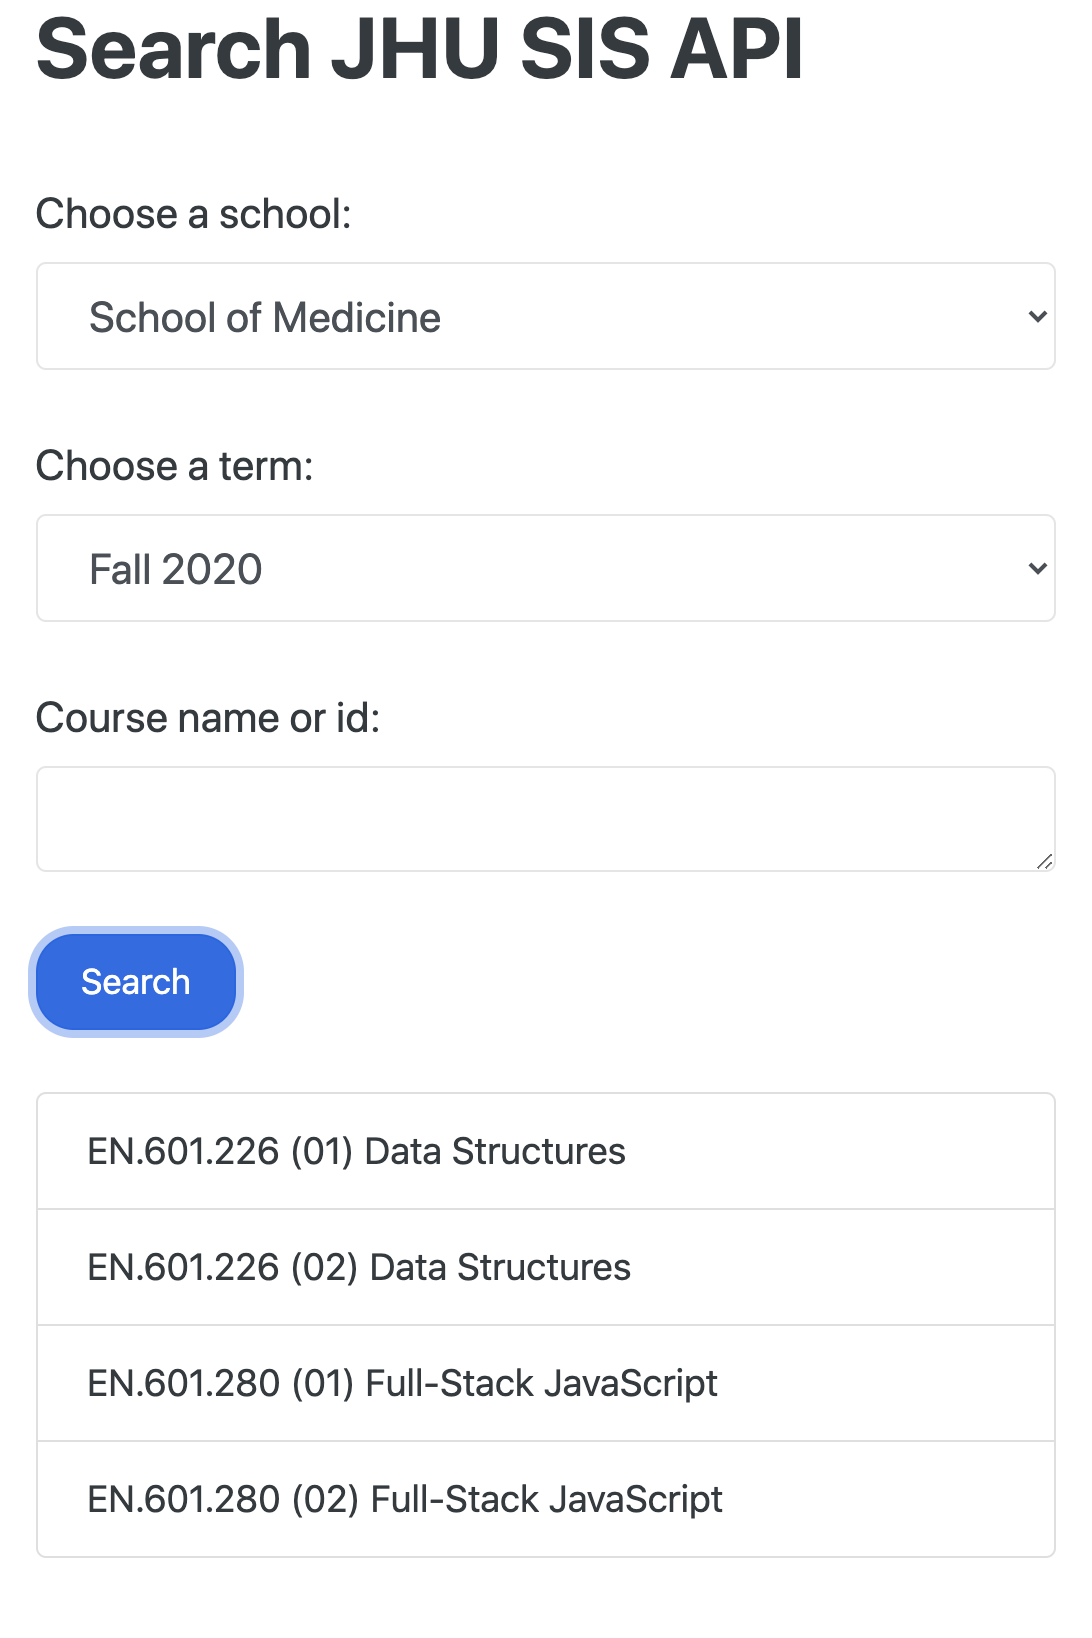
API
It's time to work with the SIS API but first, we must talk about what we mean by "API".
An application programming interface (API) generally refers to a software intermediary that allows two applications to talk to each other.
We are using the term API in the context of a client-server software architecture.
Client-Server Application
A client-server is a popular software design architecture which, at an abstract level, breaks down a software into two parts: client-side and server-side.

-
The client-side (or simply, client) is the application that runs on the end-user computer; it provides a user-interface (UI) that handles what the application feels and looks like and how it interacts with end-user. It may employ and consume resources on the user's machine (computing device) such as temporary and local storage, etc.
-
The server-side (or simply, server) is the application that receives requests from the clients, and contains the logic to send the appropriate data back to the client. Instead of user-interface, the server usually has an application programming interface (API). Moreover, the server often includes a database, which will persistently store all of the data for the application.
As long as your software application adheres to the client-server architecture (i.e. a client can send and receive data to an API on a server) you are free to build whatever user interface you want on whatever platform you want. This is advantageous as modern software application are expected to be available across multiple platforms and provide a consistent experience across devices.

Let’s make all of this a bit more concrete, by following an example of the main steps that happen when you access your grades on JHU's Student Information System (SIS).
SIS
Student Information System (SIS) is Johns Hopkins University's web-based system of record for student records and registration, billing, and course data.
We will use SIS as an example of a client-server application.
An example of Client-Server Application
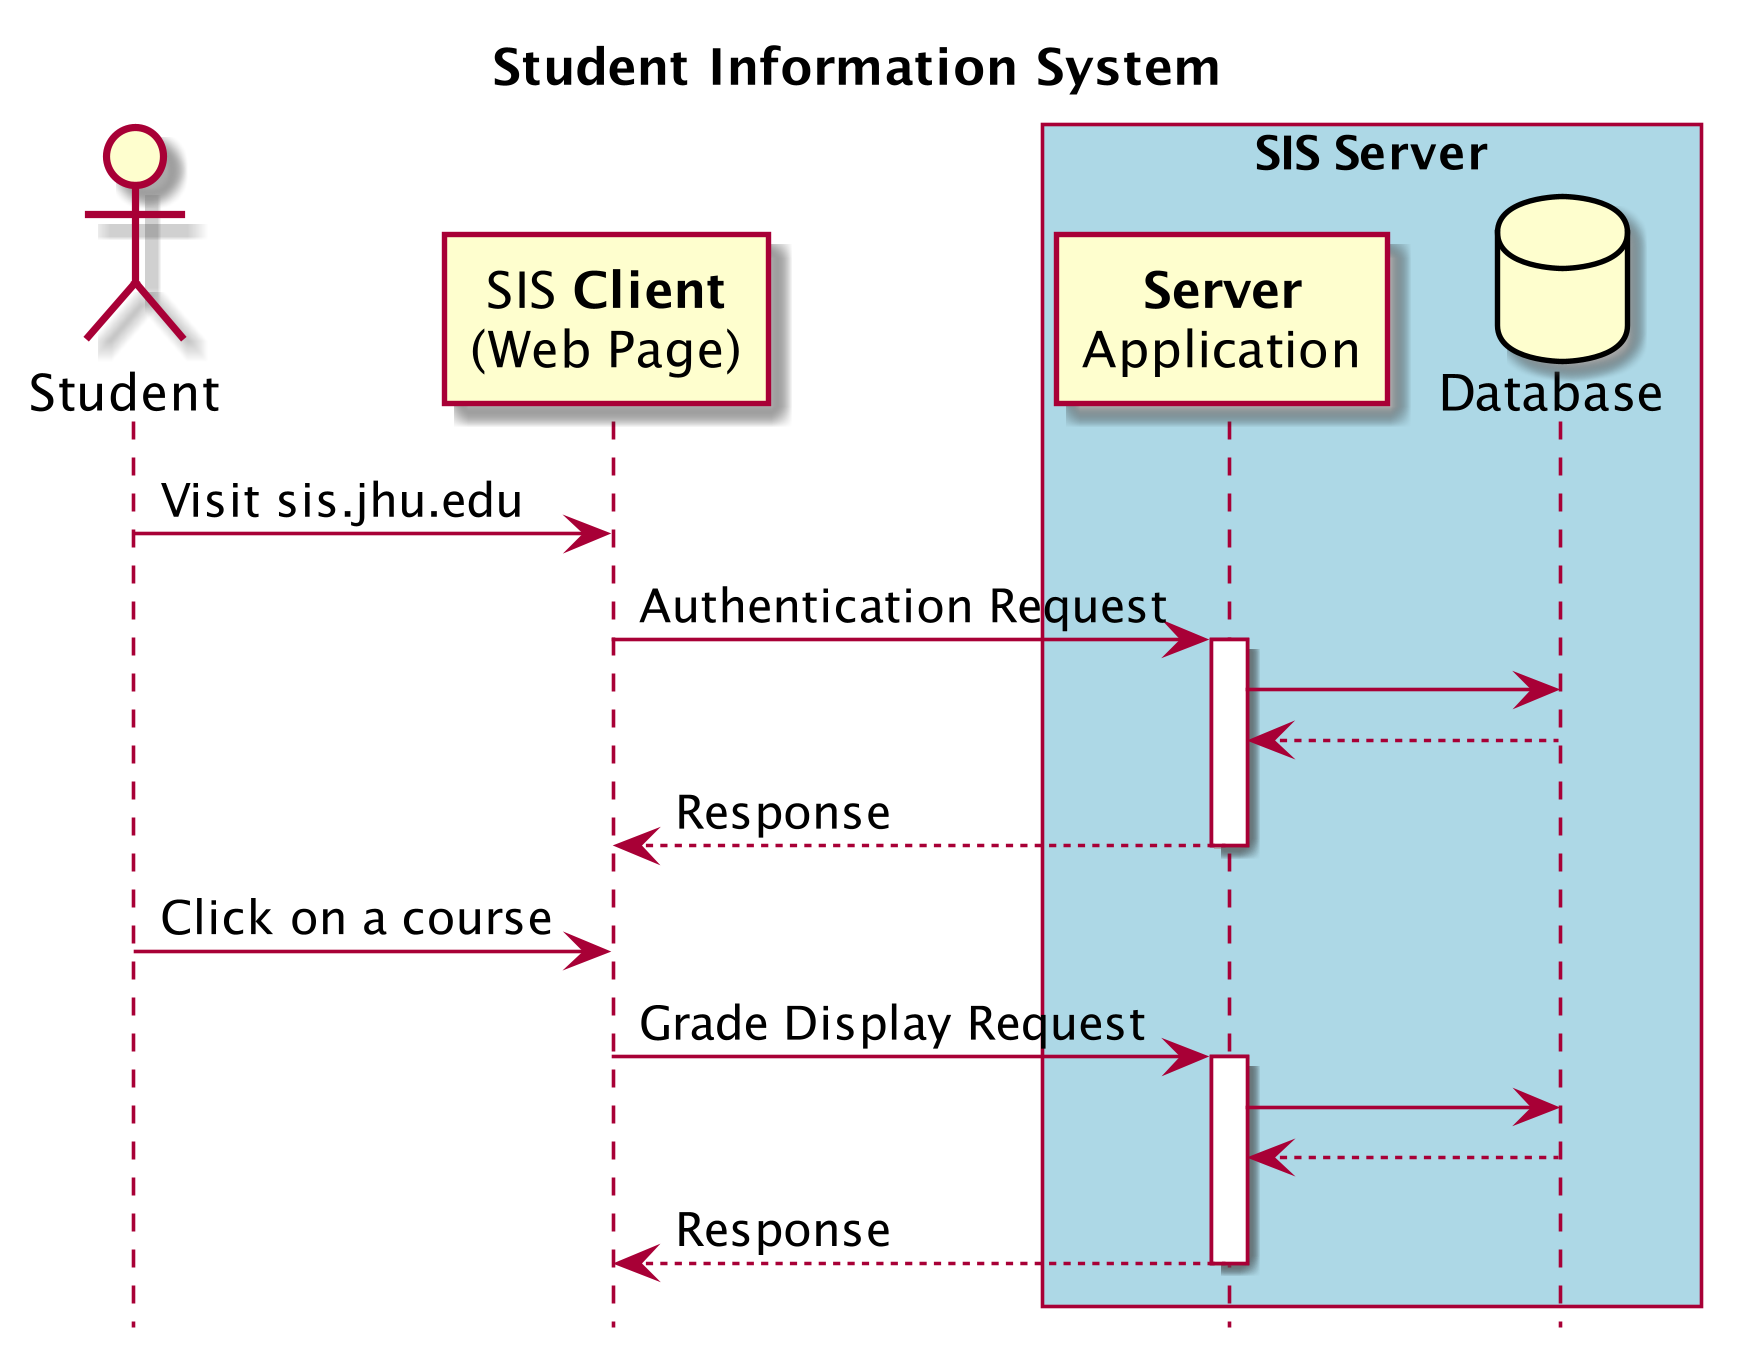
-
You visit sis.jhu.edu using an internet browser like Chrome on any device that provides internet browsing.
-
Following your visit, a web-page will be displayed in your browser. This web-page is the user-interface of SIS and it constitutes the "client" side of the SIS application. The client application allows you to interact with the SIS server (which, for the intent of this example, may be a physical computer at one of JHU's campuses).
-
On the client-side, you enter your username and password to log into SIS. At this stage, the client application (web-page where you put your username and password) will send (an authentication) request to the (SIS) server.
-
Your (authentication) request travels across the internet to the SIS server. The server, which is actively listening for requests from all users, receives your request and triggers a response.
-
The response process on the server makes a database query to check your login credentials. This database may contain other information about you such as your grades. The database query is executed, and the database sends the requested data back to the server.
-
The server receives the data that it needs from the database, and it is now ready to construct and send its response back to the client (you). In this case, the response would be the privilege to access SIS (assuming your login credential were accredited).
-
The response travels across the internet, back to your computer. Your browser receives the response and uses that information to create and render the view that you ultimately see after successfully logging in.
HTTP
Communication between Client and Server: As long as each side knows what format of messages to send to the other, they can communicate with one another. The messages send in between are generally categorized into request and response messages. And, the most common protocol for communication is HTTP.
What is HTTP?
HTTP stands for Hypertext Transfer Protocol and is used to structure requests and responses over the Internet.
There are 4 basic HTTP verbs (operation) we use in requests to interact with server:
- GET — retrieve a specific resource (by id) or a collection of resources
- POST — create a new resource
- PUT — update a specific resource (by id)
- DELETE — remove a specific resource by id
A HTTP request, in addition to an HTTP verb, typically consists of:
- a header, which allows the client to pass along information about the request
- a path to a resource
- an optional message body containing data
What is API Endpoint?
HTTP requires data to be transferred from one point to another over the network. An API endpoint is the point of entry in a communication channel when client and server interacting.
SIS API
Part of SIS is made available as a public API.
The public API is primarily a self-service course search API. It returns, in JSON Format, a list of courses available through the Public Course Search https://sis.jhu.edu/classes.
The SIS API provides several endpoints and it can be used to filter courses based on school name, academic term, section number, etc. It can further be given a custom query using a set of query string parameters to search for courses.
The API documentation is available at https://sis.jhu.edu/api.
We will be using the following endpoints:
- To get a list of all available schools
https://sis.jhu.edu/api/classes/codes/schools?key=apikeyvalue - To get a list of available academic terms
https://sis.jhu.edu/api/classes/codes/terms?key=apikeyvalue - Advanced Search
https://sis.jhu.edu/api/classes?key=apikeyvalue&School=schoolvalue&Term=termvalue&CourseTitle=titlevalue`,
The apikeyvalue is an access key which you will obtain after registeration.
Access API Key
Only registered users are permitted to access Course Search API. The registration form is available at https://sis.jhu.edu/api. To register you must provide a valid email address.

Once you have registered, you will receive an email with the API Key. The Key is a string of characters like this one: (The one here is a fake one!)
pJnMRxKD1fFECXFRX1FDXykpLww0Lazk
SIS API & CORS Policy
The browser blocks our access to the SIS API due to CORS policy.
This is an issue on SIS API's side. They must update their responses to include Access-Control-Allow-Origin: * in their HTTP header to allow requests from all domains.
To get around this issue, we must tell the browser to not pick on it!
Install Chrome's Allow-Control-Allow-Origin plugin
Once installed, click it in your browser to activate the extension. Make sure the icon's label goes from "off" to "on".
Make sure to turn it off after you are done with this tutorial.
Resources:
- MDN web docs article on Cross-Origin Resource Sharing (CORS)
- 3 Ways to Fix the CORS Error — and How the Access-Control-Allow-Origin Header Works
- Hacking It Out: When CORS won't let you be great
Postman
Postman is an API Development Environment (ADE). It was originally design to facilitate performing HTTP requests. Since then it has matured into an industry standard for designing, documenting, testing, and interacting with APIs.
Download and install Postman.
We will demo the use of Postman in class but we cannot cover much due to our limited time. Please visit the Postman Learning Center, in particular, the section about sending API requests, for more information and guidelines.
Another good tutorial to get you up and running with Postman is guru99's postman-tutorial.
Fetch
The Fetch API provides a JavaScript interface for making HTTP request. In its simplest form, its syntax looks like this
fetch('/some/api/endpoint/')
.then(response => response.json())
.then(data => console.log(data))
Calling fetch() returns a promise. We can then wait for the promise to resolve. Once resolved, the response will be available with the then() method of the promise.
Using
fetch()is an example of retrieving resources asynchronously across the network.
We will explore JavaScript's asynchronous behaviour in the next module.
Resources:
- MDN web docs Fetch API
- MDN web docs Using Fetch
- Flavio's article on The Fetch API
Step 9
Let's fetch the data about "schools" and "terms" from SIS API.
Update script.js to include the following:
const key = "USE_YOUR_KEY"; // trrible practice!
// should never save API key directly in source code
// in particular when it can potentily be seen by users
const requestOptions = {
method: "GET",
redirect: "follow",
};
fetch(
`https://sis.jhu.edu/api/classes/codes/schools?key=${key}`,
requestOptions
)
.then((response) => response.json())
.then((data) => populateSelector("schools", data))
.catch((error) => console.log("error", error));
fetch(`https://sis.jhu.edu/api/classes/codes/terms?key=${key}`, requestOptions)
.then((response) => response.json())
.then((data) => populateSelector("terms", data))
.catch((error) => console.log("error", error));
Make note of the use of then clauses.
Step 10
The final piece is to add send a search request to the SIS API and display the response.
Update the search function:
- console.log(`search for ${query} in the ${school} during ${term}`);
- showSearchResults(courses);
+ fetch(
+ `https://sis.jhu.edu/api/classes?key=${key}&School=${school}&Term=${term}&CourseTitle=${query}`,
+ requestOptions
+ )
+ .then((response) => response.json())
+ .then((data) => showSearchResults(data))
+ .catch((error) => console.log("error", error));
Save your code again and try it in your browser. Make sure the "Allow-Control-Allow-Origin" plugin is "on".
You can access the complete application at https://github.com/cs280fall20/course-search-sis-api.
Asynchronous Programming
In JavaScript programs, whenever you write code that involves operations like making a network request or querying a database, you are dealing with asynchronous code. You need to understand how asynchronous code behaves. And more importantly, you need to write asynchronous code in a clean and maintainable way. And that is what you are going to learn in this module.
Some Things Take Time!
Let's us visit the SIS API one more time.
Use Postman to get all the courses offered by the "Whiting School of Engineering". You should be using the following endpoint.
https://sis.jhu.edu/api/classes/Whiting School of Engineering?key=apikeyvalue
The above request will take at least several seconds to return with a response containing, at the time of writing, more than 47000 courses!
This preposterously large number of courses is the total of all sections of all courses offered by WSE from Spring 2009 up to now.
It is poor design that such a large amount of data is dumped on the user without any pagination. This poor design decision is however useful for us, as we bring this message home: access to resources over the internet could be visibly slow.
Not All Tasks Created Equal!
All programs are seen as composed of control structures, ordered statements or subroutines, executed in sequence.
function task(id) {
console.log("Task " + id);
}
task(1);
task(2);
task(3);
task(4);
What will happen when one task (subroutine) takes a long time to complete?
function task(id) {
console.log("Task " + id);
}
function longtask(id) {
console.log("Task " + id + " started!");
for(let i = 0; i < 3e9; i++) {
// do something!
}
console.log("Task " + id + " finished!");
}
task(1);
longtask(2);
task(3);
task(4);
The long (resource intensive) task appears to block the ones that follow!
What are the implications of this for event-driven applications such as web apps?
Well, as long as the "long task" is running, all other things are blocked! The web app will appear unresponsive or frozen!
Example
For example, YouTube loads the video content as you view it. This is a resource intensive process, in particular over a slow network. If it were to block other tasks/processes until it has finished, you would not be able to do any of the following while the video content is loading:
- Like the video
- Leave a comment or even scroll through the comments
- Maximize/minimize
- Change the volume
- Use any of the controls (play, pause, etc)
- ...
But this is not how YouTube works!
So what is the secrete? How does it perform a resource-intensive task such as streaming a video while the web page remains perfectly responsive?!
Asynchronous Programming
Asynchronous programming is a technique that allows you to execute a resource-intensive task in a non-blocking way.
In the context of the earlier example, while a "long task" is running, the "control" is returned to the application (e.g. the browser), so it can continue to handle user input and perform other tasks.
JavaScript supports async programming! In particular, operations like making a network request or querying a database can be (and almost always are) done asynchronously.
Here is our earlier example where I have used the built-in function setTimeout to simulate a time consuming task that runs asynchronously.
function task(id) {
console.log("Task " + id);
}
function longtask(id) {
console.log("Task " + id + " started!");
setTimeout(() => console.log("Task " + id + " finished!"), 5000);
}
task(1);
longtask(2);
task(3);
task(4);
The
setTimeoutis an example of an asynchronous or non-blocking function.
A helpful way to think about setTimeout is that it schedules a task to be performed in the future. It, however, does not wait until the task is executed. Therefore, setTimeout does not block the execution of other functions. Task-3, for instance, does not need to wait for 5 seconds to get its chance to be executed.
I recommend viewing the short YouTube video Asynchronous Vs Synchronous Programming by Web Dev Simplified.
Understanding Async Operations
Restaurant Metaphor
A blocking synchronous restaurant is one where the waiter will wait until your food is ready and served before helping another customer.
A non-blocking asynchronous restaurant is one where the waiter comes to your table, takes your order and give it to the kitchen. The waiter then moves on to server other tables while the chief is preparing your meal. Once your meal is ready, the waiter will get a callback to bring your food to your table.
House chores Metaphor
In a blocking synchronous system, you wash the dishes, when you are done, you take the garbage out.
In a non-blocking asynchronous system, you put the dishes in the dish washer and start it. While the dishes are being washed, you clean the kitchen and take the garbage out. Once the dishes are done, the dishwasher will beep to call on you so you can put the clean dishes in the cupboards.
Single vs Multi Threads
Some programming languages allow concurrent programming (parallel computing). This is a technique where two or more processes start at the same time, run in an interleaved fashion through context switching and complete in an overlapping time period by managing access to shared resources e.g. on a single core of CPU. This feature is called "Multithreading"; Java was design from very early on to provide it. C++ has added it in recent versions.
In our restaurant metaphor,
- a single threaded program is like having a single chief/cook. All kitchen tasks are done by one person, one after another.
- a multithreaded program is when the chief hires several cooks so while one task is being done (e.g. one meal is being cooked) other cooks can take on other tasks at the same time.
JavaScript is single threaded.
Event Loop
So how does JavaScript behave asynchronously?
The JavaScript engine relies on the hosting environment, such as the browser, to tell it what to execute next. Any async operation is taken out of the call stack and executed by the hosting environment. (This could be done in a concurrent fashion). Once the async job is completed, it will be placed in a callback queue to return to the call stack. This cycle is monitored by a process called the event loop.
The Event Loop monitors the Call Stack and the Callback Queue. If the Call Stack is empty, it will take the first event from the queue and will push it to the Call Stack, which effectively runs it.
It is beyond the scope of this course to explore this process in details. Here is a demo of our earlier async code that showcases how these pieces work together. The demo is based off a visualization and a great article by Alexander Zlatkov (read the article here).
I also recommend watching Philip Robert's talk at JSConf EU, What the heck is the event loop anyway? on YouTube.
Patterns for Dealing with Async Code
We are going to use setTimeout to simulate asynchronous call to a database and async network requests. Consider the following scenario:
- We look up a user in our database to collect its bank account number.
- We send a HTTP GET request to a bank, providing the account number, to receive a list of loans associated with the given account.
- After the list of loans were received, we will send a second request to get a complete transaction history (e.g. payments, etc) associated with the most recent loan.
Don't get hung up on the irrelevant details such as what if there are no loans associated with the account, etc.
Let's start by (simulation of) getting a user object from a database.
function getUser(id) {
console.log("Reading a user from a database...");
setTimeout(() => {
console.log("Received user data...");
return { "ID": id, "Account number": "58721094531267" }
}, 2000);
}
console.log("listening for events");
getUser(1);
console.log("still listening for events!");
Let's try to store and display the user returned from the database:
function getUser(id) {
console.log("Reading a user from a database...");
setTimeout(() => {
console.log("Received user data...");
return { "ID": id, "Account number": "58721094531267" }
}, 2000);
}
console.log("listening for events");
const user = getUser(1);
console.log(`user: ${user}`);
console.log("still listening for events!");
The user object is undefined because the return statement in getUser is executed (at least) two seconds after it was called. So what is returned from getUser will not be available at the time of calling it.
So how can we access the user returned from getUser function? There are three patterns to deal with asynchronous code:
- Callbacks
- Promises
- Async/await
We will look at each in the following sections.
Callback
Callback is a function that is called when the result of an asynchronous function is ready.
function getUser(id, callback) {
console.log("Reading a user from a database...");
setTimeout(() => {
console.log("Received user data...");
callback({ "ID": id, "Account number": "58721094531267" });
}, 2000);
}
console.log("listening for events");
getUser(1, (user) => console.log(user));
console.log("still listening for events!");
Here is an exercise for you: Add an asynchronous function, getLoans, that simulates sending a HTTP GET request to a bank, providing the account number, to receive a list of loans associated with the given account.
Use the callback pattern to display the loans.
function getUser(id, callback) {
console.log("Reading a user from a database...");
setTimeout(() => {
console.log("Received user data...");
callback({ "ID": id, "Account number": "58721094531267" });
}, 2000);
}
function getLoans(account) {
// TODO update this to an asynchronous function
return ["loan 1", "loan 2", "loan 3"];
}
console.log("listening for events");
getUser(1, (user) => {
console.log(user);
// TODO call getLoans and display the returned values
});
console.log("still listening for events!");
Solution
function getUser(id, callback) {
console.log("Reading a user from a database...");
setTimeout(() => {
console.log("Received user data...");
callback({ "ID": id, "Account number": "58721094531267" });
}, 2000);
}
function getLoans(account, callback) {
console.log("Sending HTTP GET request to a bank...");
setTimeout(() => {
console.log("Received loan data...");
callback(["loan 1", "loan 2", "loan 3"]);
}, 2000);
}
console.log("listening for events");
getUser(1, (user) => {
console.log(user);
getLoans(user["Account number"], (loans) => {
console.log(loans);
})
});
console.log("still listening for events!");
Callback Hell!
Here is the structure of our application which simulates getting transactions for the most recent loan associated with the account number of our user.
// functions "getUser", "getLoans", and "getTransactions" not shown
console.log("listening for events");
getUser(1, (user) => {
getLoans(user["Account number"], (loans) => {
getTransactions(loans["Most recent"], (transactions) => {
console.log(transactions);
});
});
});
console.log("still listening for events!");
Notice, if the function getUser, getLoans, and getTransactions were synchronous, the program would look like this:
// functions "getUser", "getLoans", and "getTransactions" not shown
console.log("listening for events");
const user = getUser(1);
const loans = getLoans(user["Account number"]);
const transactions = getTransactions(loans["Most recent"]);
console.log(transactions);
console.log("still listening for events!");
The second snippet corresponding to synchronous code is arguably more readable and easier to understand.
In the asynchronous version, because of the callbacks, we have a deeply nested structure. In practice, this can get much deeper. This is referred to as callback hell (or some resouces call it "Christmas tree problem").
method1(arg1, (arg2) => {
method2(arg2, (arg3) => {
method3(arg3, (arg4) => {
method4(arg4, (arg5) => {
method5(arg5, (arg6) => {
method6(arg6, (arg7) => {
// ...
// CALLBACK HELL
// ...
});
});
});
});
});
});
Promises
Promise was added to JavaScript in ES6. It was meant to address some of the issues with asynchronous coding, including the callback hell.
A "Promise" is a JavaScript object that holds the eventual result of an asynchronous operation.
A "promise" object has a "state" and its state at any point in time is one of the following:
- Pending: initial state, neither fulfilled nor rejected.
- Fulfilled: meaning that the operation was completed successfully.
- Rejected: meaning that the operation failed.
When you create a Promise to kick off some asynchronous operation, it is at the pending state. Once the asynchronous operation is completed, the Promise is fulfilled. If for any reason the asynchronous operations fails (for example, the network connection is disrupted in the middle of a HTTP request), then the Promise is rejected.
This is the general pattern for creating a Promise object:
const myPromise = new Promise((resolve, reject) => {
let result = [];
let success = false;
// do some async work!
// success and result must be updated through this work.
if (success) {
resolve(result);
} else {
reject(new Error("some message!"));
}
});
Note the constructor of Promise takes in a function which itself takes two (callback) functions, resolve and reject, as arguments.
Here is how you would consume a promise:
myPromise
.then((result) => {
/* do something with result */
})
.catch((error) => {
/* display the error or otherwise handle it */
});
Notice you have seen this pattern before when we used the fetch API.
I highly recommend watching Fireship's short YouTube video "JavaScript Promise in 100 Seconds".
The YouTube video JavaScript Promises In 10 Minutes from Web Dev Simplified is another excellent resource.
Replacing Callbacks with Promises
Here is the code which exhibits the callback pattern for dialing with async work:
function getUser(id, callback) {
console.log("Reading a user from a database...");
setTimeout(() => {
console.log("Received user data...");
callback({ "ID": id, "Account number": "58721094531267" });
}, 2000);
}
console.log("listening for events");
getUser(1, (user) => console.log(user));
console.log("still listening for events!");
We are going to replace the callback pattern with the Promise pattern. As a first step, we must update our async function getUser to return a Promise.
function getUser(id) {
console.log("Reading a user from a database...");
return new Promise((resolve, reject) => {
setTimeout(() => {
console.log("Received user data...");
resolve({ ID: id, "Account number": "58721094531267" });
}, 2000);
});
}
Note that I've ignored the case where the Promise may be "rejected" to keep the example concise.
Now, as an exercise, update how getUser is employed. (Hint: you must consume a Promise).
function getUser(id) {
console.log("Reading a user from a database...");
return new Promise((resolve, reject) => {
setTimeout(() => {
console.log("Received user data...");
resolve({ ID: id, "Account number": "58721094531267" });
}, 2000);
});
}
console.log("listening for events");
getUser(1, (user) => console.log(user)); // TODO update me!
console.log("still listening for events!");
Solution
function getUser(id) {
console.log("Reading a user from a database...");
return new Promise((resolve, reject) => {
setTimeout(() => {
console.log("Received user data...");
resolve({ ID: id, "Account number": "58721094531267" });
}, 2000);
});
}
console.log("listening for events");
getUser(1)
.then((user) => console.log(user));
console.log("still listening for events!");
Promises Exercise
As a reference, here is the earlier work we had done for getUser:
Callback pattern
function getUser(id, callback) {
console.log("Reading a user from a database...");
setTimeout(() => {
console.log("Received user data...");
callback({ "ID": id, "Account number": "58721094531267" });
}, 2000);
}
console.log("listening for events");
getUser(1, (user) => console.log(user));
console.log("still listening for events!");
Promise pattern
function getUser(id) {
console.log("Reading a user from a database...");
return new Promise((resolve, reject) => {
setTimeout(() => {
console.log("Received user data...");
resolve({ ID: id, "Account number": "58721094531267" });
}, 2000);
});
}
console.log("listening for events");
getUser(1)
.then((user) => console.log(user));
console.log("still listening for events!");
Exercise: Update the following code to use Promises instead of callbacks.
function getUser(id, callback) {
console.log("Reading a user from a database...");
setTimeout(() => {
console.log("Received user data...");
callback({ ID: id, "Account number": "58721094531267" });
}, 2000);
}
function getLoans(account, callback) {
console.log("Request for loan data...");
setTimeout(() => {
console.log("Received loan data...");
callback({ "Most recent": "loan 3", All: ["loan 1", "loan 2", "loan 3"] });
}, 2000);
}
function getTransactions(loan, callback) {
console.log("Request for transactions data...");
setTimeout(() => {
console.log("Received transactions data...");
callback(["tran 3", "tran 2", "tran 1"]);
}, 2000);
}
console.log("listening for events");
getUser(1, (user) => {
getLoans(user["Account number"], (loans) => {
getTransactions(loans["Most recent"], (transactions) => {
console.log(transactions);
});
});
});
console.log("still listening for events!");
Solution
function getUser(id) {
console.log("Reading a user from a database...");
return new Promise((resolve, reject) => {
setTimeout(() => {
console.log("Received user data...");
resolve({ ID: id, "Account number": "58721094531267" });
}, 2000);
});
}
function getLoans(account) {
console.log("Request for loan data...");
return new Promise((resolve, reject) => {
setTimeout(() => {
console.log("Received loan data...");
resolve({ "Most recent": "loan 3", All: ["loan 1", "loan 2", "loan 3"] });
}, 2000);
});
}
function getTransactions(loan) {
console.log("Request for transactions data...");
return new Promise((resolve, reject) => {
setTimeout(() => {
console.log("Received transactions data...");
resolve(["tran 3", "tran 2", "tran 1"]);
}, 2000);
});
}
console.log("listening for events");
getUser(1)
.then((user) => getLoans(user["Account number"]))
.then((loans) => getTransactions(loans["Most recent"]))
.then((transactions) => {
console.log(transactions);
});
console.log("still listening for events!");
Chaining Promises
Notice how we had gone from this pattern (which exhibits callback hell)
console.log("listening for events");
getUser(1, (user) => {
getLoans(user["Account number"], (loans) => {
getTransactions(loans["Most recent"], (transactions) => {
console.log(transactions);
});
});
});
console.log("still listening for events!");
to this pattern which exhibits promise chaining:
console.log("listening for events");
getUser(1)
.then((user) => getLoans(user["Account number"]))
.then((loans) => getTransactions(loans["Most recent"]))
.then((transactions) => {
console.log(transactions);
});
console.log("still listening for events!");
In the first implementation we used callbacks and that is why we ended up with the nested structure (callback hell problem). In the second implementation we used Promises and we got a flat structure.
Since Promises expose
thenmethod we can chain them to implement a complex async operation.
As a good practice, whenever you work with Promises you must make sure to catch any errors.
console.log("listening for events");
getUser(1)
.then((user) => getLoans(user["Account number"]))
.then((loans) => getTransactions(loans["Most recent"]))
.then((transactions) => {
console.log(transactions);
})
.catch((error) => {
console.log(error); // probably need to do more than this!
});
console.log("still listening for events!");
Async & Await
Here is what we have so far:
console.log("listening for events");
getUser(1)
.then((user) => getLoans(user["Account number"]))
.then((loans) => getTransactions(loans["Most recent"]))
.then((transactions) => {
console.log(transactions);
})
.catch((error) => {
console.log(error); // probably need to do more than this!
});
console.log("still listening for events!");
We can make this code even simpler using the new JavaScript feature async/await (which they have borrowed from C#).
Async/Await allows you to write asynchronous code that looks like synchronous code!
Anytime you are calling a function that returns a Promise, you can "await" its results, and then get the results just like calling a synchronous function.
For example, instead of
getUser(1)
.then((user) => console.log(user))
we can write
const user = await getUser(1);
console.log(user);
So, we can rewrite the code at the top of the page as
console.log("listening for events");
try {
const user = await getUser(1);
const loans = await getLoans(user["Account number"]);
const transactions = await getTransactions(loans["Most recent"]);
console.log(transactions);
} catch (error) {
console.log(error);
}
console.log("still listening for events!");
There is one caveat however! You cannot use the await operator in any place that you want.
The operator await can only be used inside a function, and that function must be decorated with the async modifier.
So we must do something like this:
async function displayTransactions() {
try {
const user = await getUser(1);
const loans = await getLoans(user["Account number"]);
const transactions = await getTransactions(loans["Most recent"]);
console.log(transactions);
} catch (error) {
console.log(error);
}
}
console.log("listening for events");
displayTransactions();
console.log("still listening for events!");
Async/Await are syntax sugar! Under the hood, it is converted to a chain of Promises!
Putting it all together
function getUser(id) {
console.log("Reading a user from a database...");
return new Promise((resolve, reject) => {
setTimeout(() => {
console.log("Received user data...");
resolve({ ID: id, "Account number": "58721094531267" });
}, 2000);
});
}
function getLoans(account) {
console.log("Request for loan data...");
return new Promise((resolve, reject) => {
setTimeout(() => {
console.log("Received loan data...");
resolve({ "Most recent": "loan 3", All: ["loan 1", "loan 2", "loan 3"] });
}, 2000);
});
}
function getTransactions(loan) {
console.log("Request for transactions data...");
return new Promise((resolve, reject) => {
setTimeout(() => {
console.log("Received transactions data...");
resolve(["tran 3", "tran 2", "tran 1"]);
}, 2000);
});
}
async function displayTransactions() {
try {
const user = await getUser(1);
const loans = await getLoans(user["Account number"]);
const transactions = await getTransactions(loans["Most recent"]);
console.log(transactions);
} catch (error) {
console.log(error);
}
}
console.log("listening for events");
displayTransactions();
console.log("still listening for events!");
I recommend watching Fireship's short YouTube video "The Async Await Episode I Promised" to further solidify your understanding of this subject.
Modules
Modules are the primary construct which we organize our JavaScript code.
At first glance, a JavaScript module is just a JavaScript file; it arises naturally when splitting large JavaScript programs into several sections each stored in a separate file.
Additionally, modules create scope. The variables declared in a module have "file scope"; they are not accessible outside of the module. A module system provides mechanism to export any value declared in a module and import them in another module when needed. Therefore, modules are another way (in addition to Class and Closure) to create encapsulation.
For a long time, JavaScript modules were implemented via third-party libraries (not built into the language). ECMAScript 2015 (ES6) was the first time that JavaScript provided built-in modules. We will focus on ES6 modules.1
Later, we need to learn an older module system, CommonJS, which is used by NodeJS.
IFEE Revisited!
We know that JavaScript functions create scope. We have seen the pattern of Immediately Invoked Function Expression or IFEE to create Object-Oriented like encapsulation:
// script.js file
(function () {
const number = 2;
console.log(number);
})();
Assume the above code snippet is all there is inside a script.js file which is linked to our index.html,
<script src="script.js"></script>
The IFEE gets executed as soon as the script is loaded to the webpage. The value of number (that is "2") will be printed to the browser console. The variable number however is not accessible from outside of the IFEE.
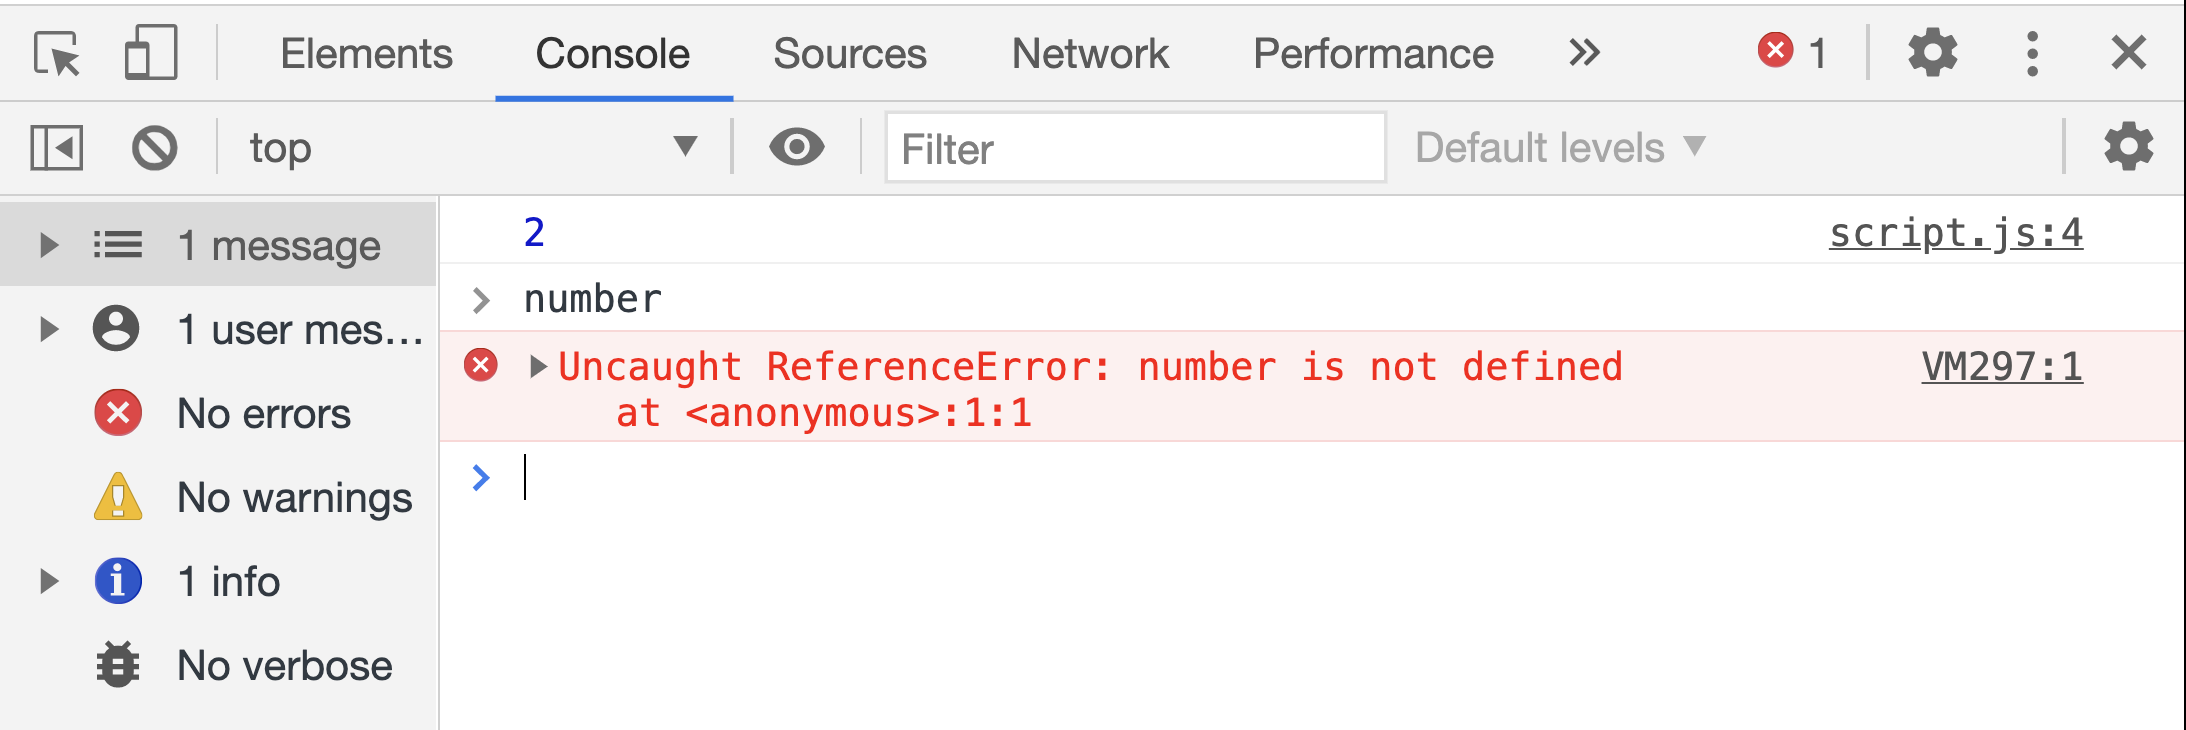
On the other hand, if we were to remove the IFEE pattern,
// script.js file
const number = 2;
console.log(number);
The number variable will be placed in the global scope.
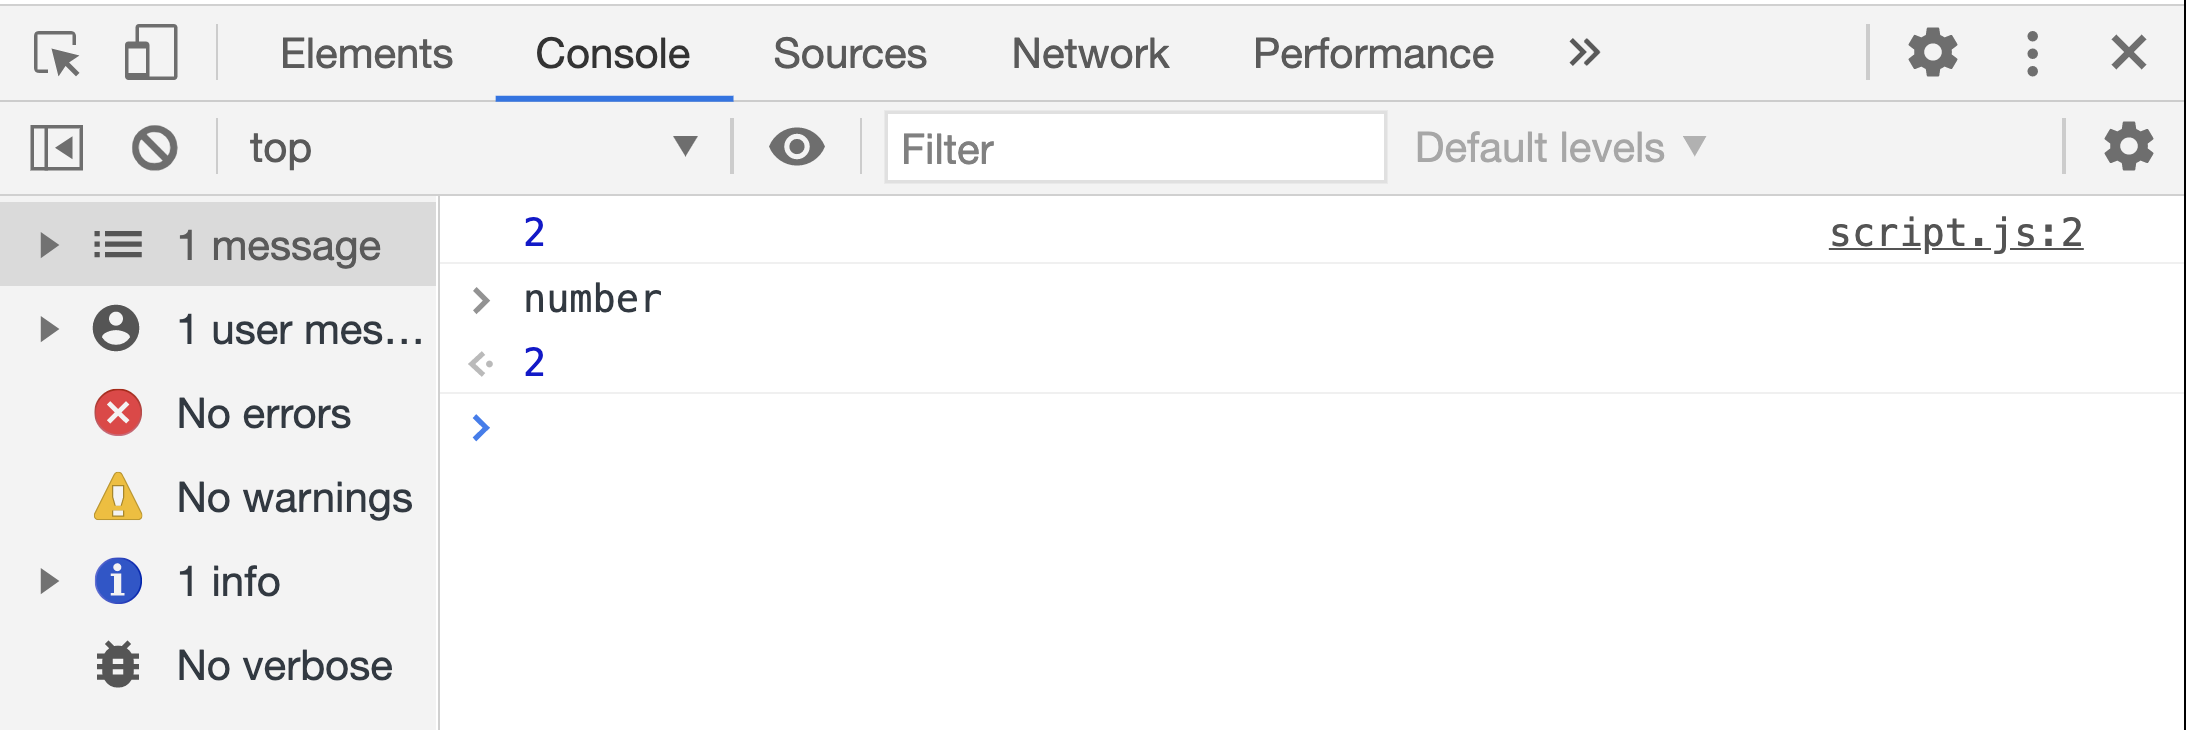
An ES6 Module is just a file!
ES6 Modules can be used to create scope. All you need to do is to tell the browser to consider script.js as a "module".
<script type="module" src="script.js"></script>
Notice the use of
type="module"attribute in the<script>element.
Modules work only via HTTP(s), not in local files If you try to open a web-page locally, via
file://protocol, you'll find that scripts attributed as "module" are blocked by CORS policy. Use a local web-server such as VS Code Live Server Extension to test modules.
As it can be seen in the image below, you will not be able to access the number variable.
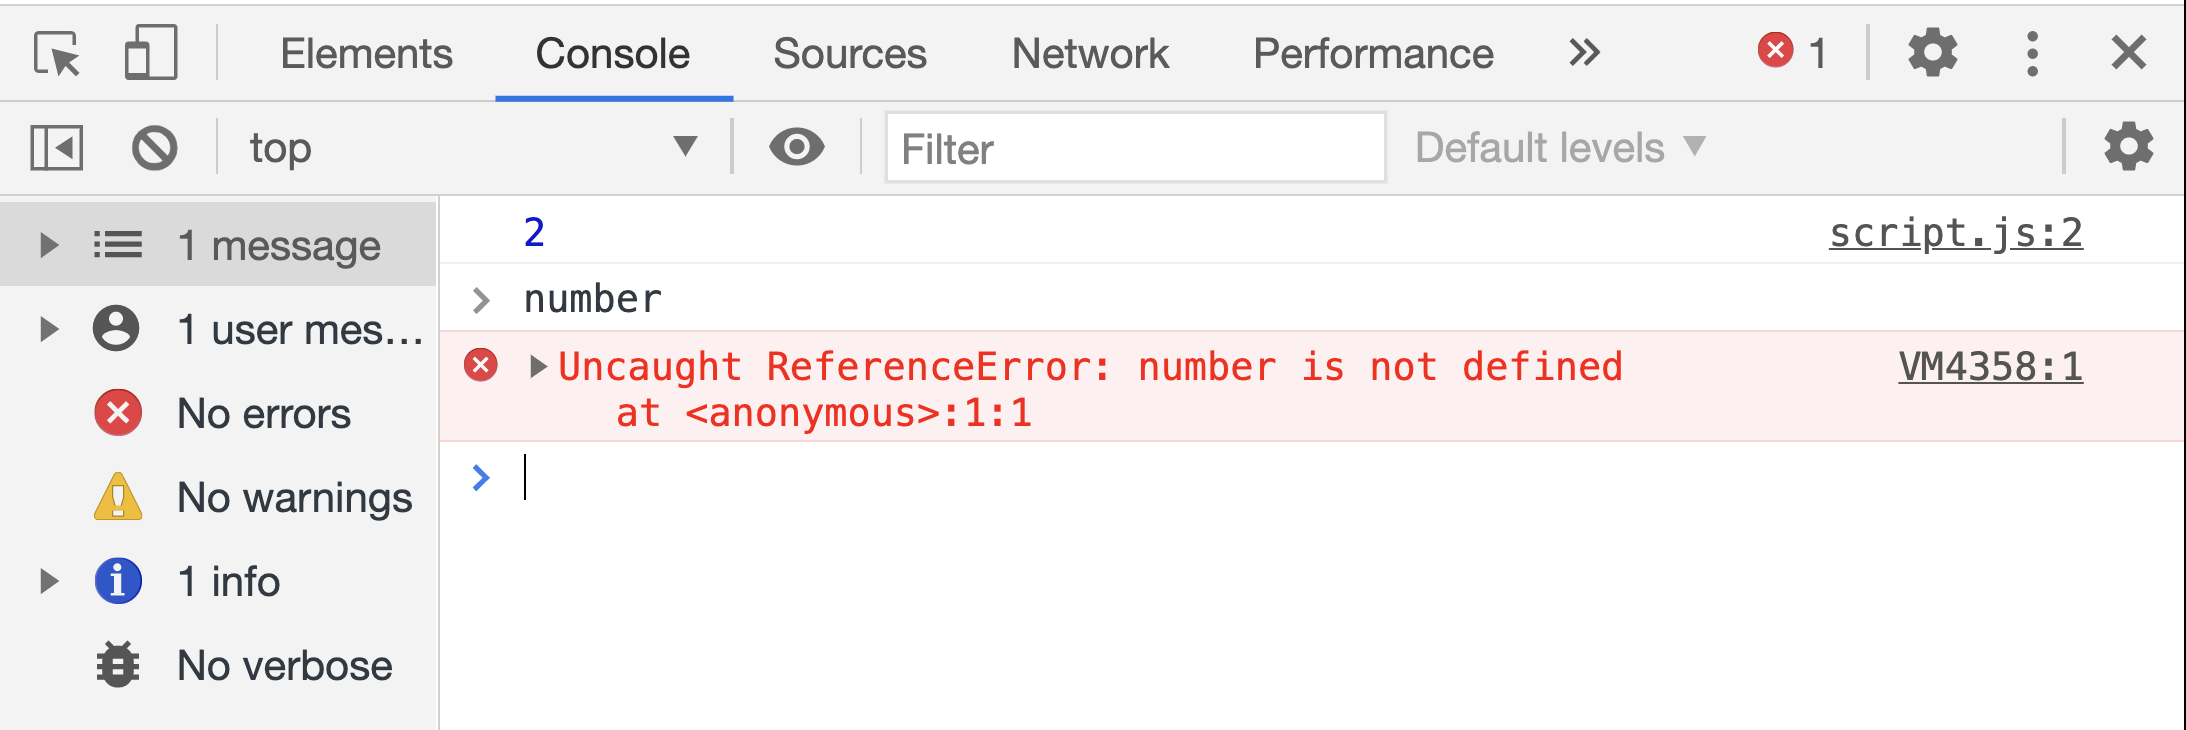
Notice the content of script.js is still simply the following two lines
// script.js file
const number = 2;
console.log(number);
With ES6 modules, each file has its own scope. To make values (objects, functions, classes, etc) available to the outside world, you must first export the value and then import the value where needed in other modules (files).
Exporting
To export a value, append its declaration with the export keyword:
// account.js file
let balance = 0;
export const INTEREST_RATE = 0.2;
export function deposit(amount) {
balance += amount;
}
export function widthraw(amount) {
balance -= amount;
}
export function getBalance() {
return balance;
}
You can export values one by one (as it is done above) or you can export all in a single statement at the end of the module:
// account.js file
let balance = 0;
const INTEREST_RATE = 0.2;
function deposit(amount) {
balance += amount;
}
function widthraw(amount) {
balance -= amount;
}
function getBalance() {
return balance;
}
export { INTEREST_RATE, deposit, widthraw, getBalance };
You can also give an alias to an exported value with the as keyword:
export { INTEREST_RATE as interest, deposit, widthraw, getBalance };
Moreover, you can break a long export statement into several export statements (not a very common practice):
export { INTEREST_RATE as interest };
export { deposit, widthraw, getBalance };
Importing
You need an import statement to import the values exported from a module.
// script.js file
import { deposit, widthraw, getBalance } from "./account.js";
console.log(getBalance());
deposit(100);
widthraw(20);
console.log(getBalance());
- The import statement must be placed at the top of your script/module file.
- The import statement begins with the
importkeyword. - Imported values are comma separated inside a pair of curly brackets.
- The
fromkeyword is used to supply the location of the module relative to the current file.
As it can be seen in the image below, the value returned by getBalance shows the balance variable (in account.js file) has been updated.
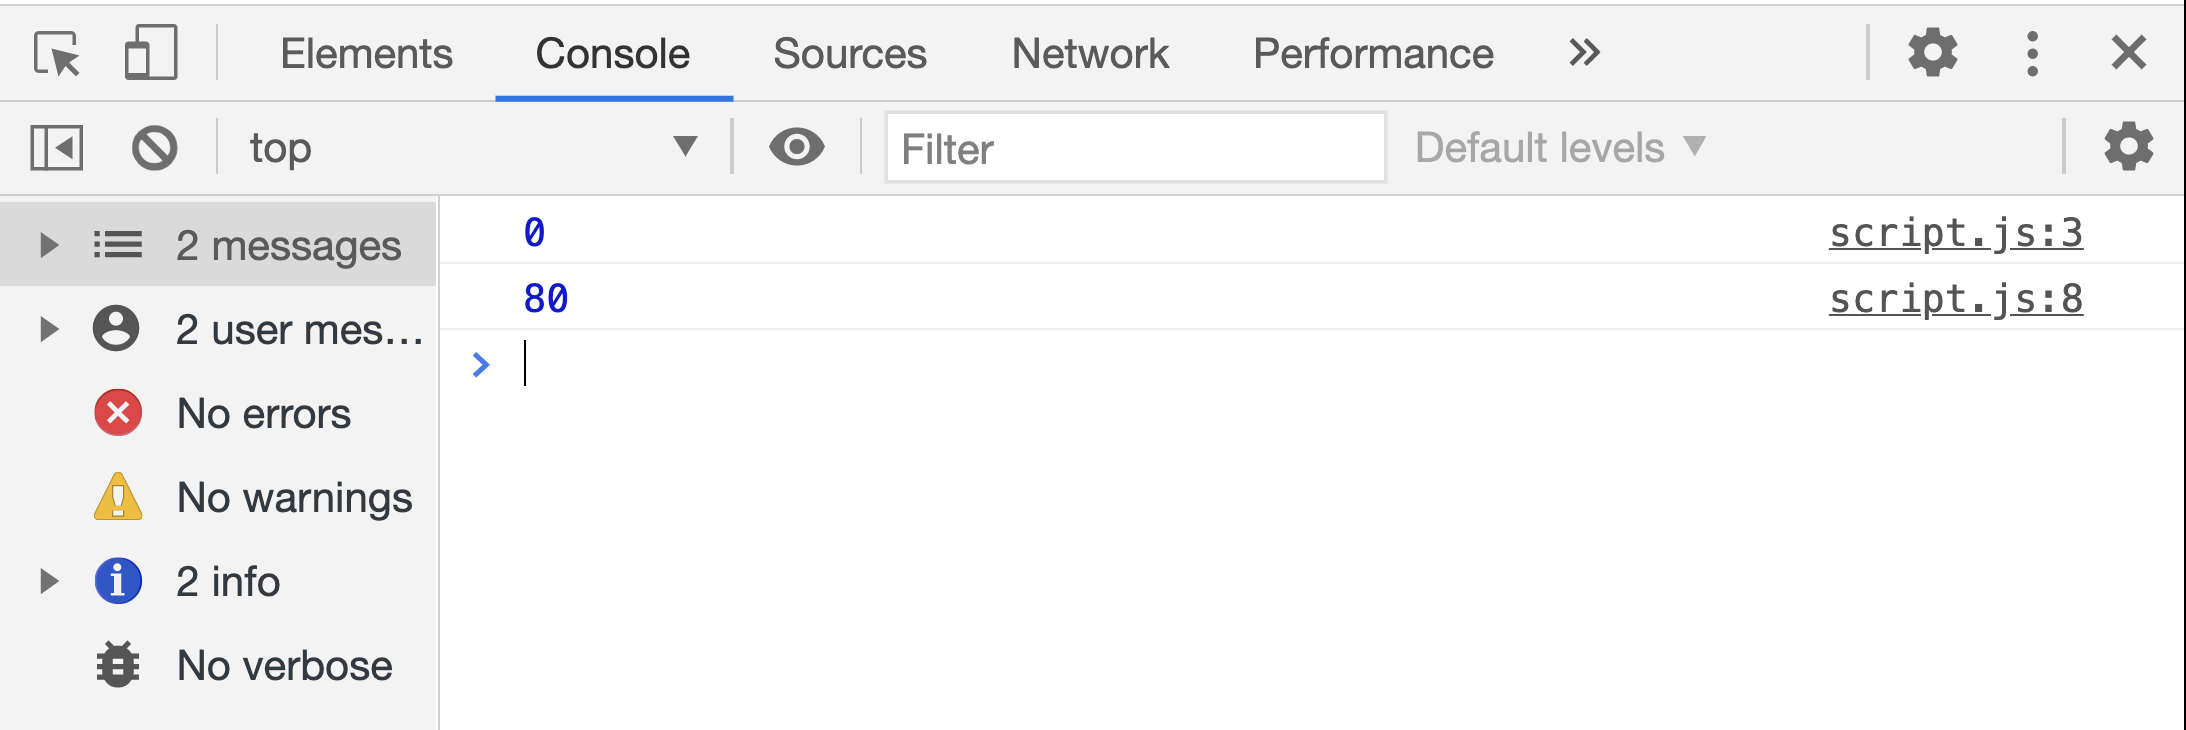
Notice, there is no requirement that we import everything a module exports. In the snippet above, I have not imported interest (alias for the INTEREST_RATE constant). In the snippet below, I only import the interest:
// script.js file
import { interest } from "./account.js";
console.log(interest);
Here is the output to the browser console:

Note that it is not possible to import a value from a module that was not exported:
// script.js file
import { balance } from "./account.js";
console.log(balance);
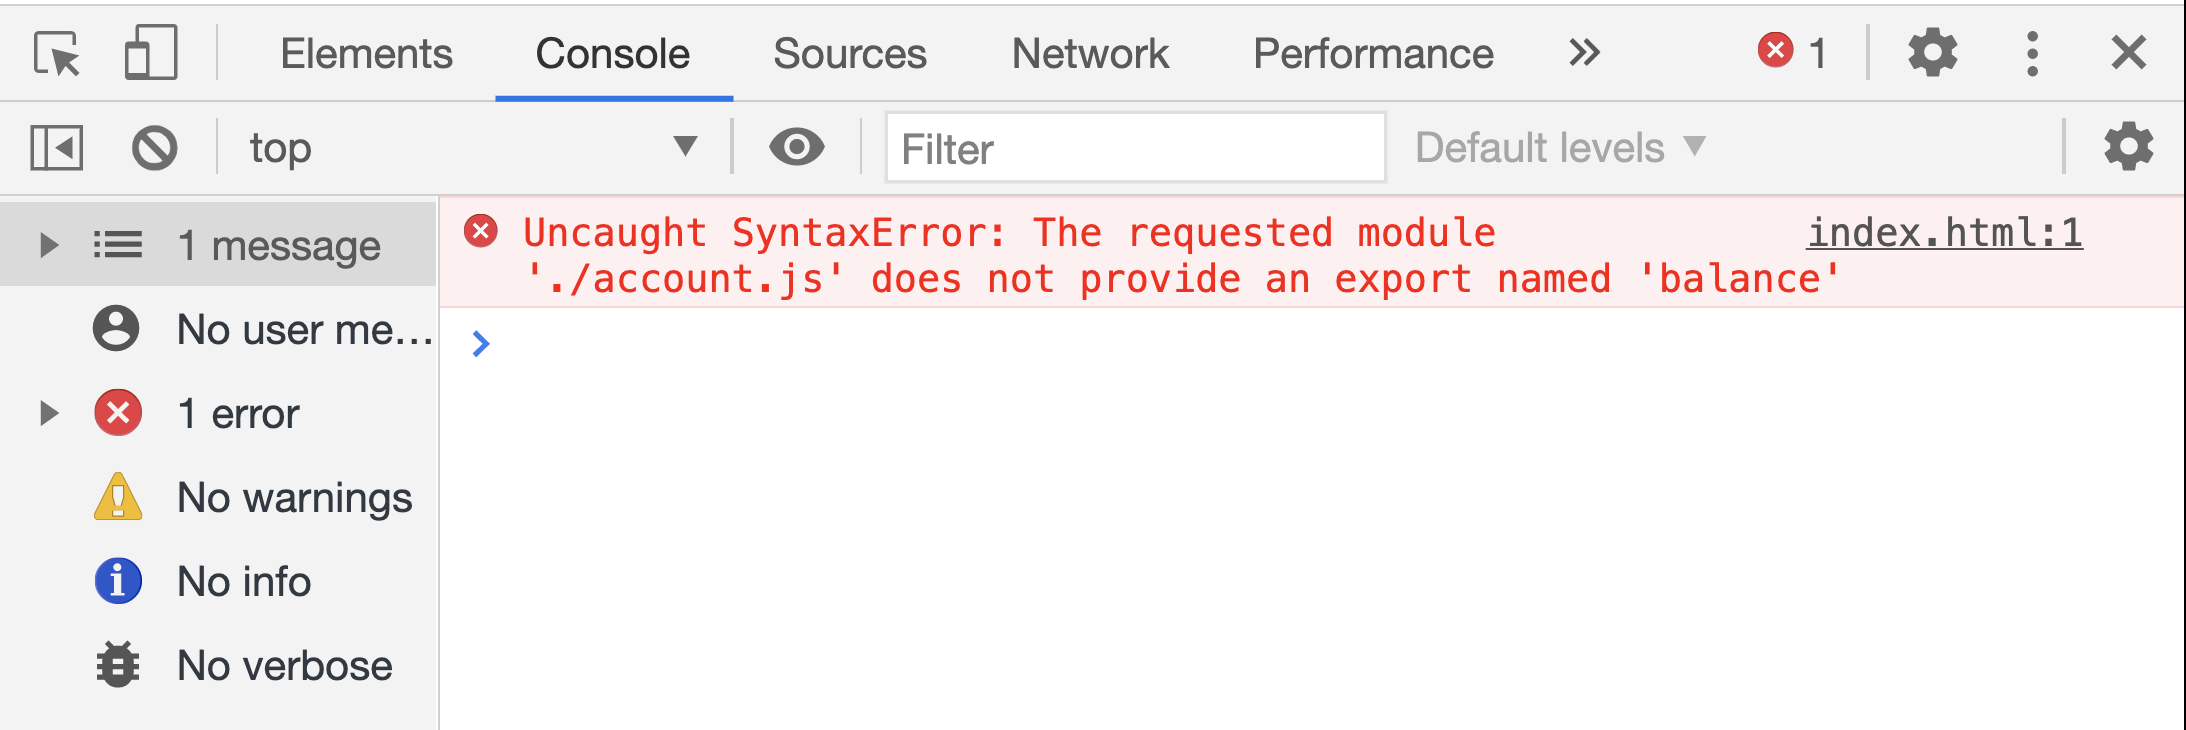
Similar to exports, you can use aliases when importing:
// script.js file
import { deposit, widthraw, getBalance as balance } from "./account.js";
console.log(balance());
deposit(100);
widthraw(20);
console.log(balance());
Although not common, it is possible to break a long import statement into several import statements:
import { deposit, widthraw } from "./account.js";
import { getBalance as balance, interest } from "./account.js";
A common pattern is to import everything that's exported by a module into one object as shown in the example below:
// script.js file
import * as Account from "./account.js";
console.log(Account.getBalance());
Account.deposit(100);
Account.widthraw(20);
console.log(Account.getBalance());
Notice (1) there is no {} in the import statement above. (2) The imported values are accessed with the dot notation (e.g.Account.getBalance()).
A module does not create a type!
Modules are the primary means to employ "Separation of Concerns" design principle. They, however, do not create a (data) "type". In our earlier example, there is only ever one instance of Account. You cannot create different types of accounts each having their own "balance".
// script.js file
import * as Account from "./account.js";
console.log(Account.getBalance());
Account.deposit(100);
Account.widthraw(20);
console.log(Account.getBalance());
To use Account as a type, you need JavaScript classes:
// account.js file
const INTEREST_RATE = 0.2;
class Account {
constructor(balance) {
this.balance = balance;
}
deposit(amount) {
this.balance += amount;
}
widthraw(amount) {
this.balance -= amount;
}
}
export { INTEREST_RATE as interest, Account };
We can now use Account as a type:
// script.js file
import { Account } from "./account.js";
const checking = new Account(100);
checking.deposit(20);
console.log(checking.balance);
This may seem contrary to our goal of hiding "balance" since JavaScript classes do not provide information hiding (at the time of writing), and the "balance" is not protected (hidden) now.
You need to appreciate the difference between modules and classes:
- Use classes to create types.
- Use modules to modularize your JavaScript program.
The module construct and the class construct have the same goal of creating encapsulations which is to group data and behavior together in logical units. The module construct further allows information hiding by creating scope. At the time of writing, information hiding is not achieved by classes. On the other hand, classes create abstractions (types) which you can instantiate or extend.
Default Export/Import
If you want to export a single value (or when one value is the primary element in a module), you could use a default export:
// account.js file
const INTEREST_RATE = 0.2;
class Account {
constructor(balance) {
this.balance = balance;
}
deposit(amount) {
this.balance += amount;
}
widthraw(amount) {
this.balance -= amount;
}
}
export default Account;
export { INTEREST_RATE as interest };
When importing a "default export," you do not use curly brackets.
// script.js file
import Account from "./account.js";
const checking = new Account(100);
checking.deposit(20);
console.log(checking.balance);
It is possible to import both default and non-default exports in one import statement. The syntax is as follows:
// script.js file
import Account, { interest } from "./account.js";
console.log(interest);
const checking = new Account(100);
checking.deposit(20);
console.log(checking.balance);
Before ES6 Modules
For a long time, JavaScript existed without a built-in module construct. At first, this was not a problem, because initially scripts were small and simple, so there was no need. But eventually JavaScript programs became more and more complex, so the community invented a variety of ways to organize code into modules. To name some (for historical reasons):
- AMD – one of the most ancient module systems, initially implemented by the library require.js.
- CommonJS – the module system used by NodeJS.
- UMD – meant to be a universal system, compatible with AMD and CommonJS.
JavaScript community is adopting ES6 modules but the legacy systems are still in use. In particular, the CommonJS module system is still the primary way Node applications are written. We shall learn about it when we learn about NodeJS.
Node
NodeJS (or simply Node) is an open source cross platform runtime environment for executing JavaScript code outside of a browser.
We use Node in particular for server-side programming to build APIs.
Use this link to download and install Node on your operating system.
Before Node
Before Node, we only used JavaScript to build applications that run inside of a browser. Every browser has a JavaScript Engine that takes your JavaScript code and turns it into an executable form
- Microsoft Edge uses Chakra
- Firefox uses SpiderMonkey
- Chrome uses V8
- Safari uses JavaScriptCore
A JavaScript engine, at its core, consists of an interpreter and a runtime environment.
- JavaScript was (and still is considered) as an interpreted language. This means the JavaScript engine in a browser reads over the JavaScript code, interprets each line, and runs it.
- Modern browsers, however, use a technology known as Just-In-Time (JIT) compilation, which compiles JavaScript to executable bytecode just as it is about to run. The byte-codes are then executed using a JavaScript Runtime Environment.
- The runtime environment inside a browser provides global objects such as
windowanddocumentthat enable JavaScript to interface with the browser and the webpage it is part of.
In 2009, Ryan Dahl took Google's v8 engine and embedded it in a C++ program and called that program Node.
Node uses Google's V8 to convert JavaScript into byte-codes but runs it outside of a browser.
In Node, we don’t have browser environment objects such as window or the document object. Instead, we have other objects that are not available in browsers, such as objects for working with the file system, network, operating system, etc.
If you are interested to learn more about the JavaScript Engine and how your code is executed, I recommend the following readings:
- JavaScript: Under the Hood
- How Does JavaScript Really Work? (Part 1)
- How Does JavaScript Really Work? (Part 2)
Run a script file with Node
Create a folder and place the following index.js file in it
// index.js file
console.log("Hello Node!");
Open the terminal at the folder containing the index.js. In the terminal, run the following command:
node index.js
This must produce the following output:
Hello Node!
Since node can only execute .js files, adding .js extension to the file path is optional! So, you can also use the command node index in the terminal to run the index.js file.
If we provide a directory path instead of a file path to Node, it will try to find and run an index.js file inside that directory. So, in our case, we can also run the index.js file by simply typing node . in the terminal (notice the proceeding dot that indicates "current folder").
If you just enter node in the terminal then you will run Node's repl module which provides a Read-Eval-Print-Loop (REPL) implementation.
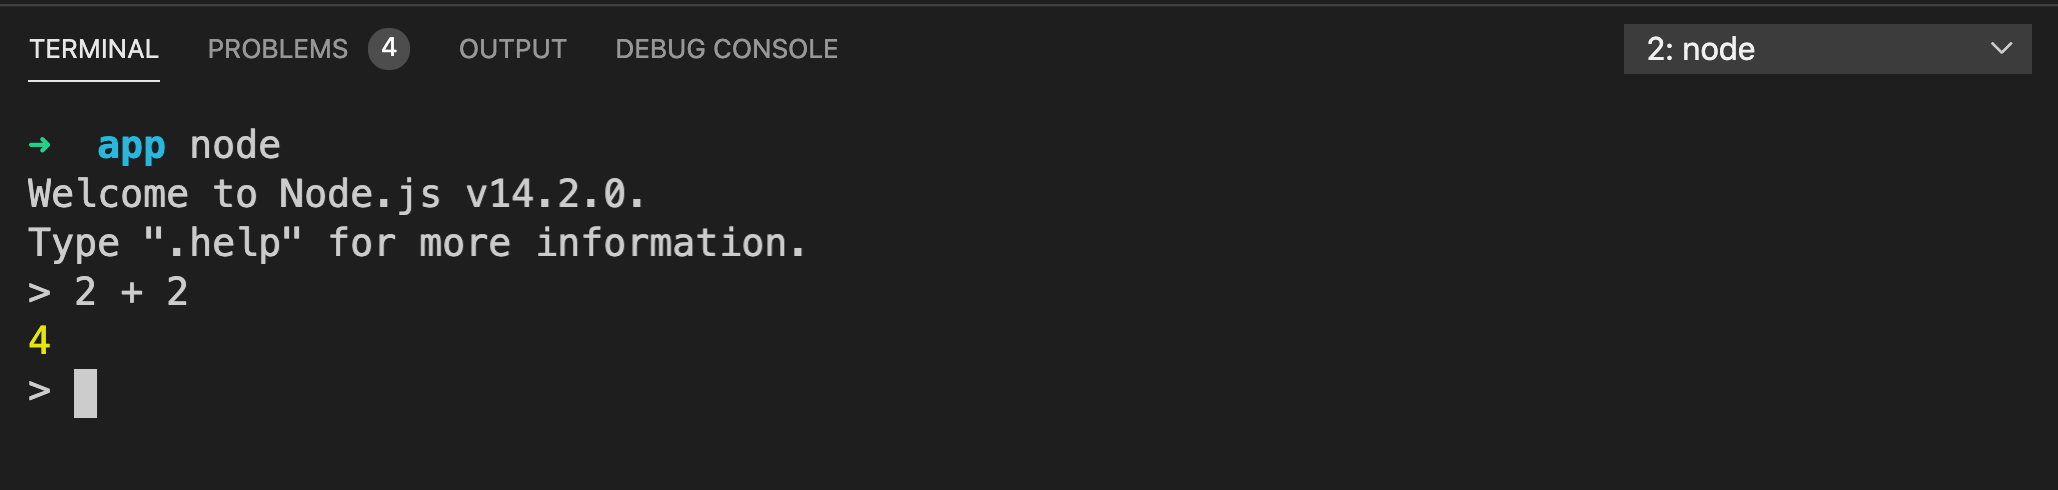
Node Module System
Every file in a Node application is considered a module.
Values defined are scoped in their file. If you want to use a value, you must explicitly export it from its file and then import it into another file.
This is the same as in ES6 modules. The only difference is the syntax of exports and imports.
Nodes default module system is based on CommonJS.1
// acount.js file
const INTEREST_RATE = 0.2;
class Account {
constructor(balance) {
this.balance = balance;
}
deposit(amount) {
this.balance += amount;
}
widthraw(amount) {
this.balance -= amount;
}
}
module.exports.interest = INTEREST_RATE;
module.exports.Account = Account;
Notice the use of module.exports instead of the export keyword in ES6 modules.
The
module.exportsis a JavaScript object. Any value which you want to export can be added as a property to theexportsobject.
To load a module, we use the require function (instead of ES6 import statements).
// index.js file
const { Account } = require("./account.js");
const checking = new Account(100);
checking.deposit(20);
console.log(checking.balance);
- The
requirefunction takes the location of the module relative to the current file. - It returns the
module.exportsobject from the module file. In the code snippet above, I have used Destructuring assignment to destruct theexportsobject. - The require statement can be placed anywhere in a file but it is typically put at the top. (Consider this a good practice and follow it!)
You can also use the ES6 module system with Node. Please refer to Node's document on ECMAScript 2015 (ES6) and beyond.
Module Wrapper Function
Let's see how the CommonJS module system works. First, try the following:
// index.js file
console.log(module);
Run the index.js file using the node runtime environment. It must print an output similar to the one below: (The "paths" will be different on your computer.)
Module {
id: '.',
path: '/Users/alimadooei/Desktop/CS280/01-FA-20/staging/code/app',
exports: {},
parent: null,
filename: '/Users/alimadooei/Desktop/CS280/01-FA-20/staging/code/app/index.js',
loaded: false,
children: [],
paths: [
'/Users/alimadooei/Desktop/CS280/01-FA-20/staging/code/app/node_modules',
'/Users/alimadooei/Desktop/CS280/01-FA-20/staging/code/node_modules',
'/Users/alimadooei/Desktop/CS280/01-FA-20/staging/node_modules',
'/Users/alimadooei/Desktop/CS280/01-FA-20/node_modules',
'/Users/alimadooei/Desktop/CS280/node_modules',
'/Users/alimadooei/Desktop/node_modules',
'/Users/alimadooei/node_modules',
'/Users/node_modules',
'/node_modules'
]
}
- Notice
moduleitself is an object. - It is present in every file!
- It has several properties, including
exportswhich itself is an empty object. - When we want to export a value, we add that value as a property to the
exportsobject.- If you have a single value to export, you can overwrite the
exportsobject to simply store only that value.
- If you have a single value to export, you can overwrite the
But where does the module object come from? The Node application wraps every file in an IFEE that looks like this:
(function (exports, require, modules, __filename, __dirname) {
// your file content goes here!
})();
This is essentially the mechanics of CommonJS modules.
To further experiment with this secrete wrapper IFEE, try the following:
// index.js file
console.log(__filename);
console.log(__dirname);
Here is the output on my computer (will be different on yours):
/Users/alimadooei/Desktop/CS280/01-FA-20/staging/code/app/index.js
/Users/alimadooei/Desktop/CS280/01-FA-20/staging/code/app
Path Module
Node comes with a bunch of useful modules. You will find information about its modules on Node's online documentation. We will look at a few of these.
Let's play around with the Path module first.
// index.js file
const path = require("path");
const pathObj = path.parse(__filename);
console.log(pathObj);
Notice the argument to require is not a file path. It simply is the name of the module. This is the pattern we use to load Node's built-in modules.
Run index.js and you will get an output similar to this one:
{
root: '/',
dir: '/Users/alimadooei/Desktop/CS280/01-FA-20/staging/code/app',
base: 'index.js',
ext: '.js',
name: 'index'
}
OS Module
Let's experiment with the OS module.
// index.js file
const os = require("os");
console.log(`Total memory ${os.totalmem()}`);
console.log(`Free memory ${os.freemem()}`);
Here is the output when I run the index.js file on my computer:
Total memory 17179869184
Free memory 544534528
FS Module
Let's experiment with the File system (FS) module.
// index.js file
const fs = require("fs");
const files = fs.readdirSync("./");
console.log(files);
The readdirSync will synchronously read the files stored in the given directory (the path to the directory is given as an argument to readdirSync function).
On my computer, running index.js results in:
[ 'account.js', 'index.js' ]
There is an asynchronous version of this function which you can (and should) use:
// index.js file
const fs = require("fs");
fs.readdir("./", (err, files) => {
console.log(files);
});
Notice we have used the callback pattern to deal with the async operation. The readdir function was written before JavaScript had Promise object. The function does not return a Promise so we cannot use the Promise pattern (nor async/await) here.
HTTP Module
One of the most powerful modules in Node is the HTTP module. It can be used for building networking applications. For example, we can build an HTTP server that listens to HTTP requests on a given port.
// index.js file
const http = require("http");
const PORT = 5000;
const server = http.createServer(routes);
function routes(request, response) {
if (request.url === "/") {
response.write("Hello world!");
response.end(); // Don't forget this!
}
}
server.listen(PORT);
console.log(`The server is listening on port ${PORT}`);
As you run index.js, you must see the following message printed in the terminal:
The server is listening on port 5000
Note the application is running! To stop it, you must halt the process by pressing Ctrl + C.
While the server application is running, open your browser and head over to http://localhost:5000/. You must see the "Hello World" message!
A note on PORT
In computer networking, a port is a communication endpoint.
- Port numbers start from 0.
- The numbers 0 to 1024 are reserved for privileged services (used by the operating system, etc.).
- For local development, you can safely use any number \(\ge 3000\).
It is beyond the scope of this course to explore what a port is and how it operates. An interested reader is referred to the Wikipedia entry "Port (computer networking)".
A very basic API
Let's update our HTTP server application as follows:
// index.js file
const http = require("http");
// sample schools
schools = [
{
Name: "School of Medicine",
},
{
Name: "Whiting School of Engineering",
},
];
// sample terms
terms = [
{
Name: "Fall 2020",
},
{
Name: "Summer 2020",
},
{
Name: "Spring 2020",
},
];
// sample courses
courses = [
{
OfferingName: "EN.601.226",
SectionName: "01",
Title: "Data Structures",
Instructors: "A. Madooei",
},
{
OfferingName: "EN.601.226",
SectionName: "02",
Title: "Data Structures",
Instructors: "A. Madooei",
},
{
OfferingName: "EN.601.280",
SectionName: "01",
Title: "Full-Stack JavaScript",
Instructors: "A. Madooei",
},
{
OfferingName: "EN.601.280",
SectionName: "02",
Title: "Full-Stack JavaScript",
Instructors: "A. Madooei",
},
];
const PORT = 5000;
const server = http.createServer(routes);
function routes(request, response) {
if (request.url === "/") {
response.write("Welcome to Courses API!");
} else if (request.url === "/api/schools") {
response.write(JSON.stringify(schools));
} else if (request.url === "/api/terms" ) {
response.write(JSON.stringify(terms));
} else if (request.url === "/api/courses" ) {
response.write(JSON.stringify(courses));
}
response.end();
}
server.listen(PORT);
console.log(`Server is listening on port ${PORT}`);
Run the application and then head over to your browser and try the following endpoints:
- http://localhost:5000/
- http://localhost:5000/api/schools
- http://localhost:5000/api/terms
- http://localhost:5000/api/courses
Try these endpoints in the Postman application too (as HTTP Get requests).
The example above showcases the essence of how API servers are built using NodeJS.
We will explore this further in future modules.
Express
Express is a web framework for Node. It allows to build web applications and APIs.
We are going to work with Express for several lectures.
The source code for the completed app (which we will build in this module) can be found at this link.
NPM
There is a lively ecosystem around JavaScript in general and Node in particular. The community embraced open-source projects. A plethora of Node libraries and applications are published and many more are added every day. These open-source projects, which are called Node packages, are published through Node Package Manager or NPM.
NPM is first and foremost an online repository of software (Node in particular) projects. At the time of writing, NPM is the world's largest software registry, with about a million records.
NPM also provides a command-line interface (CLI) that assists with package installation and dependency management. The NPM CLI is installed with Node. To ensure you have it, open the terminal and type npm --version which on my computer, at the time of writing, outputs 6.14.7.
Node packages are like building blocks that you can put together to build a software application.
You can search for packages on http://npmjs.org/. For example, the Express framework can be found at https://www.npmjs.com/package/express.
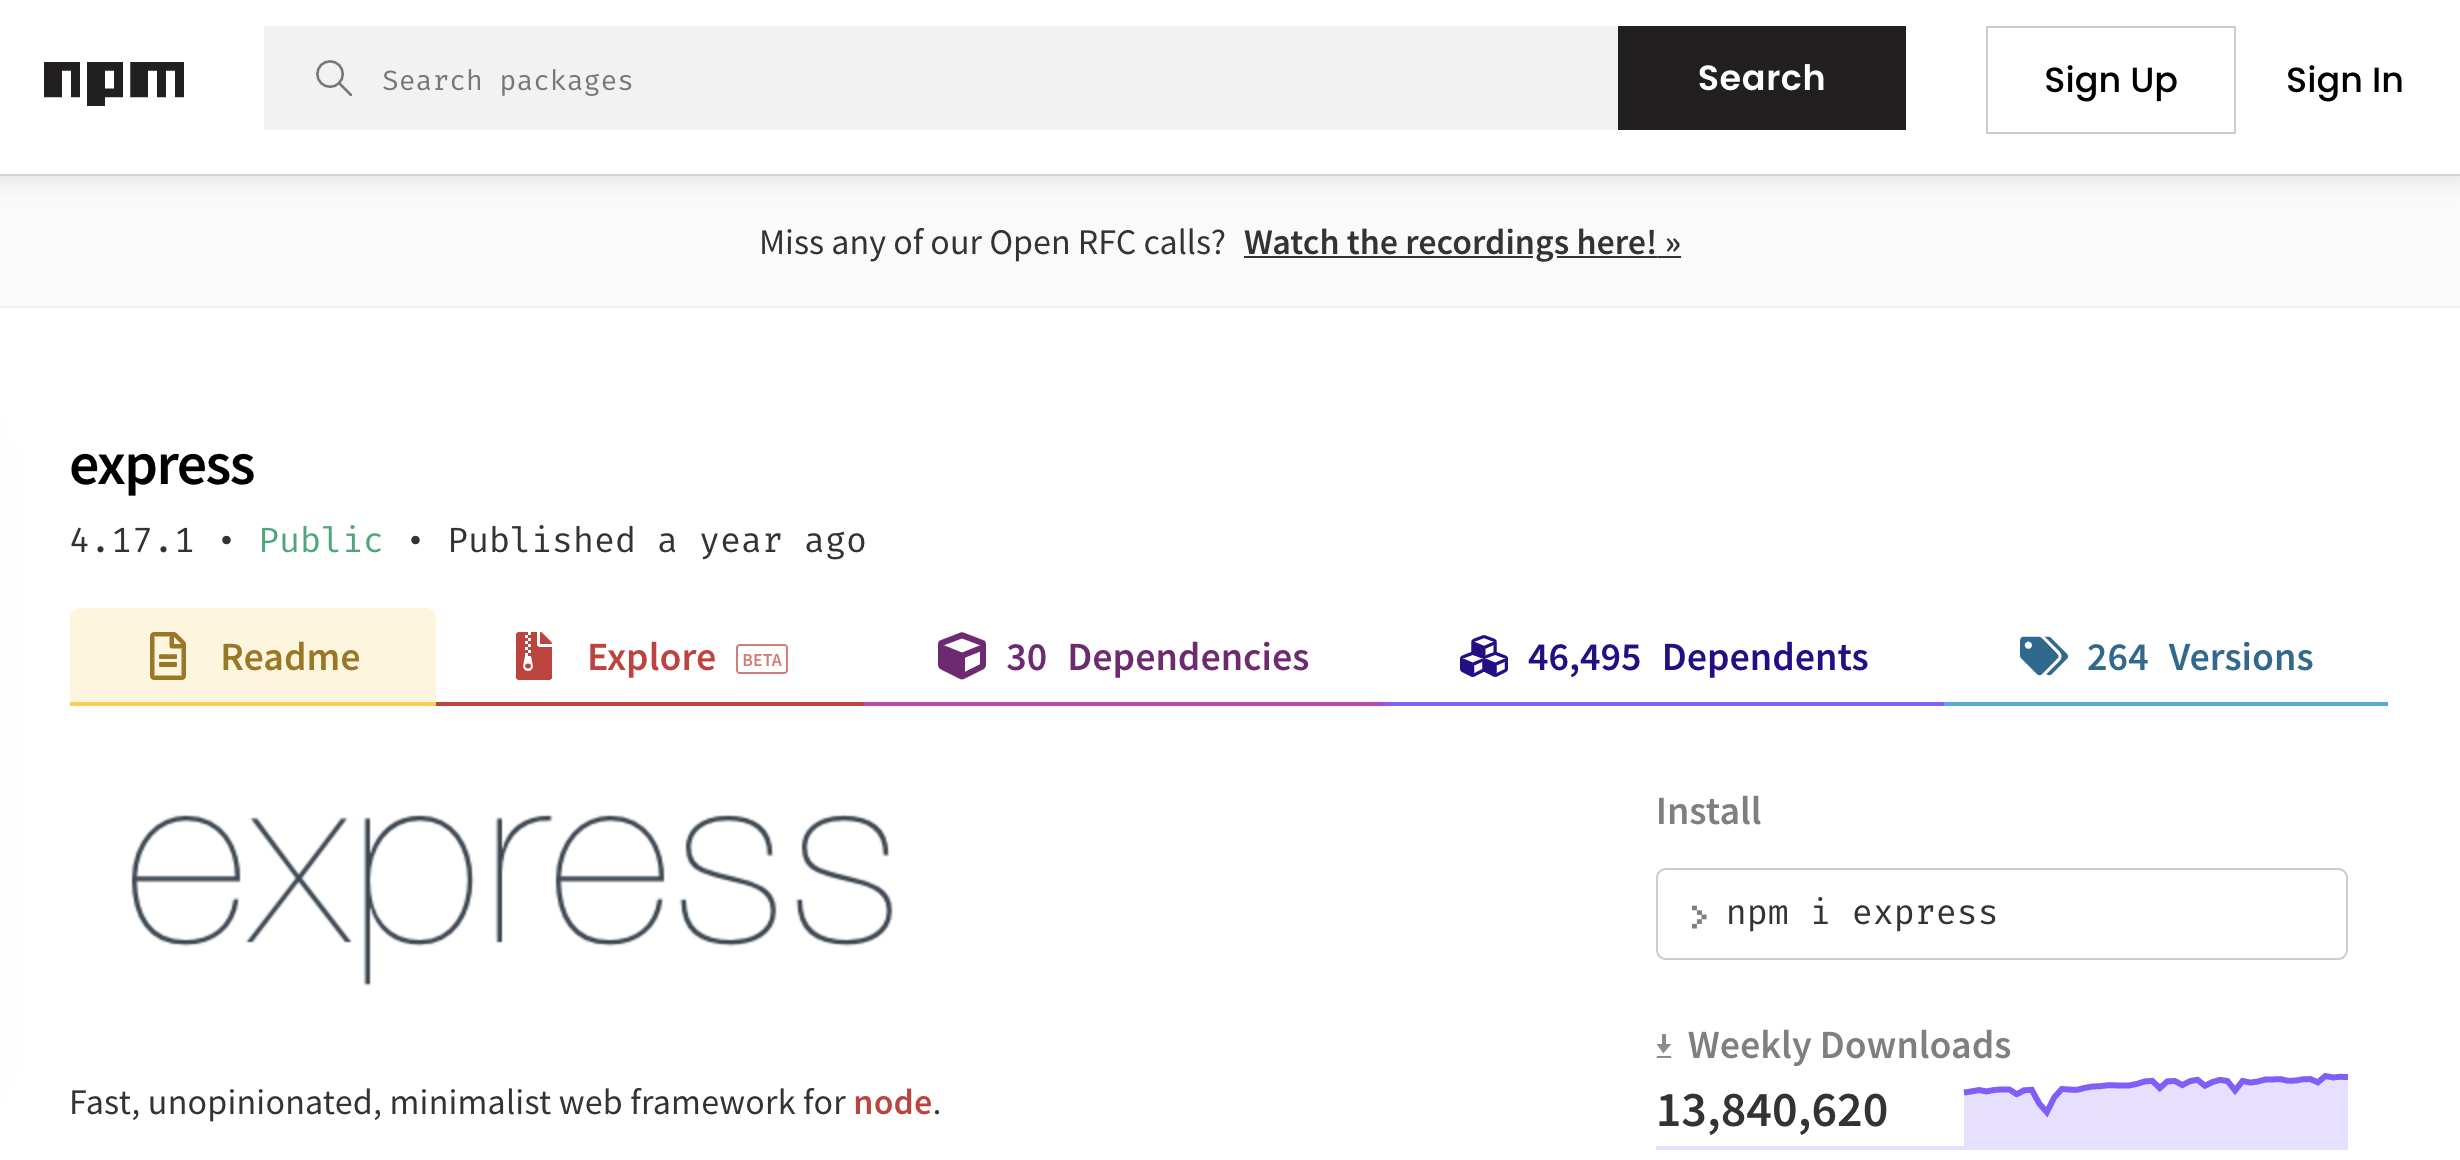
Once you have a package you want to install, it can be installed with a single command-line command.
If you want to learn more about NPM, read "About npm" on http://npmjs.org/.
Step 1: Adding Express as a Dependency
Create a new folder. I will call mine express-app. Open this folder in the terminal and run the following command:
npm init -y
The command will create a package.json file inside the express-app folder:
{
"name": "express-app",
"version": "1.0.0",
"description": "",
"main": "index.js",
"scripts": {
"test": "echo \"Error: no test specified\" && exit 1"
},
"keywords": [],
"author": "",
"license": "ISC"
}
By convention, every Node application (package) has a package.json file at its root folder. The file holds metadata relevant to the project. It is also used, by NPM, for managing the project's dependencies, scripts, version and a whole lot more. We will explore this further in future.
A Node package a folder containing a program described by a
package.jsonfile.
Next, run the following command in the terminal:
npm install express
The
npm installcommand installs a package, and any packages that it depends on.
After installing Express, it can be used in our Node application. This means we can, for instance, create a file index.js, and import Express as a module:
// index.js file
const express = require("express");
// use express in your application!
Notice three changes as a result of installing Express:
-
The following property was added to
package.json"dependencies": { "express": "^4.17.1" }This simply states that the Express package version
4.17.1or higher is a "dependency" of our application. -
A folder
node_moduleswas added toexpress-app. This folder has a lot of content in it! Essentially, the Express package itself is built out of several other packages which themselves are made of other packages. All of these packages are "installed" (downloaded tonode_modulesfolder) so that Express (and thus your app) can work as expected.Make sure to always exclude
node_modulesfolder from your Git repository. Addnode_modules/*to your.gitignorefile. -
A file,
package-lock.jsonis added to the root of your project. As stated earlier, the Express framework itself has many other dependencies. All the packages needed to make Express work are also added as a dependency of your project with their exact versions to thepackage-lock.jsonfile.The
package-lock.jsonis automatically generated and modified. You should never directly edit it.Make sure to include
package-lock.jsonin your Git repository. For any subsequent installs of your project, you need this file to get the exact dependencies which your project is build on.
Install Your Node Application
When you pull down a repository of your Node application, you need to install all the dependencies before running your app. This is also the case for all the starter/completed codes we provide you with.
Let's simulate the process for installing a Node application.
Delete the node_modules folder. Then open the terminal and type the following command:
npm install
This will look up the dependencies in package.json file (and package-lock.json) and install them all.
You must now have node_modules folder rappeared in the root of your application (inside the express-appfolder).
Step 2: Hello Express
Here is a minimal Express application:
// index.js file
const express = require("express");
const app = express();
const port = 5000;
app.get("/", (req, res) => {
res.send("Hello Express!");
});
app.listen(port, () => {
console.log(`Express app listening at http://localhost:${port}`);
});
Go to terminal and run node index.js. You will see the following message printed in the terminal:
Express app listening at http://localhost:5000
While the Express app is running, open your browser and go to http://localhost:5000/. You will see the "Hello Express" message!
Recall: to stop the app, you must halt the process by pressing Ctrl + C.
The application we've built here with Express is identical to the one we had built earlier with Node's HTTP Module. In fact, Express is built on top of Node's HTTP module but it adds a ton of additional functionality to it.
Express provides a clean interface to build HTTP server applications. It provides many utilities, takes care of nuances under the hood, and allows for many other packages to be added as middleware to further the functionality of Express and your server application.
Dissecting the code
Let's take a closer look at our Express app:
const express = require("express");
const app = express();
const port = 5000;
app.get("/", (req, res) => {
res.send("Hello Express!");
});
app.listen(port, () => {
console.log(`Express app listening at http://localhost:${port}`);
});
We will explore it line by line:
- The
require("express")returns a function which we capture in theexpressvariable. - This function returns an object which we capture in the
appvariable by invokingexpress(). - The
appobject has methods for handling HTTP requests among other things. - The
app.get()handles a HTTP Get request.- The first argument is a path, a string representing part of a URL that follows the domain name (see "Anatomy of a URL" for more information).
- The second argument is a callback function. We'll talk about it shortly.
- The
app.listen()binds and listens for connections on the specified port. This method is identical to Node'shttp.Server.listen(). It optionally takes a second argument, a callback function, which I've used to simply print a message to the terminal.
Step 3: A very basic API
Let's recreate the simple API we've created earlier with the HTTP module but this time we will be using Express:
const express = require("express");
const app = express();
const port = 5000;
// sample schools
schools = [
{
Name: "School of Medicine",
},
{
Name: "Whiting School of Engineering",
},
];
// sample terms
terms = [
{
Name: "Fall 2020",
},
{
Name: "Summer 2020",
},
{
Name: "Spring 2020",
},
];
// sample courses
courses = [
{
OfferingName: "EN.601.226",
SectionName: "01",
Title: "Data Structures",
Instructors: "A. Madooei",
},
{
OfferingName: "EN.601.226",
SectionName: "02",
Title: "Data Structures",
Instructors: "A. Madooei",
},
{
OfferingName: "EN.601.280",
SectionName: "01",
Title: "Full-Stack JavaScript",
Instructors: "A. Madooei",
},
{
OfferingName: "EN.601.280",
SectionName: "02",
Title: "Full-Stack JavaScript",
Instructors: "A. Madooei",
},
];
app.get("/", (req, res) => {
res.send("Hello Express!");
});
app.get("/api/schools", (req, res) => {
res.json(schools);
});
app.get("/api/terms", (req, res) => {
res.json(terms);
});
app.get("/api/courses", (req, res) => {
res.json(courses);
});
app.listen(port, () => {
console.log(`Express app listening at http://localhost:${port}`);
});
Run the application and then head over to your browser and try the following endpoints:
- http://localhost:5000/
- http://localhost:5000/api/schools
- http://localhost:5000/api/terms
- http://localhost:5000/api/courses
Step 4: Routing
Routing refers to responding to client requests received over various endpoints (URLs).
In an Express app, routing generally looks like this:
app.METHOD(PATH, HANDLER)
Where:
appis an instance ofexpress.METHODis an HTTP request method, in lowercase. For example,app.get()to handle GET requests andapp.postto handle POST requests. Express supports methods that correspond to all HTTP verbs.PATHis a "path" on the server. It typically appears after the domain name in a URL. For example, inhttps://sis.jhu.edu/api/classes/codes/schoolsthe path is/api/classes/codes/schools.HANDLERis the function executed when the route is "matched".
Let's focus on an example of routing:
app.get("/api/schools", (req, res) => {
res.json(schools);
});
The Express app is listening on http://localhost:5000/. When a client goes to the URL http://localhost:5000/api/schools, the path /api/schools is matched with the above route and the following "handler" function is executed:
(req, res) => {
res.json(schools);
}
-
The
reqis an object that represents the HTTP request. The Express app will build this object (based on the incoming requests) with properties for the request query string, parameters, body, HTTP headers, and so on. -
The
resis an object that represents the HTTP response. The Express app provides many properties so you can appropriately respond to an HTTP request. For example,res.json(schools)sends back theschoolsas a JSON object.
Note that we have not yet made any use of the req object. However, in earlier lectures, when we interacted with the SIS API, we've seen how for instance the API Key was passed as a query parameter along with the API endpoint. Similarly, if a client were to make the following Get request to our Express app:
http://localhost:5000/api/schools?key=pJnMRxKD1fFECXFRX1FDXykpLww0Lazk
We could get the (API) key and print it to the terminal as follows:
app.get("/api/schools", (req, res) => {
console.log(req.query.key);
res.json(schools);
});
Step 5: Web Application
We have deployed simple web apps to GitHub Pages. When a client visits the URL of our deployed app, they send an HTTP Get request to the GitHub server. The GitHub server in response sends the index.html file (and the script.js, style.css and any other files linked to index.html) to the client. The client's browser then renders the index.html and the client will see the app.
We can build our own server to serve clients with files and data pertaining to a web application.
Add the following index.html file to the express-app folder.
<!DOCTYPE html>
<html lang="en">
<head>
<meta charset="UTF-8">
<meta name="viewport" content="width=device-width, initial-scale=1.0">
<title>Express App</title>
</head>
<body>
<h1>Hello Express!</h1>
</body>
</html>
Update the index.js file so when a client visits http://localhost:5000, they would receive the index.html file.
app.get("/", (req, res) => {
res.sendFile(path.resolve(__dirname, "index.html"));
});
Note: to use the Path module you must import it
const path = require("path");
Run the Express app and then visit http://localhost:5000.
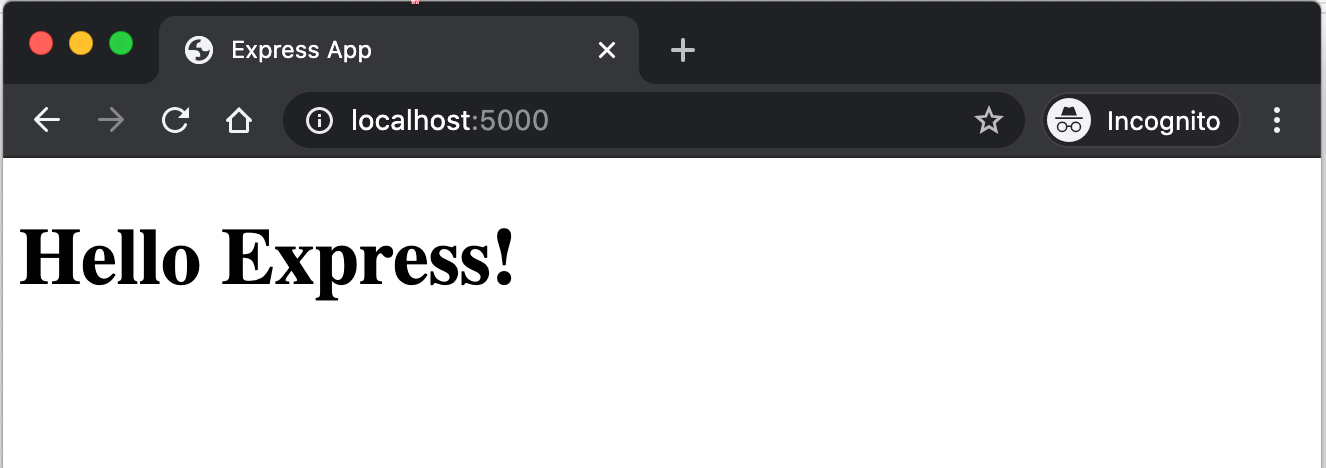
Step 6: Login
Let's add a login form to our Web application. To keep things simple, we only ask for username!
Update index.html by adding the following form element to it:
<form action="/dashboard">
<label for="uname">username:</label>
<input type="text" id="username" name="uname"><br><br>
<input type="submit" value="Login">
</form>
Notice the action attribute of the form.
Save index.html and refresh http://localhost:5000/.
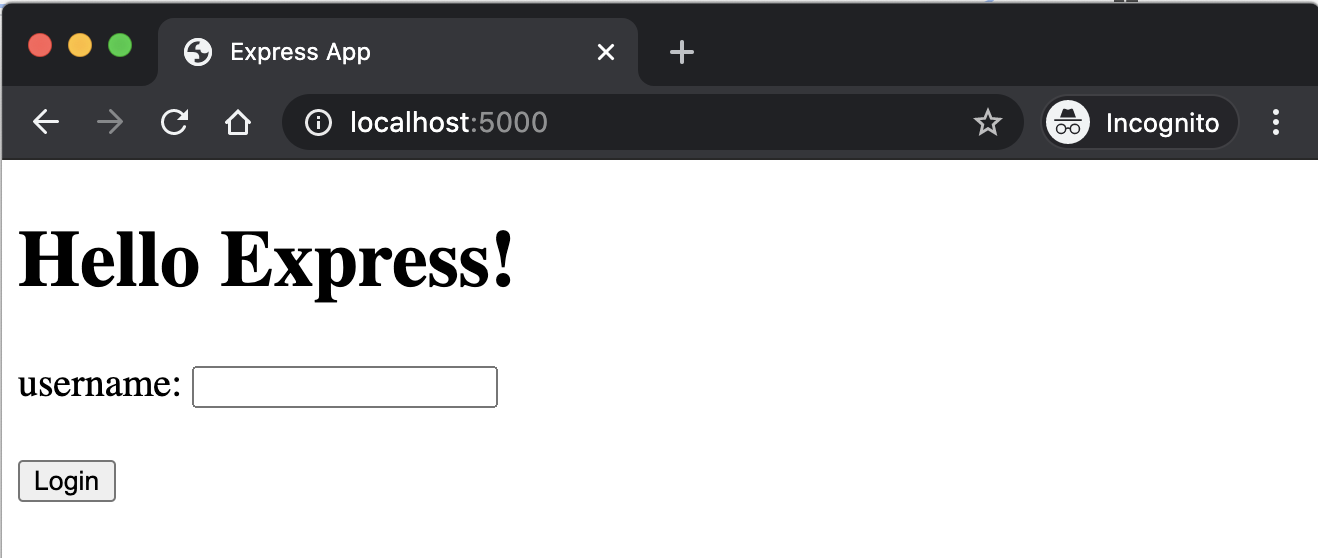
Go ahead an key in a username and then hit on the login button. What does happen?
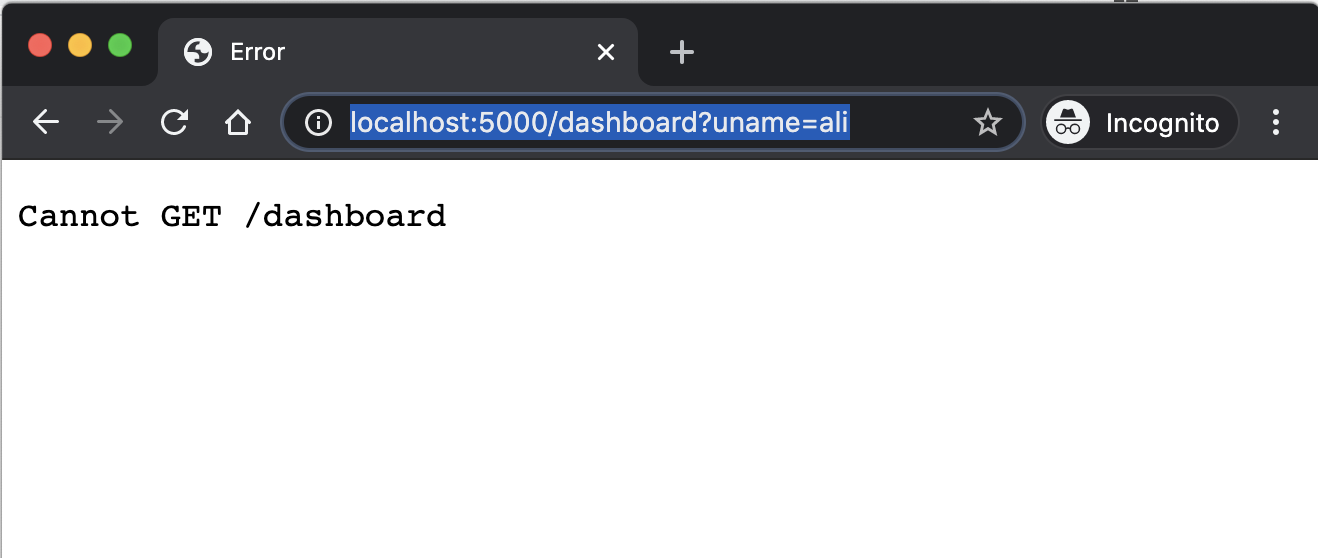
The browser is directed to the http://localhost:5000/dashboard?uname=ali. There is no route in our Express app to serve this endpoint however.
Add the following to index.js
app.get("/dashboard", (req, res) => {
res.send(`Welcome ${req.query.uname}`);
});
Reload the Express app. Go to http://localhost:5000/. Enter a username and press login. You will be redirected to the "dashboard" endpoint where a welcome message awaits you!
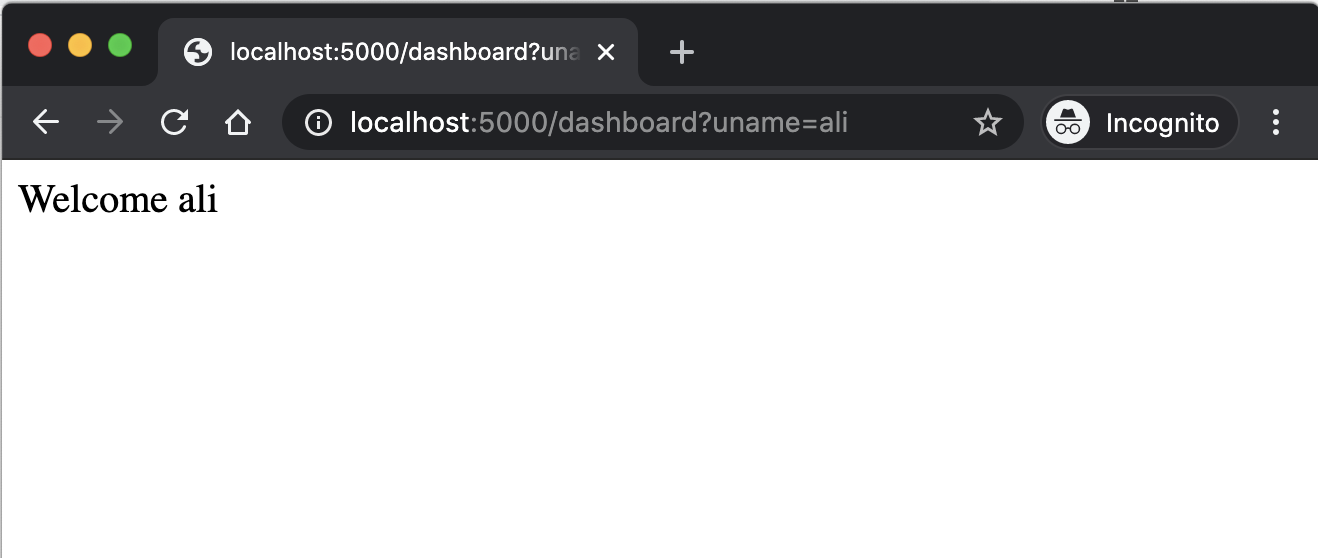
Step 7: The Dashboard!
Let's make an HTML page for the dashboard. Create dashboard.html with the following content:
<!DOCTYPE html>
<html lang="en">
<head>
<meta charset="UTF-8">
<meta name="viewport" content="width=device-width, initial-scale=1.0">
<title>Dashboard</title>
</head>
<body>
<h1>Welcome USERNAME!</h1>
</body>
</html>
Update the route handler to serve this file:
app.get("/dashboard", (req, res) => {
console.log(`Welcome ${req.query.uname}`);
res.sendFile(path.resolve(__dirname, "dashboard.html"));
});
Rerun your Express app. Visit http://localhost:5000/. Enter a username and press login. You will be redirected to the "dashboard" endpoint!
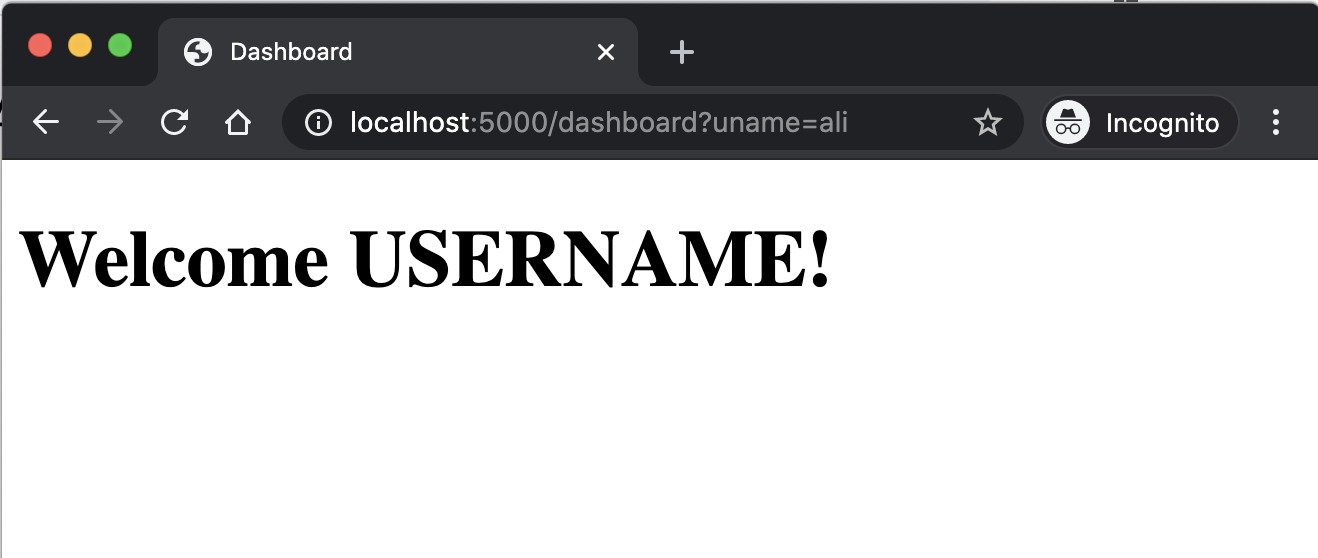
The only issue now is to find a way to dynamically update the USERNAME (in dashboard.html) based on the request query parameter which we receive (req.query.uname).
Step 8: Template Engine
In order to dynamically update the dashboard.html we need a template engine. A template engine enables you to use static template files in your application.
At runtime, the template engine replaces variables in a template file with actual values, and transforms the template into an HTML file sent to the client.
There are many template engines out there! We will be using Nunjucks. It is specially designed to play well with JavaScript and that is the main reason we prefer it over alternatives.
Stop your Express app and add Nunjucks as a dependency to your application (i.e. install it using NPM):
npm install nunjucks
Let's add and configure Nunjucks in index.js. At the top of the file, add the following line:
const nunjucks = require("nunjucks");
Add the following after declaration of the app variable:
nunjucks.configure("views", {
autoescape: true,
express: app,
});
Create a new folder, views, inside the express-app folder. Create dashboard.njk file with the following content, inside the views folder:
<!DOCTYPE html>
<html lang="en">
<head>
<meta charset="UTF-8">
<meta name="viewport" content="width=device-width, initial-scale=1.0">
<title>Dashboard</title>
</head>
<body>
<h1>Welcome {{ uname }}!</h1>
</body>
</html>
Notice this file is identical to dashboard.html except for the {{ uname }} in <h1> element.
The {{}} is a Nunjucks syntax for looking up a variable's value from the template context. The template context must be provided in your route handler:
// index.js file
app.get("/dashboard", (req, res) => {
let data = {
uname: req.query.uname,
};
res.render("dashboard.njk", data);
});
Rerun your Express app. Visit http://localhost:5000/. Enter a username and press login. You will be redirected to the "dashboard" endpoint!
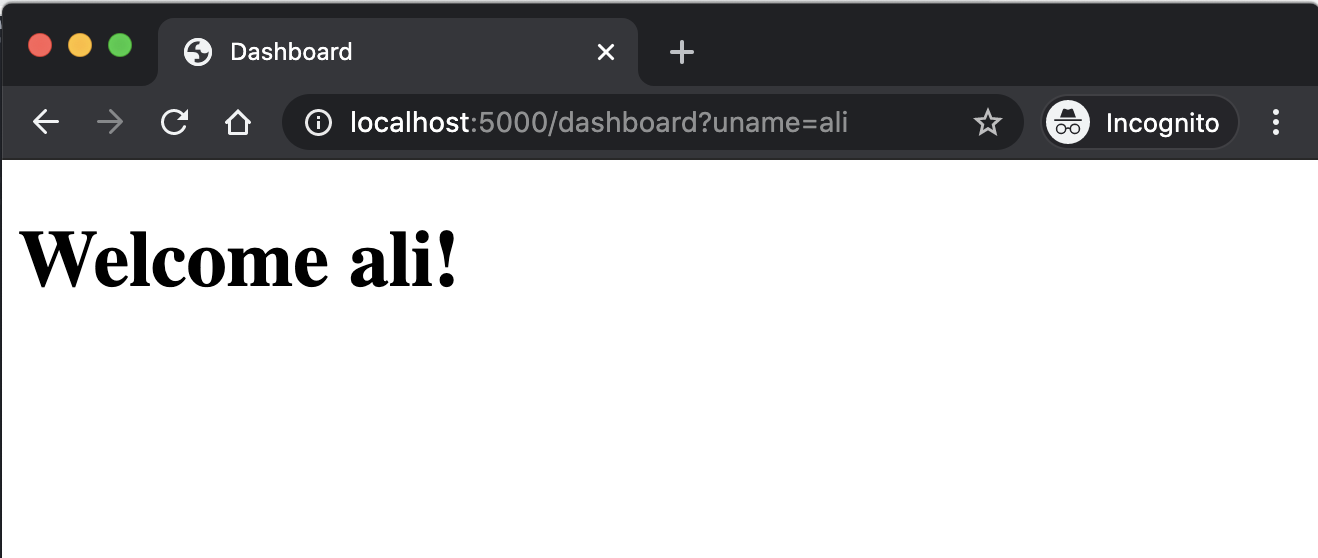
There is a lot more we can do with template engines. Essentially, we can build a full-fledged web application using Express, template engines, and a database. In future modules, we will further explore these possibilities.
Step 9: Serving Static Files
Let's add minimal styling to our application! Create the following style.css file and place it inside express-app/assets:
body {
margin: 2em;
text-align: center;
line-height: 1.5;
font-size: 1.1em;
}
Put a link to style.css in index.html and dashboard.njk:
<link rel="stylesheet" href="style.css">
Notice the href attribute does not include the folder assets in the CSS file path. We will have the Express to serve the content of assets folder as a static files.
Static files are files such as images, CSS files, and even JavaScript files which are shared among your HTML pages and do not change during runtime as a result of user interaction (hence, "static").
To serve static files, place the following statement somewhere after declaration of the app variable:
app.use(express.static("assets"));
Rerun your Express app. Visit http://localhost:5000/. You must see the look of the application changed!
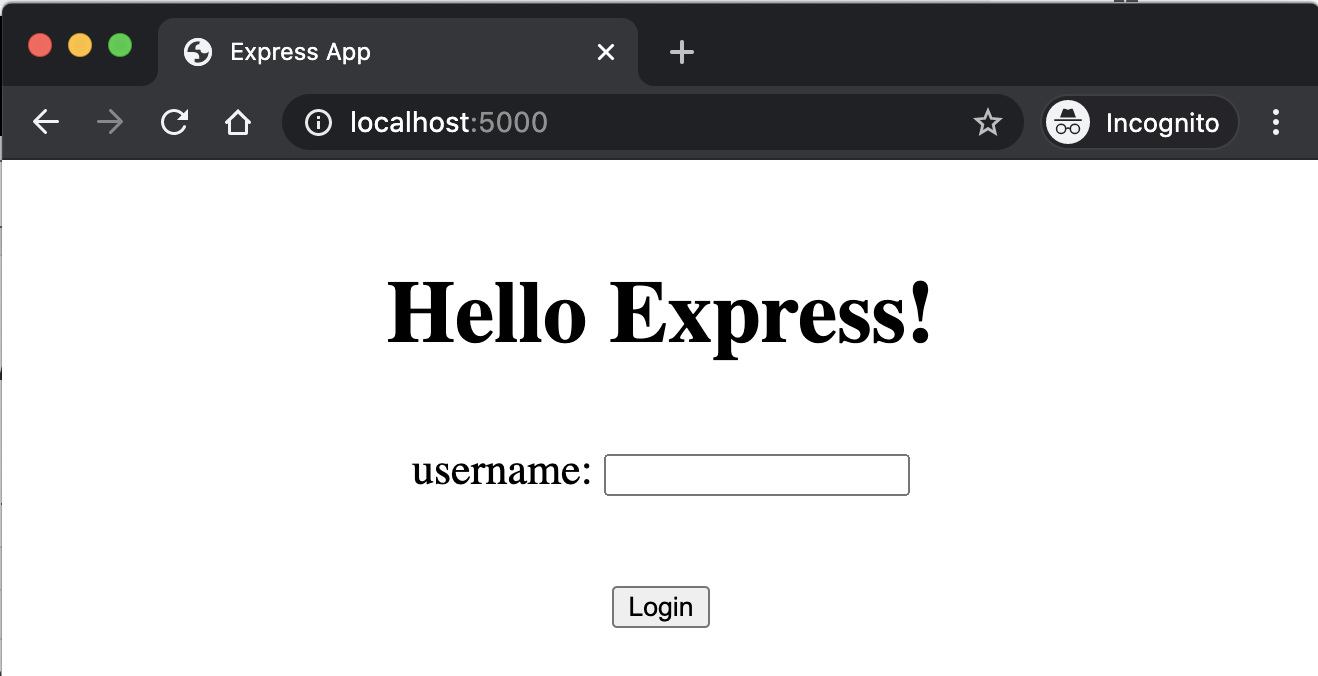
Continuous Delivery with Heroku
Continuous Delivery (or Continuous Deployment, or CD) is a software engineering approach in which software functionalities are delivered frequently through automated deployments.
Heroku, a platform as a service (PaaS), is one of the most popular choices for deploying and running software applications. Heroku is primed for continuous delivery.1
Heroku, in a nutshell, is a cloud application platform that lets you deploy your server online. By taking care of most things related to deployment, it makes it easy to get your application up and running.
Before we get started, you must create a free Heroku account (sign up).
You may also install the Heroku CLI, although, we are going to use the Integration with GitHub tool for automatic deployement.
Read more about Continuous Delivery on Heroku at https://www.heroku.com/continuous-delivery.
Step 1
Login to your Heroku account and create a (free) Heroku app.
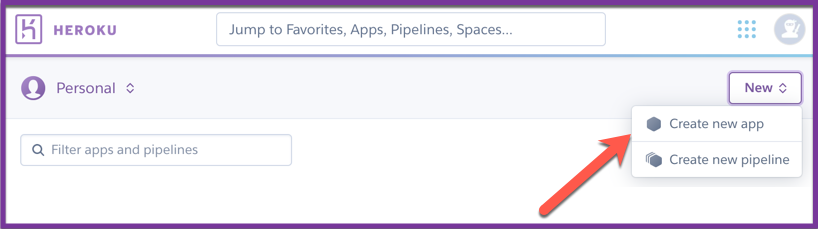
Give your app a name. Most names are already be taken! You must come up with a unique one.
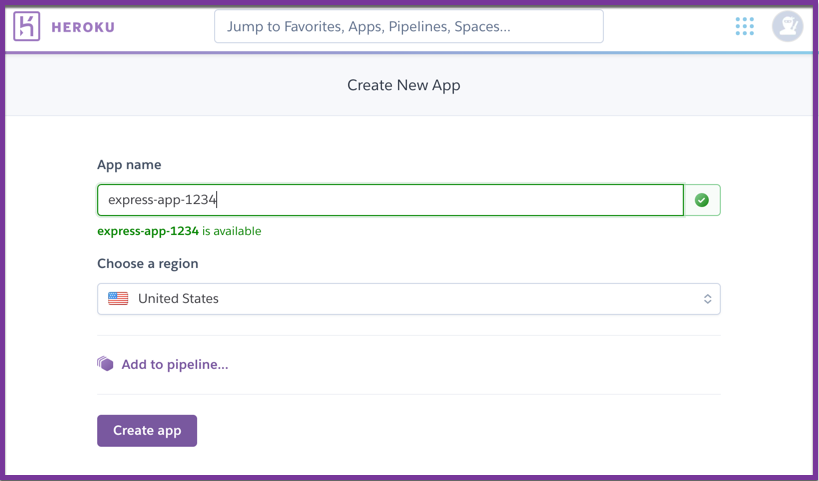
Once the app is created, connect it to your GitHub Account.
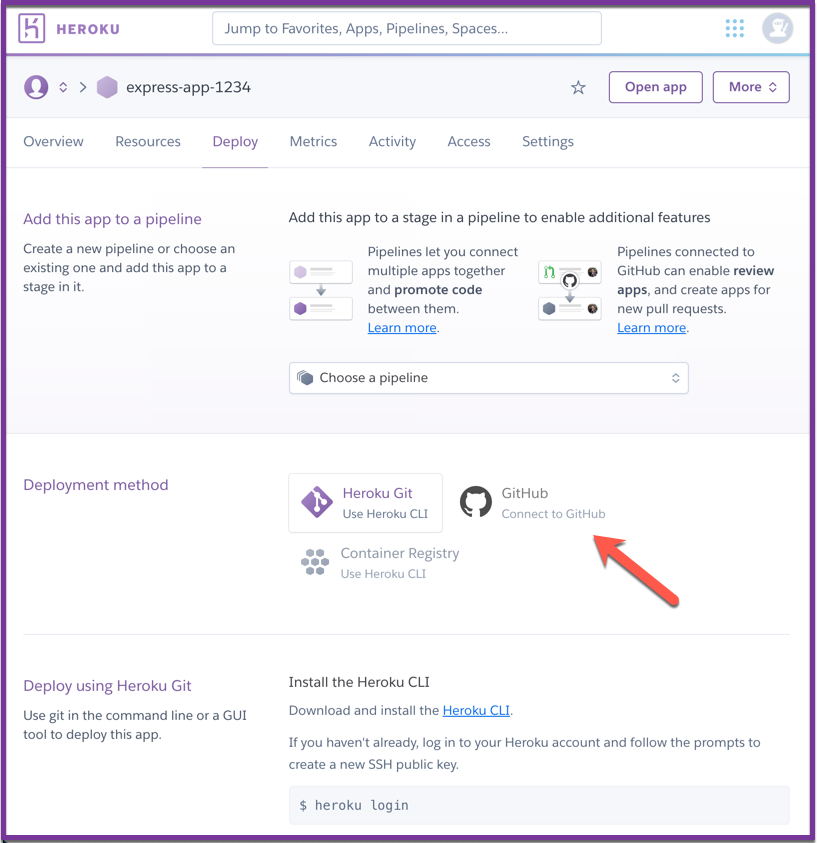
You must now select the repository that holds the source code of your app.
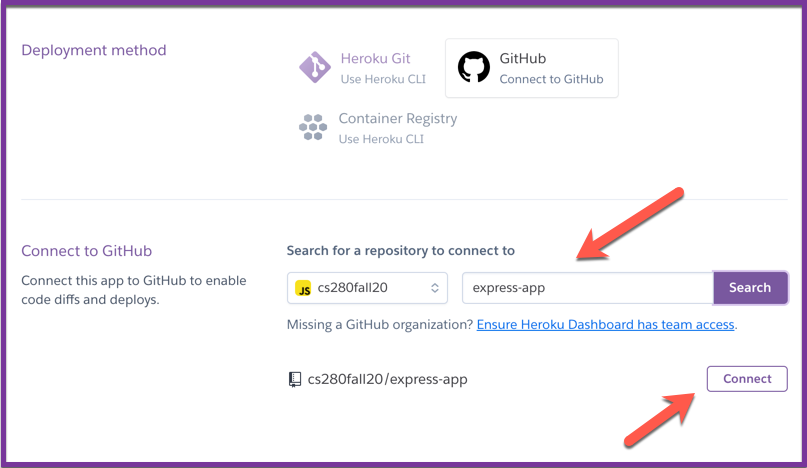
App is connected now:
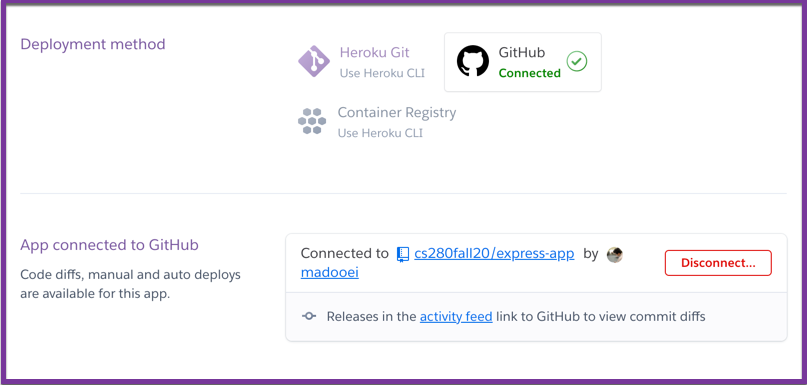
Enable Automatic Deploys.
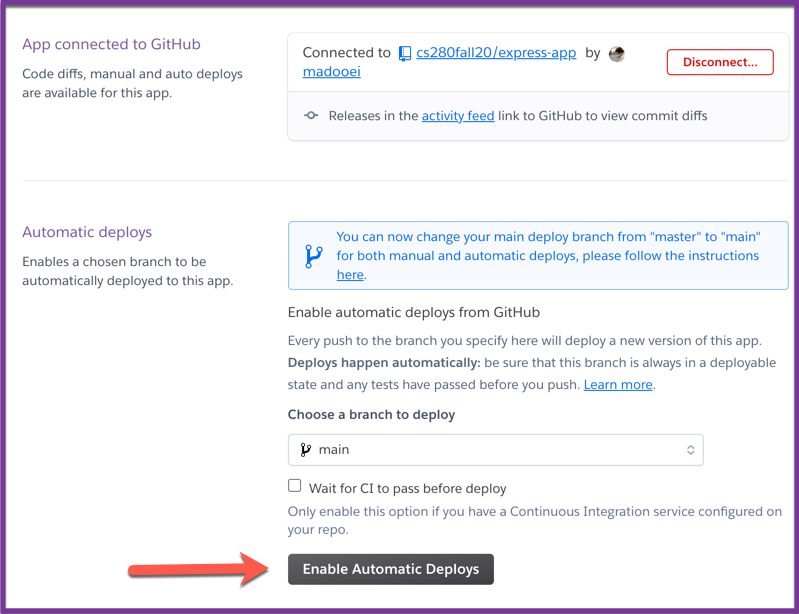
From this point on, every time you push to main, it will be deployed to the Heroku.
Notice that GitHub has changed the default branch name from
mastertomainabout 11 days ago! (Read their announcement here). Heroku had updated their default branch for deployment (frommastertomain) before GitHub doing this. If you are wondering why, read this article: Regarding Git and Branch Naming.
Step 2
We must make two changes to our repository for Heroku to successfully deploy our application from it.
First, we must add a Procfile to the root of the repository with the following content
web: node ./index.js
A Procfile specifies the commands that are executed by the Heroku app on startup. Read more about it here.
Next, we must update the index.js as follows. Change this line
const port = 5000;
to the following:
const port = process.env.PORT || 5000;
In many environments (e.g. Heroku), and as a convention, you can set the environment variable PORT to tell your web server what port to listen on.
So process.env.PORT || 5000 means: use whatever is in the environment variable PORT as the port number, or 5000 if there's nothing there.
We need this change because Heroku will automatically assign a port to your application. It then stores the port number as a environment variable.
Finally, commit and push your changes. As the new changes get to your GitHub repository, Heroku will build and deploy the application. Give it a minute or two and then visit your your app.
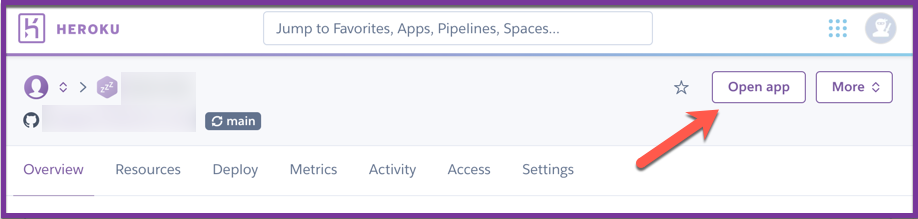
Ours is deployed at https://express-app-1234.herokuapp.com/.
Deploy from Terminal
You don't need a GitHub repository to deploy an application to Heroku. There may be cases where you want to deploy a local development without creating a GitHub repository. This section teaches you how to use Heroku CLI for that.
First, download and install Heroku CLI by following this guideline.
Next, you must link your Heroku CLI to your Heroku account. This is done by loggin to your account through the command-line interface. Please follow the instructions here.
We are going to create a very simple Express app locally before deploying it to Heroku. Create a folder heroku-cli-demo. Open the terminal and change the directory to heroku-cli-demo folder. Run npm init -y to initiate a Node project. Follow this by running npm install express.
Heroku does not need GitHub but it does need Git! So, before going any further, create a .gitignore file inside heroku-cli-demo with the following content:
.DS_Store
.vscode/*
.idea/*
node_modules/*
Next, head over to the terminal and run the following commands:
git init
git add .
git commit -m "Initial Commit"
Create the index.js file inside heroku-cli-demo with the following content:
const express = require("express");
const app = express();
const port = process.env.PORT || 5000;
app.get("/", (req, res) => {
res.send("Hello Heroku!")
});
app.listen(port, () => {
console.log(`Express app listening at port: ${port}`);
});
Notice the statement const port = process.env.PORT || 5000; that allows us to use this script both locally and on Heroku by dynamically changing the port number.
Create the Procfile file inside heroku-cli-demo with the following content:
web: node ./index.js
Go to the terminal and run the following commands:
git add .
git commit -m "App is ready for deployment"
We can now deploy the Express app to Heroku with two simple commands!
First, create a Heroku App using CLI. In the terminal, run the following command:
heroku create
Here is the output on my computer
Creating app... done, ⬢ sleepy-ocean-40199
https://sleepy-ocean-40199.herokuapp.com/ | https://git.heroku.com/sleepy-ocean-40199.git
Notice an app has been created with a randomly generated name and it is now available at https://sleepy-ocean-40199.herokuapp.com/. The URL will be different for you.
Second, deploy the local repository to Heroku App. In the terminal, run the following command:
git push heroku master
This command pushes your code to the Heroku app and triggers a build followed by deployment. Here is the output on my computer
Enumerating objects: 9, done.
Counting objects: 100% (9/9), done.
Delta compression using up to 12 threads
Compressing objects: 100% (7/7), done.
Writing objects: 100% (9/9), 5.22 KiB | 5.22 MiB/s, done.
Total 9 (delta 1), reused 0 (delta 0)
remote: Compressing source files... done.
remote: Building source:
remote:
remote: -----> Node.js app detected
remote:
remote: -----> Creating runtime environment
remote:
remote: NPM_CONFIG_LOGLEVEL=error
remote: NODE_ENV=production
remote: NODE_MODULES_CACHE=true
remote: NODE_VERBOSE=false
remote:
remote: -----> Installing binaries
remote: engines.node (package.json): unspecified
remote: engines.npm (package.json): unspecified (use default)
remote:
remote: Resolving node version 12.x...
remote: Downloading and installing node 12.19.0...
remote: Using default npm version: 6.14.8
remote:
remote: -----> Installing dependencies
remote: Installing node modules
remote: added 50 packages in 1.131s
remote:
remote: -----> Build
remote:
remote: -----> Caching build
remote: - node_modules
remote:
remote: -----> Pruning devDependencies
remote: audited 50 packages in 0.79s
remote: found 0 vulnerabilities
remote:
remote:
remote: -----> Build succeeded!
remote: -----> Discovering process types
remote: Procfile declares types -> web
remote:
remote: -----> Compressing...
remote: Done: 22.9M
remote: -----> Launching...
remote: Released v3
remote: https://sleepy-ocean-40199.herokuapp.com/ deployed to Heroku
remote:
remote: Verifying deploy... done.
To https://git.heroku.com/sleepy-ocean-40199.git
* [new branch] master -> master
My app is now up and running at https://sleepy-ocean-40199.herokuapp.com/.
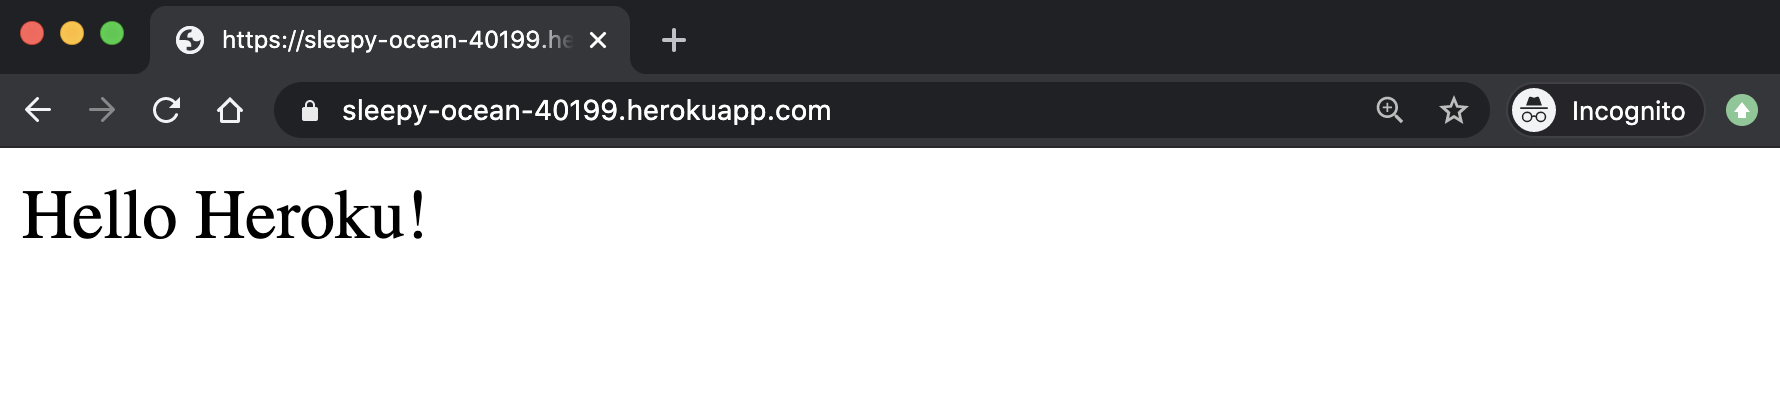
From this point on, every time I make a change to the local repository, I must commit those changes and then run the command
git push heroku masterto trigger a deployment on Heroku.
Note: you can rename the app from the randomly generated name to something else. The instruction are provided here.
YouNote API
We are going to build the API for a note taking application called YouNote.
In our API, users will be able to create notes, as well as read, update, and delete the notes they’ve created.
The source code for the completed app (which we will build in this module) can be found at this link.
Step 1
Create a folder younote-api. Open the terminal and change directory to your project folder. Run the command npm init -y. Then, install Express: npm install express.
Create a index.js file with the following content.
const express = require("express");
const app = express();
const port = 4567;
app.listen(port, () => {
console.log(`Server is listening on http://localhost:${port}`);
});
You can run your Express app now (node index.js in the terminal).
Step 2
Create a folder model inside younote-api. Create the file Note.js inside the model folder, with the following content:
class Note {
constructor(content, author) {
this.content = content;
this.author = author;
}
}
module.exports = Note;
You can now go to index.js and import Note to make a sample object:
const Note = require("./model/Note.js");
const note = new Note("Sample Note", "Ali");
console.log(note);
Rerun the Express app and make sure the sample note is printed to the terminal.
Expected output
Note { content: 'Sample Note', author: 'Ali' }
Step 3
We will eventually store our notes in a database but for now let's simply keep them in an array.
Add the following to index.js:
const notes = [];
notes.push(new Note("Sample 1", "Author 1"));
notes.push(new Note("Sample 2", "Author 2"));
notes.push(new Note("Sample 3", "Author 3"));
console.log(notes);
Rerun the Express application again and ensure the samples are printed to the terminal.
Expected output
[
Note { content: 'Sample 1', author: 'Author 1' },
Note { content: 'Sample 2', author: 'Author 2' },
Note { content: 'Sample 3', author: 'Author 3' }
]
It is going to be annoying if, during development, every time we change something in the code, we would need to stop the server and run it again.
Stop the application and install nodemon:
npm install -g nodemon
Nodemon is a utility that will monitor for any changes in your source and automatically restart your server.
I've decided to install it globally (the flag -g means install globally) since we will very likely use Nodemon for other projects.
After installation, instead of using node command, use nodemon to run your application:
nodemon index.js
Make a small change to your code and save the file. Notice the server is restarted automatically!
Step 4
As stated earlier, we will eventually use a database to add persistence to this application. For now, we will add a Data Access Object for Note.
In a nutshell, a Data Access Object is an object that provides an abstraction over some type of database or other persistence mechanism.
Create the NoteDao.js file inside the model folder with the following content:
class NoteDao {
constructor() {
this.notes = [];
}
}
module.exports = NoteDao;
We shall provide methods for common database operations.
CRUD stands for create, read, update, and delete. It refers to the common tasks you want to carry out on database.
NoteDao is going to provide CRUD operation for notes.
Let's start with "create"; add the following method to NoteDao:
create(content, author) {
this.notes.push(new Note(content, author));
}
To use Note, you must import it in NoteDao.js:
const Note = require("./Note.js");
Most databases will assign a unique ID to an object once it is created. We can simulate that here:
create(content, author) {
const note = new Note(content, author);
note._id = this.nextID();
this.notes.push(note);
return note;
}
where we declare nextID in the constructor
constructor() {
this.notes = [];
this.nextID = uniqueID();
}
Here is the implementation of uniqueID()
const uniqueID = function() {
let id = 0;
return function() {
return id++;
}
}
Notice the use of closure! Place uniqueID outside of the NoteDao class definition.
Step 5
Add the following method to NoteDao class:
readAll() {
return this.notes;
}
The readAll method is like a getter method that returns all notes.
Let's update the index.js where we created sample notes previously to instead use NoteDao as follows:
const notes = new NoteDao();
notes.create("Sample 1", "Author 1");
notes.create("Sample 2", "Author 2");
notes.create("Sample 3", "Author 2");
notes.create("Sample 4", "Author 1");
console.log(notes.readAll());
As you save the changes to your file, you must see the sample notes printed to the terminal.
Expected output
[
Note { content: 'Sample 1', author: 'Author 1', _id: 0 },
Note { content: 'Sample 2', author: 'Author 2', _id: 1 },
Note { content: 'Sample 3', author: 'Author 2', _id: 2 },
Note { content: 'Sample 4', author: 'Author 1', _id: 3 }
]
It is common to search a database for a specific record/object using its unique identifier. We can add the following read method for that:
read(id) {
return this.notes.find((note) => note._id === id);
}
It is also common to search for database records given one or more attributes. We can allow clients to search for notes given their author or content attributes.
Let's update the readAll method to have an optional parameter author:
readAll(author = "") {
if (author !== "") {
return this.notes.filter((note) => note.author === author);
}
return this.notes;
}
To test our application, update the index.js where we created sample notes previously to read (and return) notes given an id or their author:
const notes = new NoteDao();
notes.create("Sample 1", "Author 1");
notes.create("Sample 2", "Author 2");
notes.create("Sample 3", "Author 2");
notes.create("Sample 4", "Author 1");
console.log(notes.read(2));
console.log(notes.readAll("Author 1"));
console.log(notes.readAll());
As you save the changes to your file, you must see the sample notes printed to the terminal.
Expected output
Note { content: 'Sample 3', author: 'Author 2', _id: 2 }
[
Note { content: 'Sample 1', author: 'Author 1', _id: 0 },
Note { content: 'Sample 4', author: 'Author 1', _id: 3 }
]
[
Note { content: 'Sample 1', author: 'Author 1', _id: 0 },
Note { content: 'Sample 2', author: 'Author 2', _id: 1 },
Note { content: 'Sample 3', author: 'Author 2', _id: 2 },
Note { content: 'Sample 4', author: 'Author 1', _id: 3 }
]
Step 6
Let's implement a method to "update" a note given its ID:
update(id, content, author) {
const index = this.notes.findIndex((note) => note._id === id);
if (index !== -1) {
this.notes[index].content = content;
this.notes[index].author = author;
return this.notes[index];
}
return null;
}
Let's also provide an operation to "delete" a note given its ID:
delete(id) {
const index = this.notes.findIndex((note) => note._id === id);
if (index !== -1) {
const note = this.notes[index];
this.notes.splice(index, 1);
return note;
}
return null;
}
To test our application, update the index.js where we created sample notes previously to update/delete notes given their id:
const notes = new NoteDao();
notes.create("Sample 1", "Author 1");
notes.create("Sample 2", "Author 2");
notes.create("Sample 3", "Author 2");
notes.create("Sample 4", "Author 1");
console.log(notes.read(2));
console.log(notes.readAll("Author 1"));
console.log(notes.readAll());
console.log(notes.update(0, "Sample 0", "Author 3"));
console.log(notes.delete(1));
console.log(notes.readAll());
As you save the changes to your file, you must see the sample notes printed to the terminal.
Expected output
Note { content: 'Sample 3', author: 'Author 2', _id: 2 }
[
Note { content: 'Sample 1', author: 'Author 1', _id: 0 },
Note { content: 'Sample 4', author: 'Author 1', _id: 3 }
]
[
Note { content: 'Sample 1', author: 'Author 1', _id: 0 },
Note { content: 'Sample 2', author: 'Author 2', _id: 1 },
Note { content: 'Sample 3', author: 'Author 2', _id: 2 },
Note { content: 'Sample 4', author: 'Author 1', _id: 3 }
]
Note { content: 'Sample 0', author: 'Author 3', _id: 0 }
Note { content: 'Sample 2', author: 'Author 2', _id: 1 }
[
Note { content: 'Sample 0', author: 'Author 3', _id: 0 },
Note { content: 'Sample 3', author: 'Author 2', _id: 2 },
Note { content: 'Sample 4', author: 'Author 1', _id: 3 }
]
Now that we know the NoteDao works fine, delete all the console.log message in index.js and leave it as creating four sample notes.
Step 7
We are ready to build our API.
Recall the following HTTP verbs (operations):
- POST: to create a resource
- PUT: to update it
- GET: to read it
- DELETE: to delete it
We will start with HTTP GET requests.
Let's document our HTTP requests as we implement them:
| Read Notes | |
|---|---|
| HTTP Method | GET |
| API Endpoint | /api/notes |
| Request Path Parameter | |
| Request Query Parameter | |
| Request Body | |
| Response Body | JSON array of notes |
| Response Status | 200 |
What is Response Status?
The response status is a "code" (number) returned to the client that signals the success/failure of their request. Here are the common status codes and their meaning:
| Status | Meaning |
|---|---|
| 200 (OK) | This is the standard response for successful HTTP requests. |
| 201 (CREATED) | This is the standard response for an HTTP request that resulted in an item being successfully created. |
| 204 (NO CONTENT) | This is the standard response for successful HTTP requests, where nothing is being returned in the response body. |
| 400 (BAD REQUEST) | The request cannot be processed because of bad request syntax, excessive size, or another client error. |
| 403 (FORBIDDEN) | The client does not have permission to access this resource. |
| 404 (NOT FOUND) | The resource could not be found at this time. It is possible it was deleted, or does not exist yet. |
| 500 (INTERNAL SERVER ERROR) | The generic answer for an unexpected failure if there is no more specific information available. |
Add this route to index.js
app.get("/api/notes", (req, res) => {
res.json(notes.readAll());
});
As you save the code, nodemon reruns the Express application. Open your browser and head over to http://localhost:4567/api/notes. You must receive a JSON array containing our 4 sample notes.
You can also hit this endpoint on Postman to test it.
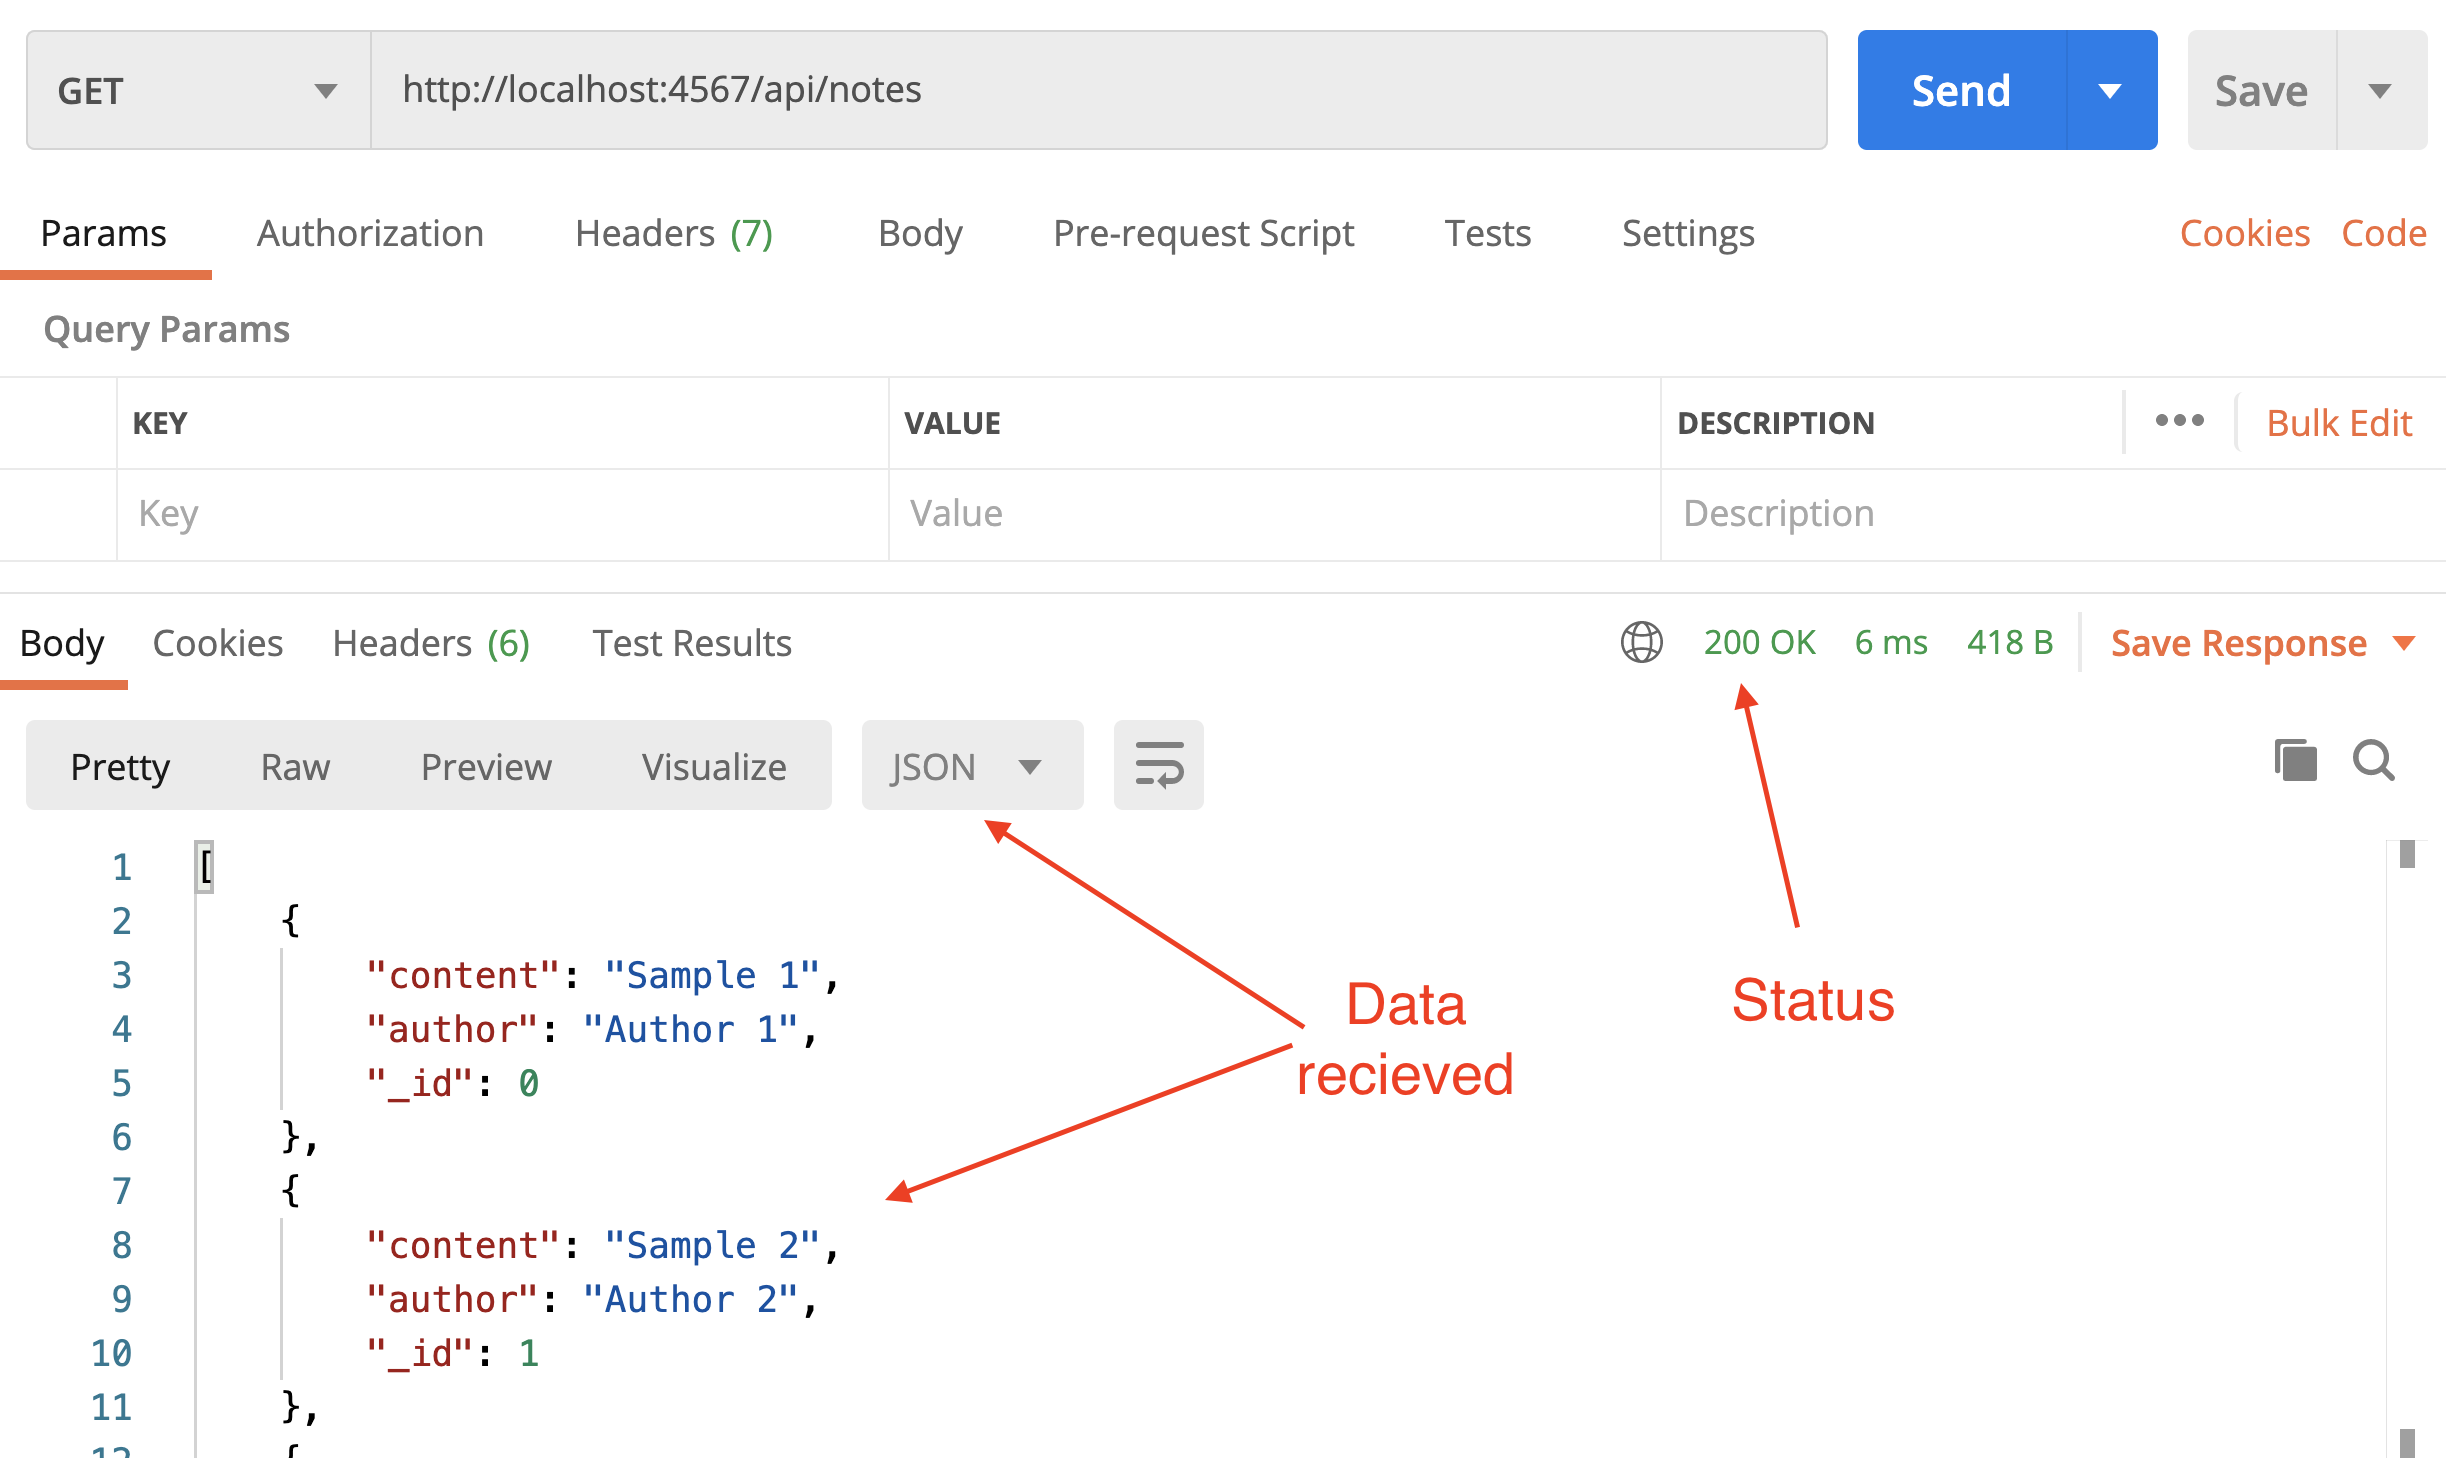
Step 8
Here is another GET request.
| Read Notes (filter by author) | |
|---|---|
| HTTP Method | GET |
| API Endpoint | /api/notes |
| Request Path Parameter | |
| Request Query Parameter | author |
| Request Body | |
| Response Body | JSON array of notes |
| Response Status | 200 |
For this one, we expect a client to use the same endpoint as before but optionally provide an author name as a query parameter. We can update the route we already have (/api/notes) to account for this scenario:
app.get("/api/notes", (req, res) => {
const author = req.query.author;
res.json(notes.readAll(author));
});
Save the code then head over to your browser and visit http://localhost:4567/api/notes?author=Author 2. You must receive a JSON array containing two sample notes, written by "Author 2".
Test this endpoint in Postman too.
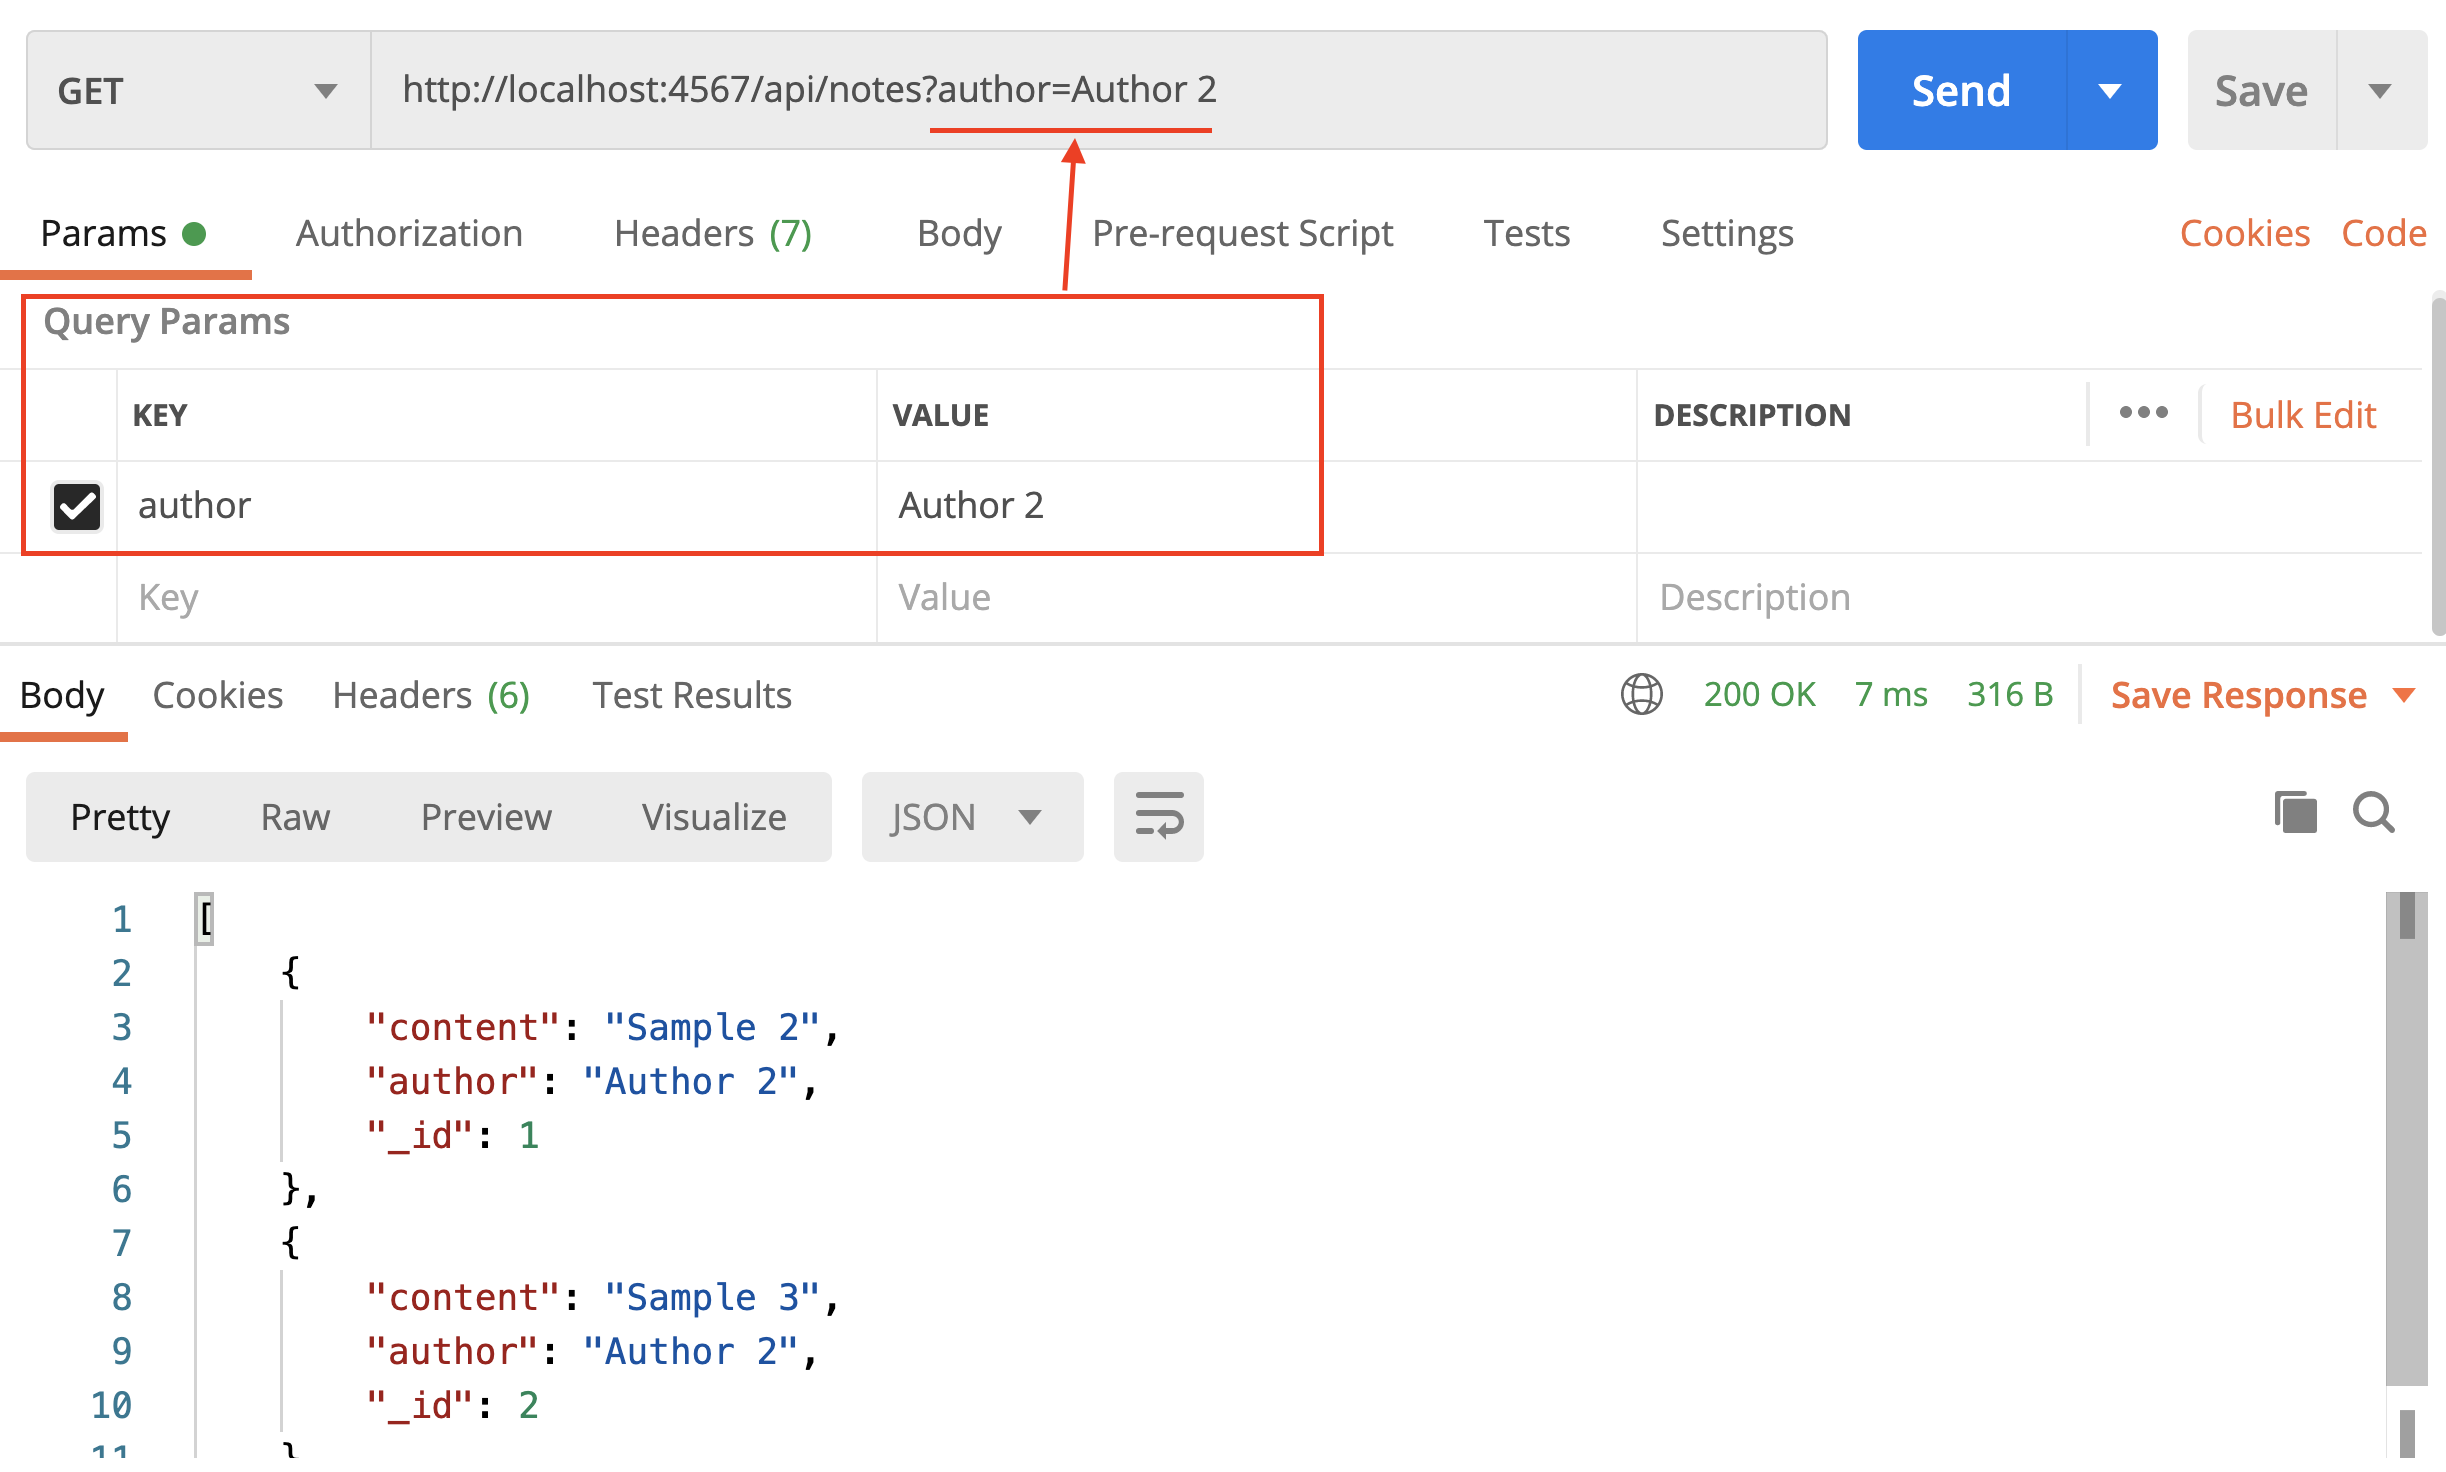
Step 9
Let's create a route to receive a specific note given its ID.
| Read Note | |
|---|---|
| HTTP Method | GET |
| API Endpoint | /api/notes/:noteId |
| Request Path Parameter | noteId |
| Request Query Parameter | |
| Request Body | |
| Response Body | JSON object (note) |
| Response Status | 200 |
Notice the API endpoint; to retrieve an item from a collection, it is common to use an endpoint /api/collection/:id where id is the ID of the item you are searching for.
Add the following route to index.js:
app.get("/api/notes/:id", (req, res) => {
const id = Number.parseInt(req.params.id);
res.json(notes.read(id));
});
Notice how the path contains :id and how I have used req.params object to get the path parameter (as opposed to using req.query for getting query parameters).
If you want to identify a resource, you should use "path parameter". But if you want to sort or filter items, then you should use query parameter. Source: When Should You Use Path Variable and Query Parameter?
Save the code then head over to your browser and visit http://localhost:4567/api/notes/2. You must receive a JSON object containing the note with ID of 2.
Test this endpoint in Postman too.
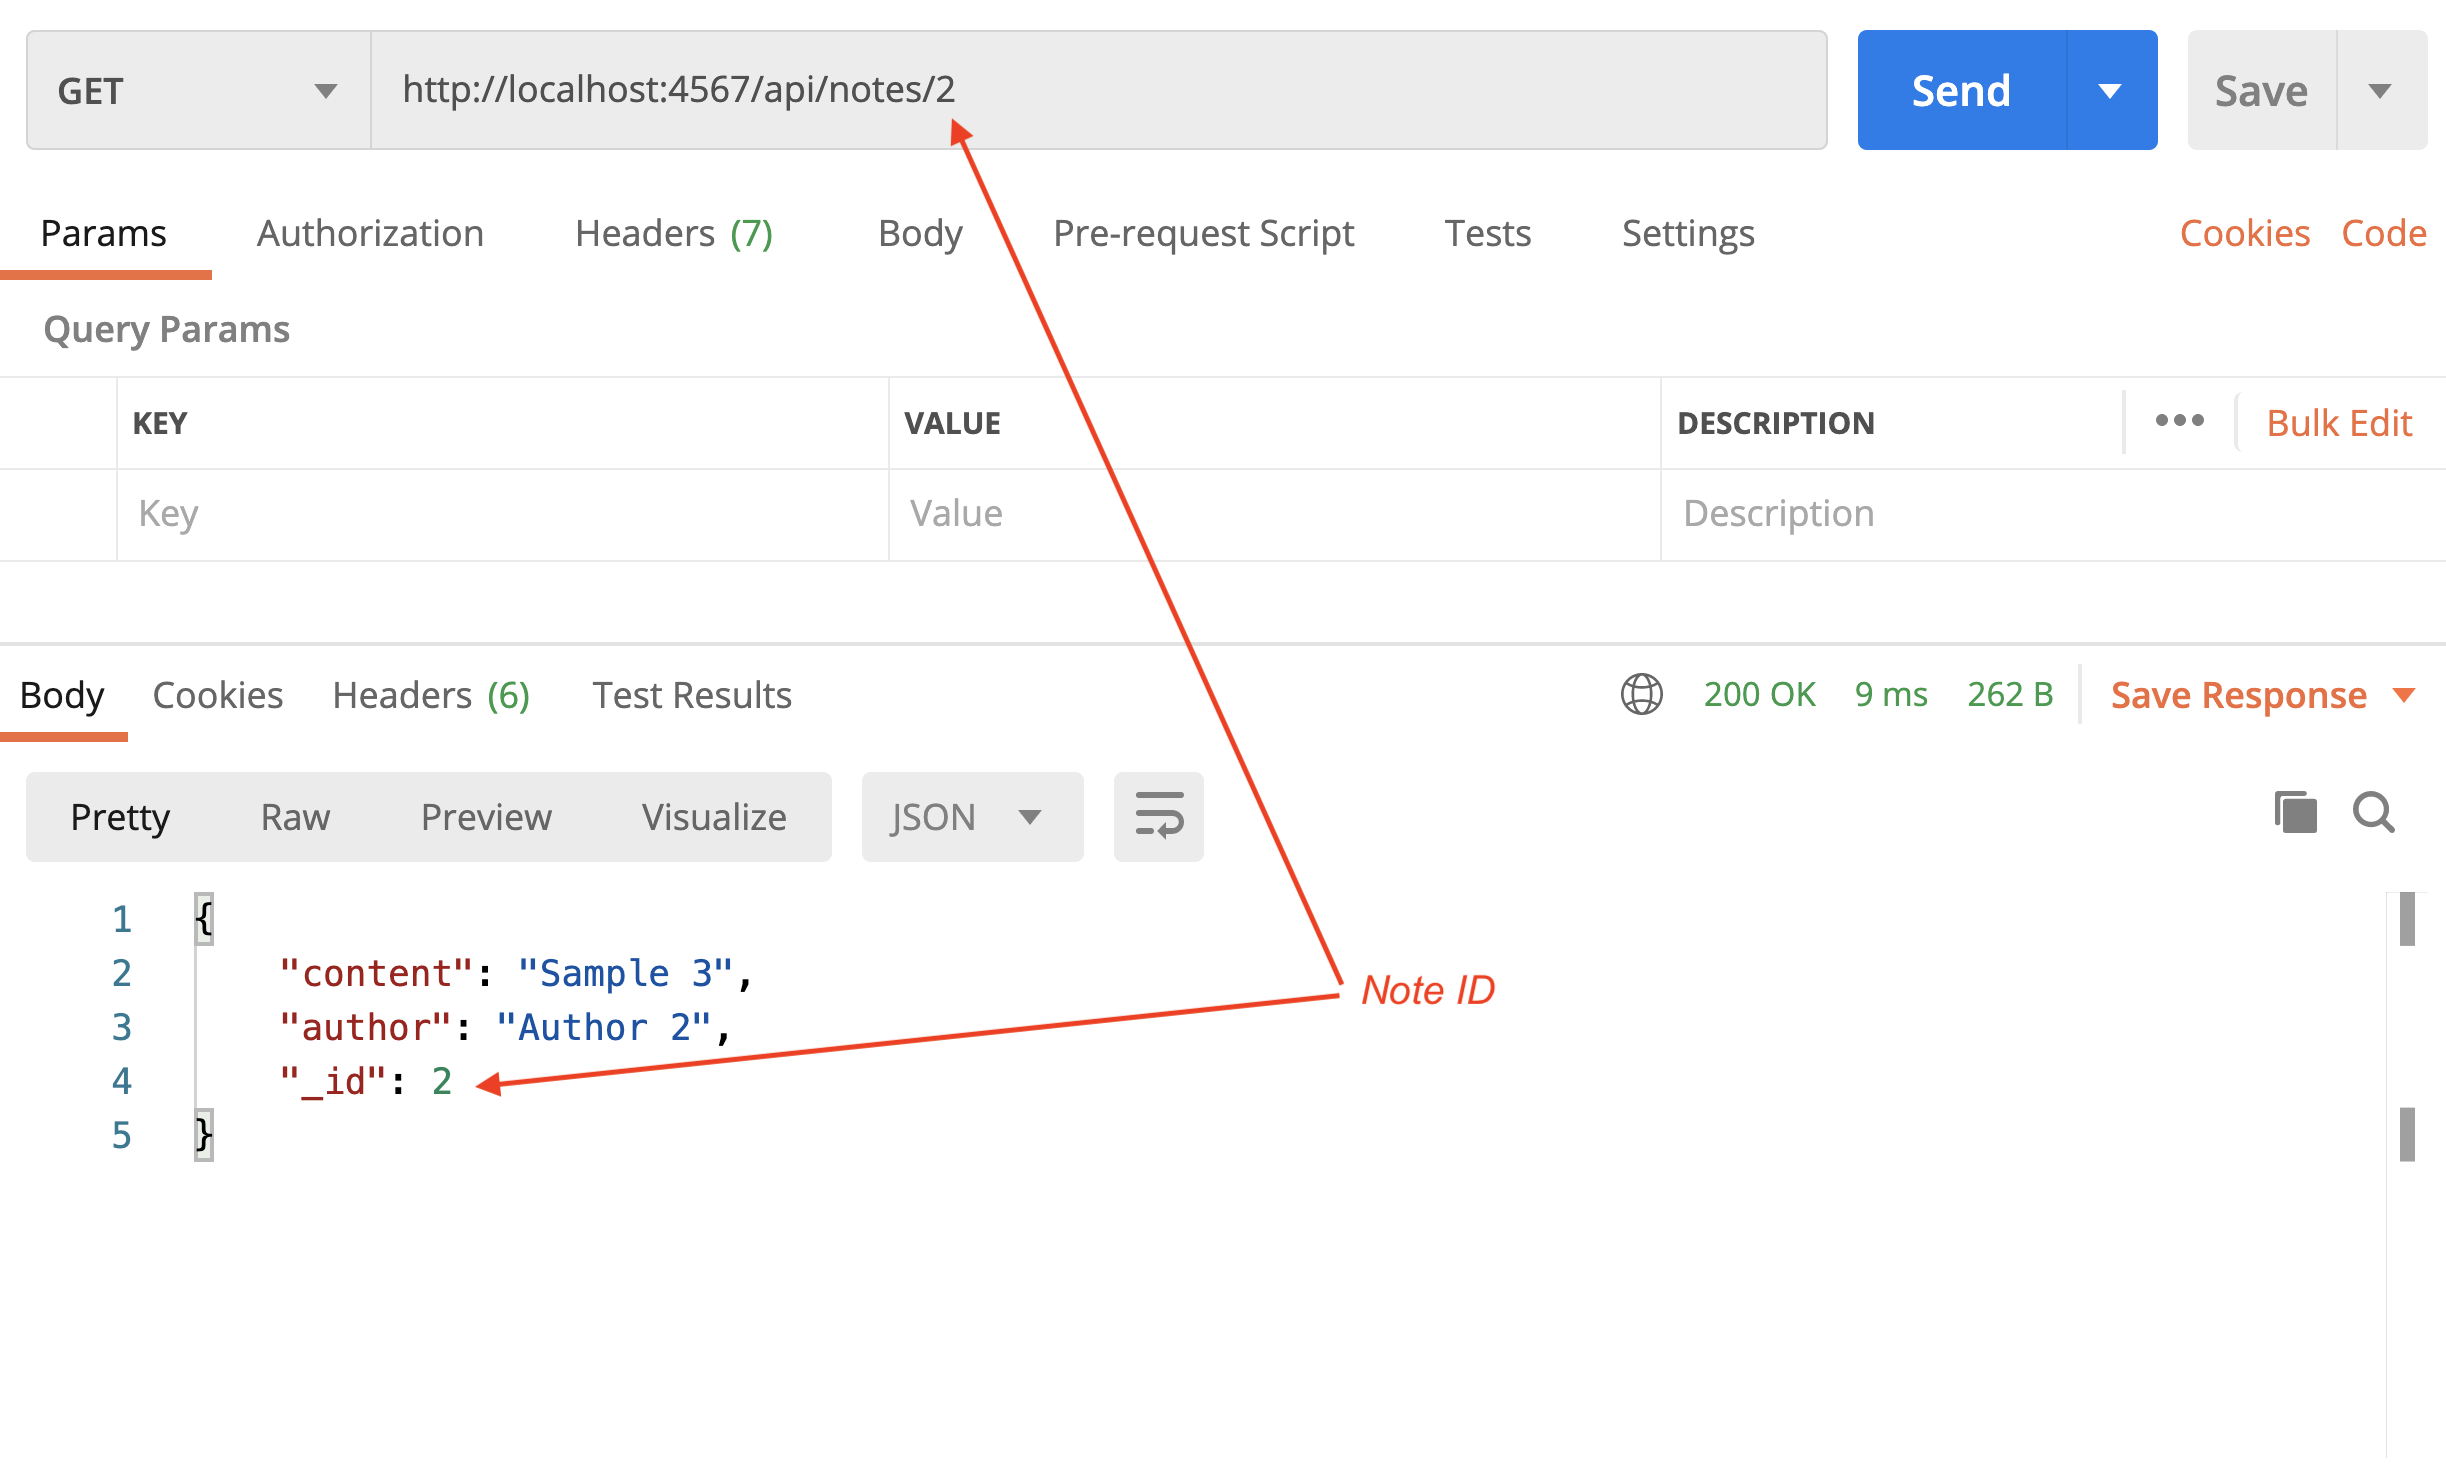
Step 10
Let's include a route to create a note.
| Create Note | |
|---|---|
| HTTP Method | POST |
| API Endpoint | /api/notes |
| Request Path Parameter | |
| Request Query Parameter | |
| Request Body | JSON object (note attributes) |
| Response Body | JSON object (created note) |
| Response Status | 201 |
Notes:
- We use a POST method to create a note
- The path (endpoint) is similar to the GET request we had earlier for receiving all notes. You can think about it as we are going to post to the collection of notes here (whereas before we were going to read the collection of notes).
- We need to provide the attributes (content & author) for creating the note. This attribute will be provided in the "body" (payload) of the request (we will see soon what that means!)
- Once the note is created, we will return the newly created resource. This is just a common pattern in the design of APIs.
- We send a status code of 201 to signal the resource creation succeeded.
Add the following route to index.js:
app.post("/api/notes", (req, res) => {
const content = req.body.content;
const author = req.body.author;
const note = notes.create(content, author);
res.status(201).json(note);
});
Notice how I have set the status code.
Also, notice how I have used req.body object to get the attributes of the note. The client is expected to provide these attributes as a JSON data in the request body. To allow Express parse the request body, we must add the following line somewhere in index.js (after app is declared):
app.use(express.json());
You will not be able to test a POST request in your browser (where you typically write URLs is for GET requests). You must test this endpoint in Postman.
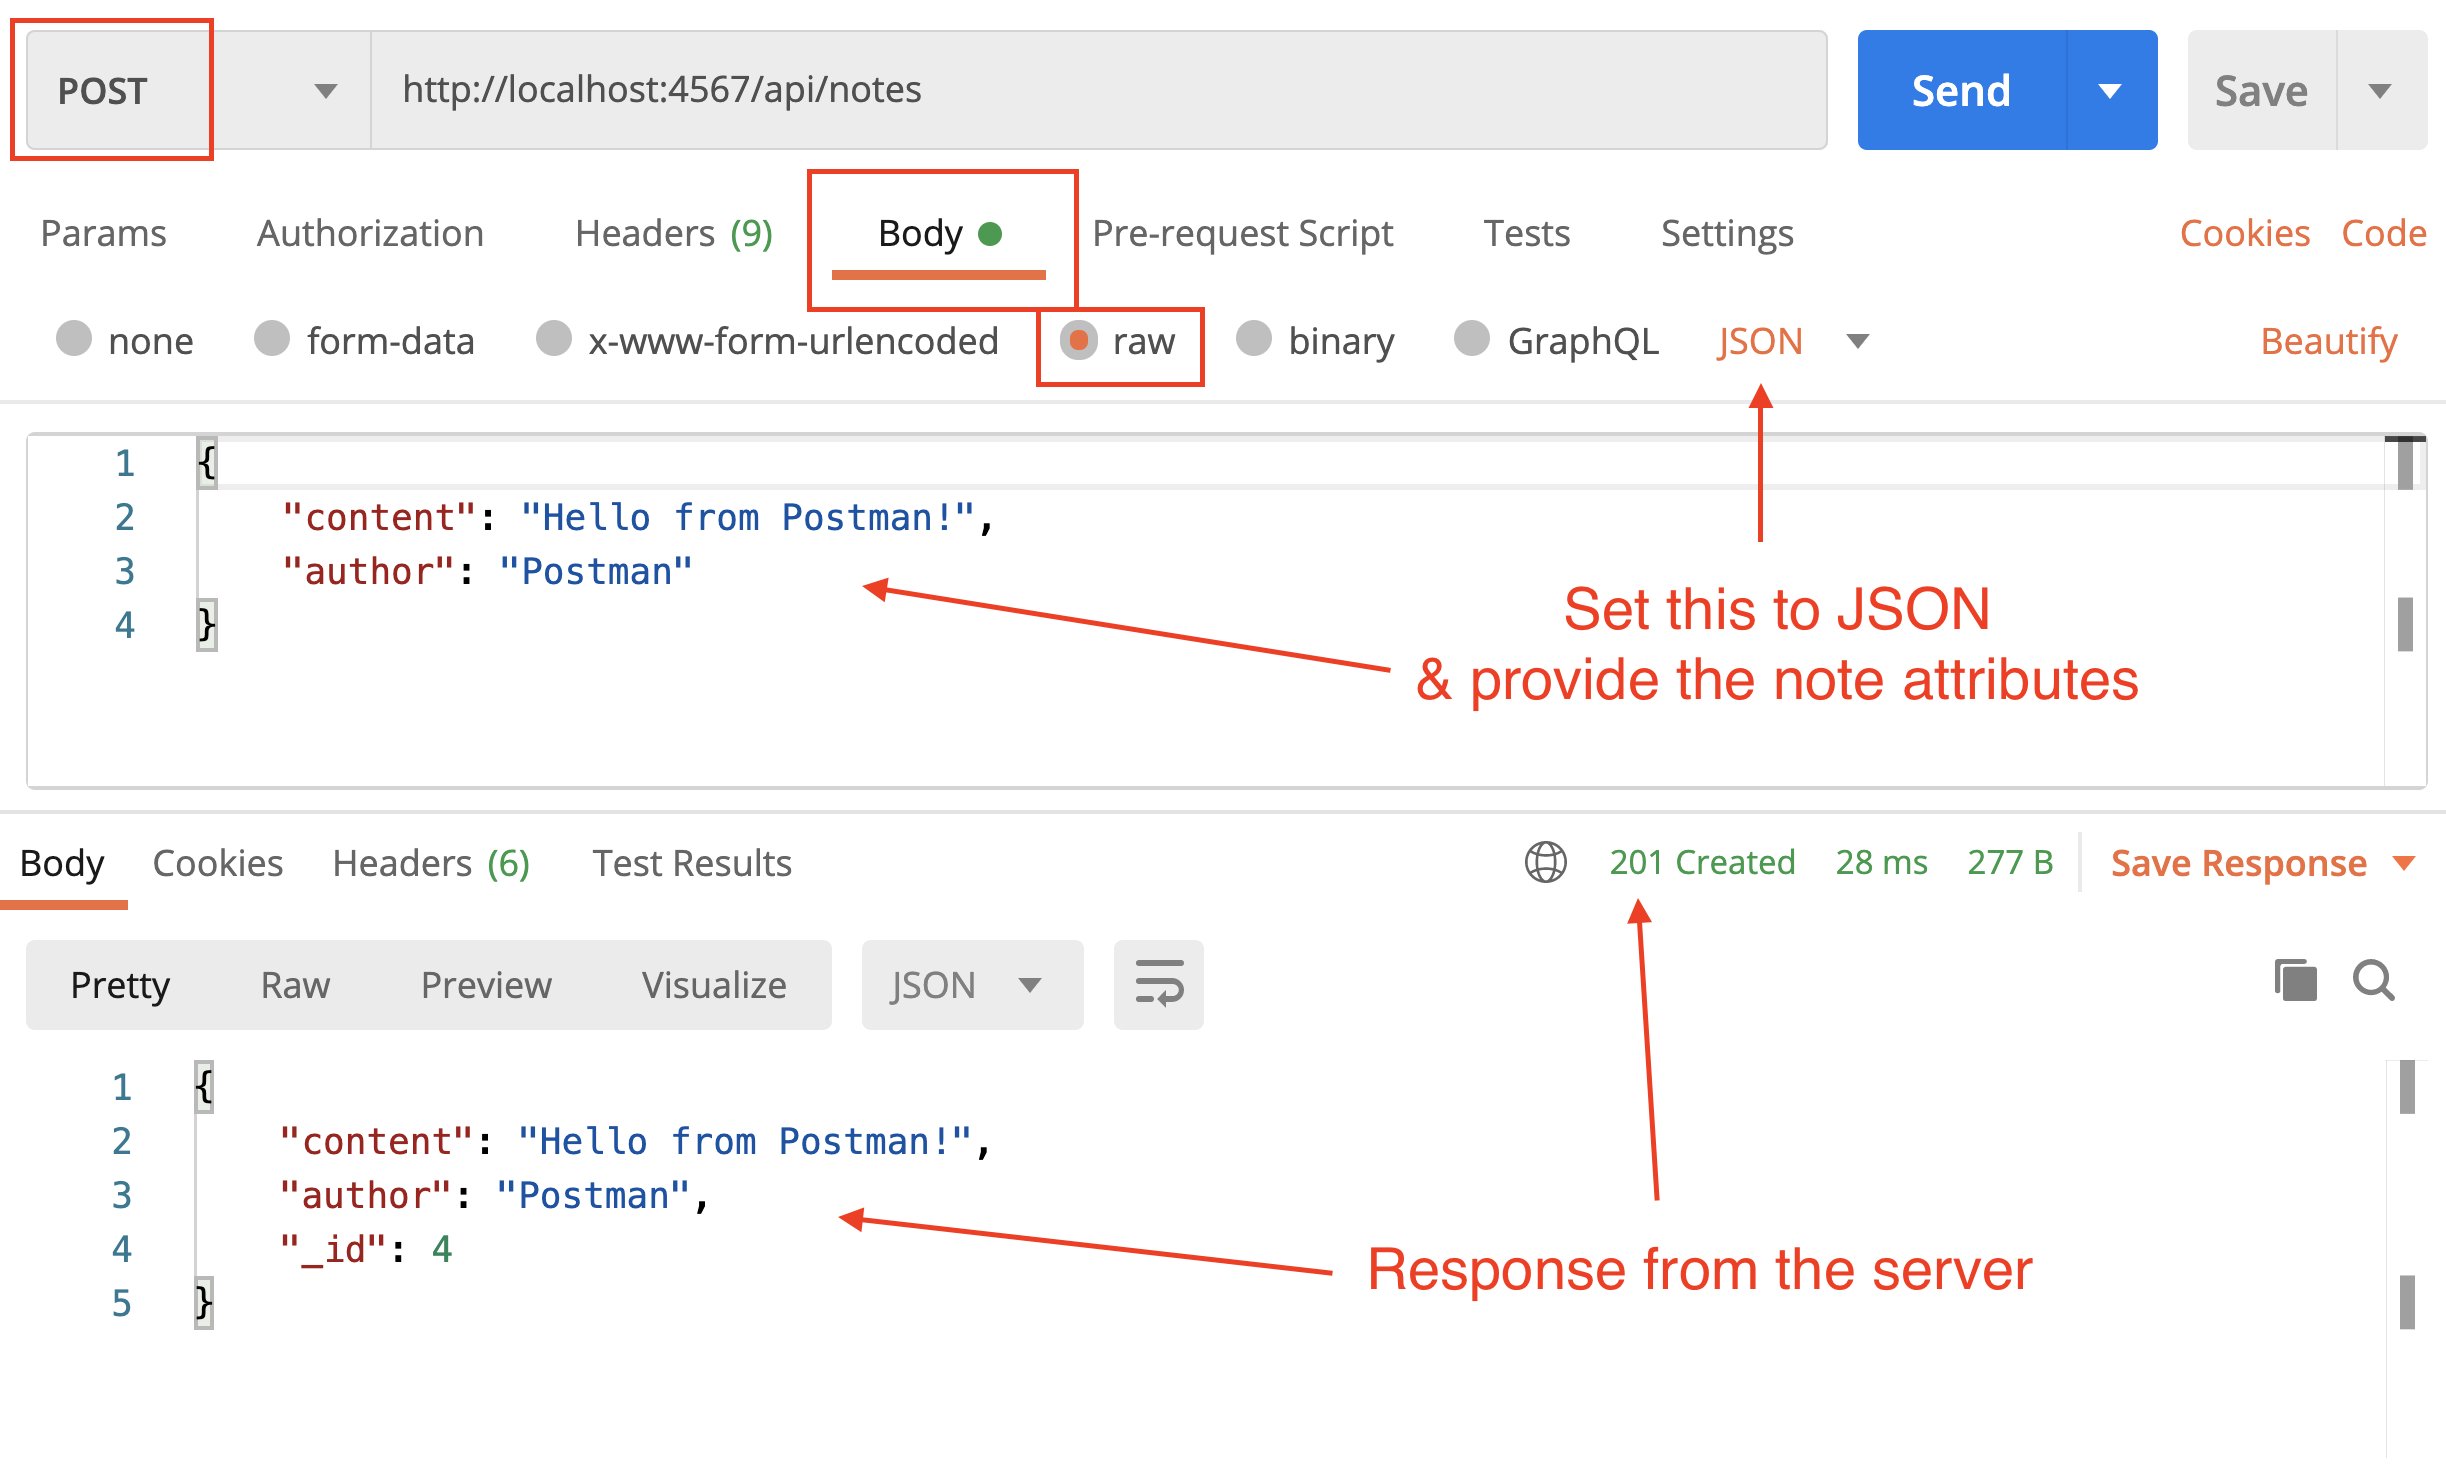
Step 11
We need to provide input validation when designing our API. In particular when we create, update, or delete resources.
We can perform input validation inside our route handler or delegate that to NoteDao.
I've gone with the latter; update NoteDao.create method:
create(content, author) {
if (!content || !author) {
throw new Error("Invalid attributes");
}
const note = new Note(content, author);
note._id = this.nextID();
this.notes.push(note);
return note;
}
If either content or author are falsy values (null, undefined, or empty string), and error will be thrown.
Update the route handler in index.js to include error handling:
app.post("/api/notes", (req, res) => {
const content = req.body.content;
const author = req.body.author;
try {
const note = notes.create(content, author);
res.status(201).json(note);
} catch (error) {
res.status(400).send(error.message);
}
});
Notice I set the status code to 400 before sending the error message.
In Postman, test the input validation by sending a request to api/notes endpoint with insufficient or invalid attributes.
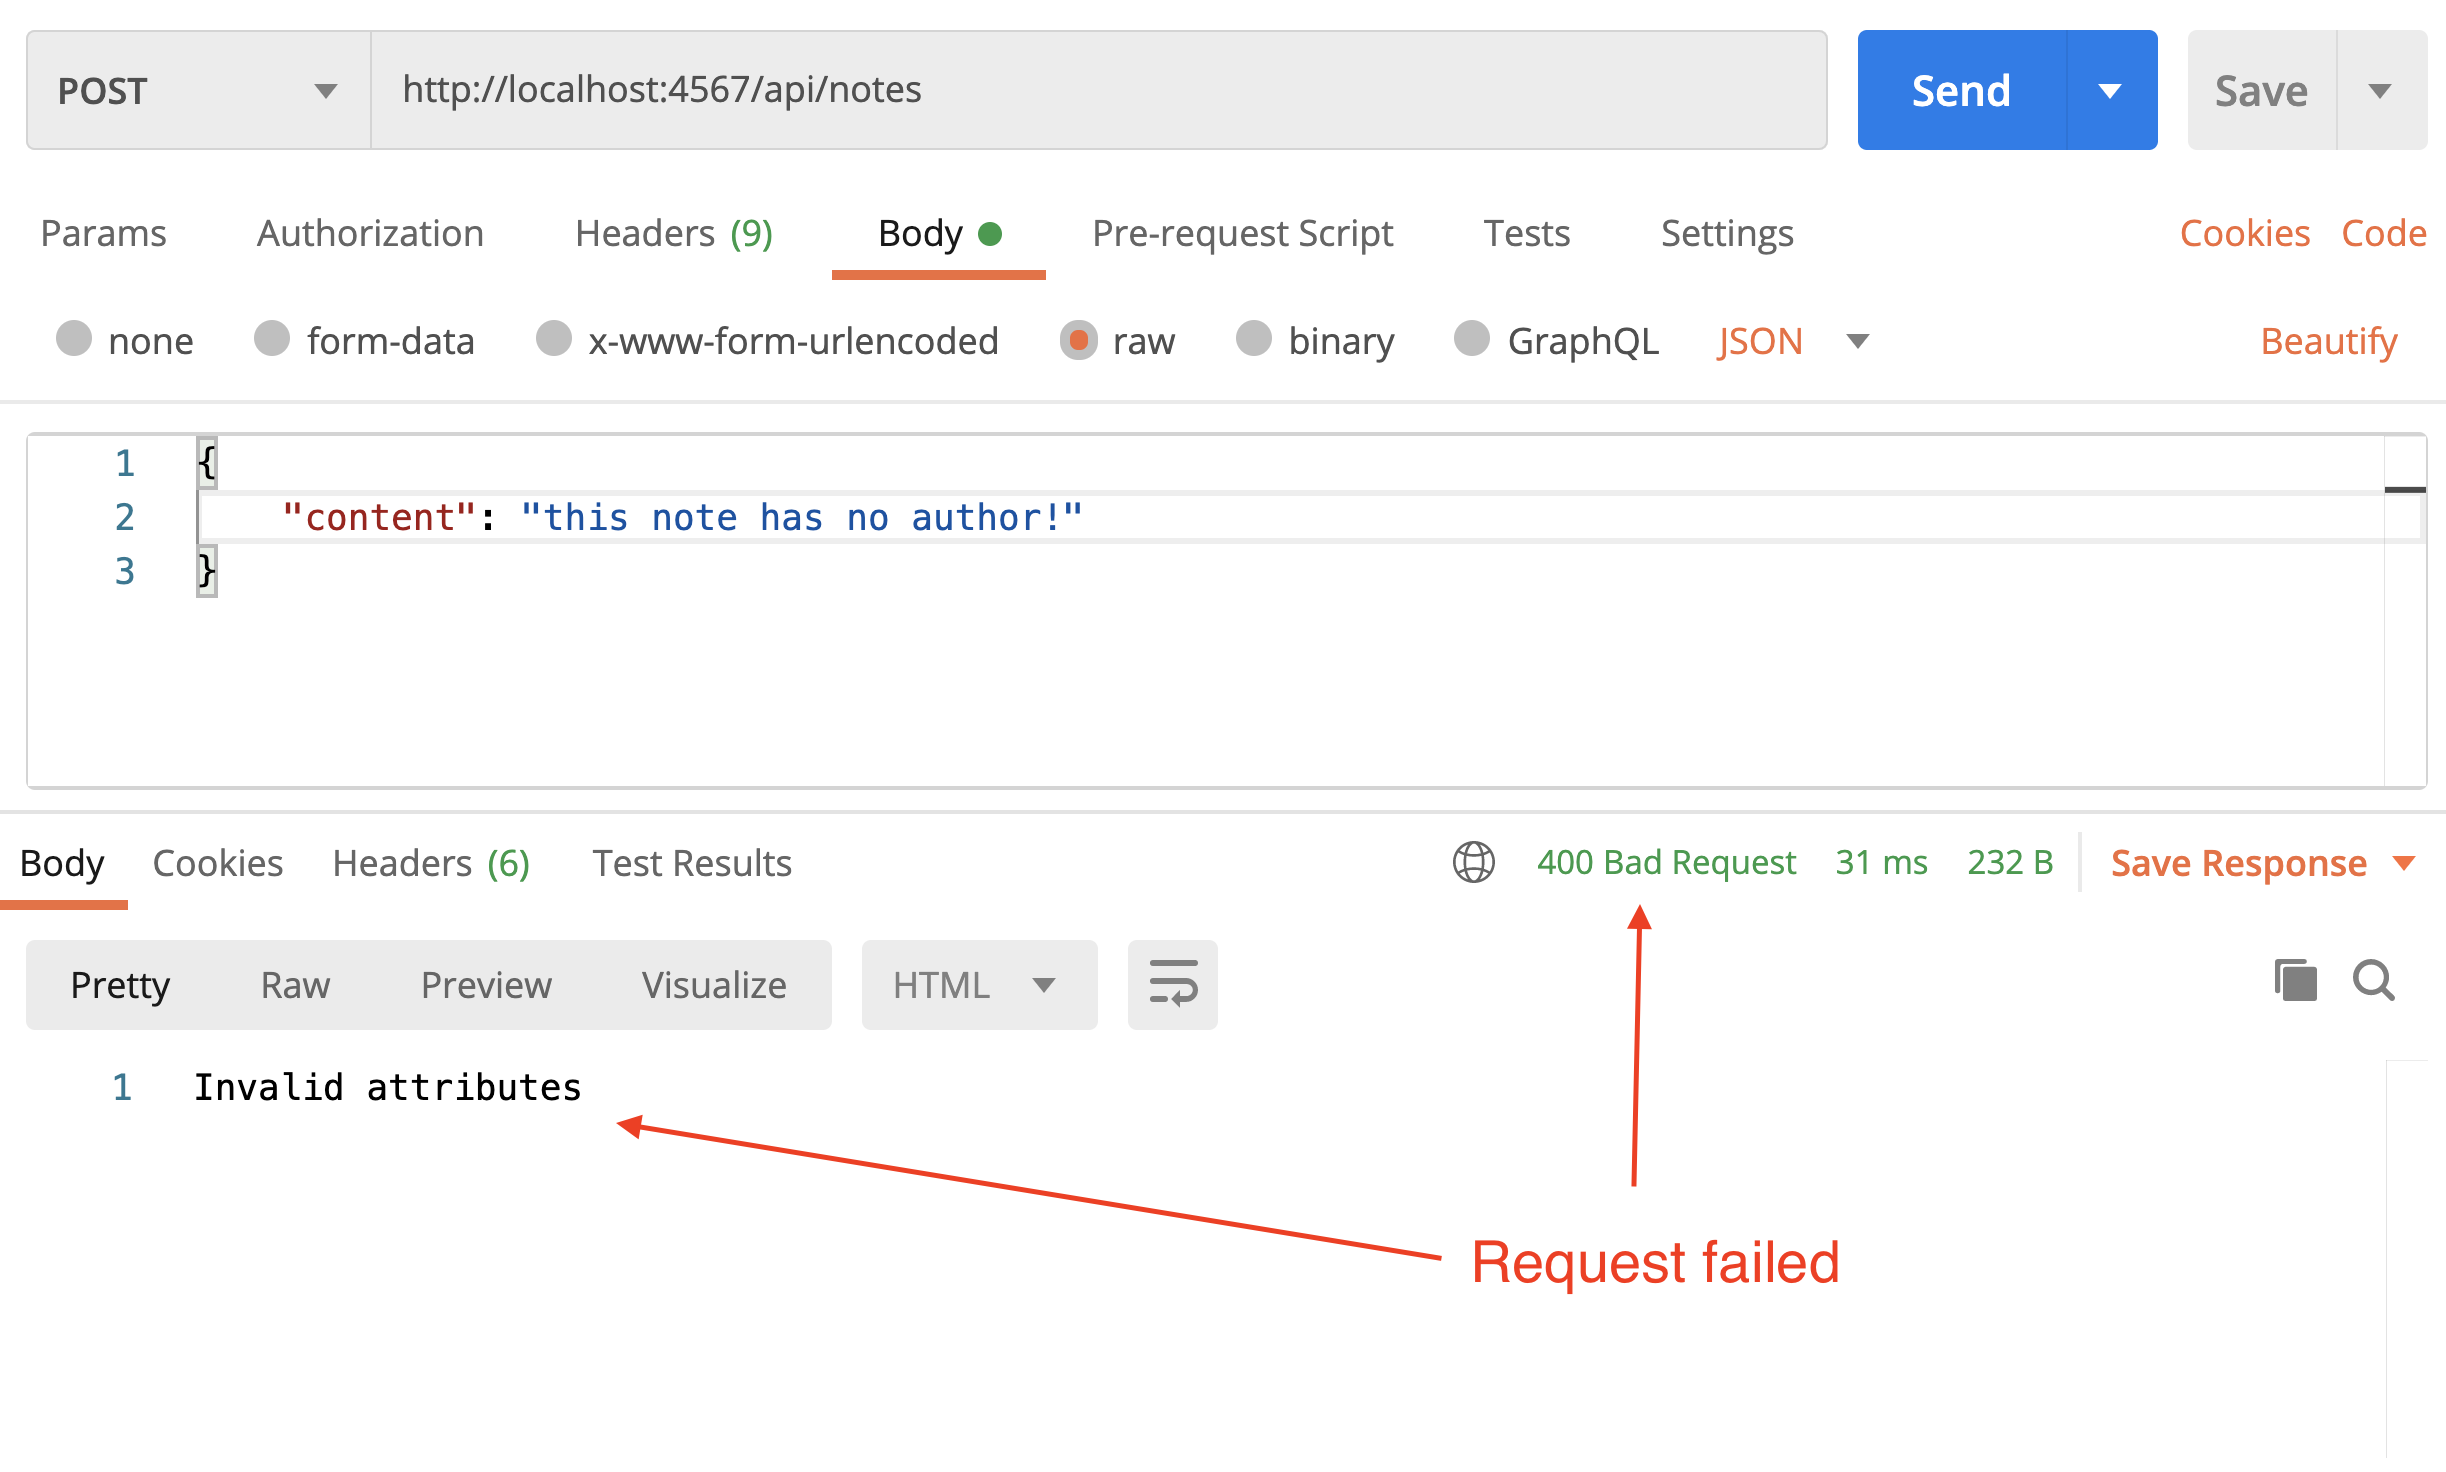
Step 12
Let's include a route to delete a note.
| Delete Note | |
|---|---|
| HTTP Method | DELETE |
| API Endpoint | /api/notes/:noteId |
| Request Path Parameter | noteId |
| Request Query Parameter | |
| Request Body | |
| Response Body | JSON object (note) |
| Response Status | 200 |
Notice the path (endpoint) is similar to the GET request we had earlier for retrieving a note given its ID. By convention, we return the deleted note (with status code 200).
Add the following route to index.js:
app.delete("/api/notes/:id", (req, res) => {
const id = Number.parseInt(req.params.id);
const note = notes.delete(id);
if (note) {
res.json(note);
} else {
res.status(404).send("Resource not found!");
}
});
Notice that if the given ID does not exist in the notes collection, the NoteDao returns null. I've accordingly respond with a 404 status to signal "resource was not found".
In Postman, test this endpoint by attempting to delete a note that exist.
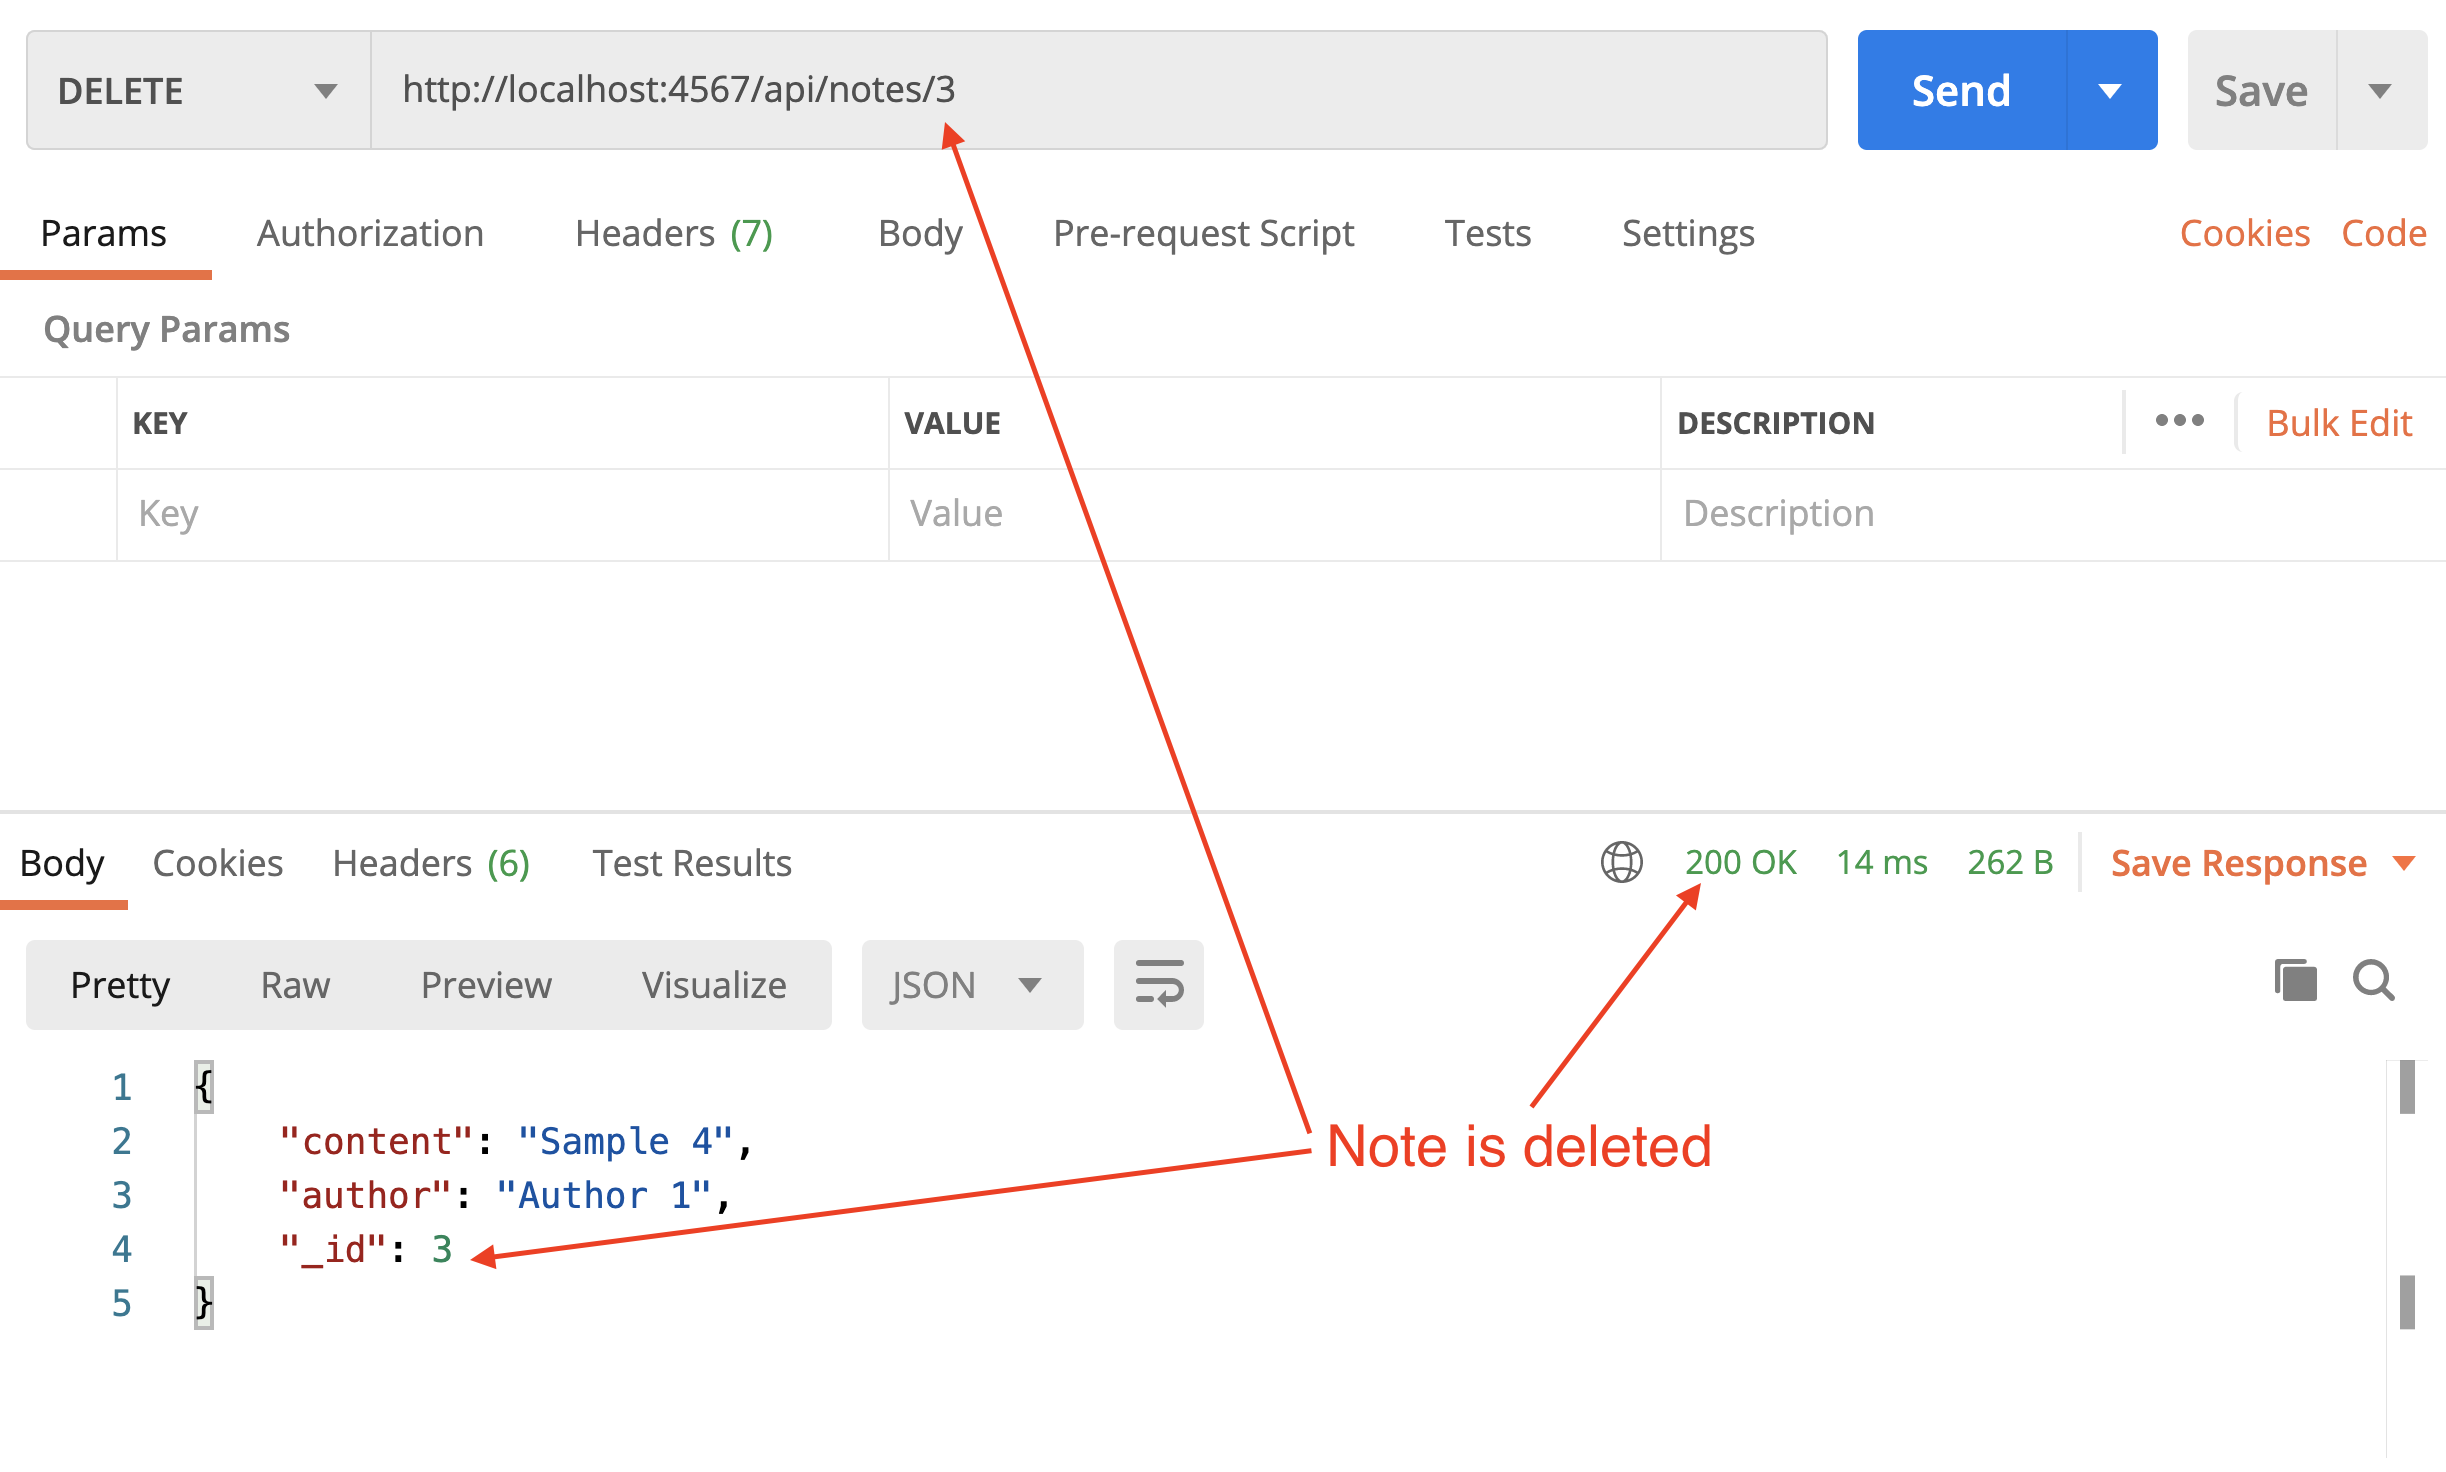
Also, test by requesting to delete a note that does not exist.
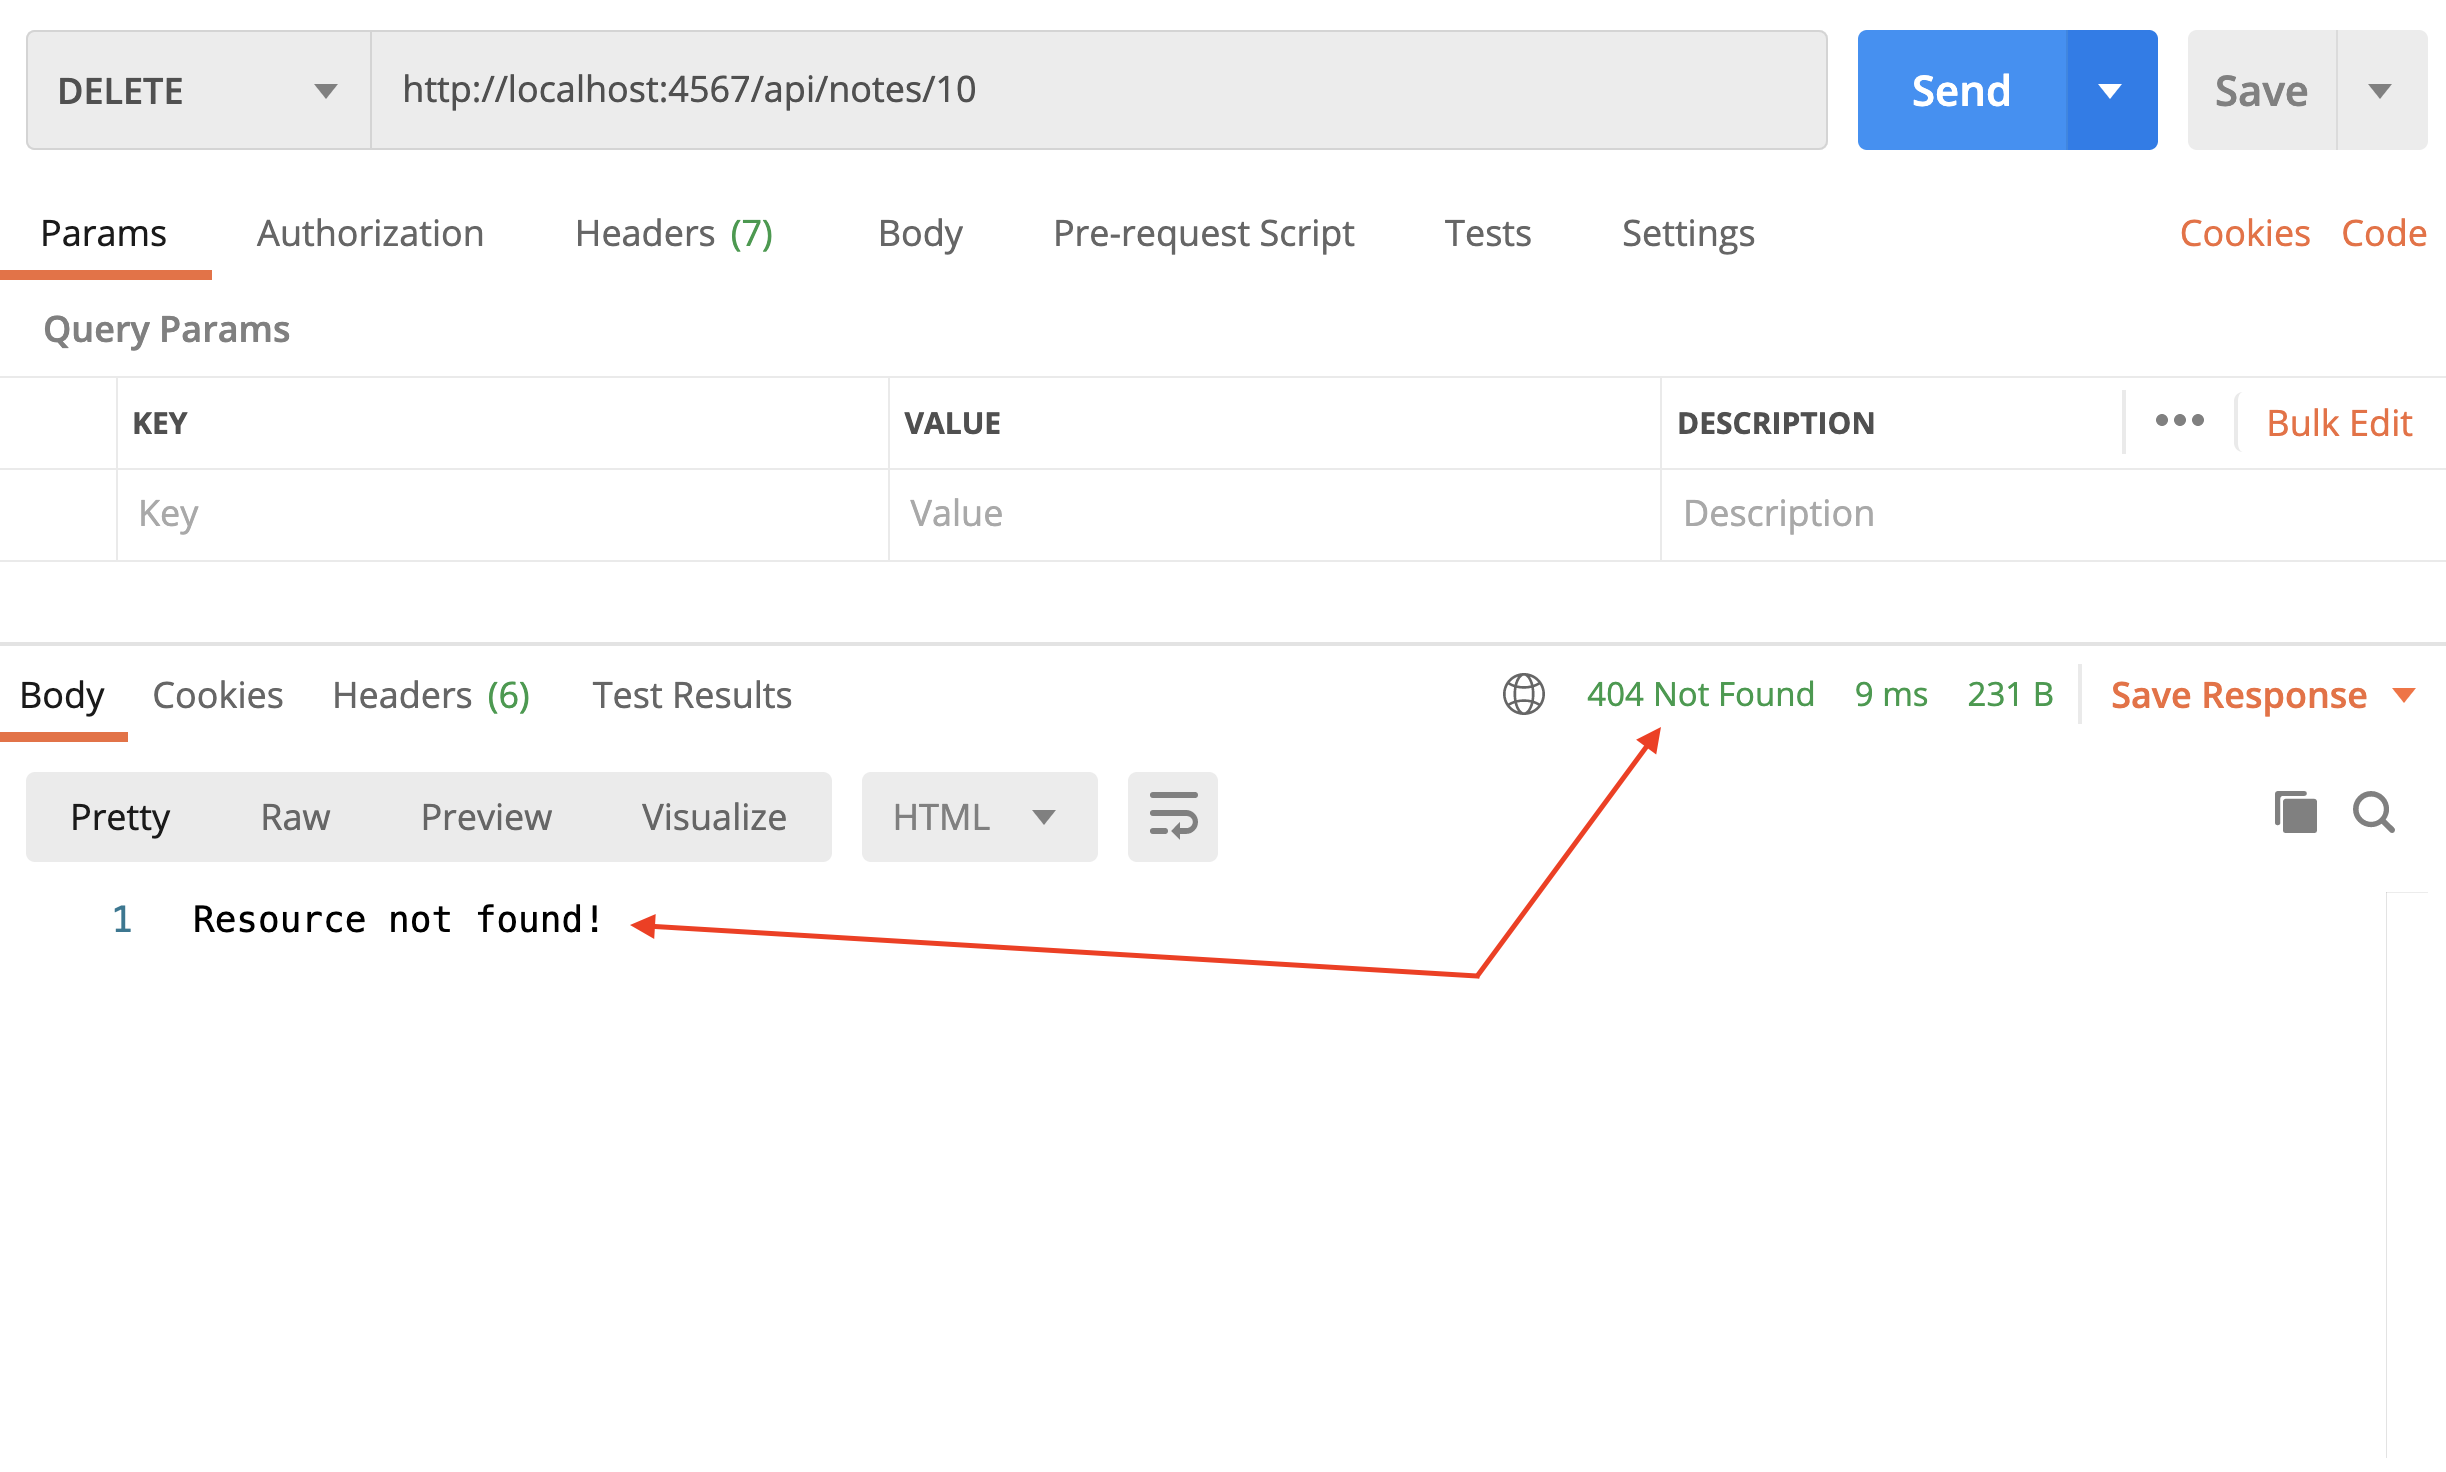
Step 13
Let's include a route to update a note.
| Update Note | |
|---|---|
| HTTP Method | PUT |
| API Endpoint | /api/notes/:noteId |
| Request Path Parameter | noteId |
| Request Query Parameter | |
| Request Body | JSON object (note attributes) |
| Response Body | JSON object (updated note) |
| Response Status | 200 |
Similar to how we updated NoteDao.create to provide input validation, we must update NoteDao.update method:
update(id, content, author) {
if (!content || !author) {
throw new Error("Invalid attributes");
}
const index = this.notes.findIndex((note) => note._id === id);
if (index !== -1) {
this.notes[index].content = content;
this.notes[index].author = author;
return this.notes[index];
}
return null;
}
Add the following route to index.js:
app.put("/api/notes/:id", (req, res) => {
const id = Number.parseInt(req.params.id);
const content = req.body.content;
const author = req.body.author;
try {
const note = notes.update(id, content, author);
if (note) {
res.json(note);
} else {
res.status(404).send("Resource not found!");
}
} catch (error) {
res.status(400).send(error.message);
}
});
Notice I set two error status code: (400) for invalid request and (404) for invalid ID number (resource not found).
In Postman, test this endpoint by attempting to update a note that exist.
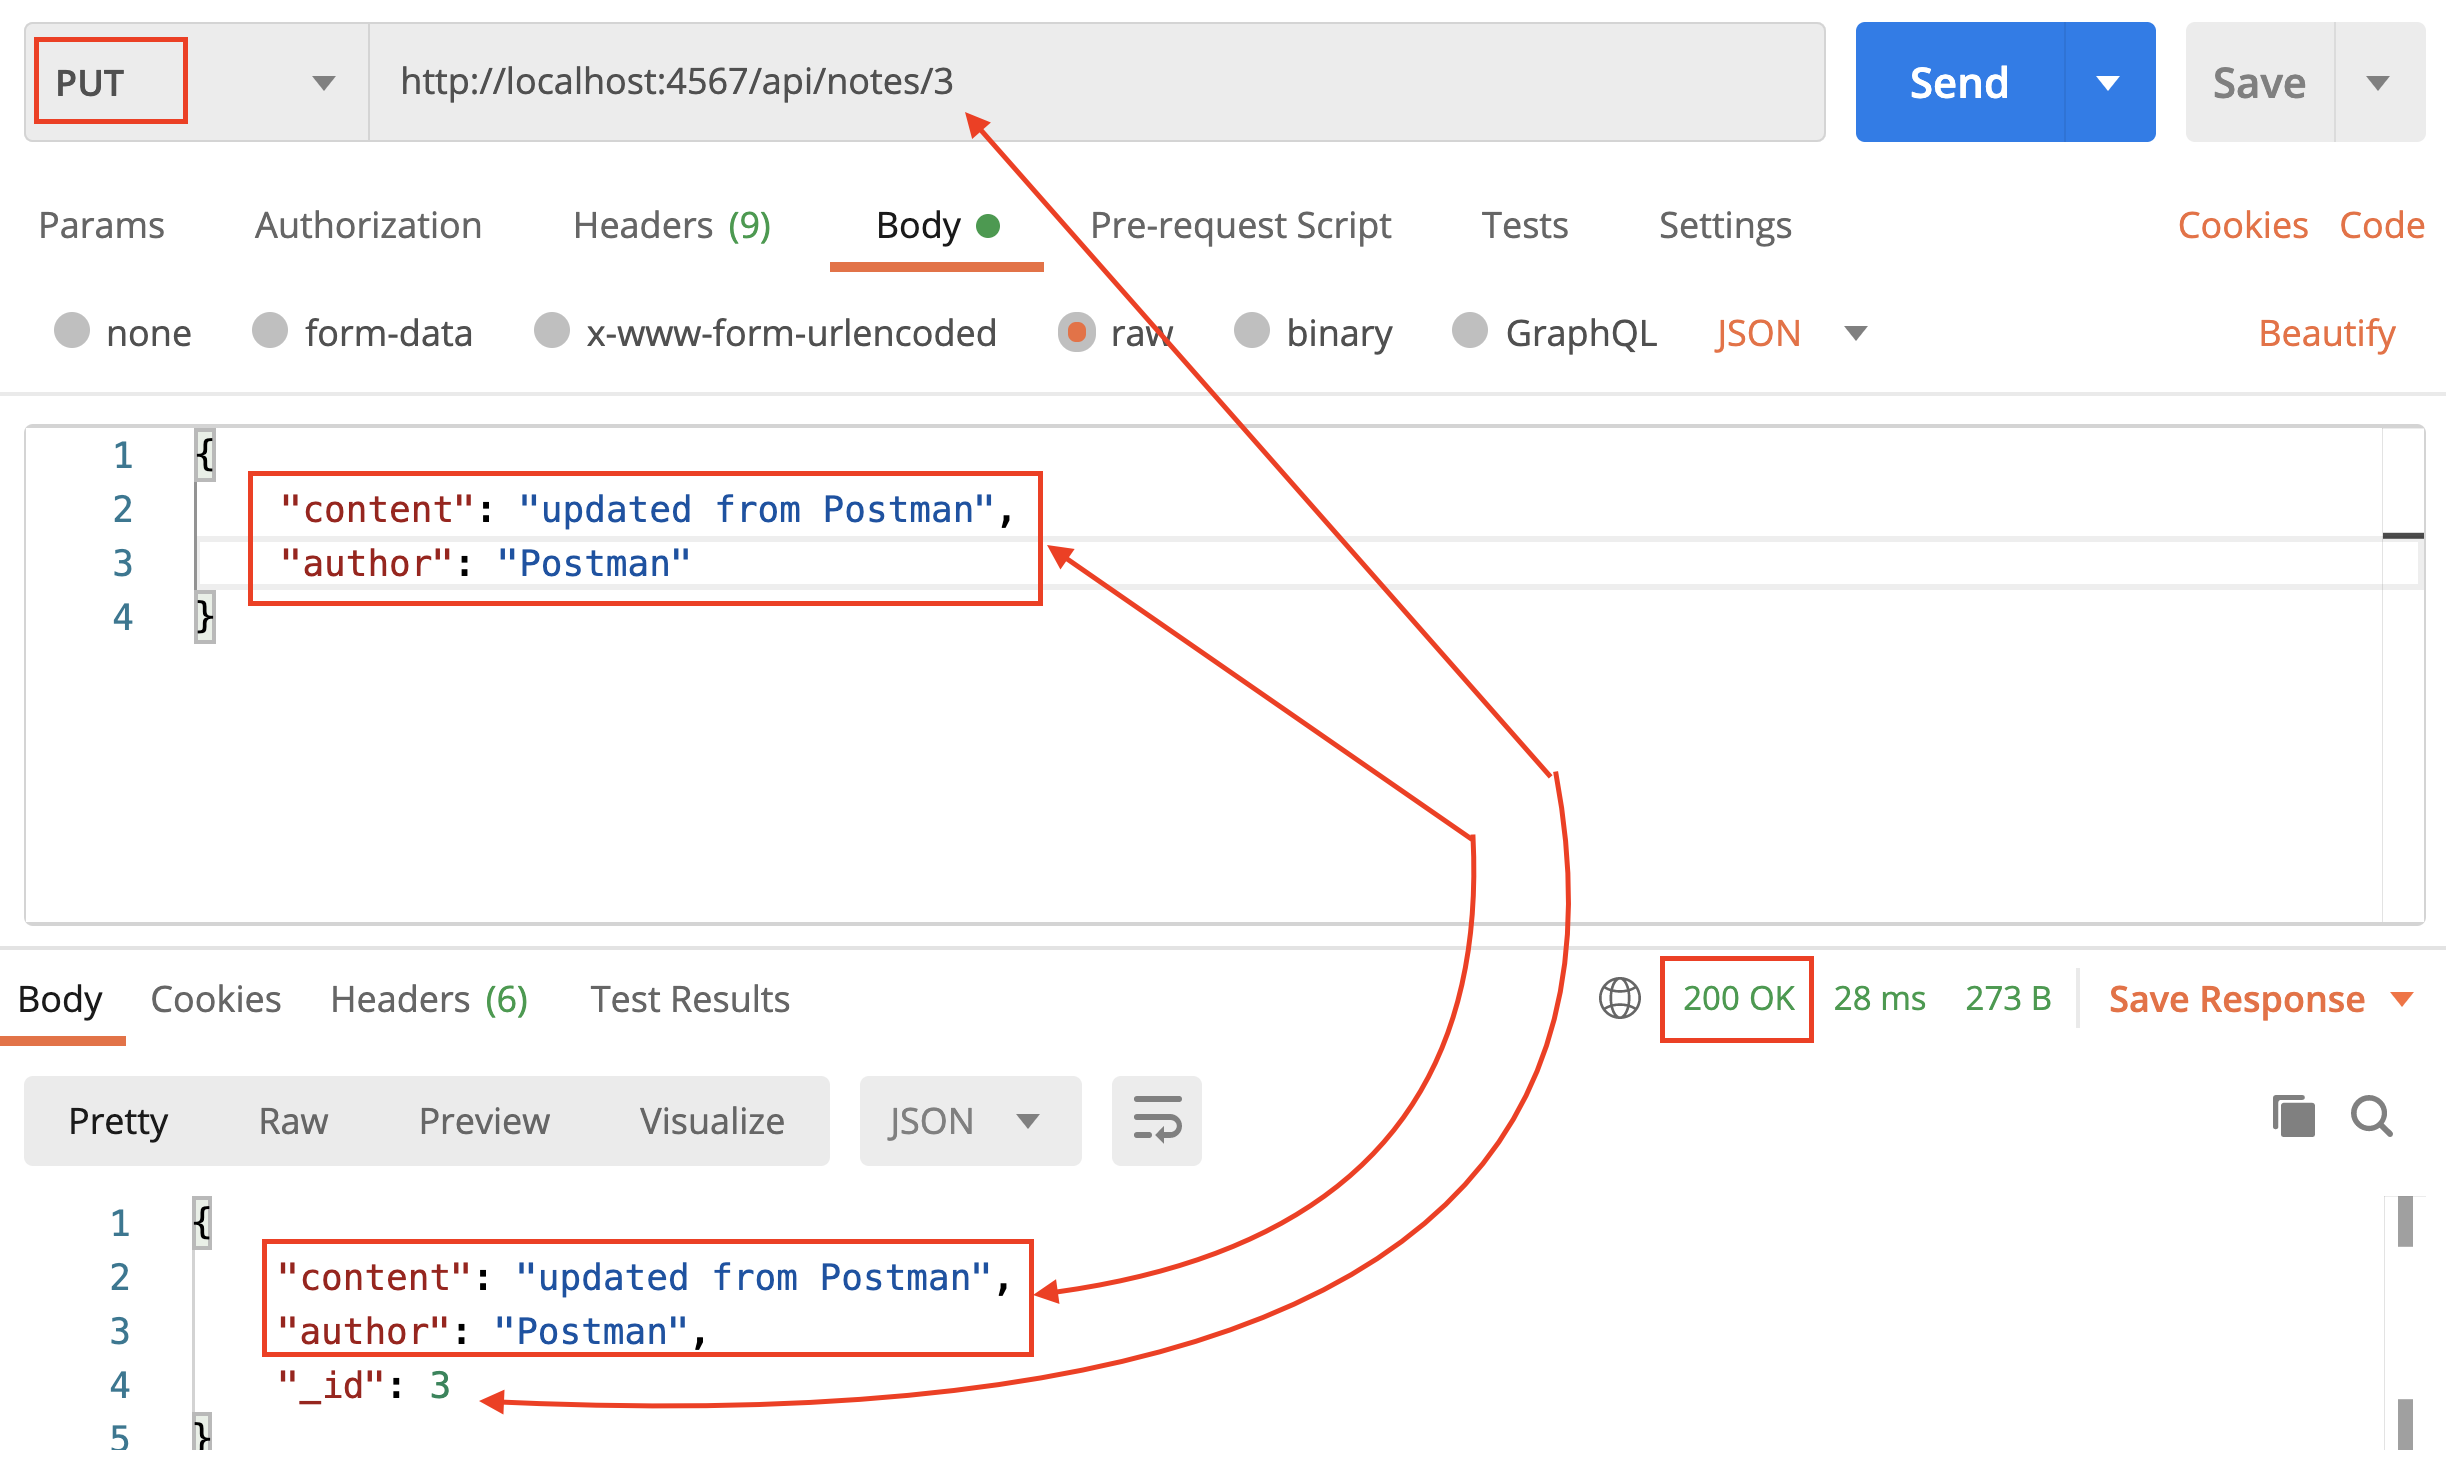
Also, test by requesting to update a note that does not exist.
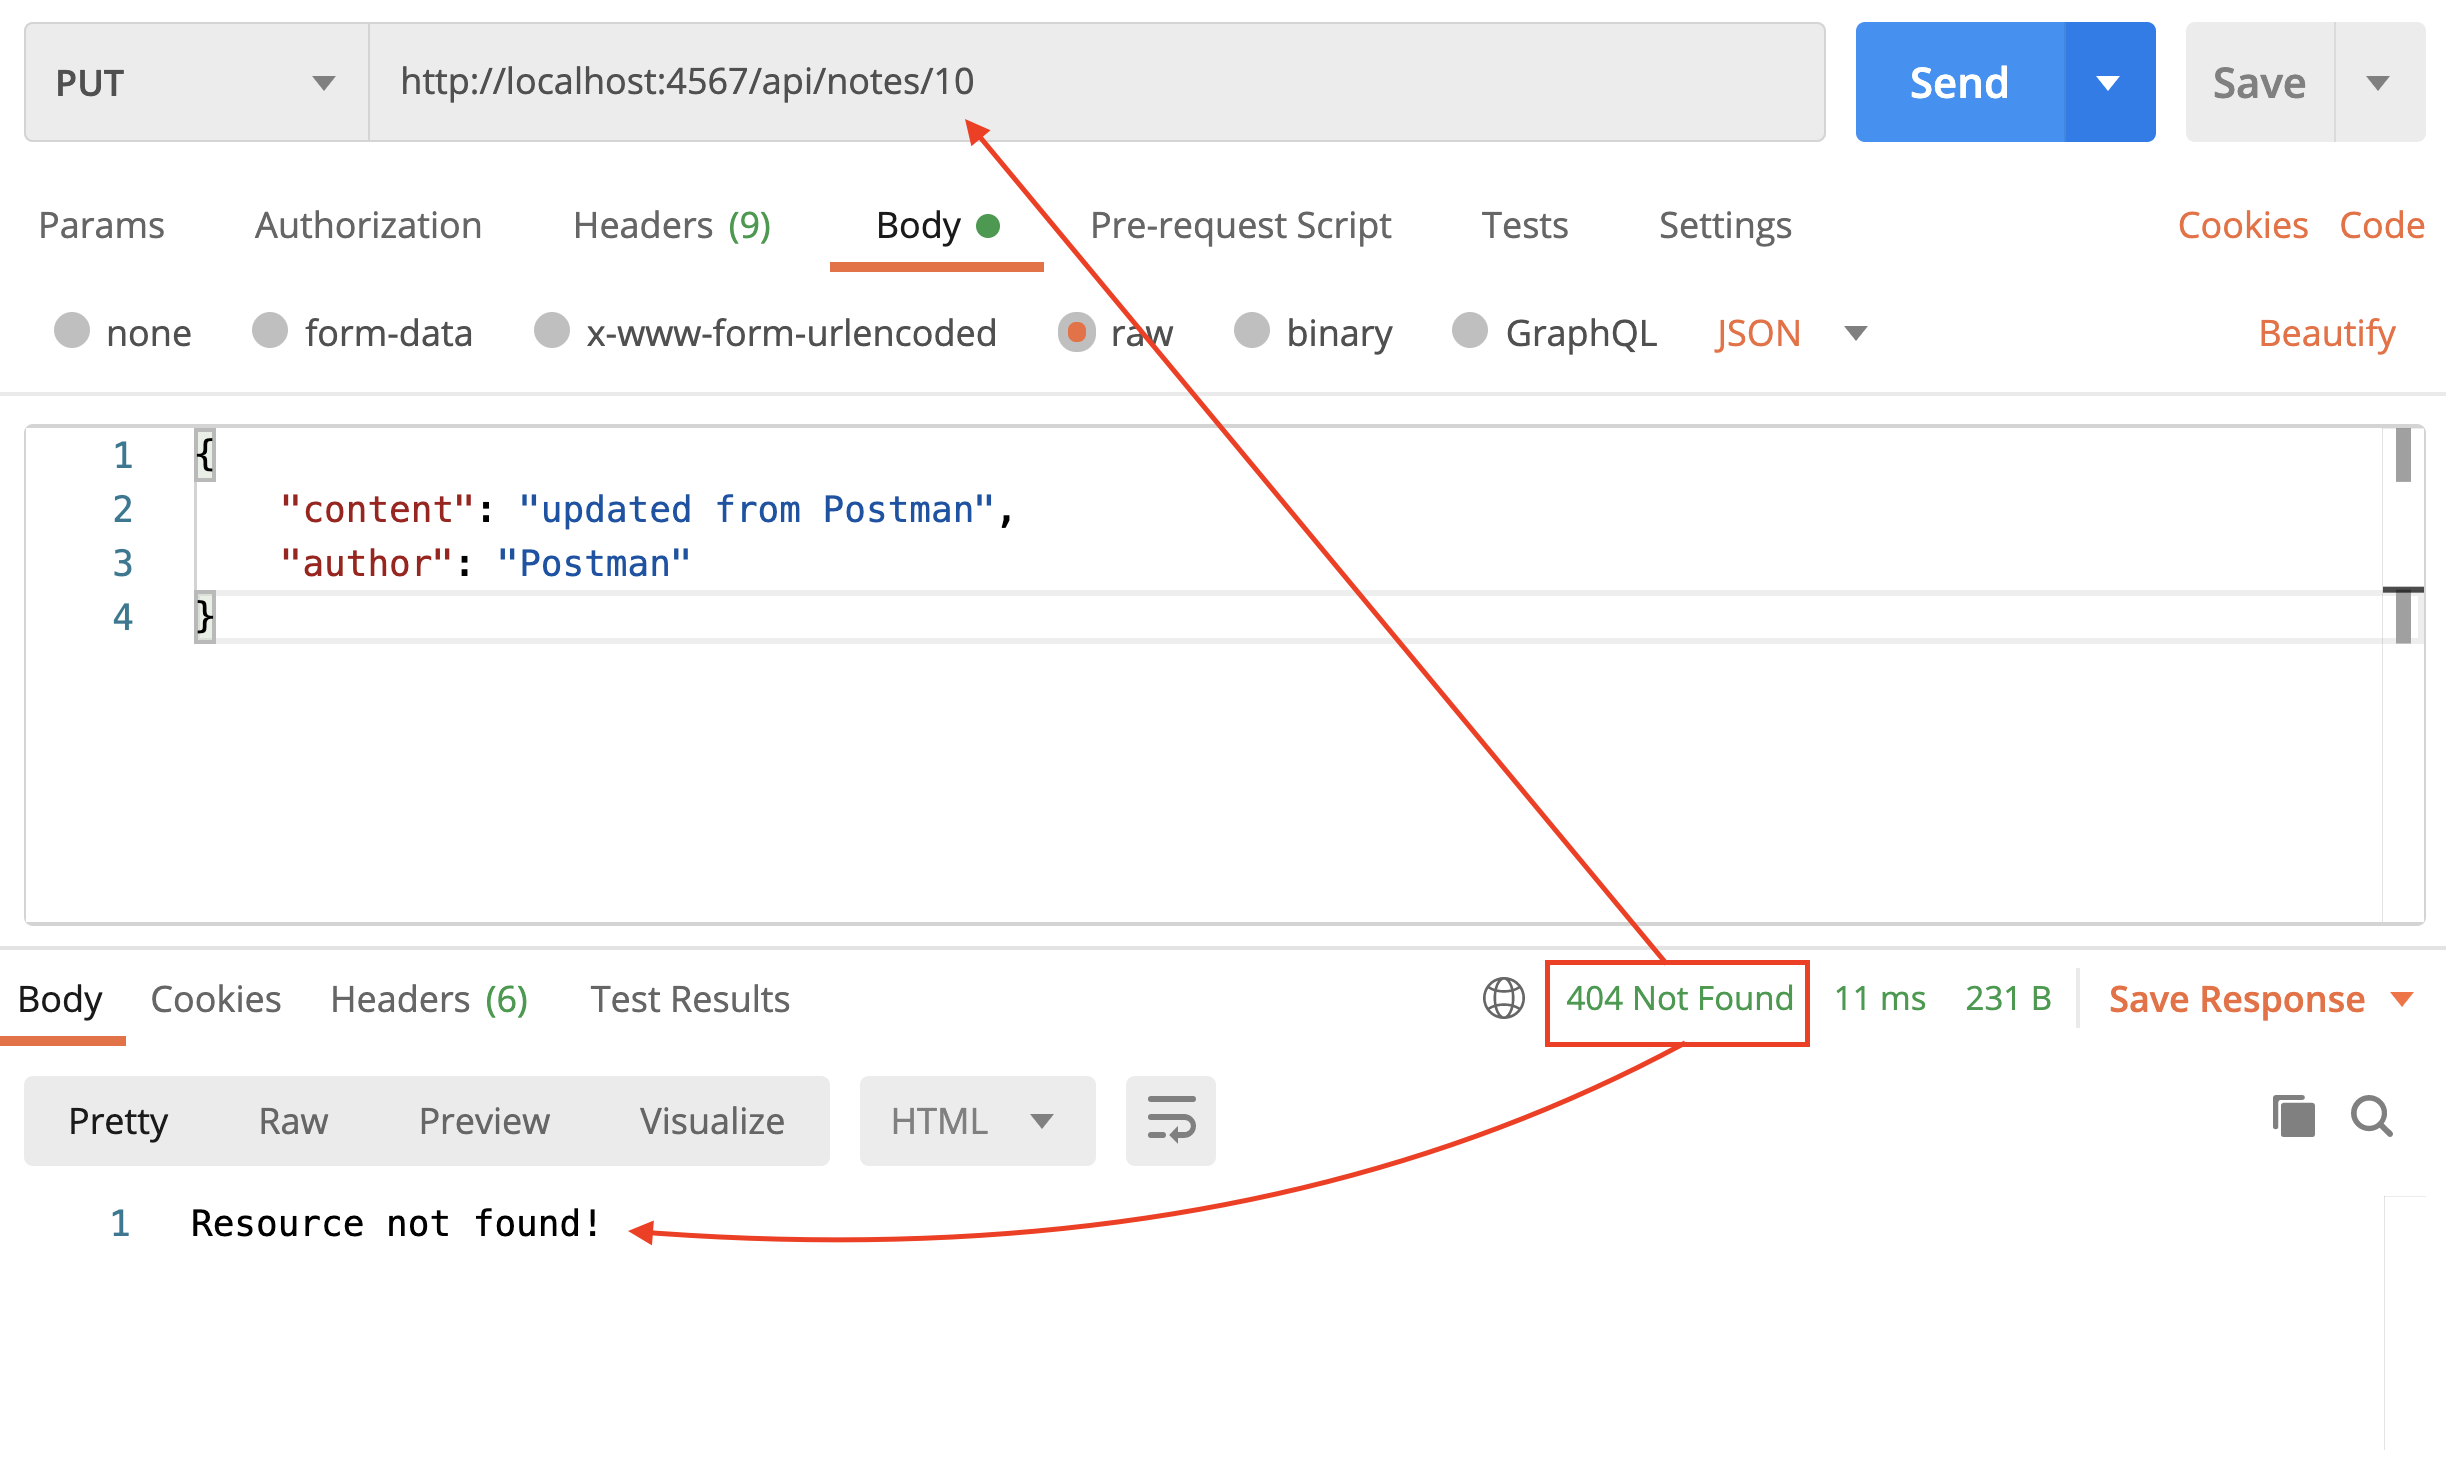
Finally, test the endpoint with insufficient or invalid attributes.
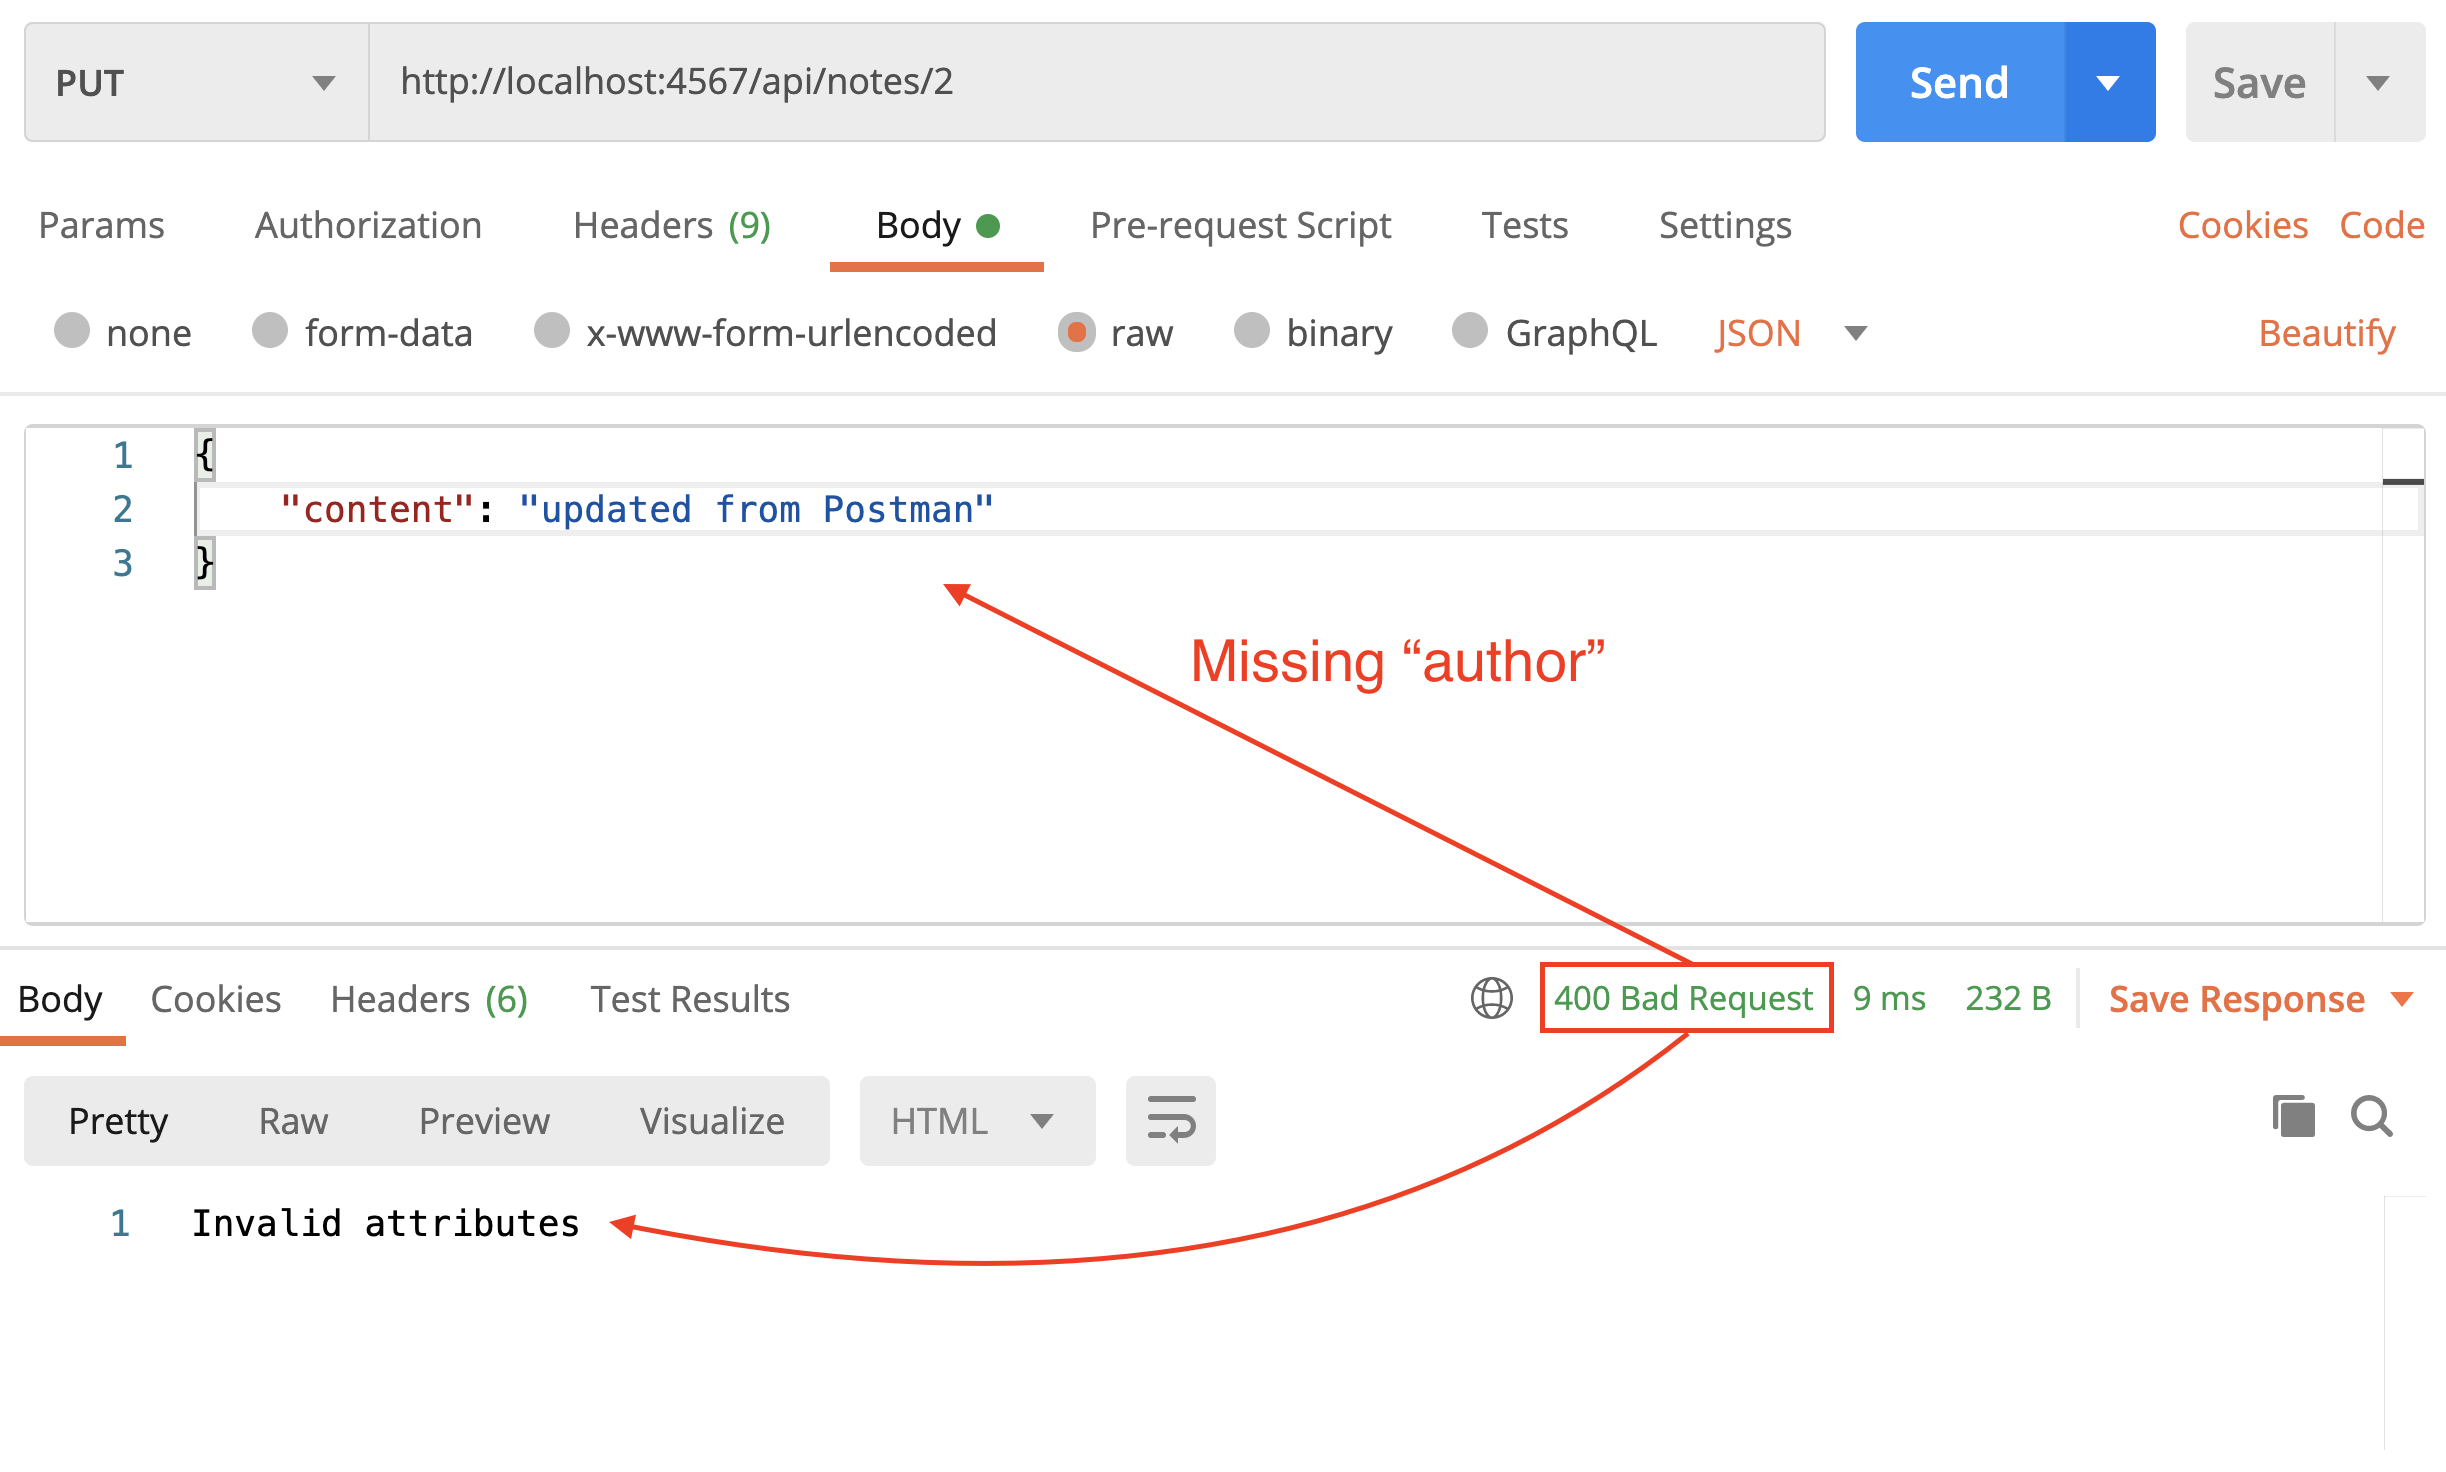
Step 14
We are almost done with the YouNote API. It needs some polishing (refactoring the code, incorporating some best practices, etc) which we will do in the next module.
Until then, I recommend reading the following short reads:
- An Introduction to APIs by Zapier.
- Best practices for designing APIs by Philipp Hauer.
Refactoring YouNote API
In his classic book, Refactoring, Martin Fowler defines refactoring as
The process of changing a software system in such a way that it does not alter the external behavior of the code yet improves its internal structure.
Refactoring is the art of making design changes to keep the software fit for its purpose and ready for more changes. In this module, we will refactor and polish our YouNote API.
The source code for the completed app (which we will build in this module) can be found at this link.
Step 1
It is always good practice to write tests, but perhaps essential before refactoring our code. Having tests enables us to continuously test the code as we refactor it, to ensure the changes we make don't break the expected behavior.
For testing APIs, we can use Postman. In its simplest form, we can save the API requests, group them in "collections" and run them at a later time. This arrangement would serve similar to having a suite of tests.
You can do a lot more with Postman, such as Automated Testing and API Monitoring. Please refer to their documentation for more details.
For this lecture, ensure you have all the following API requests "saved" in a "collection". To create a collection, simply click on + New Collection and give it a name.
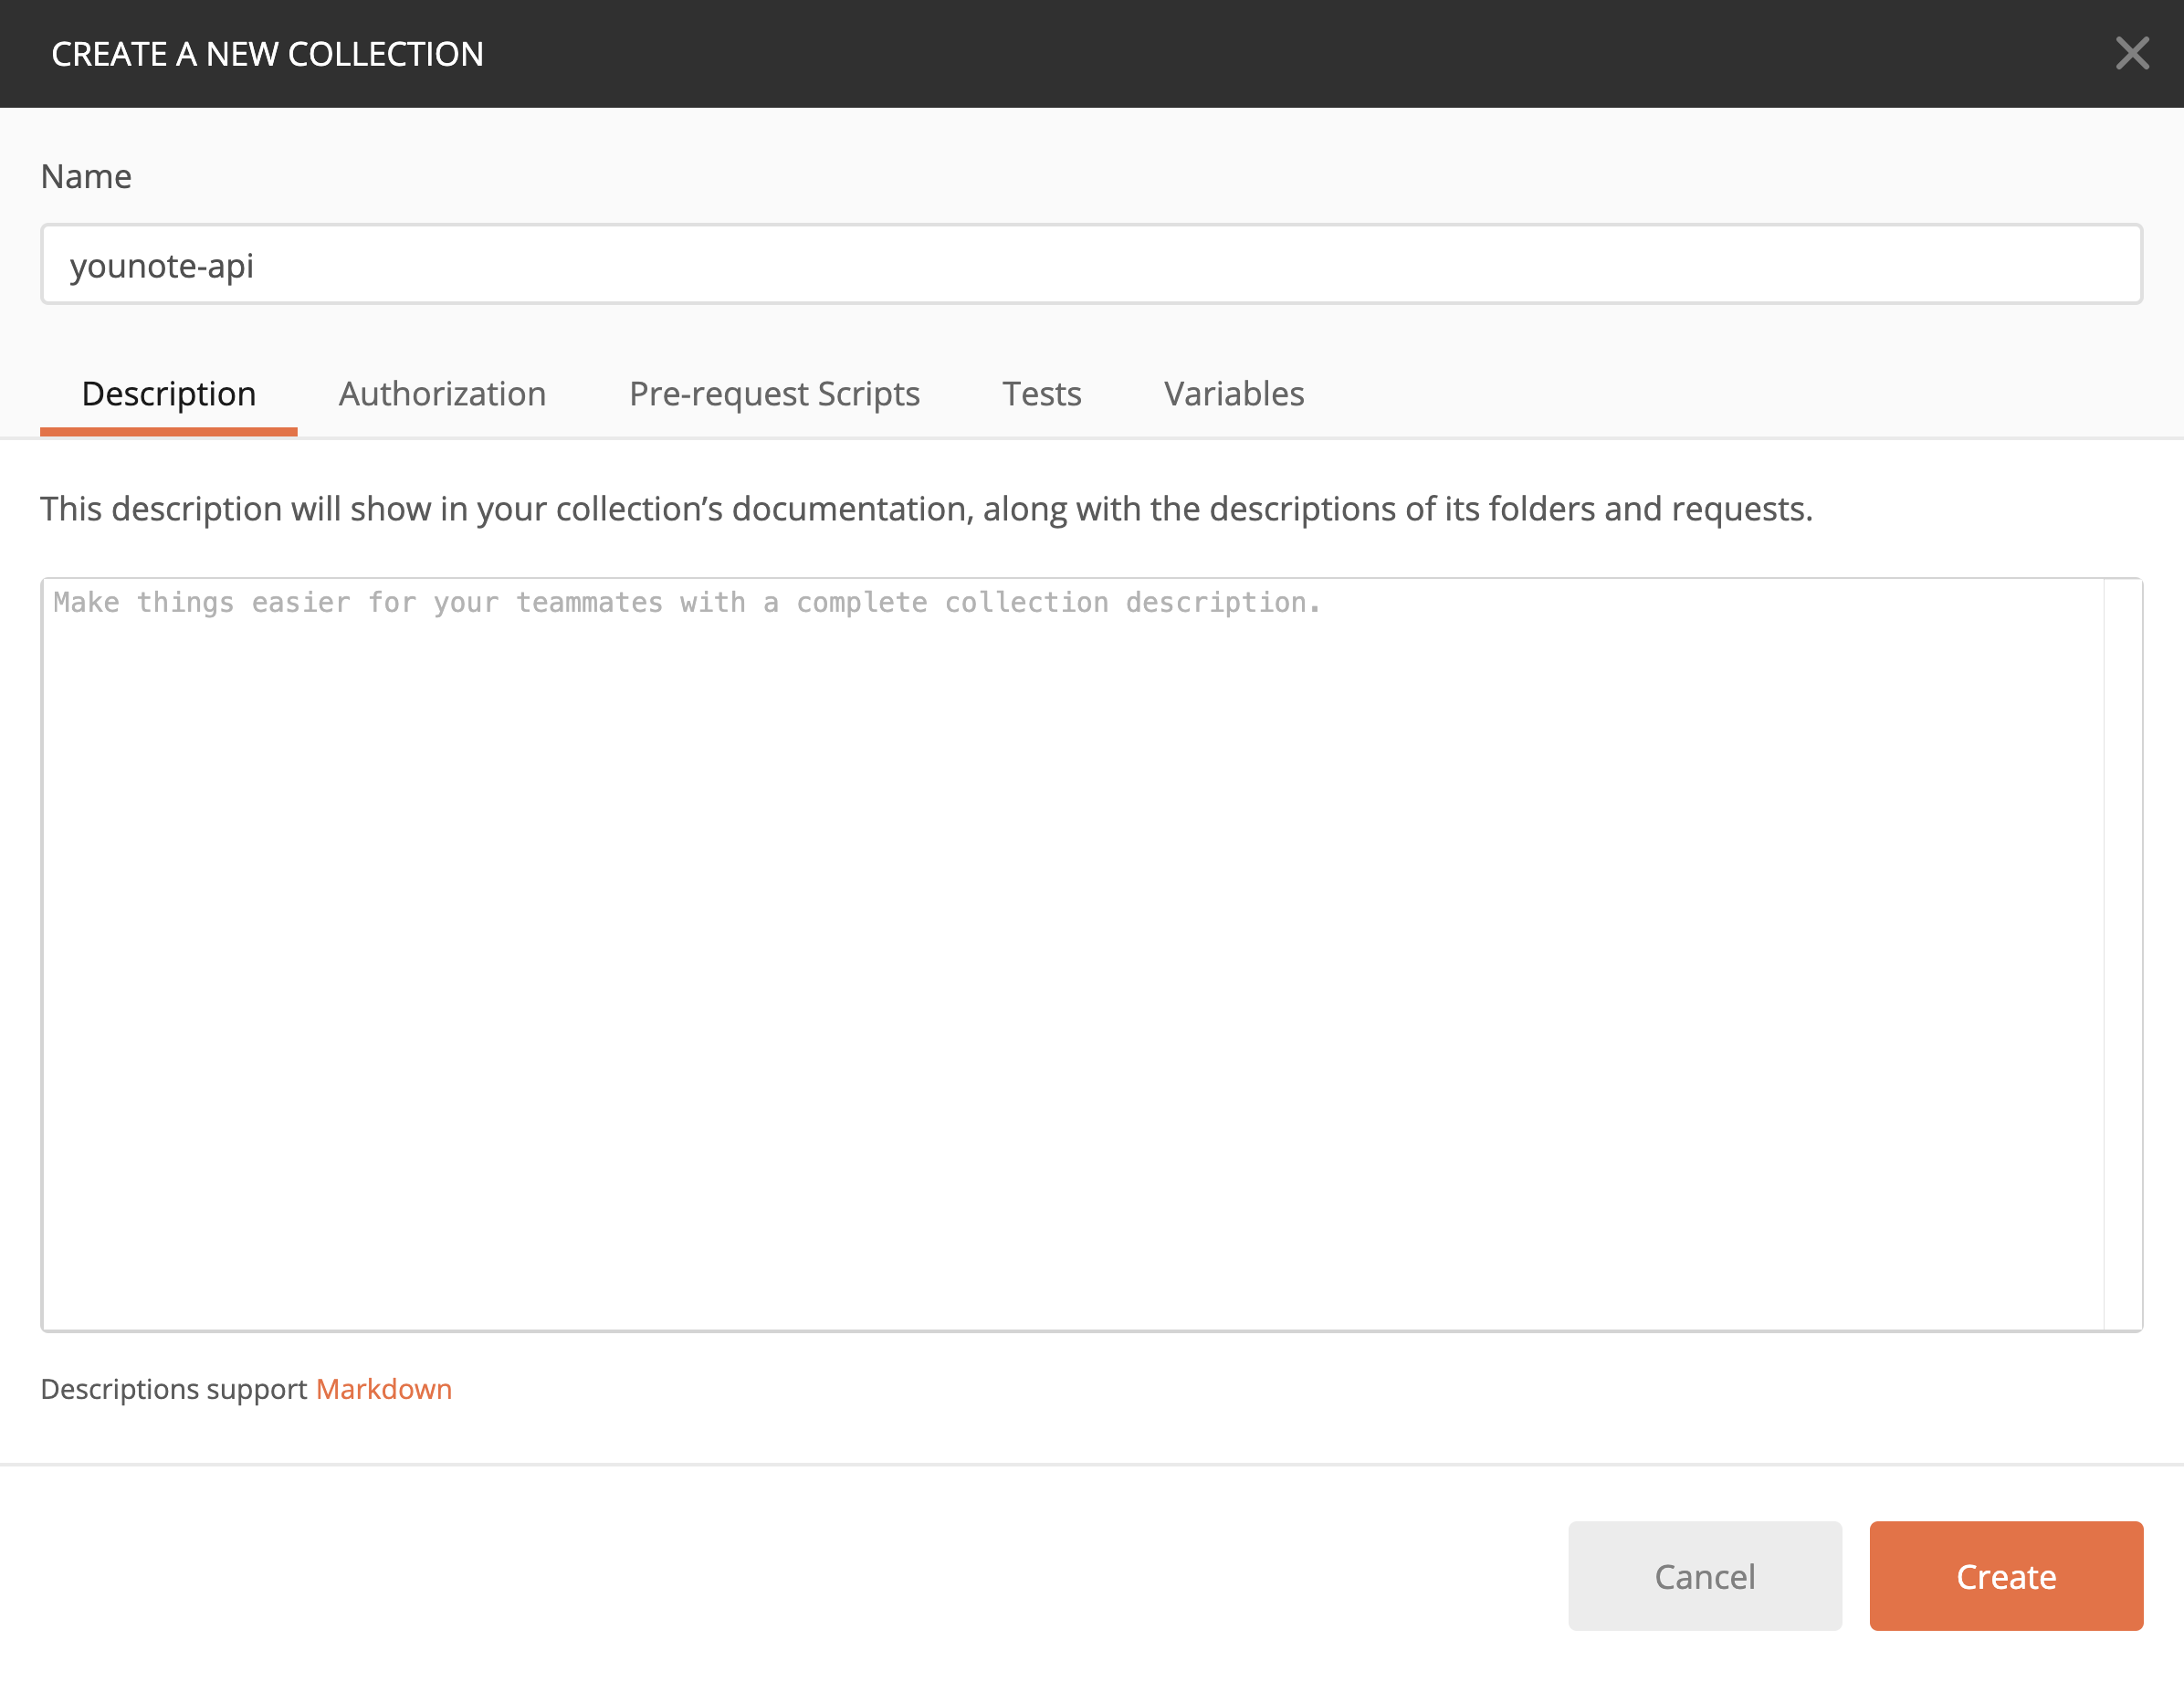
To save an API (HTTP) Request in Postman, simply press
Command+S(orCtrl+Sif on Windows), give it a name and select which collection it should be saved to.
Here are the API requests we have made in the previous module, as we have developed YouNote API:
Get all notes

Get notes by a given author

Get a note given its ID

Create a note

Delete a note given its ID

Delete note (invalid ID)

Update note

Update note (invalid ID)

Update note (invalid attributes)

A nice feature in Postman is that you can "run" all the requests saved in a collection (which is similar to running all your "tests"), and you can share your collection with others, in various forms! I have, for instance, exported the collection into a JSON file and you can download it from here and import it to your Postman application.
To import the collection, click on the big Import button on the top left side of the Postman application.
Step 2
The index.js file for the YouNote API contains several routing methods related to CRUD operations for notes. It is perceivable that we will have other resources/entities, such as users, in this application. It will likely be the case that we will need several other routing methods for CRUD operations for other resources.
Express has a Router object that enables you to move routing logic into a separate file. We will use the express router to refactor routing code.
Create a folder routes inside the younote-api folder. The files in this folder will contain all of our routes and we will export them using the express router.
Create a file notes.js inside routes folder. Copy and paste the content of index.js into notes.js. We will now make the following updates:
-
Remove the following statements
- const port = 4567; - app.use(express.json()); - app.listen(port, () => { - console.log(`Server is listening on http://localhost:${port}`); - }); -
Update the path to
NoteDao- const NoteDao = require("./model/NoteDao.js"); + const NoteDao = require("../model/NoteDao.js"); -
Make the following update
- const app = express(); + const app = express.Router();The
Router()returns an an object with similar HTTP methods (.get,.post,.put,.delete, etc) to theappobject we have previously been using. -
Rename
appvariable torouter(you must apply this consistently to all instances ofappinnote.jsfile). This renaming is not a "must"; it is a good name choice though. -
Add the following statement to the end of
note.jsfilemodule.exports = router; -
Update
index.jsto simply contain the following:const express = require("express"); const noteRoutes = require("./routes/notes.js"); const app = express(); const port = process.env.PORT || 4567; app.use(express.json()); app.use(noteRoutes); app.listen(port, () => { console.log(`Server is listening on http://localhost:${port}`); });The routes related to "notes" are now encapsulated within
noteRoutesobject and the expressappis told to "use" it. Notice that I've also updated the declaration ofportwith somewhat forward thinking for when we deploy this application on Heroku.
Run the API server and run the API requests in Postman to ensure this refactoring has not broken our API's behavior.
Step 3
Phillip Hauer has a great blog post API Design Best Practices. We have already employed some and we will employ two more here (and a few other practice in later modules).
One of the recommendations is "Wrap the actual data in a data field". Let's refactor routes/note.js to incorporate this practice:
Find every instance of res.json() and update it to wrap its argument in a data object as in the example below:
- res.json(note);
+ res.json({ data: note });
Once done, save the file and rerun the API requests in Postman. Here is an example for retrieving a note given its ID.
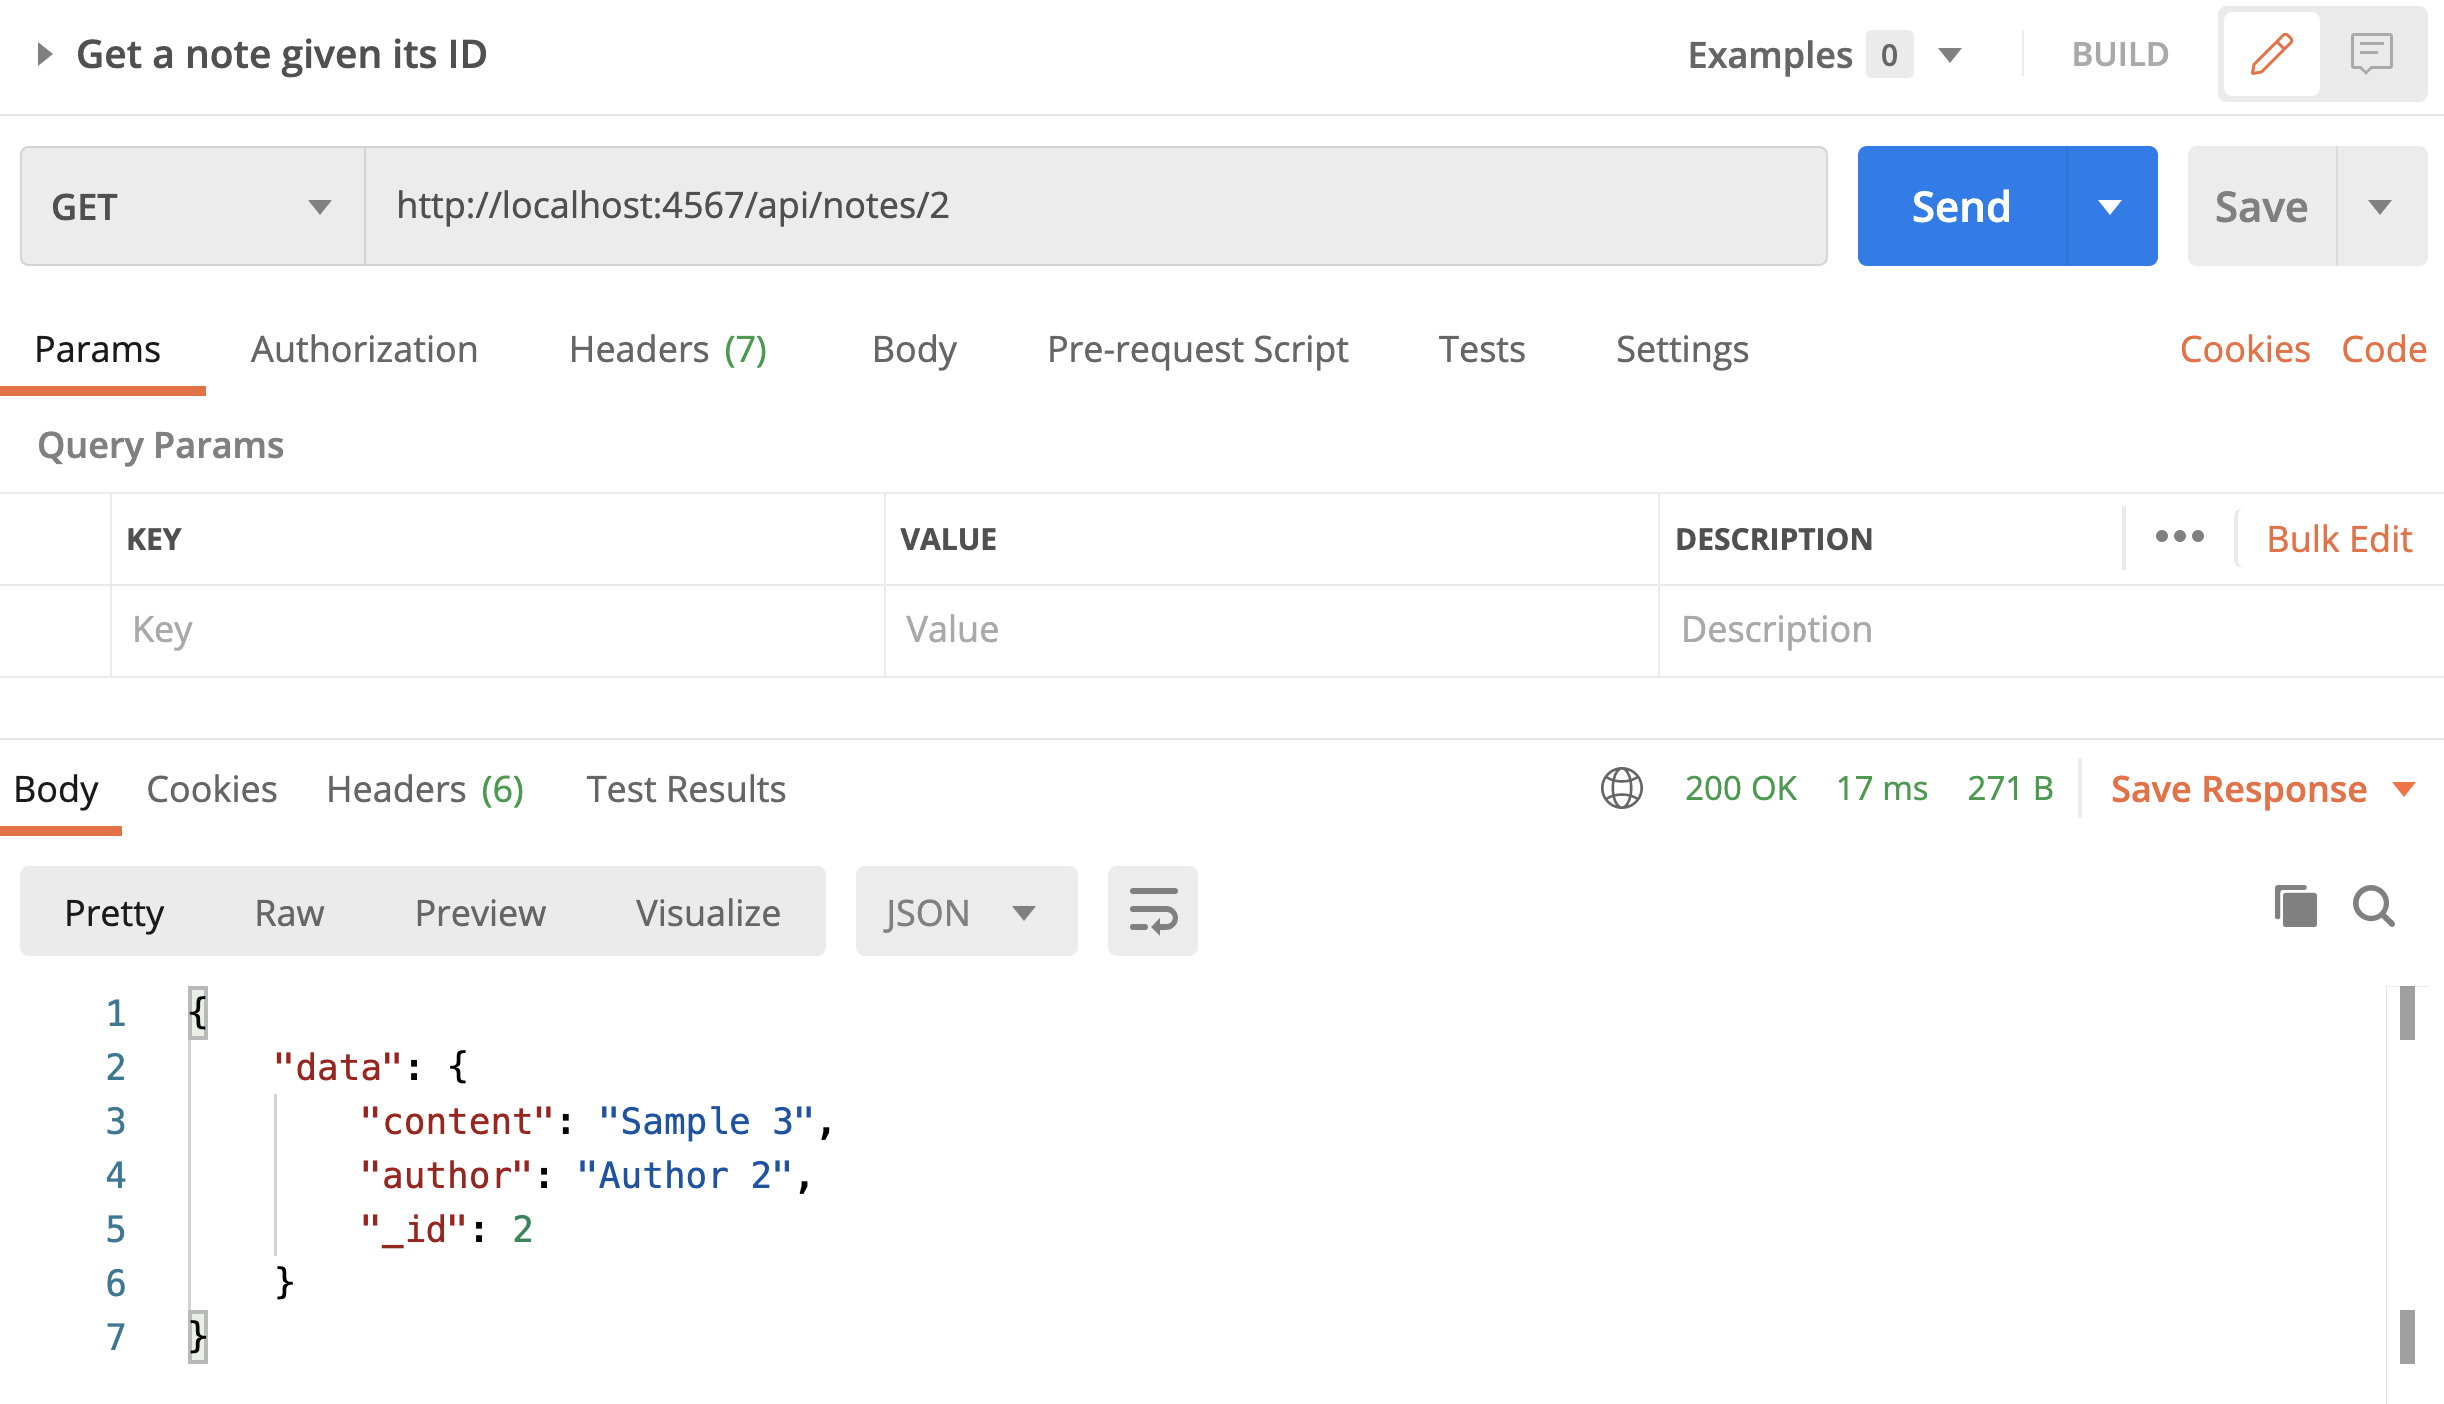
Similarly, we are going to wrap error messages in an errors object. In the blog post, this recommendation is made under "Provide Useful Error Messages". Here is an example:
- res.status(404).send("Resource not found!");
+ res.status(404).json({
+ errors: [
+ {
+ status: 404,
+ detail: "Resource not found!",
+ },
+ ],
+ });
You must update all instances where the response entailed an "error" to adhere to the pattern above.
Once done, save the file and rerun the API requests in Postman. Here is an example for attempting to delete a note given an invalid ID.
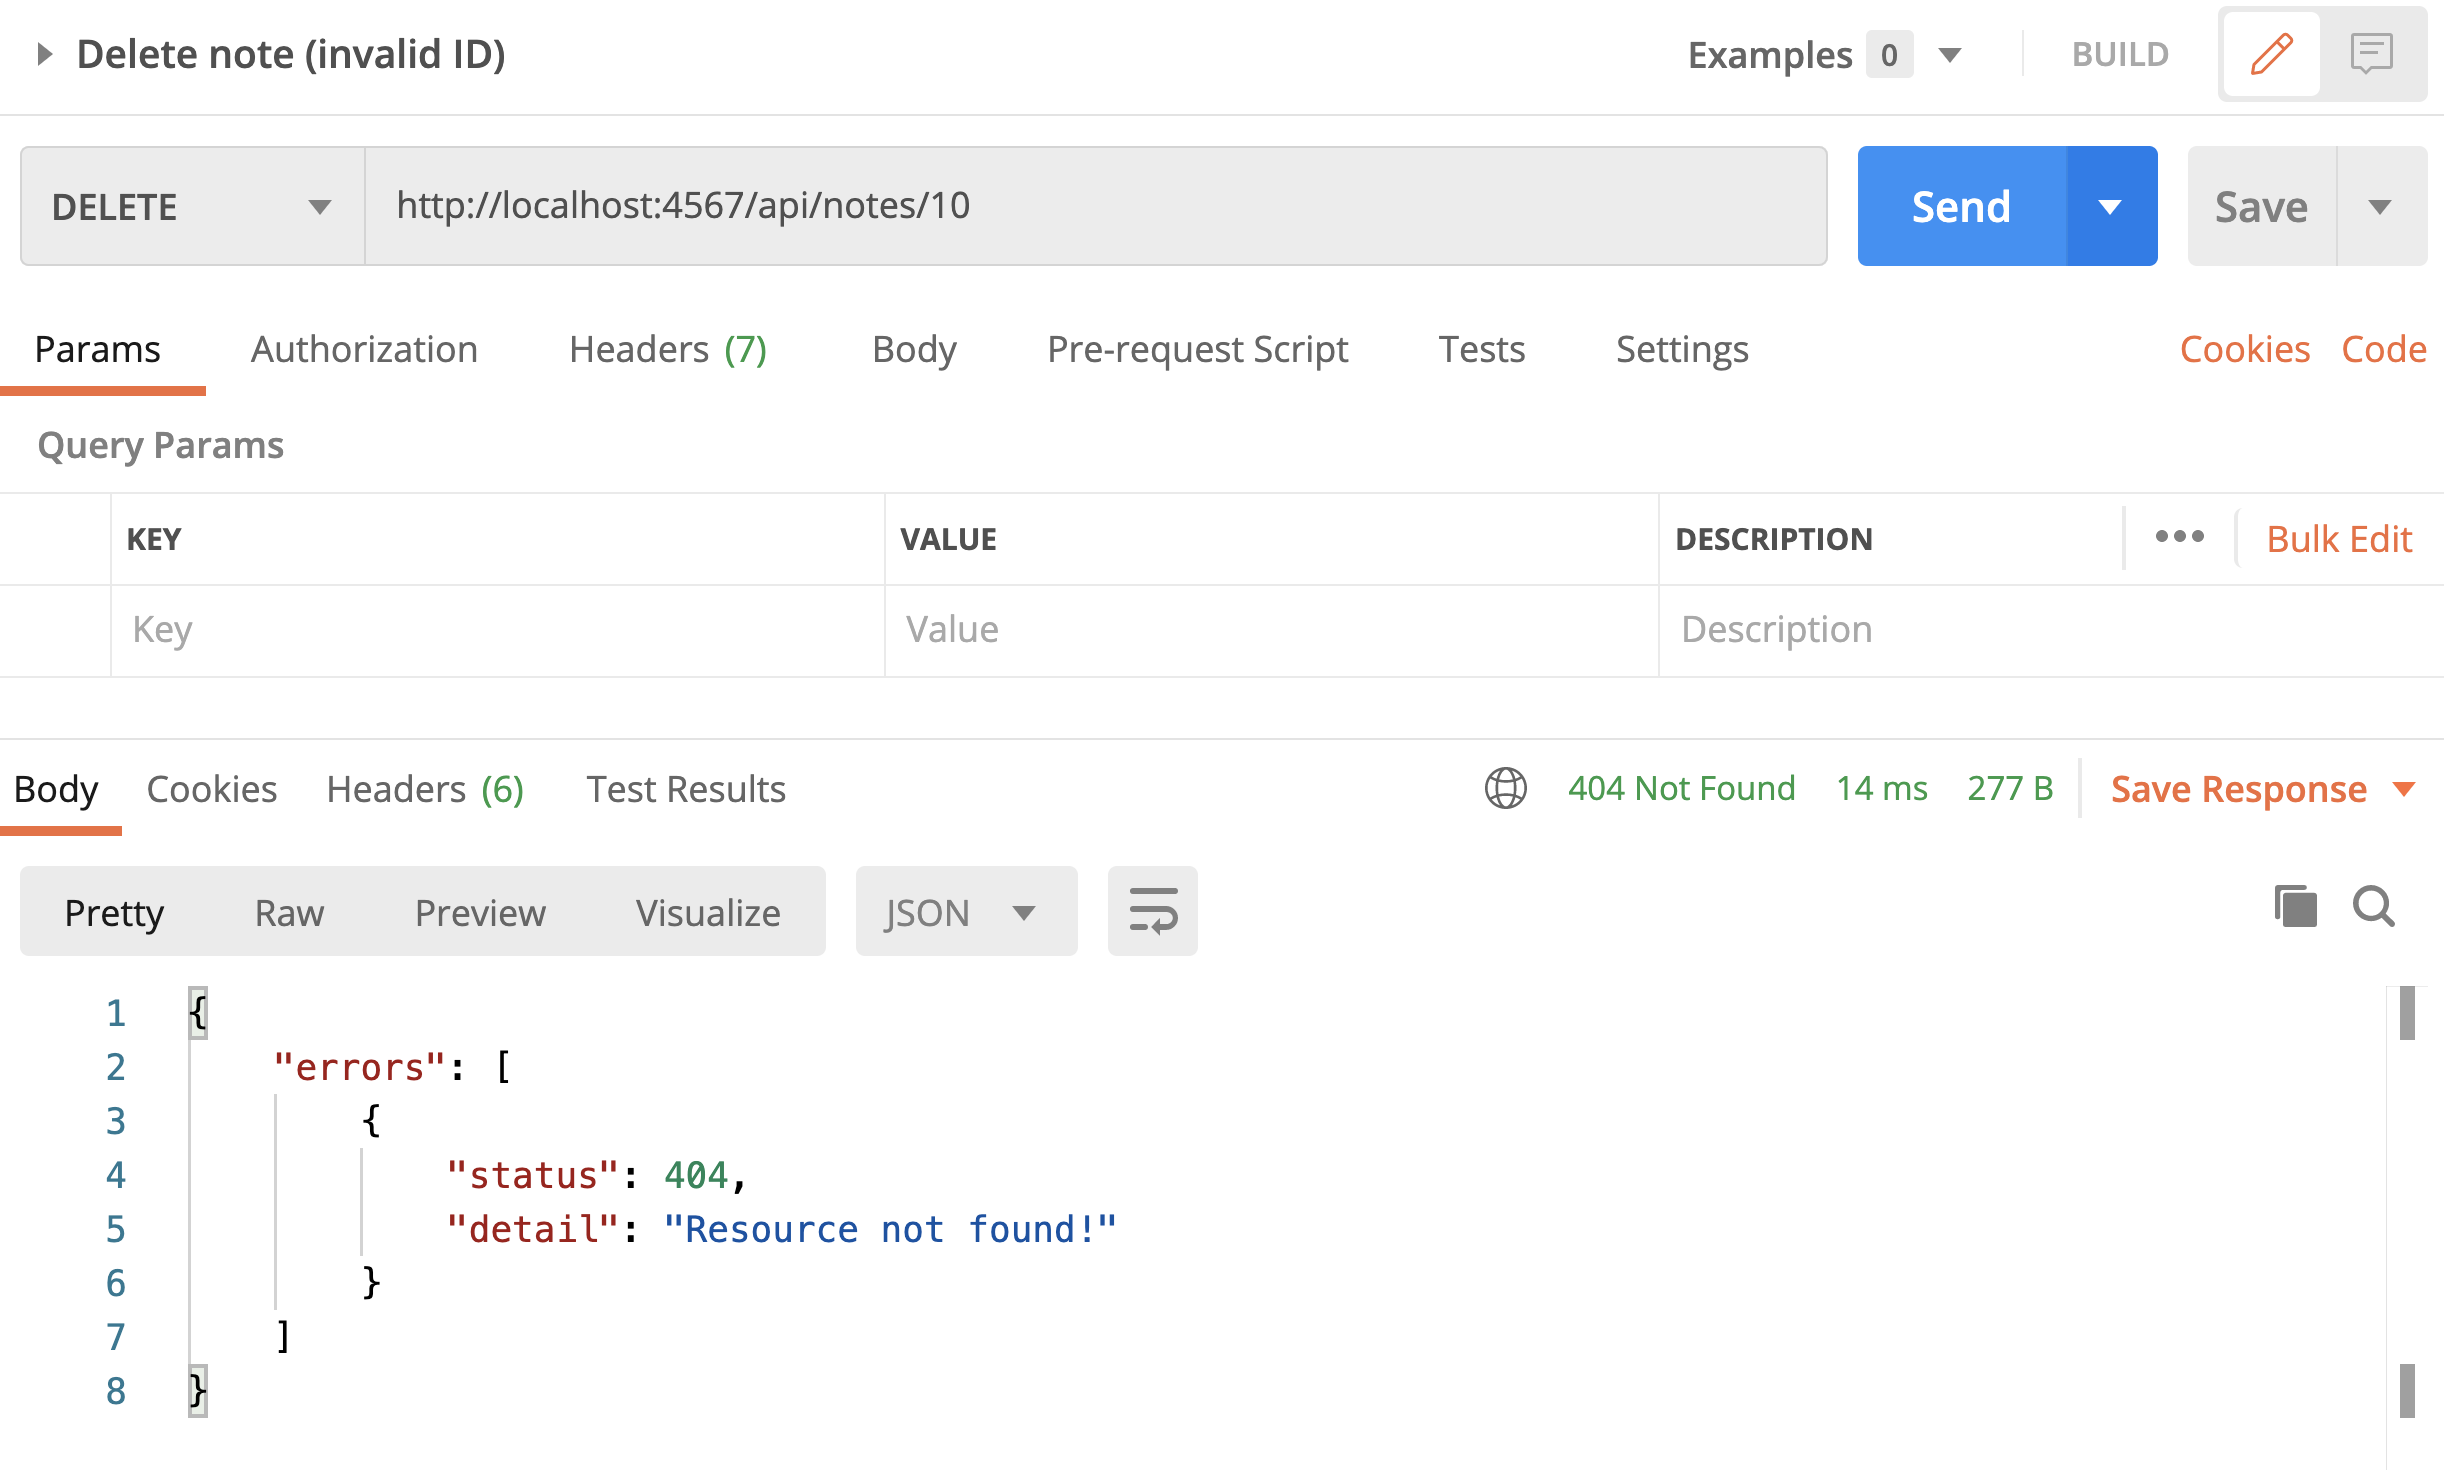
Step 4
The routes/note.js file contains the following statement which generates sample data. This sample data generation is not a responsibility of a route handler. We need to refactor and extract this segment into its own file (module).
Create a folder called data and add a file notes.js to it, with he following content:
function addSampleNotes(notes) {
notes.create("Sample 1", "Author 1");
notes.create("Sample 2", "Author 2");
notes.create("Sample 3", "Author 2");
notes.create("Sample 4", "Author 1");
}
module.exports = { addSampleNotes };
Update the routes/note.js file:
const express = require("express");
+ const { addSampleNotes } = require("../data/notes.js");
const router = express.Router();
const notes = new NoteDao();
- notes.create("Sample 1", "Author 1");
- notes.create("Sample 2", "Author 2");
- notes.create("Sample 3", "Author 2");
- notes.create("Sample 4", "Author 1");
+ addSampleNotes(notes);
Save the files and run the API requests in Postman to ensure this refactoring has not broken our API's behavior.
Now stop the API server! We are going to install a package that assists us with generating more realistic fake data! Run the following command in the terminal.
npm install faker
The faker package can generate fake users, images, content, etc.
Update data/notes.js:
const faker = require("faker");
const NUM_SAMPLES = 4;
function addSampleNotes(notes) {
for (let i = 0; i < NUM_SAMPLES; i++) {
notes.create(faker.lorem.paragraphs(), faker.name.findName());
}
}
module.exports = { addSampleNotes };
Run the API server and run the API requests in Postman to ensure this refactoring has not broken our API's behavior. You may need to update some of the requests; for instance, the author name "Author 2" is not among the sample data anymore so a request to retrieve notes written by this author will return an empty array object.
Note the drawback of using a package like
fakeris that the randomness involved in generating fake data makes it difficult to test the API.
We can also use faker's random "unique ID" generator to assign unique IDs to notes; it will be more realistic to what a database does compared to our auto-incrementing ID feature currently in place in NoteDao.
Update the NoteDao file as follows:
-
import
fakerconst faker = require("faker"); -
Use it to assign random unique IDs:
- note._id = this.nextID(); + note._id = faker.random.uuid(); -
You don't need the
uniqueIDfunction, so delete it! -
You don't need this statement in the constructor, so delete it:
- this.nextID = uniqueID();
Open the routes/notes.js file and remove the following casting (since IDs are not integers anymore)
- const id = Number.parseInt(req.params.id);
+ const id = req.params.id;
Save the files and run the API requests in Postman to ensure this refactoring has not broken our API's behavior. You will need to update many of the requests; for instance, every request that contained a "note id" request parameter needs to be updated as we no longer have integer IDs.
Step 5
Recall the issue with CORS (Cross Origin Resource Sharing) when we were working with the SIS API. The browser blocked our access to the SIS API due to CORS policy. We needed to install a plugin to get around this issue. At the time, I've noted this is an issue on SIS API's side. They must update their responses to include Access-Control-Allow-Origin: * in their HTTP header to allow requests from all domains. This will be the case for our YouNote API as well. Since the intention is to build a "public" API, we must allow cross domain requests.
The fix happens to be very simple, as long as we are working with NodeJS & Express. To understand how the fix works, go to Postman, run any of the requests, and notice in the response, there are 6 "header" attributes.
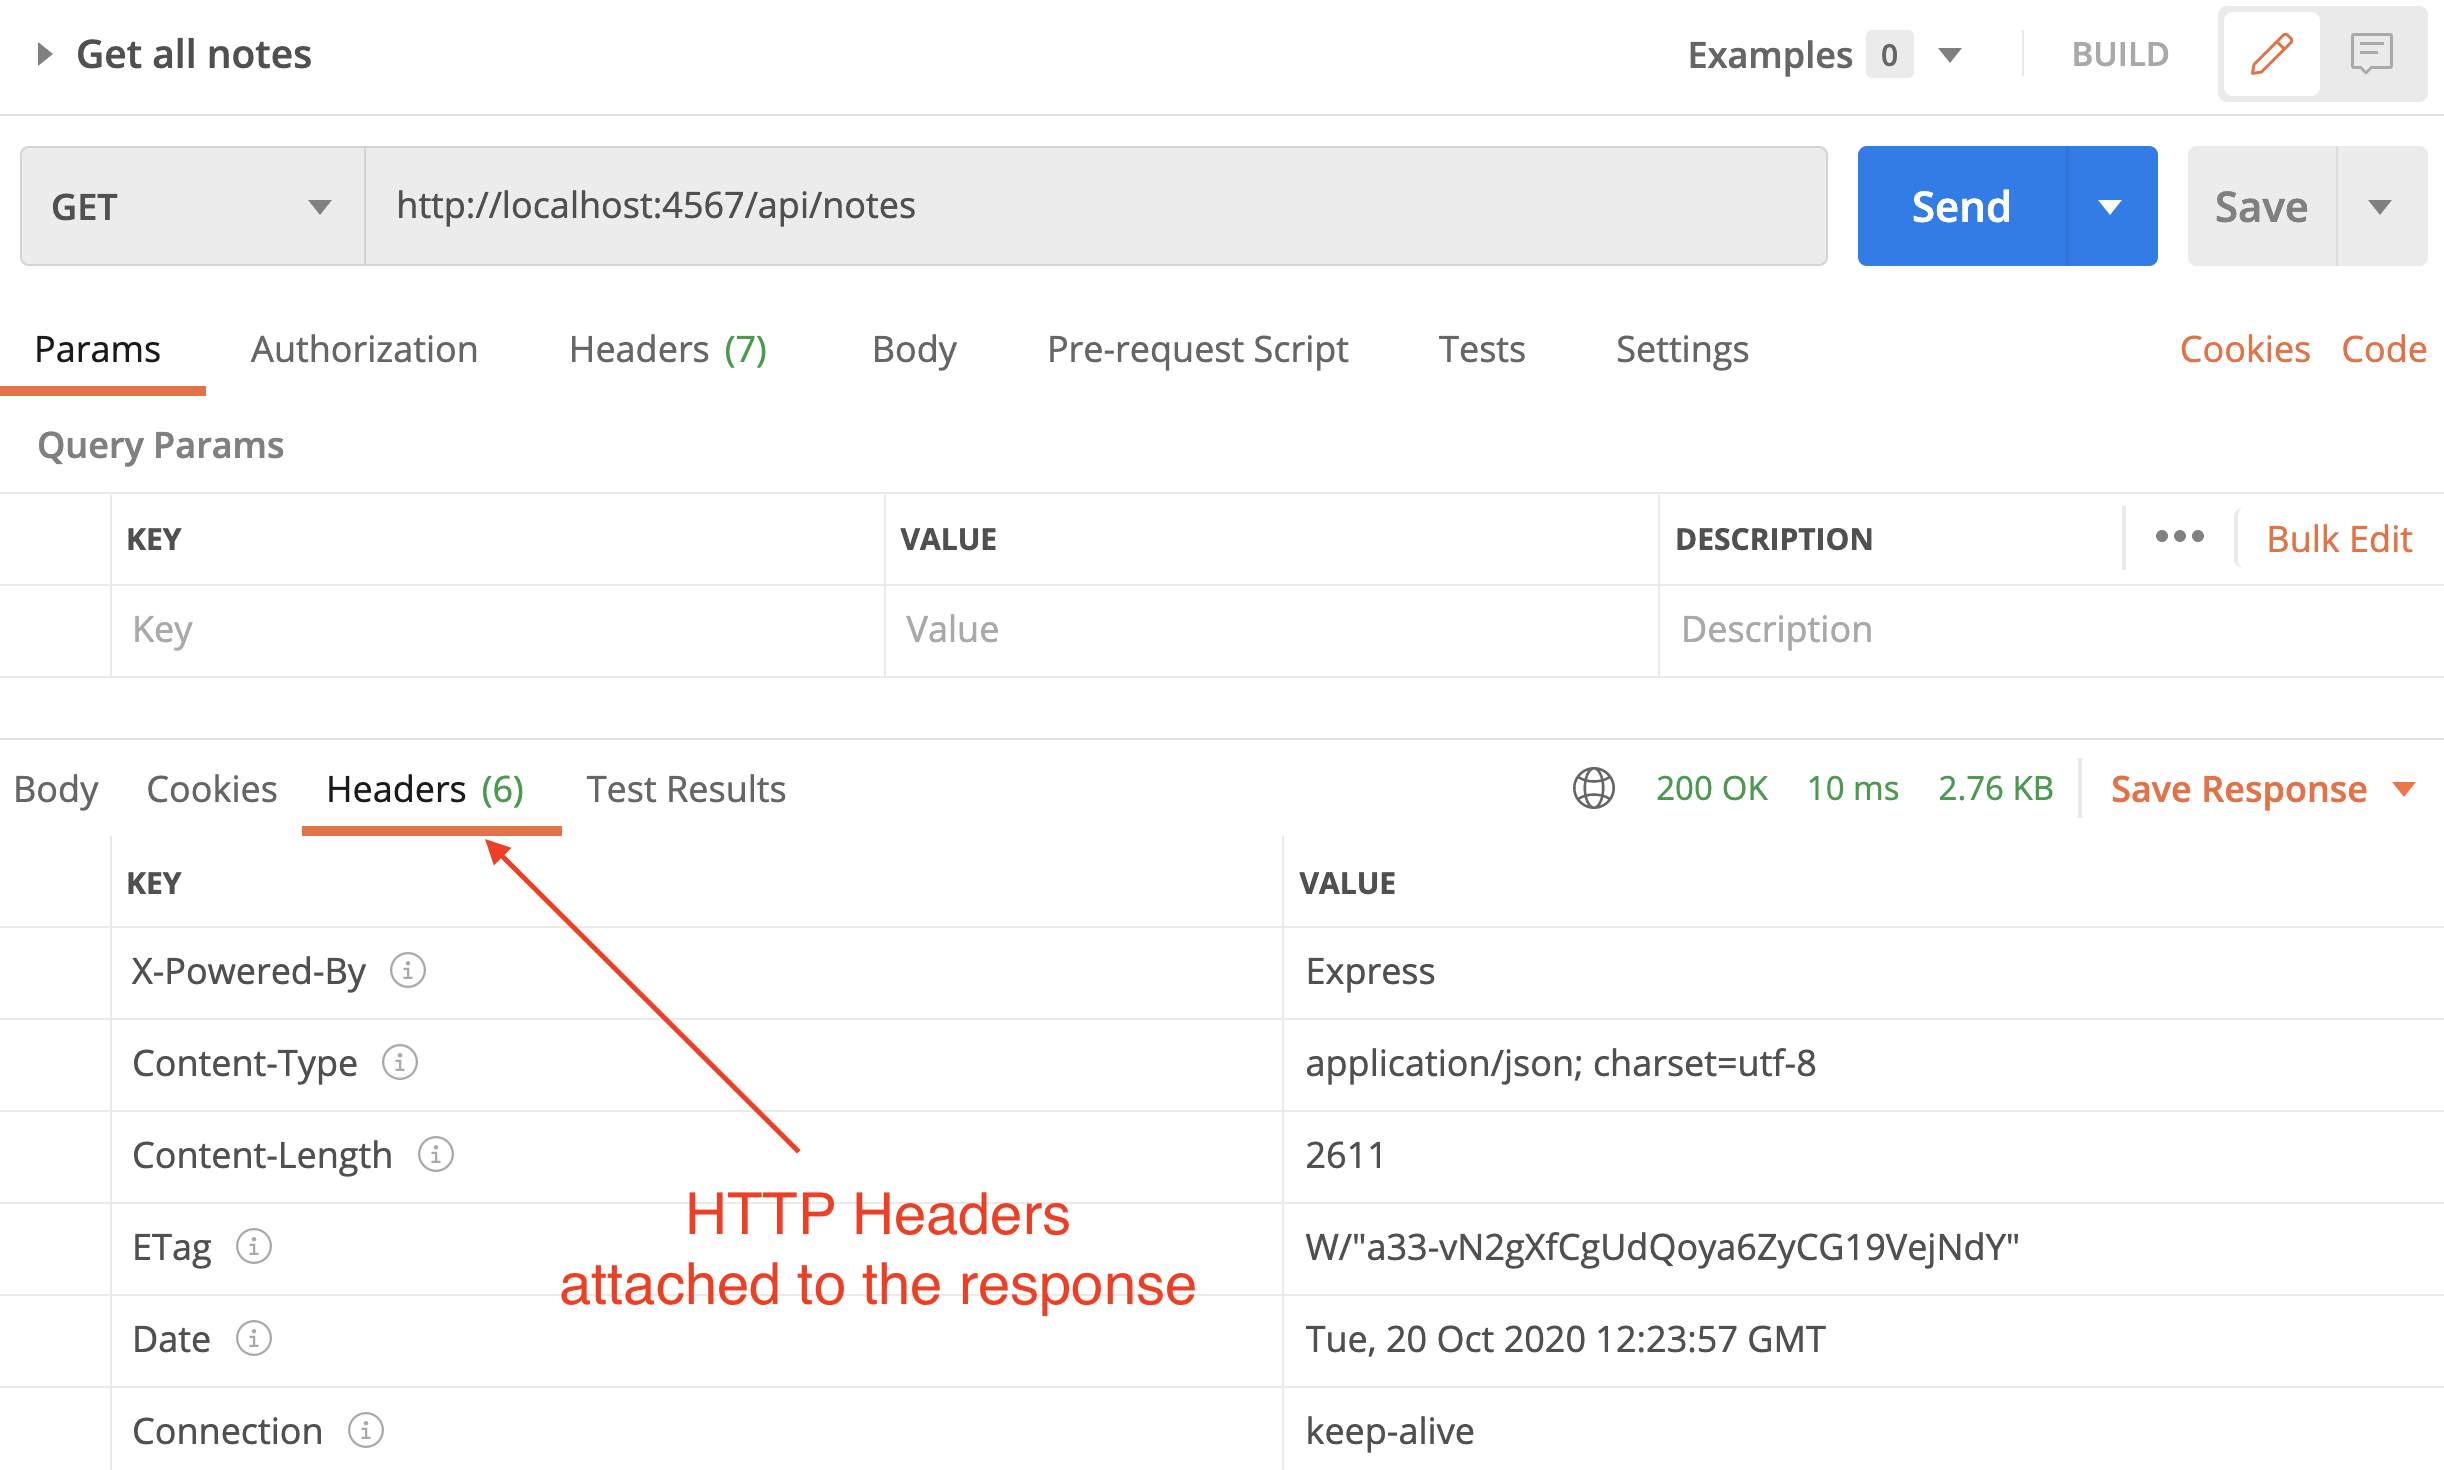
Now, stop the API server and install the Node package cors
npm install cors
Next, update the index.js file by
-
Importing cors
const cors = require("cors"); -
Linking it to express
app.use(cors());
That's it! Run the server again and run any of the API requests in Postman. Make note of the response header attributes:
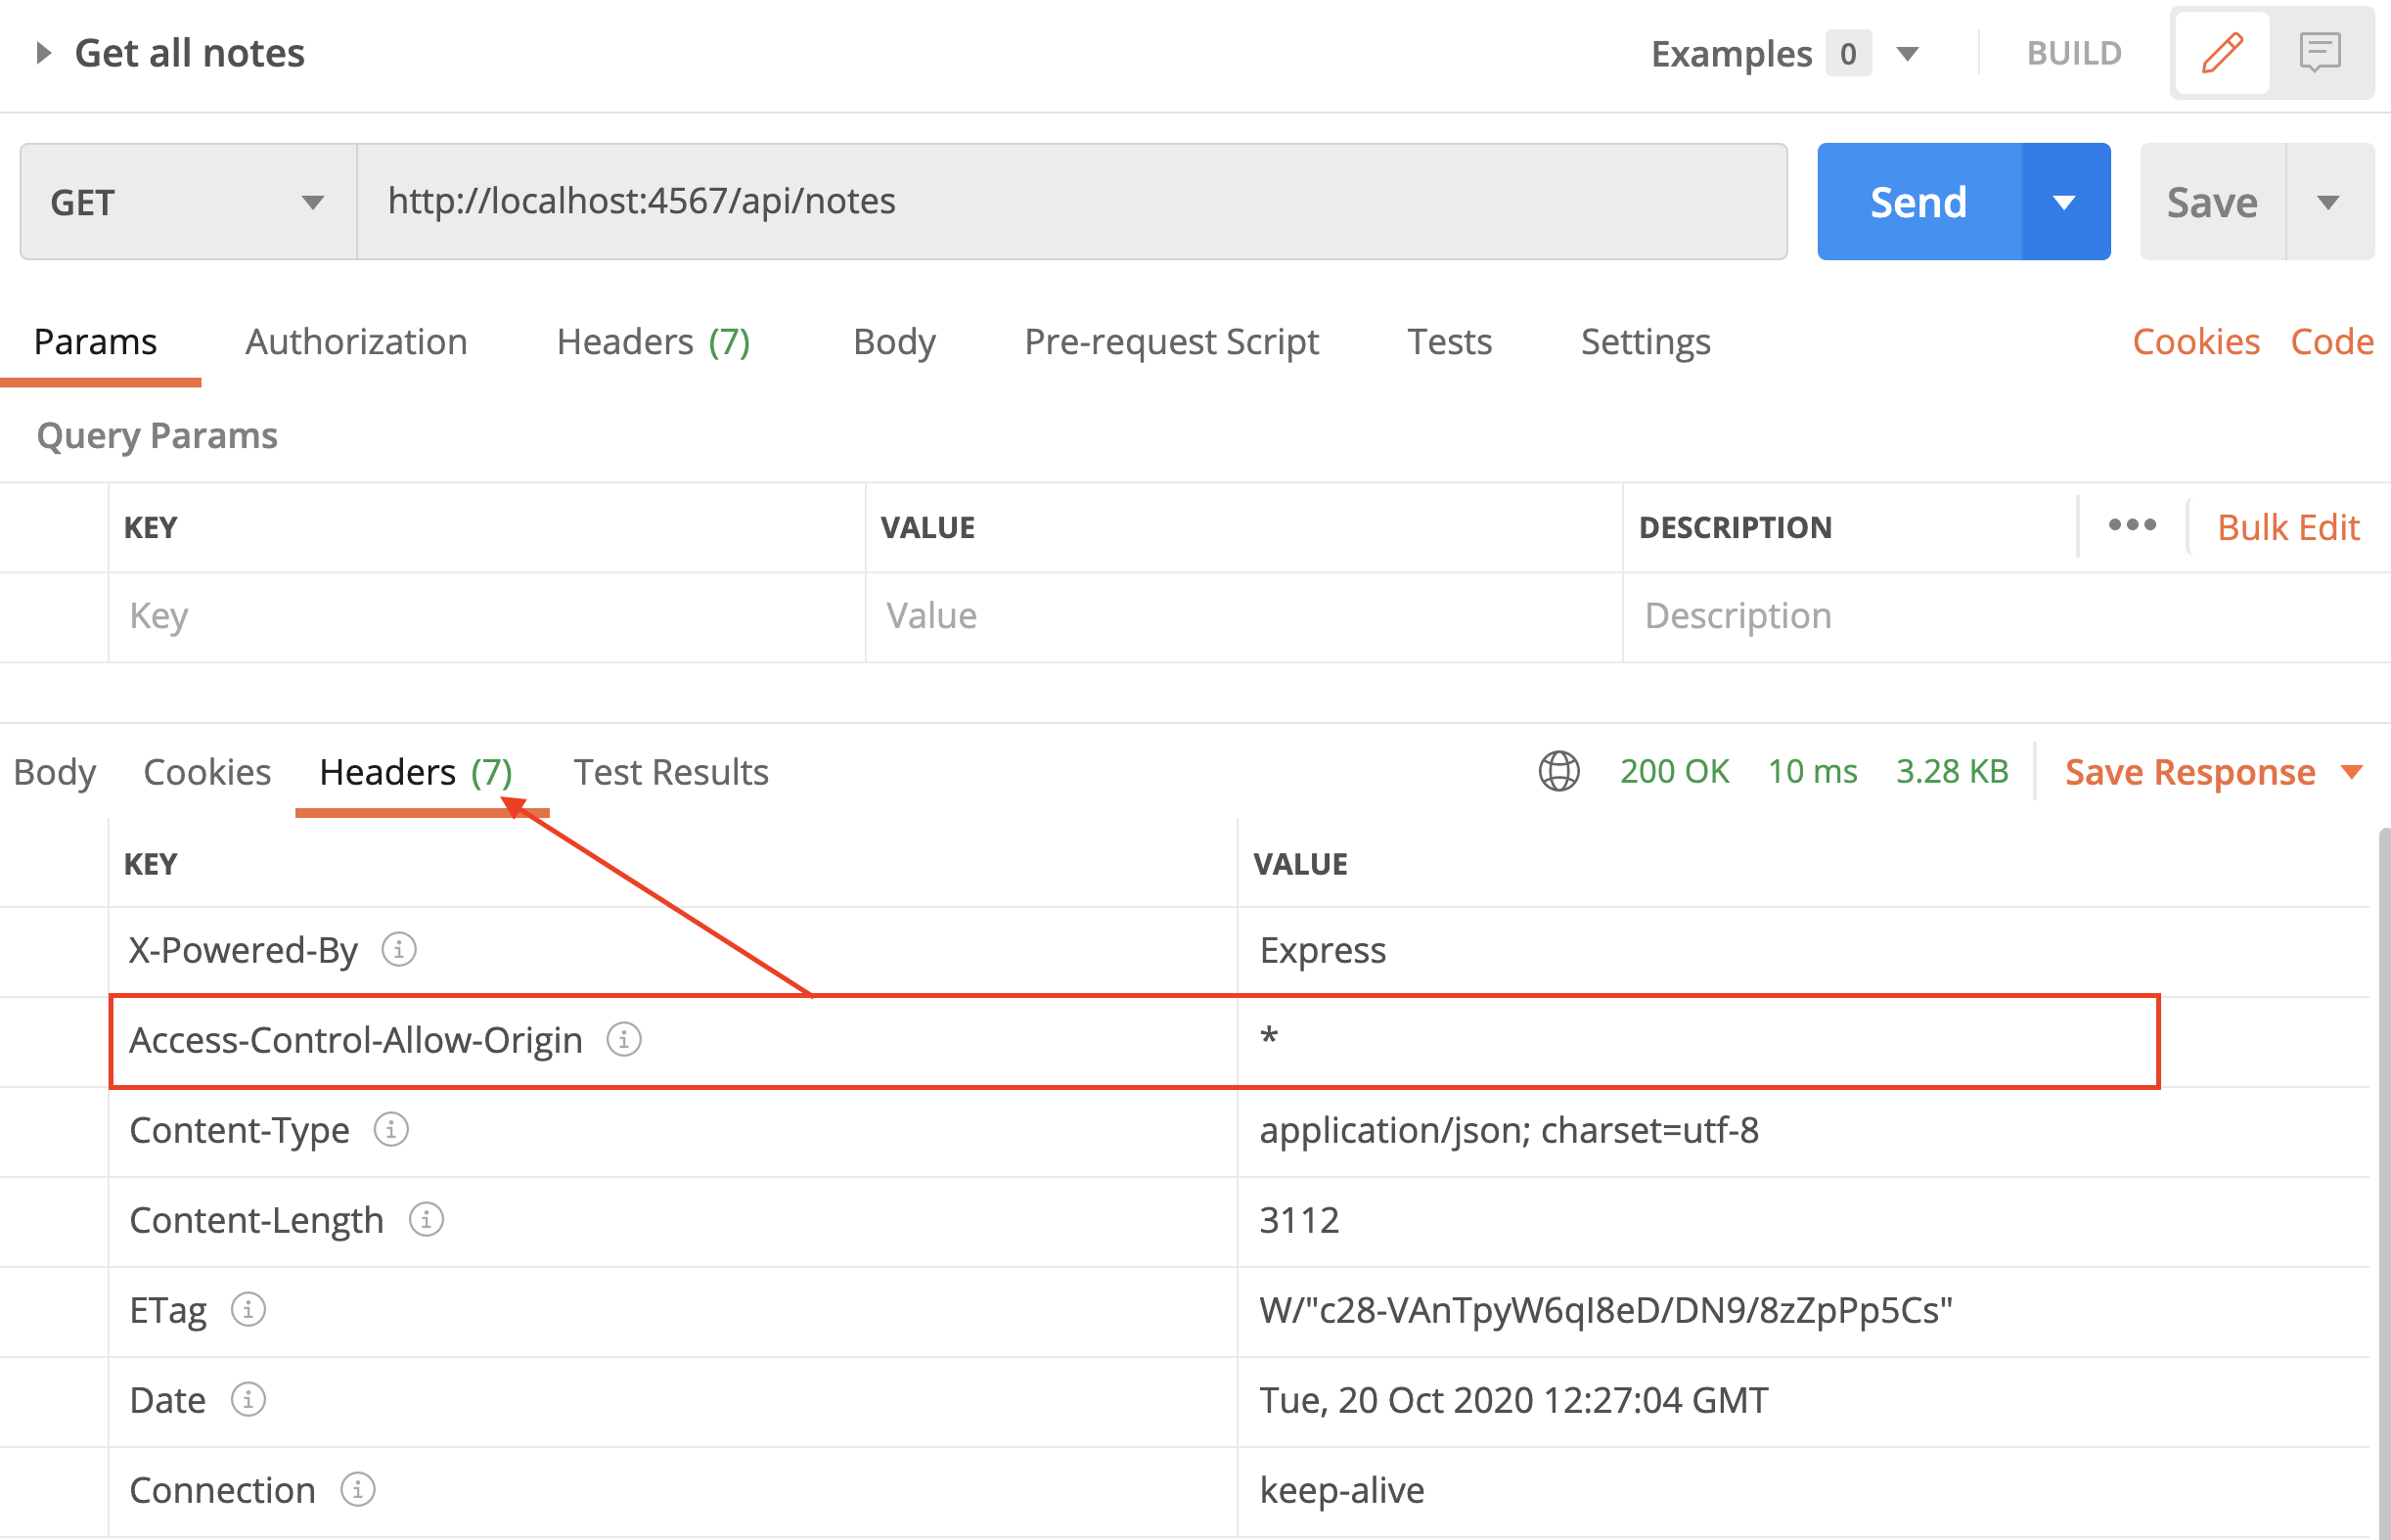
The cors package adds this Access-Control-Allow-Origin: * to the header of every response we send back to the client. This information informs applications such browsers that we allow cross domain requests.
The cors package can take many options to e.g. allow requests from certain domains (but not all). There are many resources online if you are interested to learn more about this. This short video could be a good starting point: Node API - CORS, what is it and how to use it on YouTube.
Step 6
We have allowed cross domain requests to our API. This is needed however it makes our server more vulnerable to various security risks. We can get help from another Node package called helmet to compensate for this. Helmet can protect our API from some well-known web vulnerabilities by setting HTTP headers appropriately.
To use helmet, stop the API server and install the it:
npm install helmet
Next, update the index.js file by
-
Importing helmet
const helmet = require("helmet"); -
Linking it to express
app.use(helmet());
That's it! Run the server again and run any of the API requests in Postman. Make note of the response header attributes:
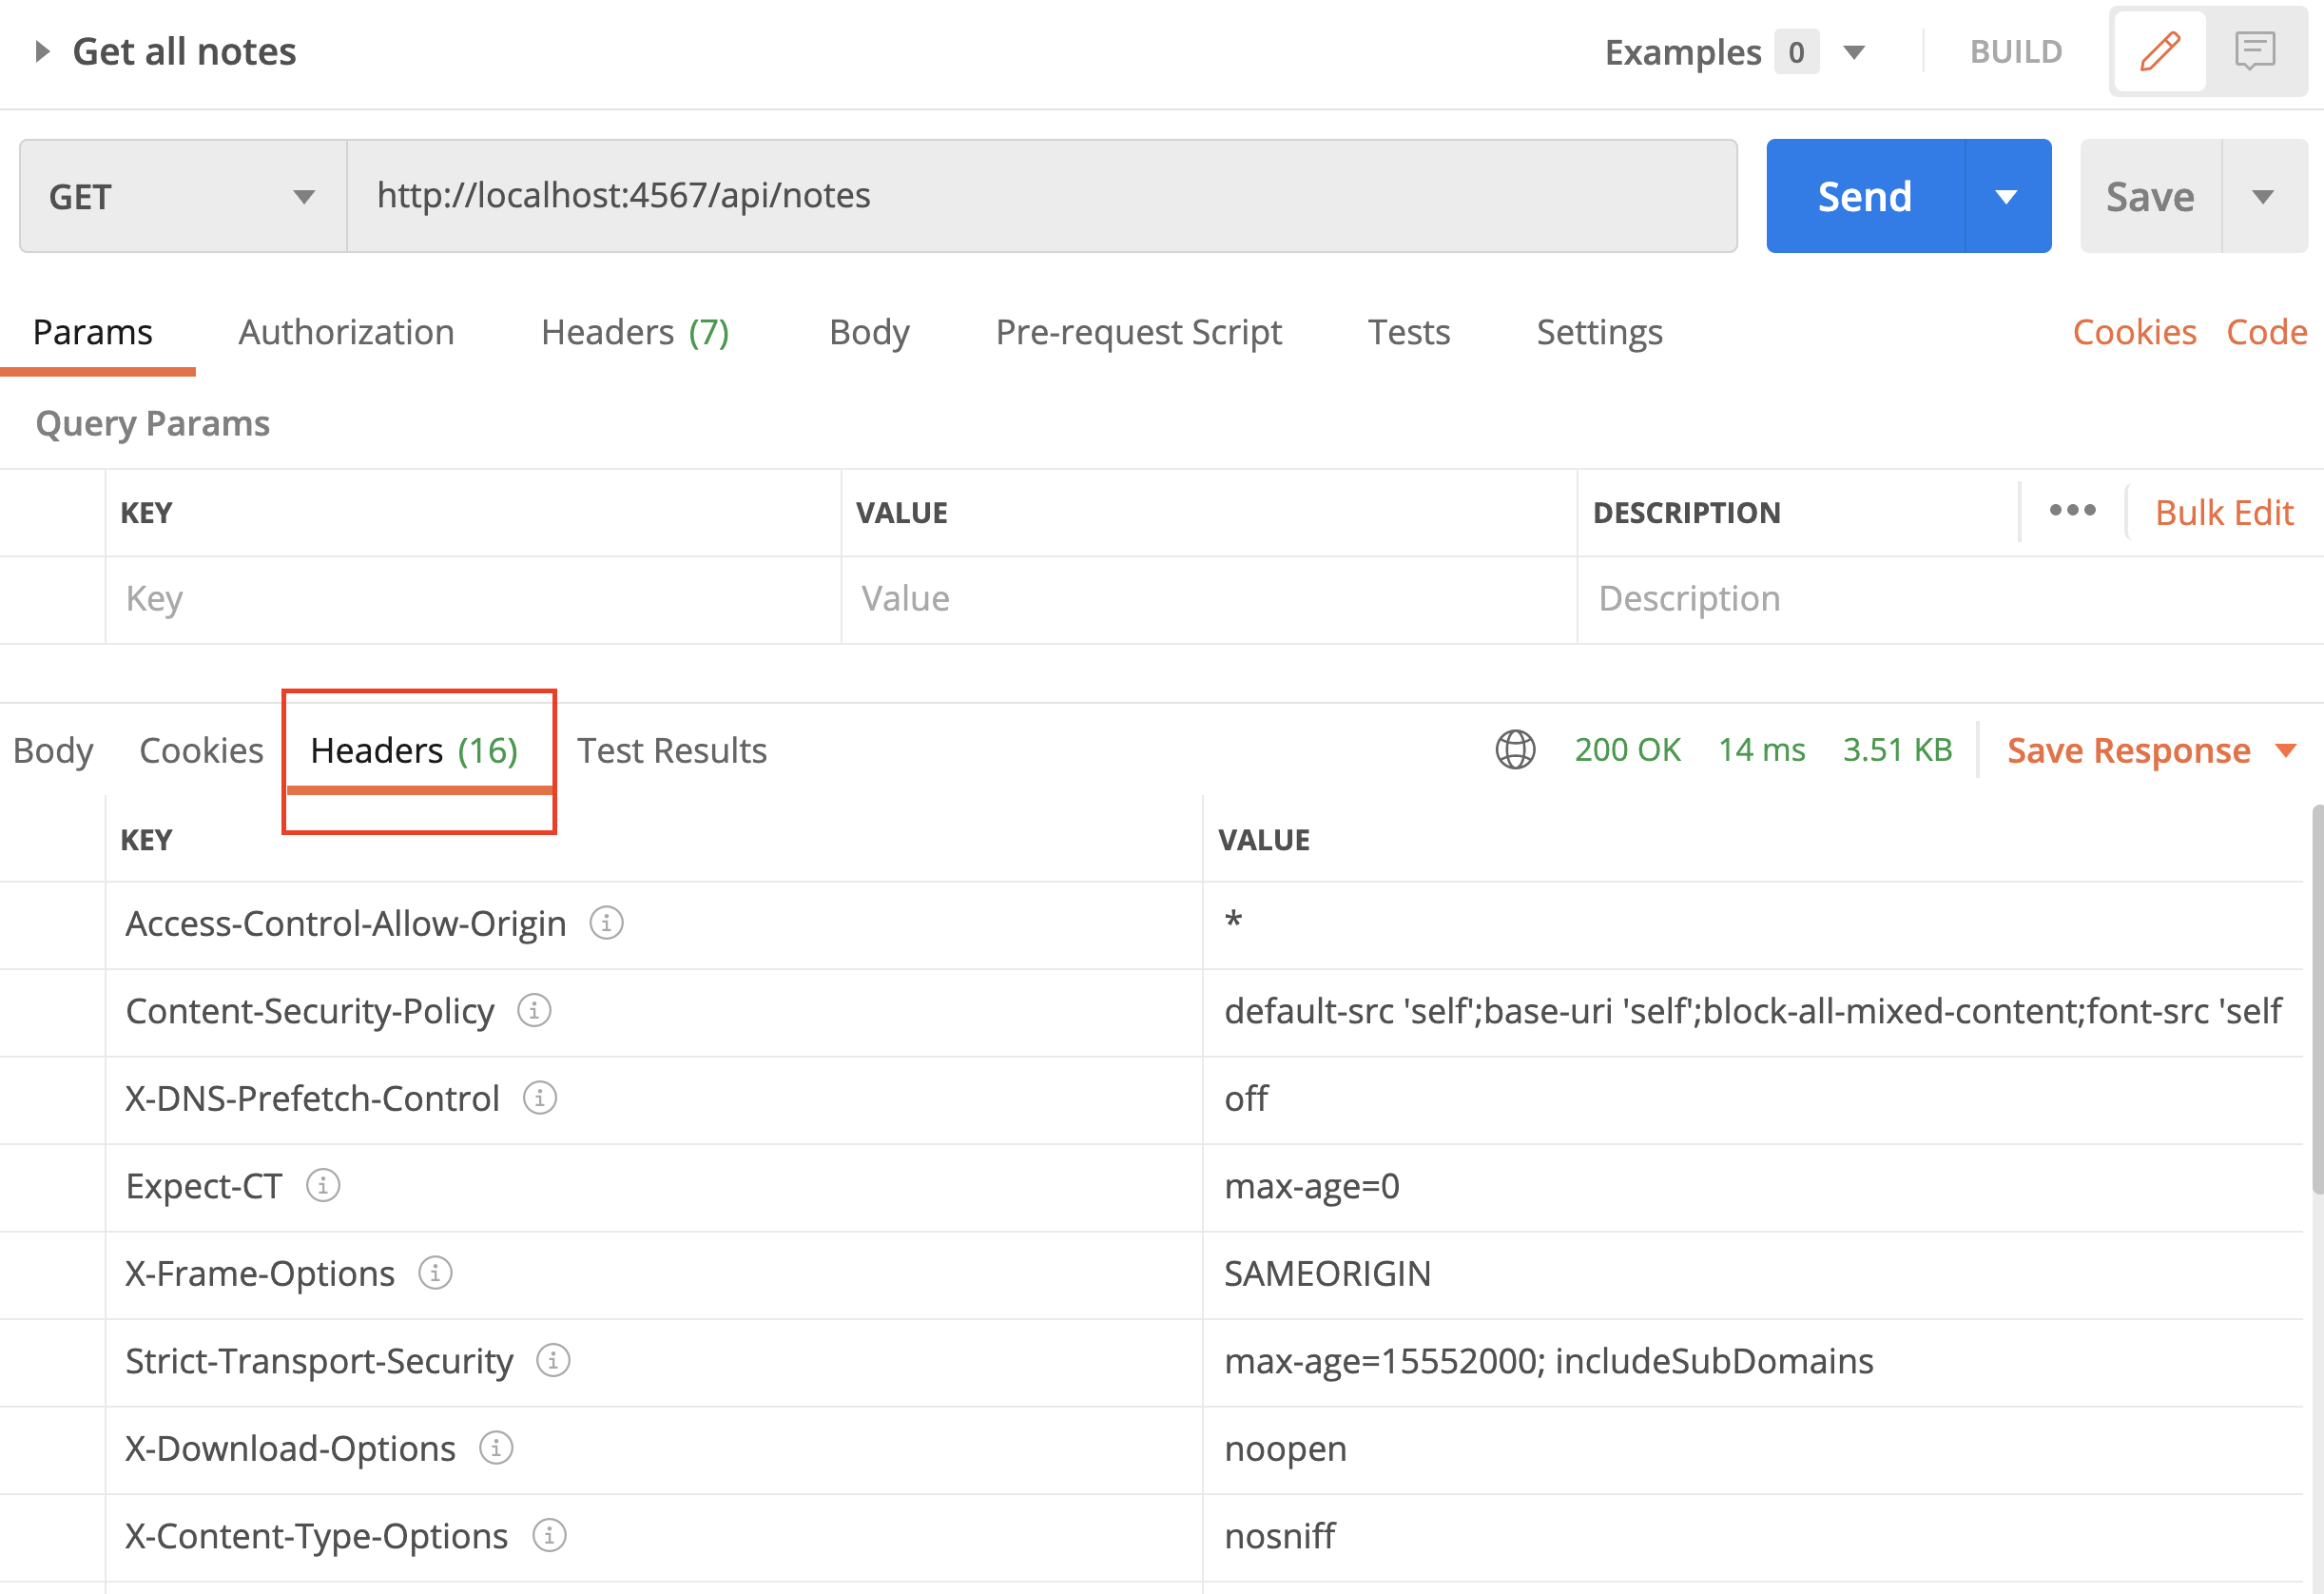
It is beyond the scope of this course to get into the details of what these headers mean and what they do. If you are interested, a good starting point is this short YouTube video Secure ExpressJS Application With Helmet. I also recommend watching this (longer) YouTube video Information Security with HelmetJS with FreeCodeCamp by Dylan Israel.
Step 7
Look at these four lines from index.js file:
app.use(cors());
app.use(helmet());
app.use(express.json());
app.use(noteRoutes);
The pattern of app.use(something) is how Express employs middleware functions.
Middleware functions are functions that have access to the request object (
req) and the response object (res), and they can modify application’s request-response cycle.
For example, cors and helmet add "headers" to all our responses before they are actually sent to client. The express.json reads all the requests and if they contain JSON payload, it parses the JSON and makes it available to us through req.body object.
There are many middleware available for Express and you can make your own. The best place to start is "Using middleware" on Express official Guidelines. You can also look at Express middleware under Resources at expressjs.com for a list of popular middleware functions. We have already used a few but let's add another one:
Stop the API server and install morgan
npm install morgan
Next, update the index.js file by
-
Importing morgan
const morgan = require("morgan"); -
Linking it to express
app.use(morgan("dev"));
We use morgan to log HTTP requests. As you interact with the API server, you can look at the console (terminal) for the server and see the requests that are received and served by the server. Morgan generated color-coded output based on response status for development use. For example, output will be colored green for success codes, red for server error codes, yellow for client error codes, cyan for redirection codes, etc.
Run the server again and run some of the API requests in Postman. Make note of console as the server is running:
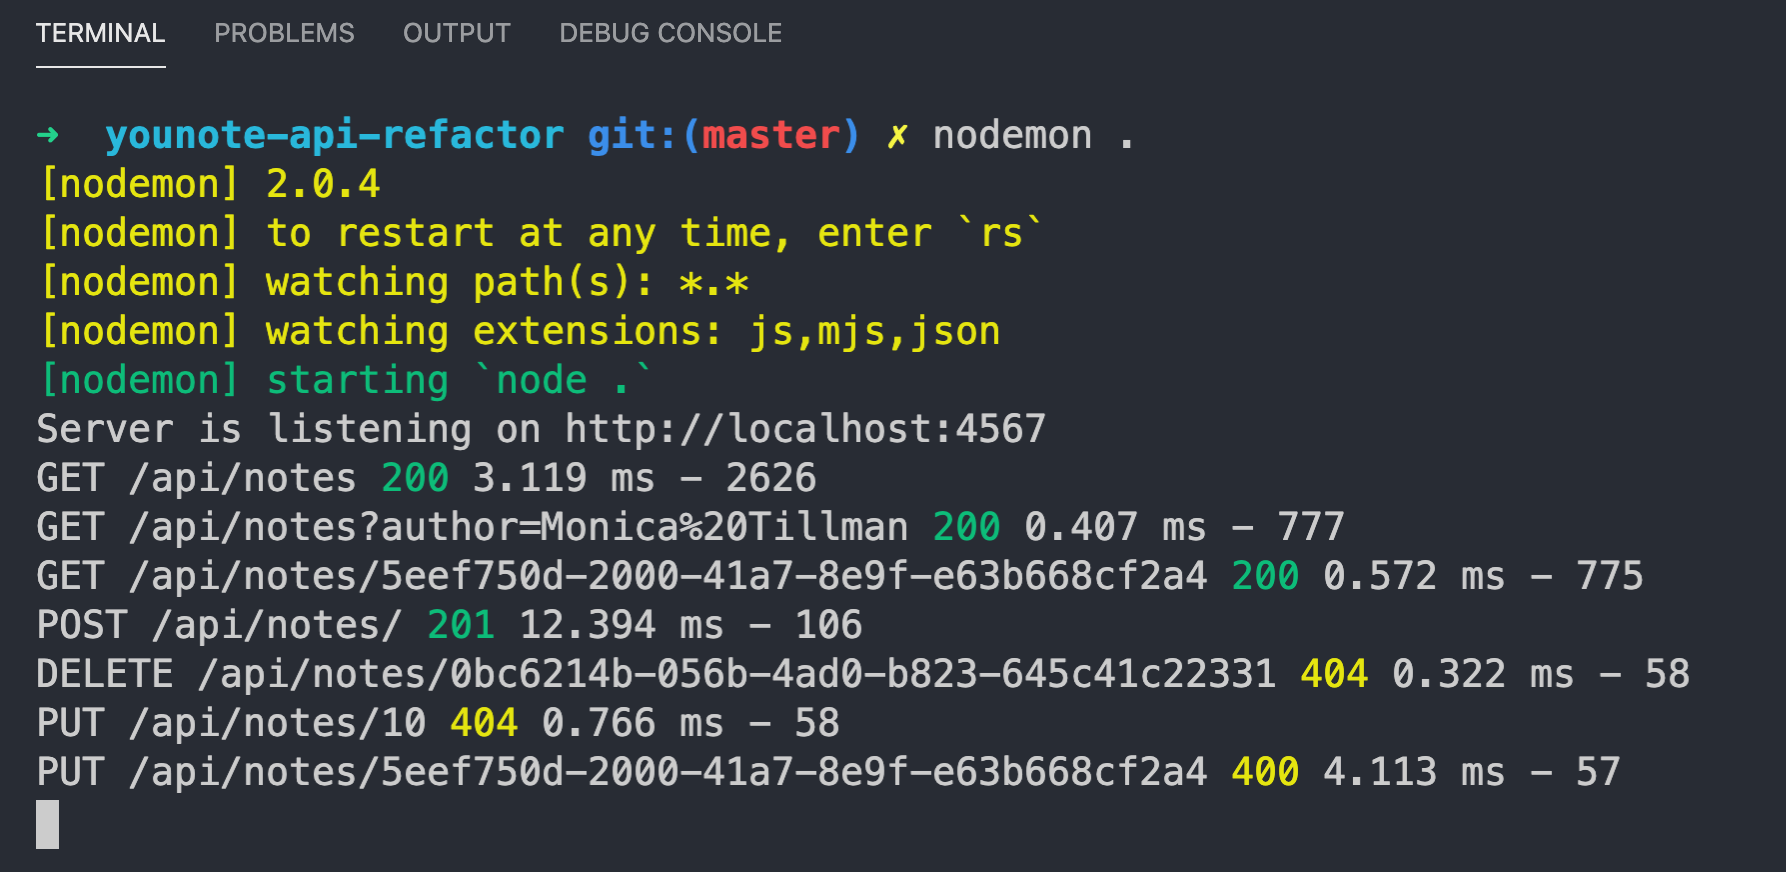
MongoDB
Adding persistence to application means storing data so that it persists beyond the lifetime of the application.
The easiest way to achieve this is perhaps to save data to (plain text) files. For simple applications, it is fine to persist data directly to disk as text files. However, when building larger applications, in particular for use by many users, file-based persistence can cause problems:
- sharing can cause data loss or lead to security problems
- having multiple files can result in data redundancy and inconsistency
- querying files is difficult in particular in case of concurrent access
The solution is to use a database (together with a Database Management System).
A database is a shared collection of related data.
Database Management Systems (DBMS) provide a convenient environment to create, secure and maintain databases.
DBMS provides an API for users to (efficiently) retrieve and store information from/to database.
We will be using a database and DBMS application called MongoDB.
MongoDB is a cross-platform document-oriented database program.
MongoDB uses JSON-like documents with optional schemas. It plays well with JavaScript and Node applications. Its simplicity (compared to traditional relational databases) speeds up application development and reduces the complexity of deployments.
You can run MongoDB locally or in the cloud. When you deploy your application you will need a cloud database. The developers of MongoDB have created an online application called MongoDB Atlas, or simply Atlas, that assists you with handling the complexity of deploying and managing your MongoDB instance on popular cloud service provides such as AWS, Google, and Azure.
We are going to work with MongoDB Atlas to provision a cloud database which we will use on our local computer as well as when our application is deployed.
The source code for the completed demo app (which we will build in this module) can be found at this link.
Step 1
There is the official Get Started with Atlas document that I have found to be unfortunately not very helpful for first time users. I've made an effort here to document the "getting started" process more closely. In particular, there are certain things you need to do once, to get set up, and other things which you will do every time you need a cloud database.
Get started with Atlas
Go to https://www.mongodb.com/cloud/atlas.

Click on "Start free" and create an account.

You will be redirected to the following page. "Skip" this step.

When asked to "Choose a path", select "Shared Clusters" and click on "Create a cluster".

You will be taken to the following view, get yourself out of it by clicking on the "clusters" link (top left as highlighted in the image).

After clicking on "clusters" you will be taken to the following view:

Notice on the top left (above image), the "organization" and "project" are set to default names generated by Atlas. You can change (rename) these or make new ones as you wish. To rename, access their settings (gear/ellipsis icon, as highlighted in the image).
There is no need for you to change "organization" and/or "project" names. That said, I have renamed my organization to "CS280" and my project to "YouNote".
Step 2
Database Access
We now need to create at least one "user" and provide it with permissions to connect to our database. Here, user means the developer (i.e. you) not the end-user of your product. You can create multiple users with different functional role/permissions.
Under the security tab, click on "Database Access".

Then click on "Add New Database User". You will be presented with the following view.

Select the following options:
- Authentication Method: Password
- Database user privilege: Atlas admin
I've chosen the username younote-admin and autogenerated a secure password.
Click on "Add User". It will take a moment for the new setting to be put in place. You will eventually see the following view:
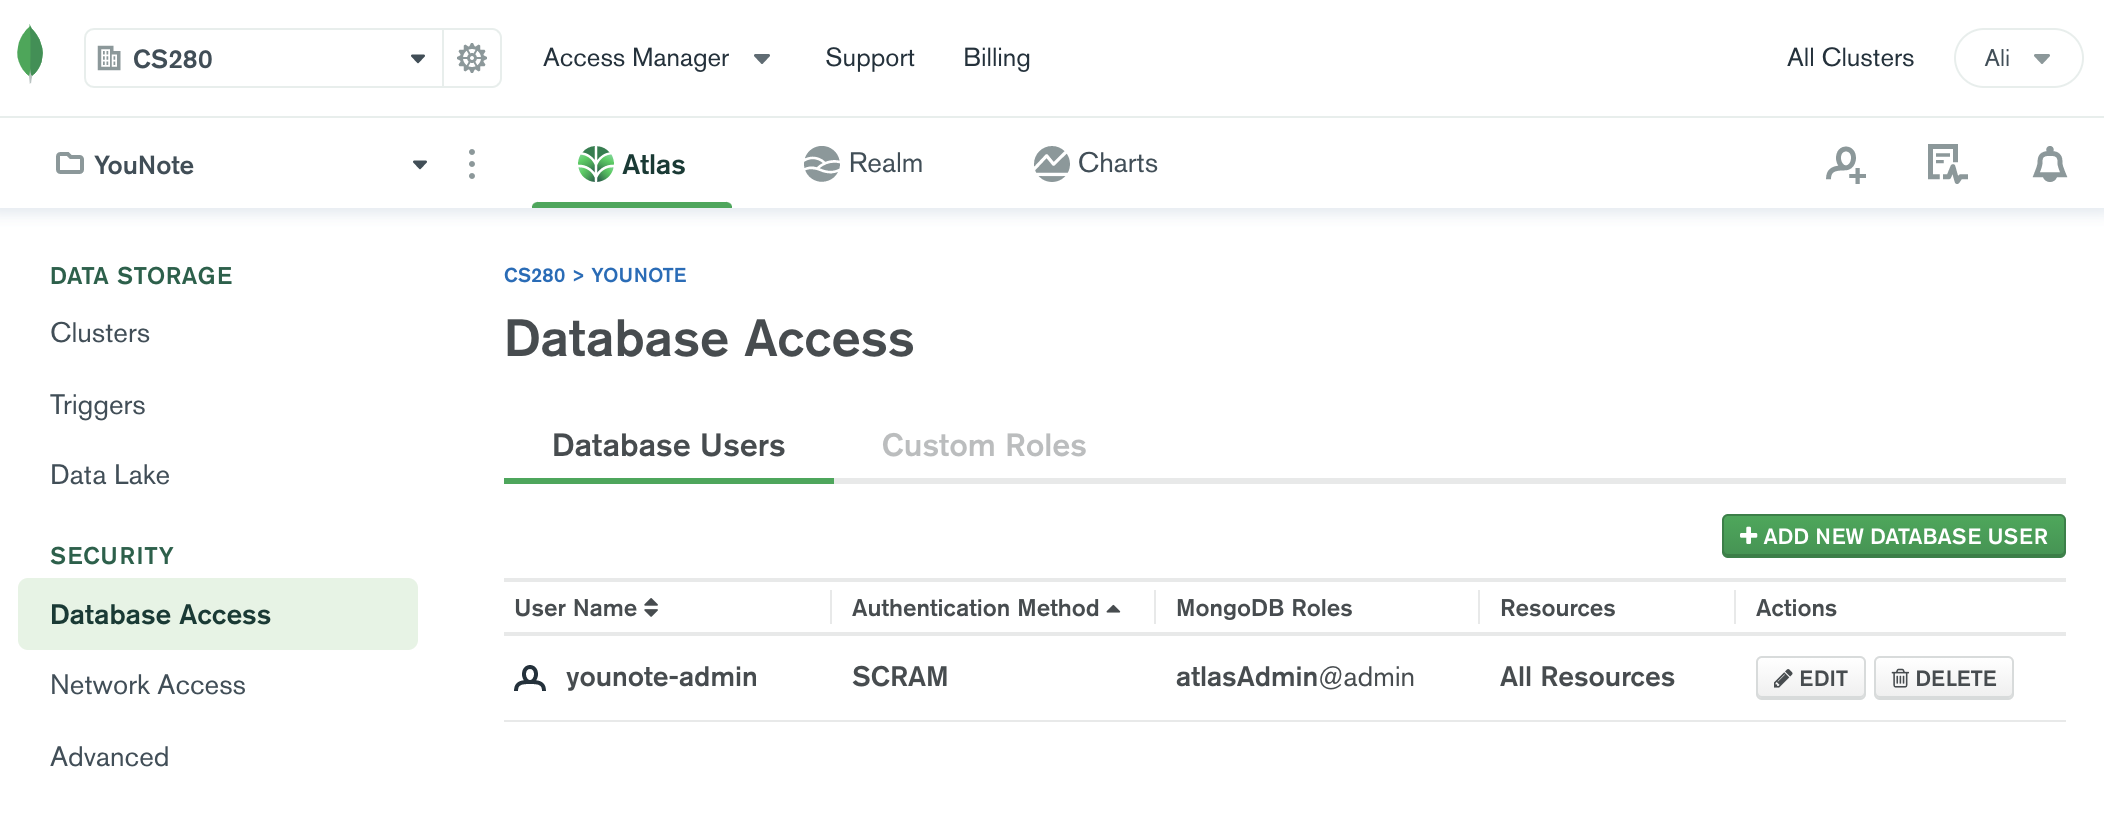
Network Access
As an extra layer of security, you can restrict access to your cloud database by selectively allowing/prohibiting certain IP addresses. We are going to allow all IPs! This does not mean that everyone will have access to our database! Only the database "users" will have access (and they need to be authenticated using their password).
Under the security tab, click on "Network Access".

Then click on "Add IP Address". You will see the prompt below:

Click on "ALLOW ACCESS FROM ANYWHERE". Notice once you click on that option, the "Access List Entry" will be set to 0.0.0.0/0.
Confirm your selection. It will take a moment for the new setting to be put in place. You will eventually see the following view:
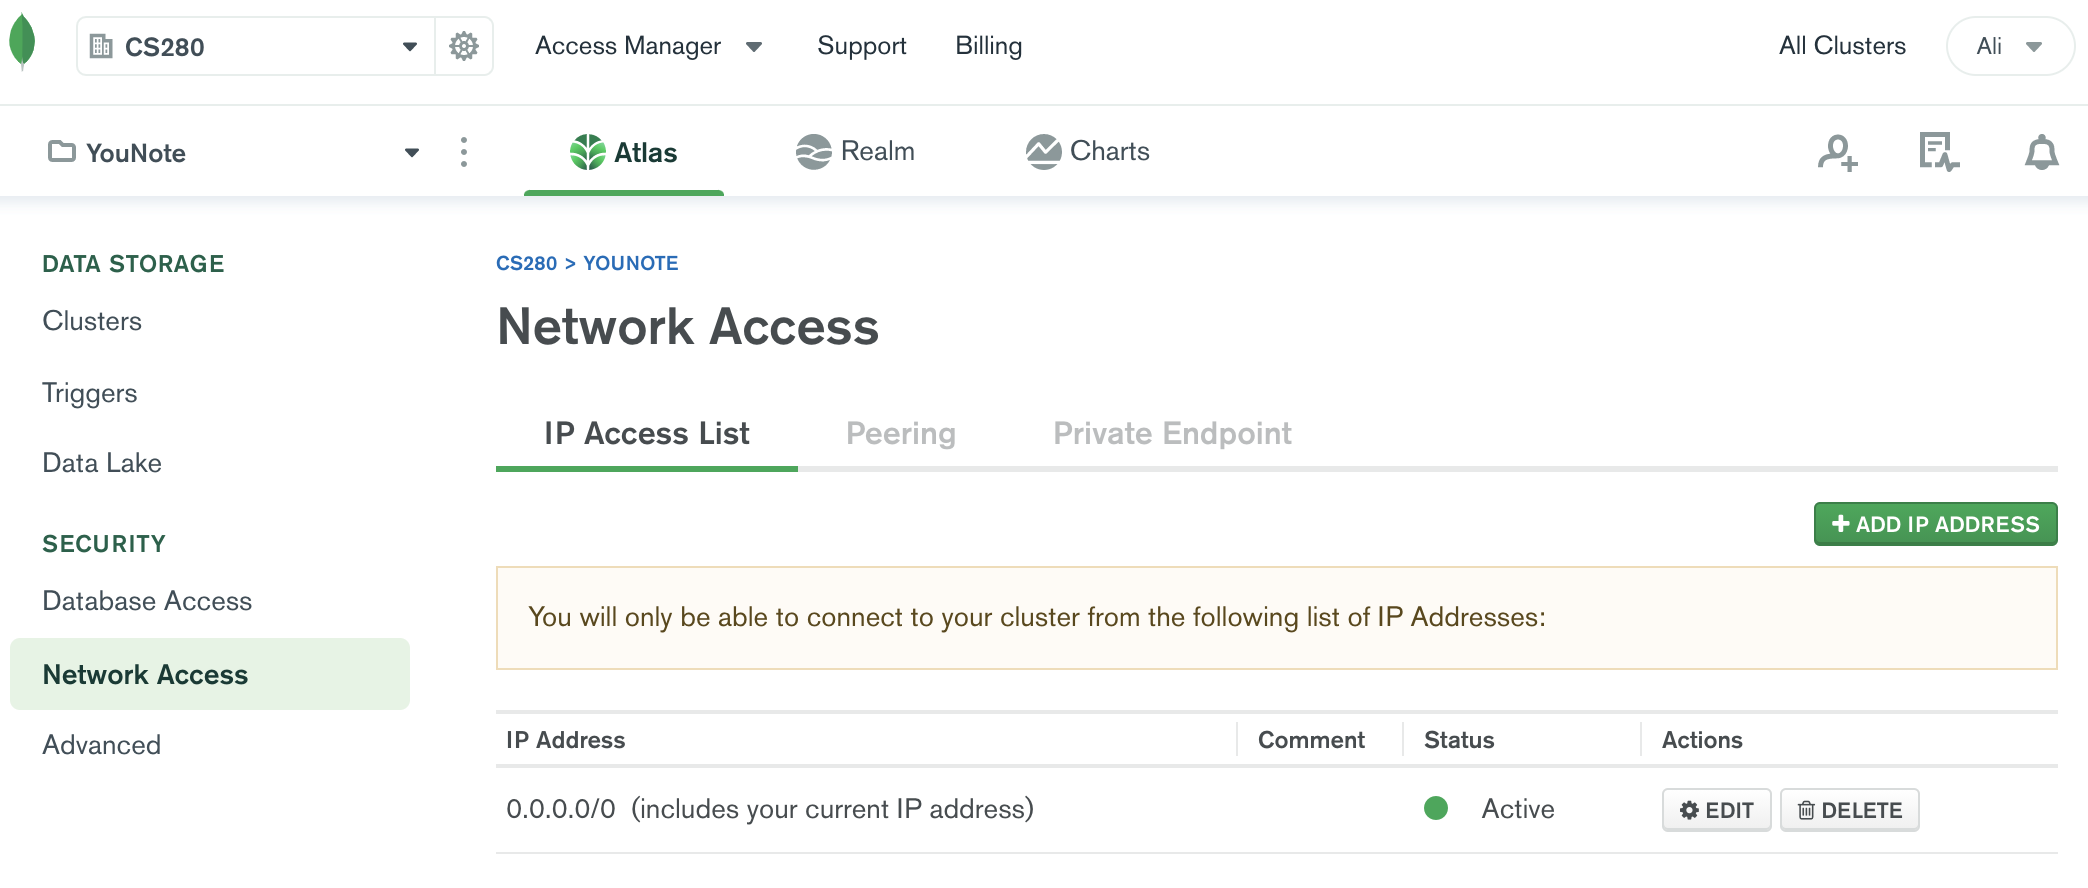
Step 3
Build a Cluster
Each MongoDB deployment that is managed by Atlas is called a "cluster".
We will create a "starter" cluster which is free. The free tier clusters are enough for small applications.
Under "Data Storage", click on "Clusters" and then click on the green button that says "Build a Cluster".

You will be taken back to this page:

Select "Create Cluster". You will see the following page:

Notice you have the option to choose between AWS, Google Cloud or Azure. All of them have free and paid tiers.
I will keep the following "recommended" options:
- Cloud Provider: AWS
- Region: N. Virginia (
us-east-1) - Cluster Tier: M0 Sandbox (Shared RAM, 512 MB Storage).
- This is the free forever tier.
- Additional Settings: MongoDB 4.2, No Backup.
Note the cluster name by default is Cluster0. You can change this now. However, once your cluster is created, you won't be able to change its name.
I will change the cluster name to younote-api.
It may take a minute or two for the cluster to be created. Once it is done you should be greeted with the following screen.

We are ready to connect our YouNote API to the MongoDB cluster in the cloud.
Step 4
Before connecting the YouNote API to the MongoDB cluster in the cloud, we will make a demo app to get familiar and practice working with MongoDB from a Node application.
Create a folder mongo-demo. Open the terminal and change directory to mongo-demo. Initiate a Node application:
npm init -y
There is an official MongoDB driver for NodeJS. It provides an API to work with MongoDB from within Node applications. We, however, are going to use another Node package called Mongoose to work with MongoDB.
Mongoose is an object document mapping (ODM) that sits on top of Node's MongoDB driver.
It is not required to use Mongoose with MongoDB but there are advantages in doing so (see e.g. Top 4 reasons to Use Mongoose with MongoDB).
Install mongoose and while at it, install faker as well so we can populate our database with some fake data!
npm install mongoose faker
Create an index.js file:
const mongoose = require("mongoose");
console.log(mongoose);
Save the file and run it
node index.js
Notice the mongoose object printed to the terminal. We will be using some of the functions attached to this object.
Step 5
Let's connect our demo Node app to the MongoDB cluster we have created on Atlas.
Go to MongoDB Atlas website, find your cluster and click on the "Connect" button.

You will be presented with the following prompt:
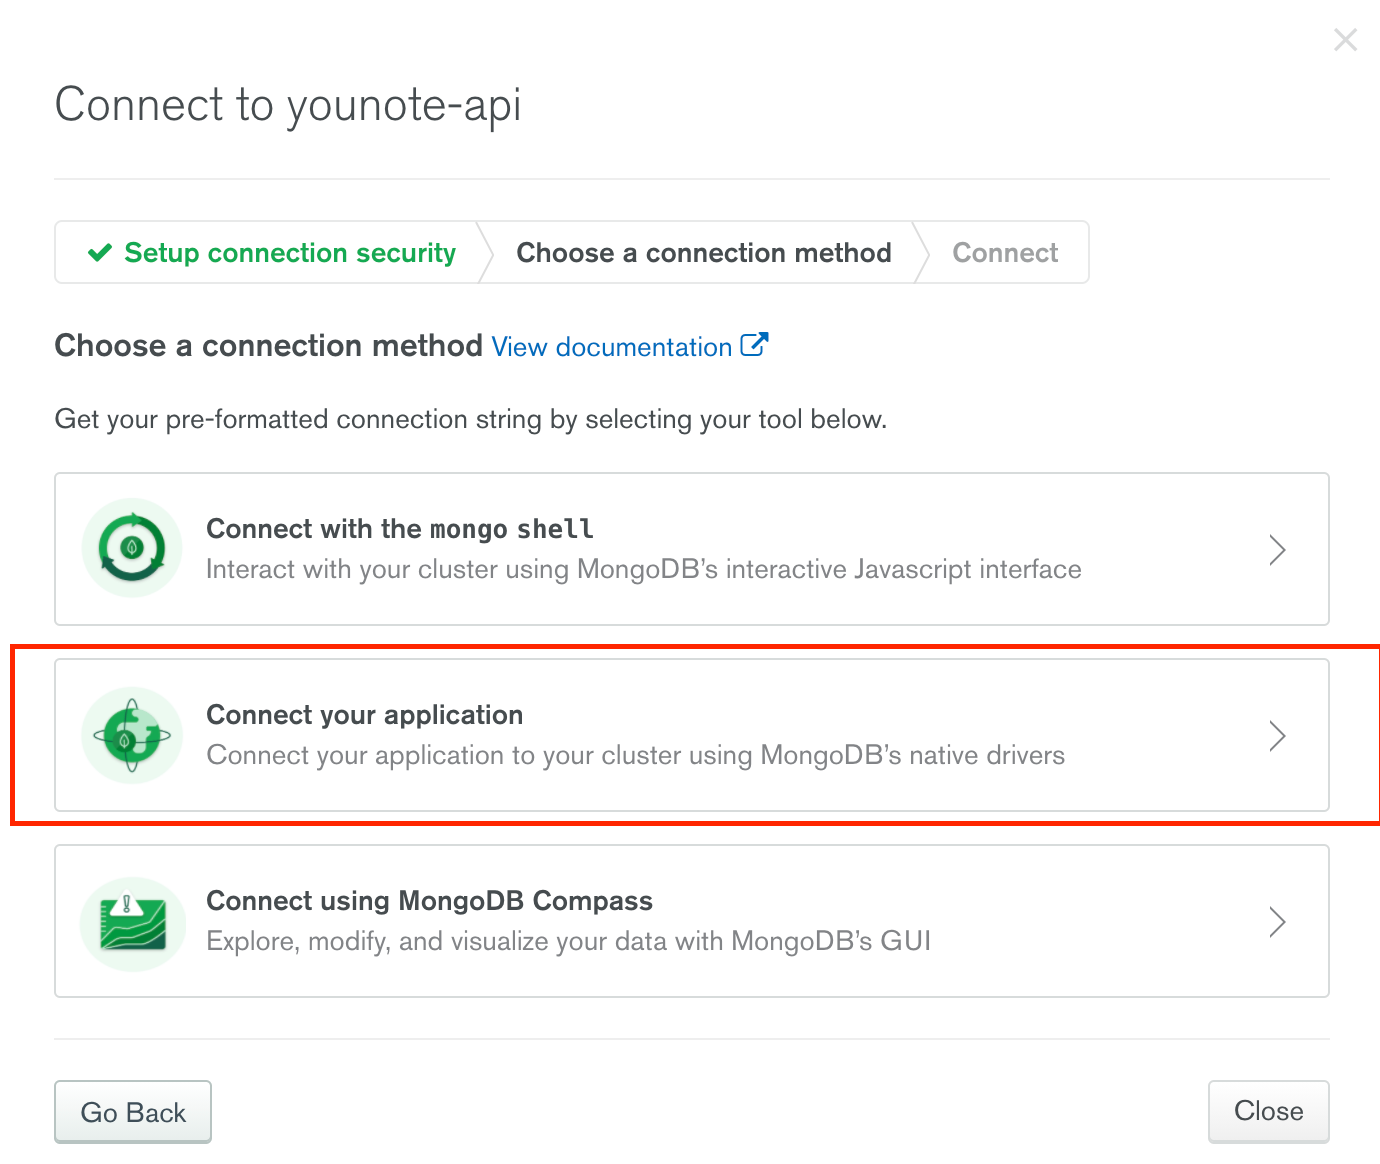
Select "Connect your application". You will see the following view:
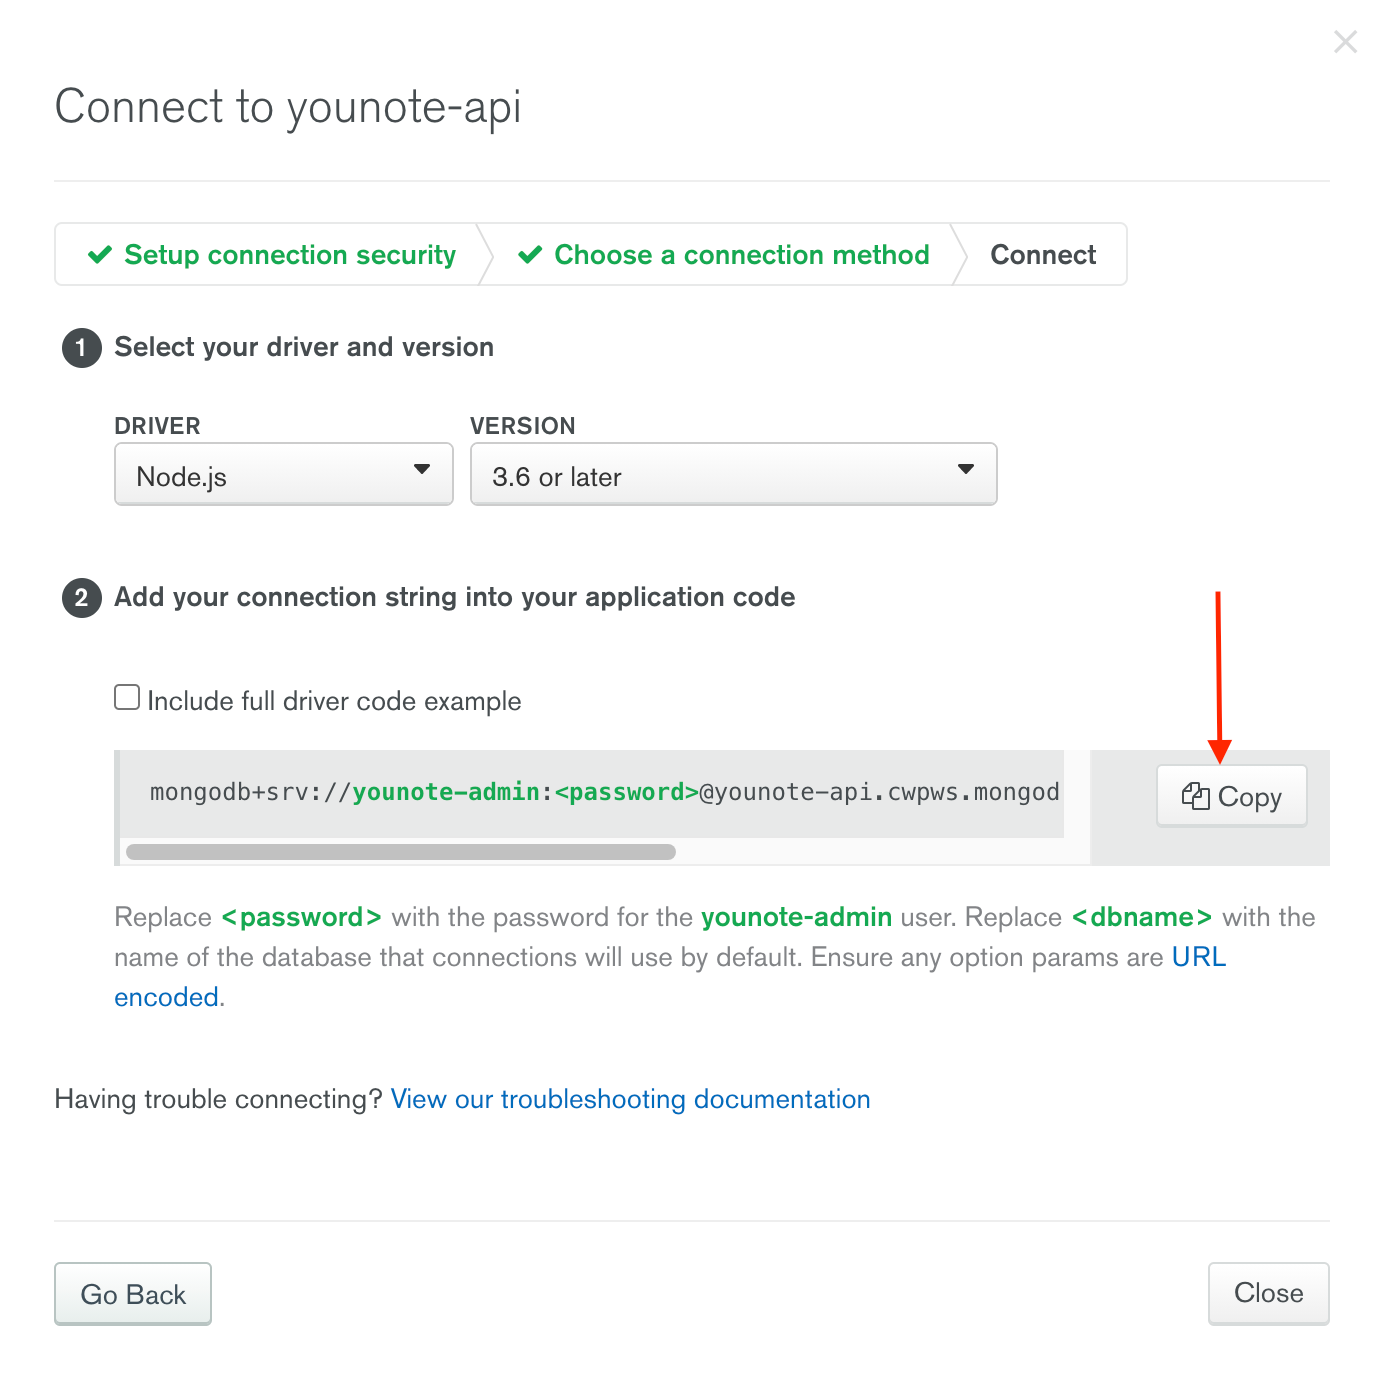
Click on the copy button and past the value in the index.js file:
const URI = `mongodb+srv://younote-admin:<password>@younote-api.cwpws.mongodb.net/<dbname>?retryWrites=true&w=majority`
This is a Uniform Resource Identifier (URI) (similar to URL for accessing websites). The URI will allow you to connect to the MongoDB cluster in the cloud. Notice, within the URI, there is <password> and <dbname>. We need to update these:
const password = "not-shown-here";
const dbname = "younote-db";
const URI = `mongodb+srv://younote-admin:${password}@younote-api.cwpws.mongodb.net/${dbname}?retryWrites=true&w=majority`
You can choose any value for dbname (database name); I've settled on younote-db.
As for the password, it is the password we had Atlas generate for our younote-admin user. To get the password, go to "Database Access" under "Security" and then click on "Edit" button as depicted below:

In the "Edit User" prompt, click on "Edit Password".

You will see the following view; click on the "Copy" button.

Finally, paste the copied password into the index.js file (in the code snippet above, it is where it says not-shown-here).
It is a bad practice to include sensitive information like password inside source code. We will fix this soon!
Step 6
We must remove the password from within the source code. A common practice is to store sensitive information such as passwords as "environment variables". Then, we can have the node application read that environment variable.
Update the index.js file:
- const password = "not-shown-here";
+ const password = process.env.DB_ADMIN_PASSWORD;
Now we must create an environment variable DB_ADMIN_PASSWORD and store the password in that variable. The process of creating environment variables varies in different environments (e.g. Mac vs. Windows). There is a Node package that makes this as easy as defining variables in a text file.
Install the dotenv package:
npm install dotenv
Create a .env file inside mongo-demo folder. Open the file and add the following:
DB_ADMIN_PASSWORD="your-password-goes-here"
Add the following to the top of index.js
require("dotenv").config();
To ensure this works as intended, you can add console.log(password) to index.js and run it.
You must exclude (ignore) the
.envfile from your git repository.
Step 7
Add the following to index.js
const option = {
useNewUrlParser: true,
useUnifiedTopology: true,
};
mongoose
.connect(URI, option)
.then(() => {
console.log("Connected to MongoDB!");
})
.catch((err) => {
console.log(err);
});
We are using the connect method on mongoose object to establish a connection to our MongoDB cluster in the cloud.
The connect method takes two arguments and returns a Promise. The arguments are the database URI and an option object. You can read about available option parameters, in particular those that are important for tuning Mongoose, here (link opens to mongoose documentation).
Once the Promise returned by the connect method resolves, we print the message "Connected to MongoDB!". If the attempt to connect fails for any reason, the error will be printed to the terminal.
Run the demo application; if you have followed all the steps correctly, it will work and you will see "Connected to MongoDB!" printed in the terminal.
Mongoose emits events when e.g. a connection is established (or failed to establish due to an error). So, another pattern for working with Mongoose is the following that uses the event listeners on connection object:
mongoose.connect(URI, option);
mongoose.connection.on("open", () => {
console.log("Connected to MongoDB!");
});
mongoose.connection.on("error", (err) => {
console.log(err);
});
Run the demo application to check that this alternative approach works too. It might be a good idea to deliberately provide mongoose with e.g. wrong password and check that connection fails.
Step 8
We have connected our demo application to our MongoDB cluster in the cloud. Let's store some data! Before doing so, we need to understand how MongoBD organizes data.
A Mongo Database is made up of collections and documents.
A collection represents a single entity in your app. For example in our YouNote app, we have "notes" and we may later add other entities like "users". Each of such entities will be a single collection in our database.
A collection contains documents. A document is an instance of the entity represented by the collection. For example, a collection called notes will have documents each representing a note. Each "note" document would contain the attributes that make up a note (such as "content", "author", etc). A document in MongoDB looks a lot like a JSON object.
If you have never worked with a database, it may be helpful to think about collections as folders and documents as files organized inside the folders.
If you have experience working with databases, it most likely has been with a Relational database. (For those never heard of it, you can think of relational databases like spreadsheets where data is structured in tables and each entry is a row in a table.) MongoDB is not a relational database although you can think of collections as tables and documents as the rows (records) in a table.
For this demo application, we will make a collection of "users". Each user will have a "username" and a "password". As the first step, we will define a schema for "user" documents. According to MongoDB documentation:
A document schema is a JSON object that allows you to define the shape and content of documents embedded in a collection. You can use a schema to require a specific set of fields, configure the content of a field, or to validate changes to a document based on its beginning and ending states.
Add the following to index.js:
const Schema = mongoose.Schema;
const UserSchema = new Schema({
username: { type: String },
password: { type: String },
});
We are using the Schema class from Mongoose to create a document schema for users. The code snippet above essentially establishes that a user will have a username and a password and both of these attributes are going to be of type String.
Next, we create a model:
const User = mongoose.model("User", UserSchema);
Notice the first argument to mongoose.model is the singular name for the entity your model is for. Mongoose automatically looks for the plural, lowercased version of your model name as the collection that holds documents of that model. Therefore, the model "User" will result in construction of a users collection in the database.
Models are one of the constructs which Mongoose brings to the table. You can link a document schema to a model, then use the model to construct documents, as shown in the example below:
User.create(
{
username: faker.internet.userName(),
password: faker.internet.password(),
},
(err, user) => {
if (err) console.log(err);
console.log(user);
}
);
Aside: Faker package
We use the faker package to generate fake (but realistic) username and password! Don't forget to import the faker package
const faker = require("faker");
The create method attached to a Mongoose model allows you to create documents of that model. It takes two arguments: an object representing the data to be saved in the database, and a callback function. The create method invokes the callback function by passing two arguments to it: an error (which will be null if there was no error) and the document created (which will be null if there was an error).
Save the index.js file and run it. If all goes well, you will get the user document (which looks like a JSON) printed to the terminal.
Once the data is printed to the terminal, head over to MongoDB Atlas website. Find your cluster and click on the "Collections" button.
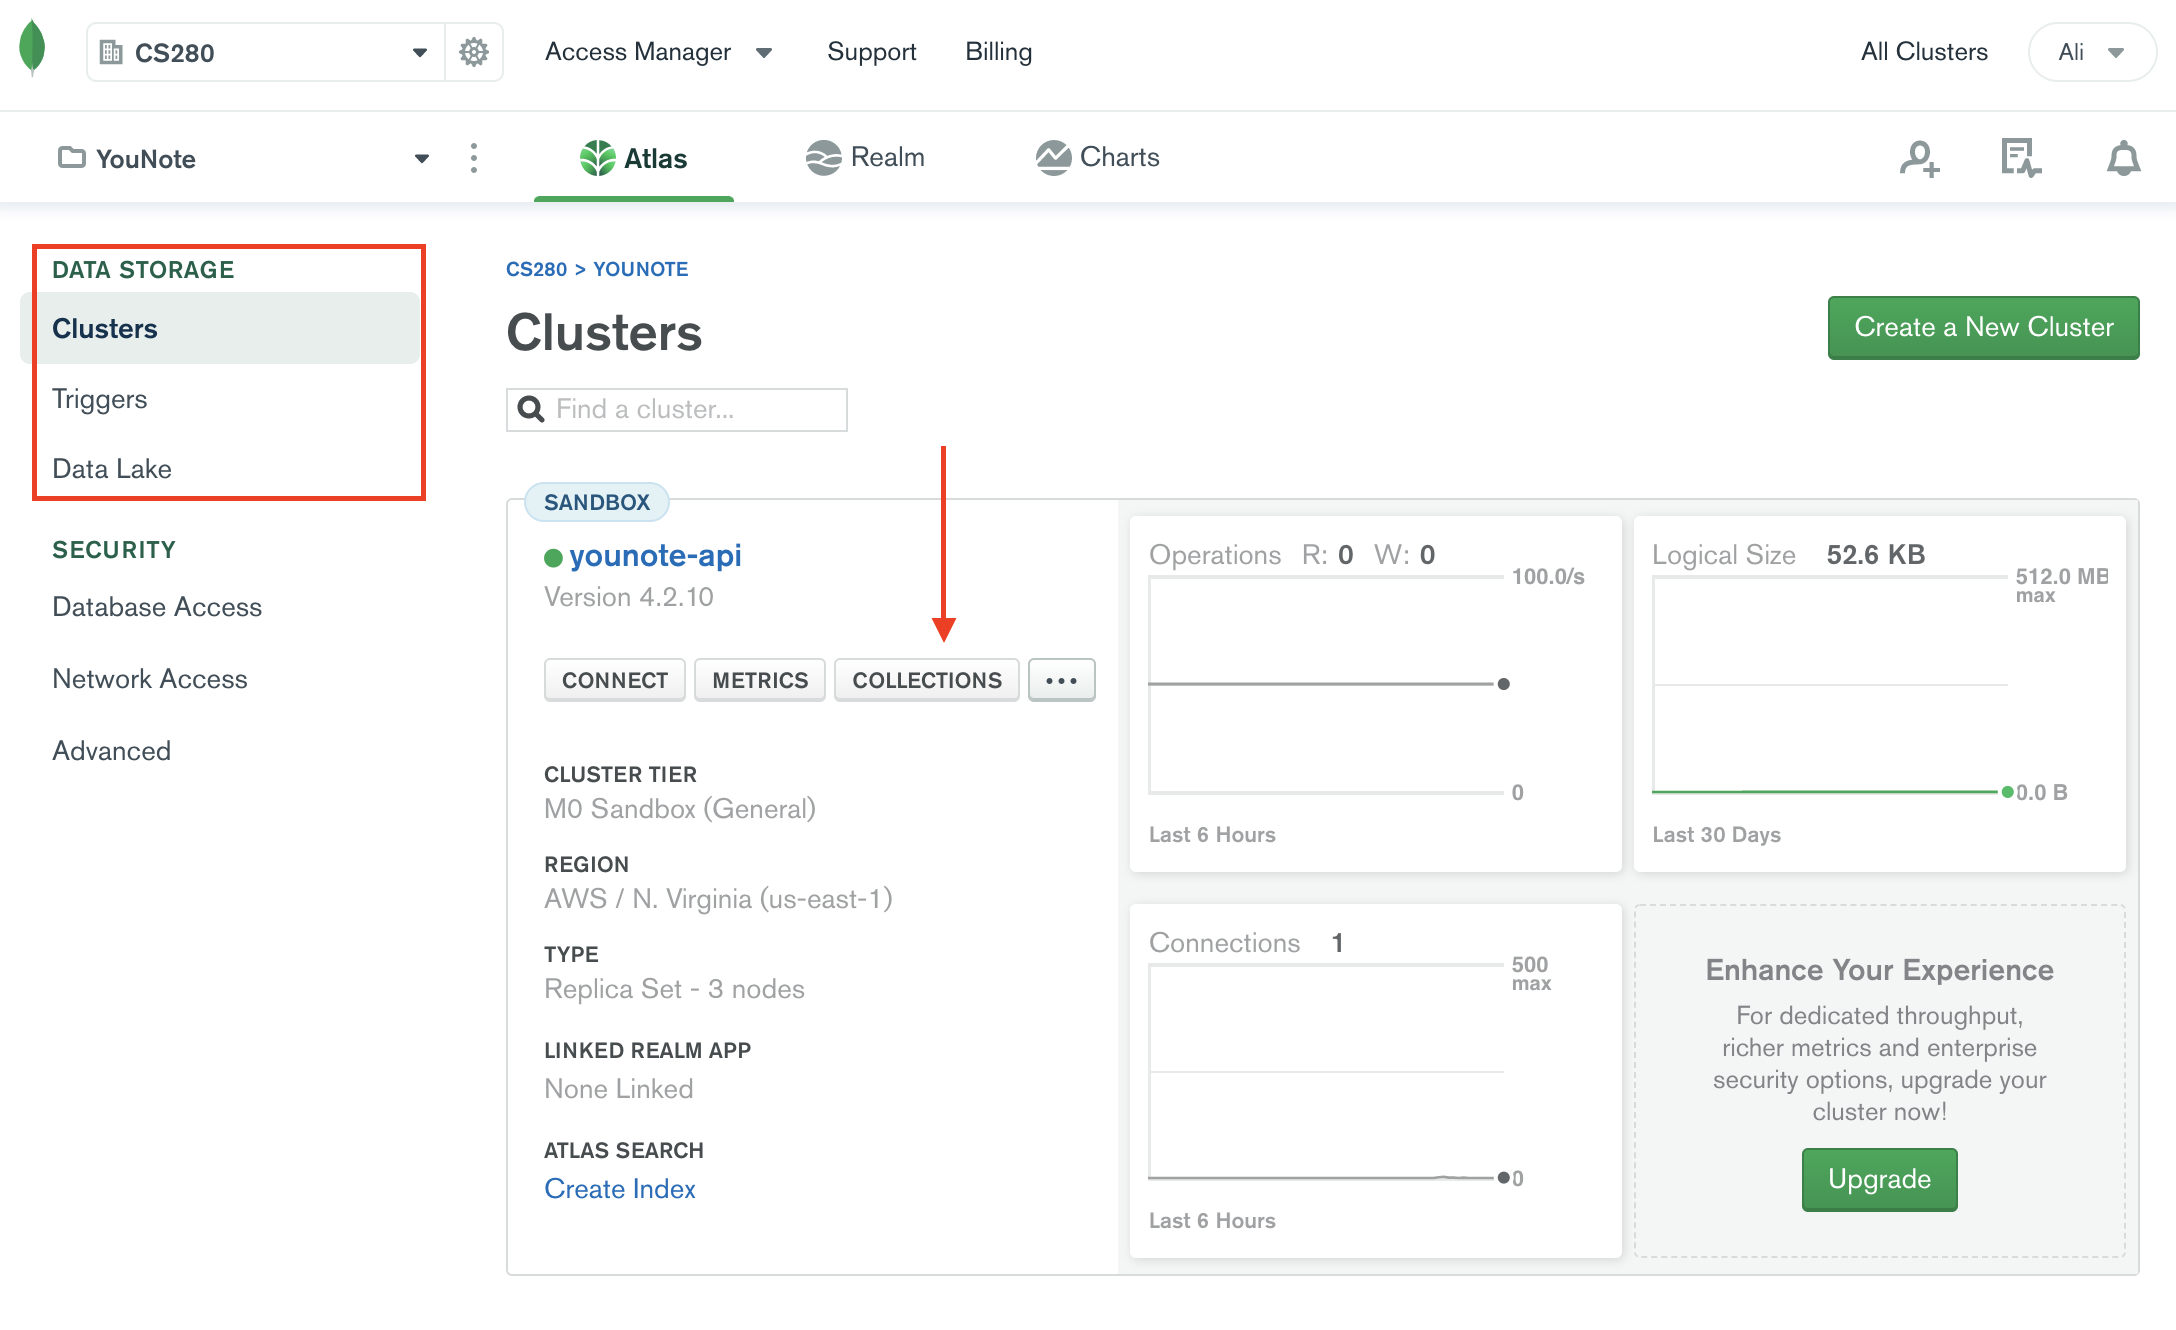
You must be able to find the user we have just created!
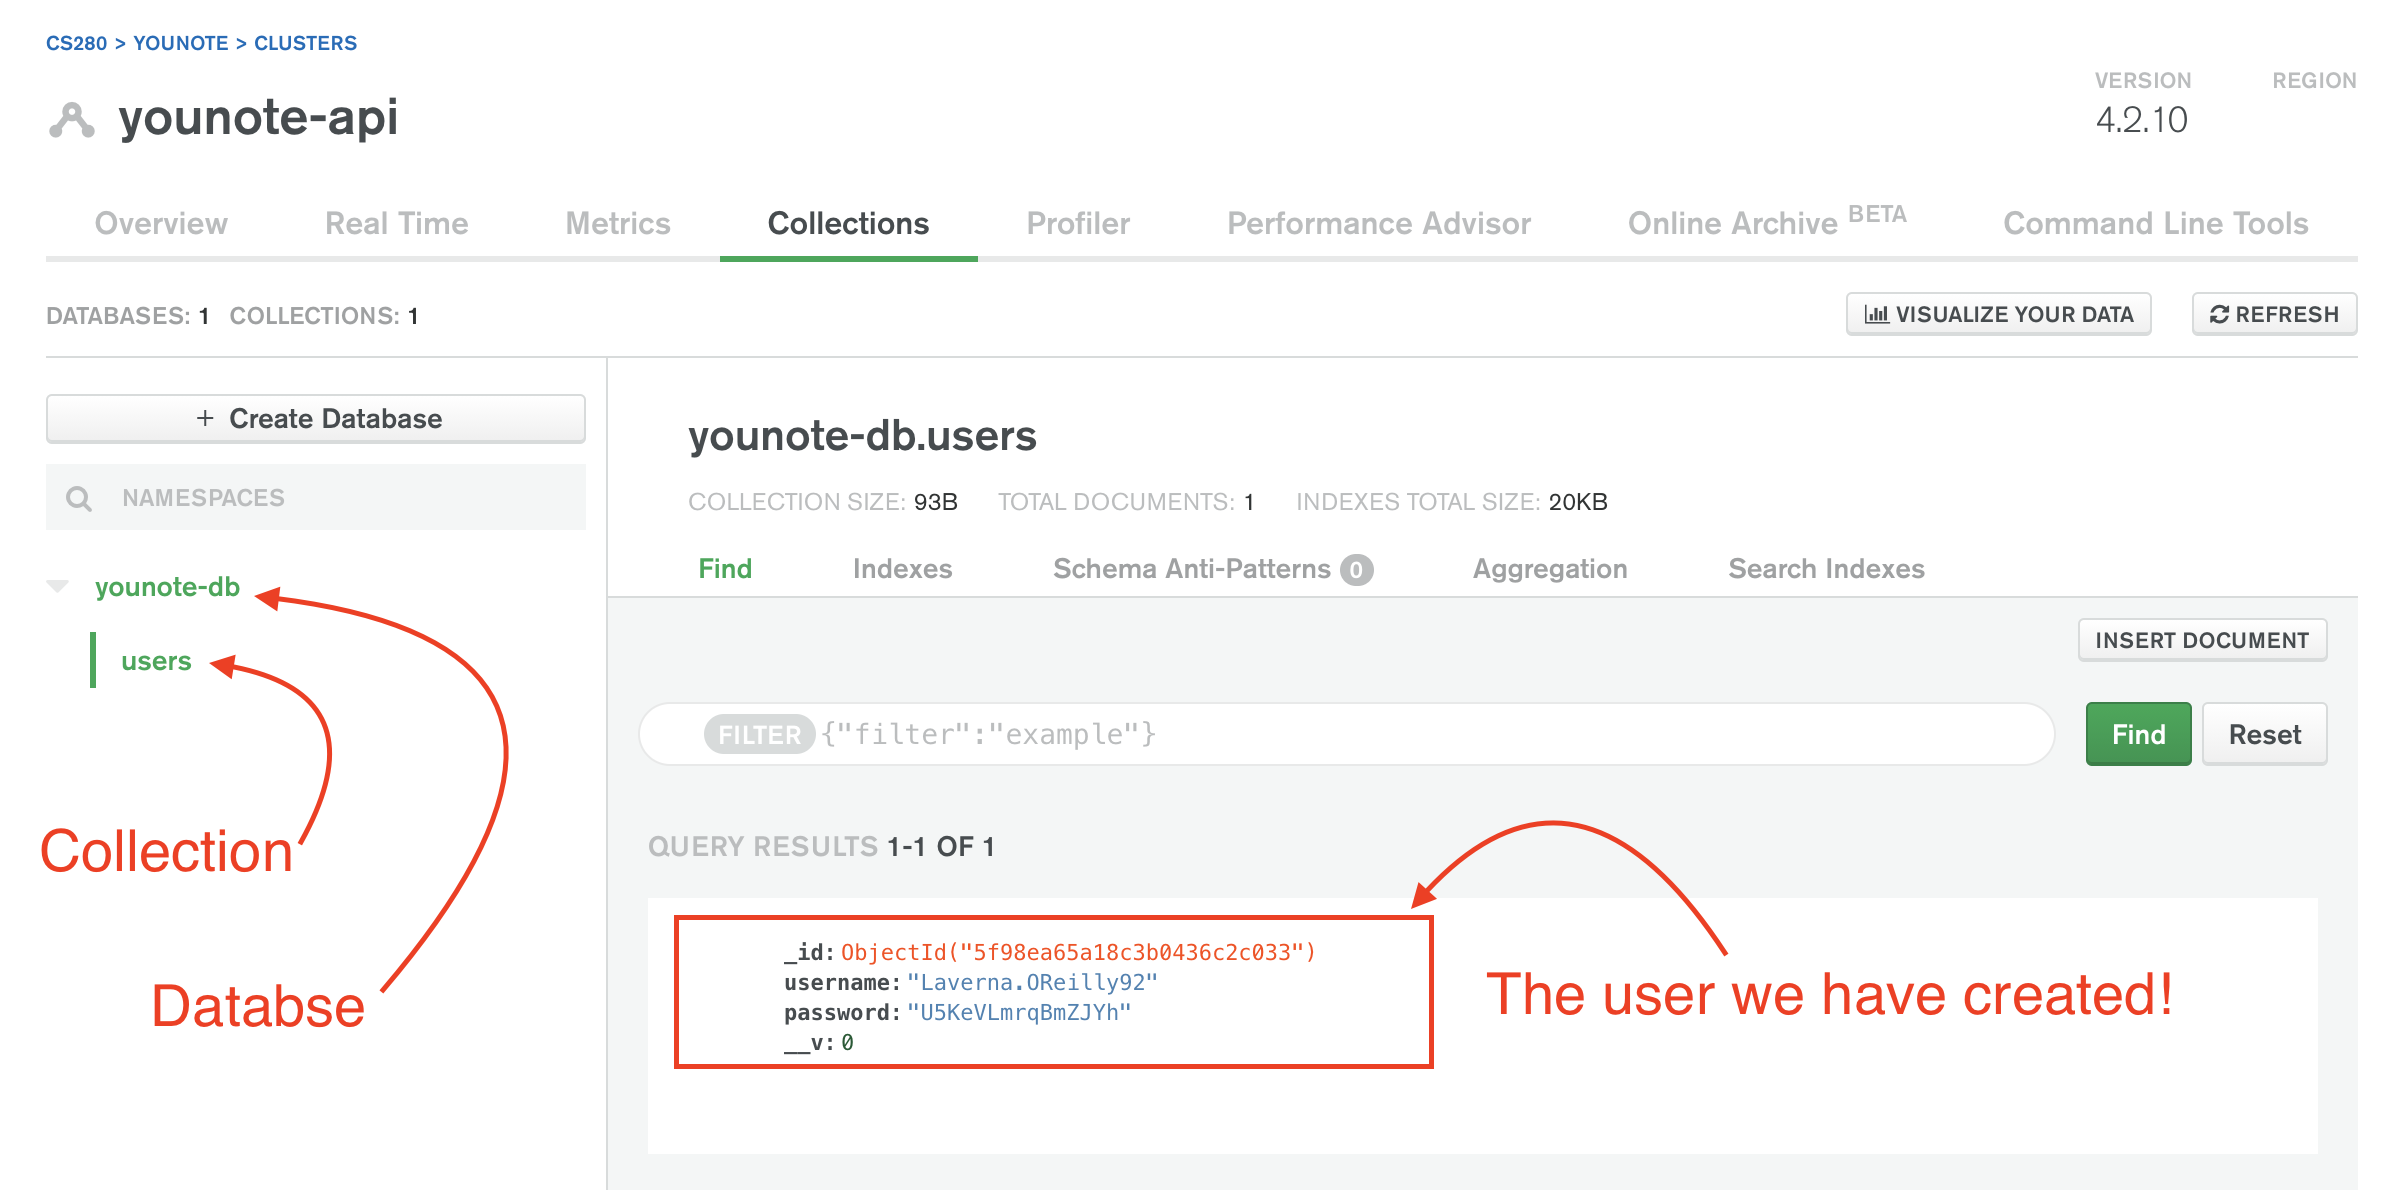
Step 9
The create method attached to a Mongoose model is, as you expect, an async operation. We embraced the callback pattern to deal with it. We can try the alternative patterns:
Promise Pattern: rewrite the User.create(...) as follows.
User.create({
username: faker.internet.userName(),
password: faker.internet.password(),
})
.then((user) => {
console.log(user);
})
.catch((err) => {
console.log(err);
});
Save index.js and run the application. A new user document must be printed to the terminal. Go to Atlas website and click on "Refresh" button to see the new user added to the database.
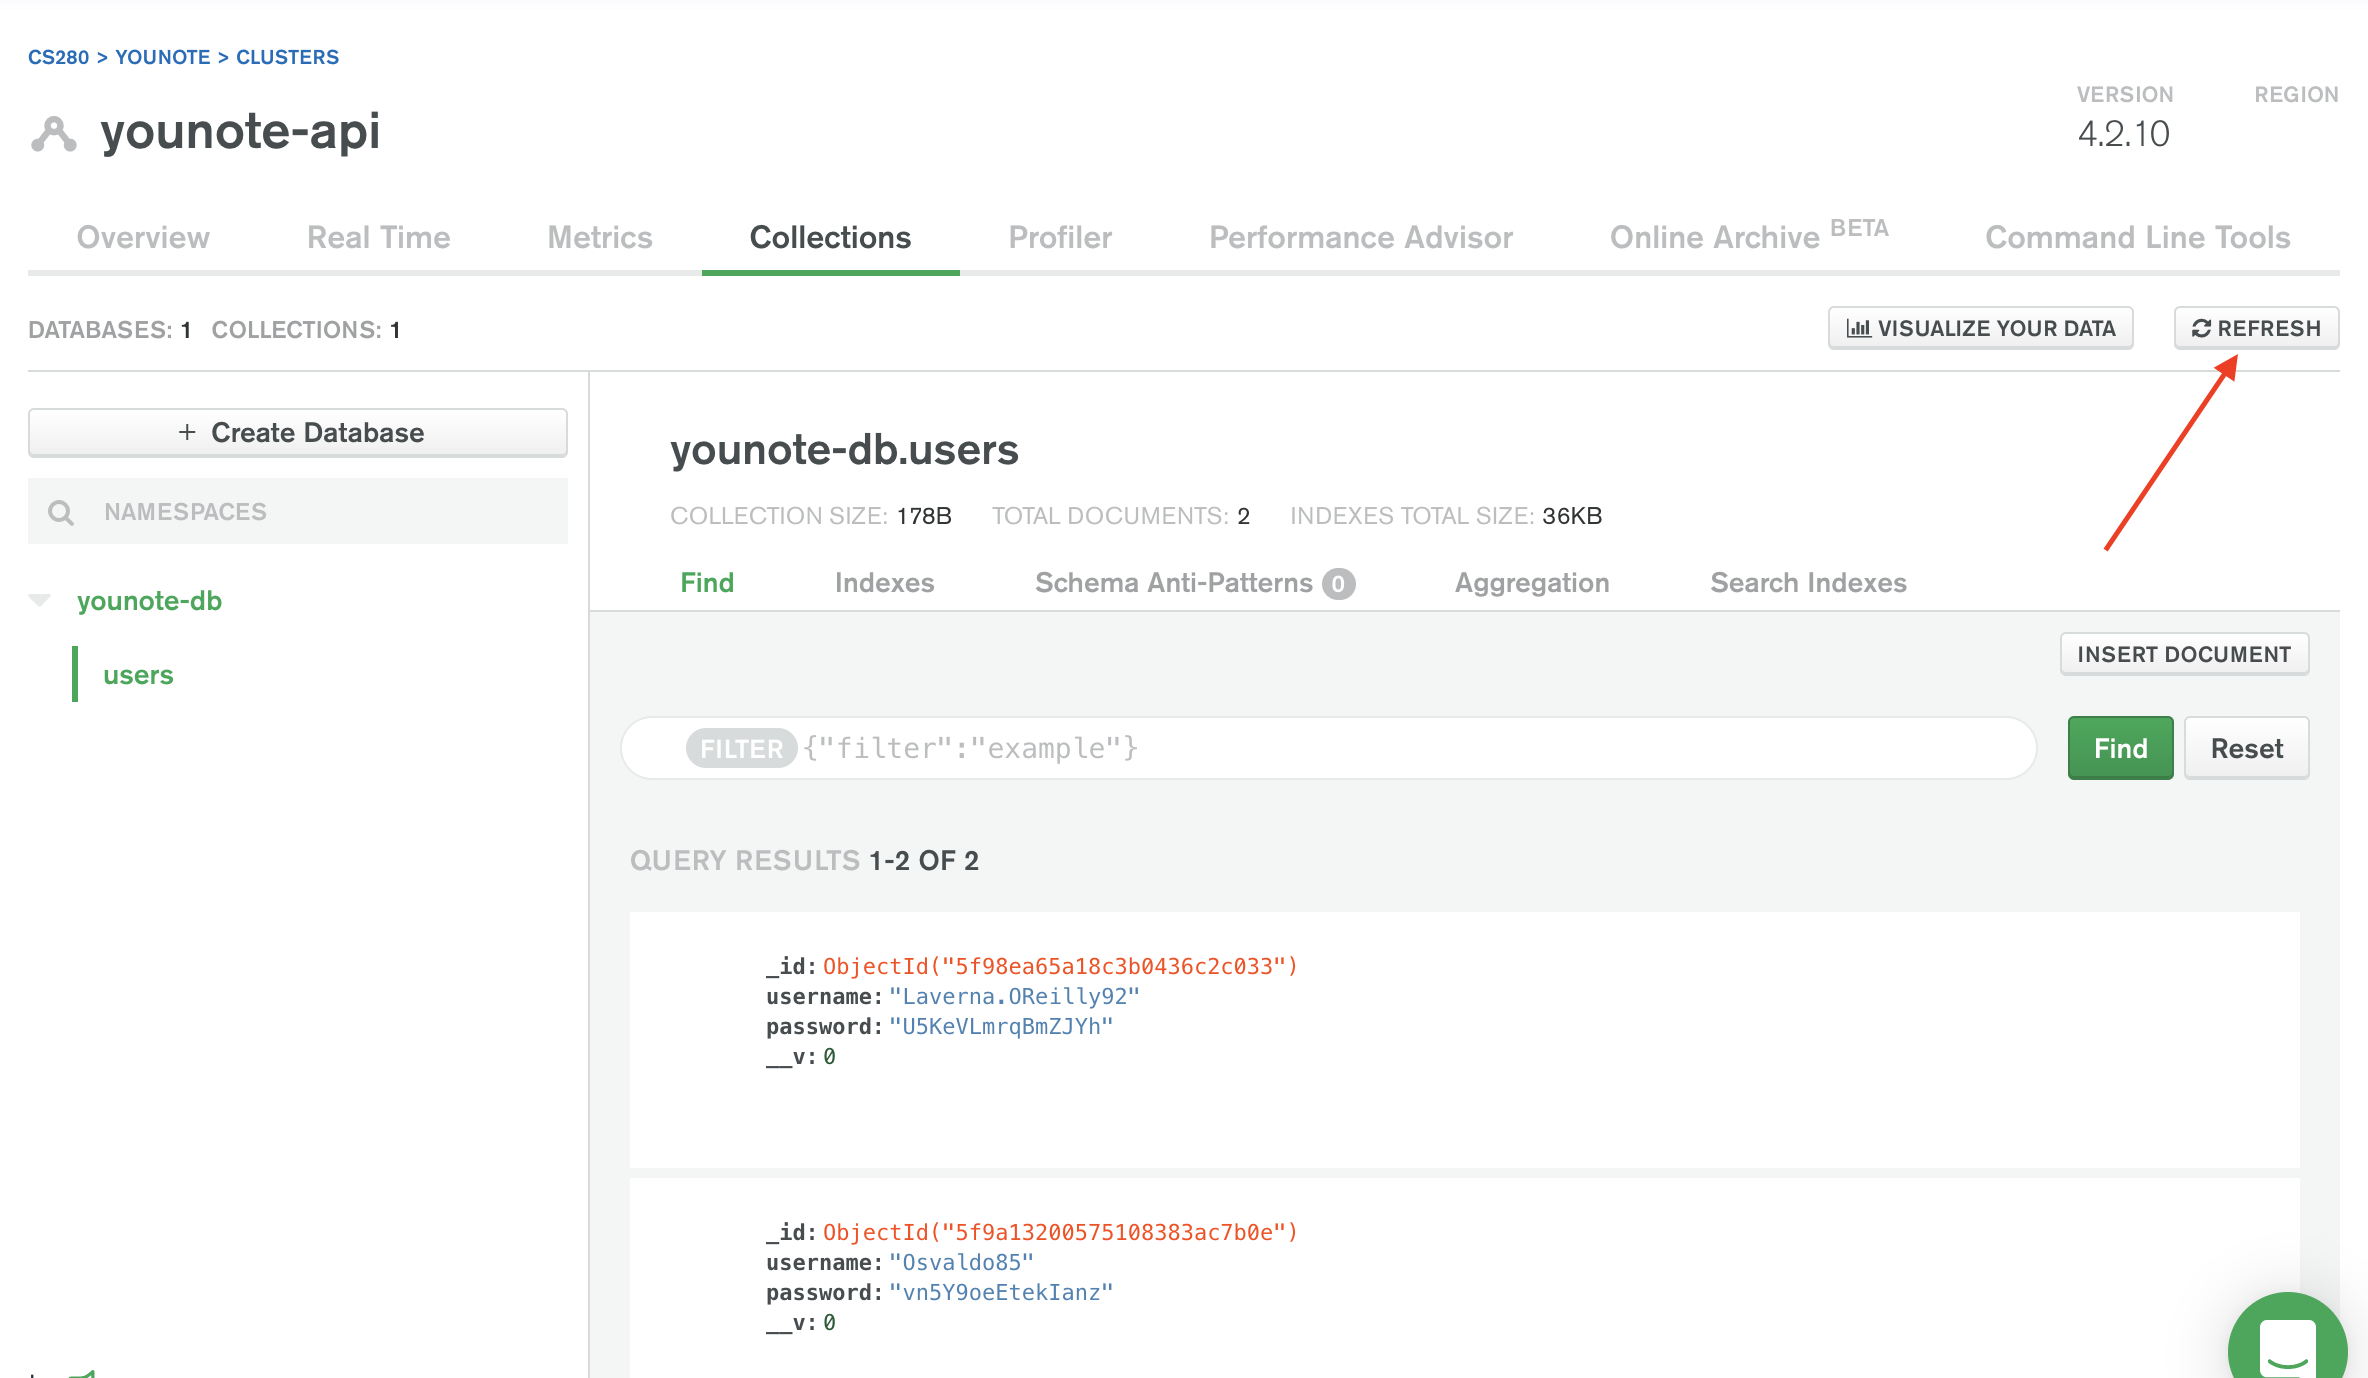
Async/Await Pattern: rewrite the User.create(...) as follows.
async function createUser(username, password) {
try {
const user = await User.create({
username,
password,
});
console.log(user);
} catch (err) {
console.log(err);
}
}
createUser(faker.internet.userName(), faker.internet.password());
Save index.js and run the application. A new user document must be printed to the terminal. Go to Atlas website and click on "Refresh" button to see the new user added to the database.
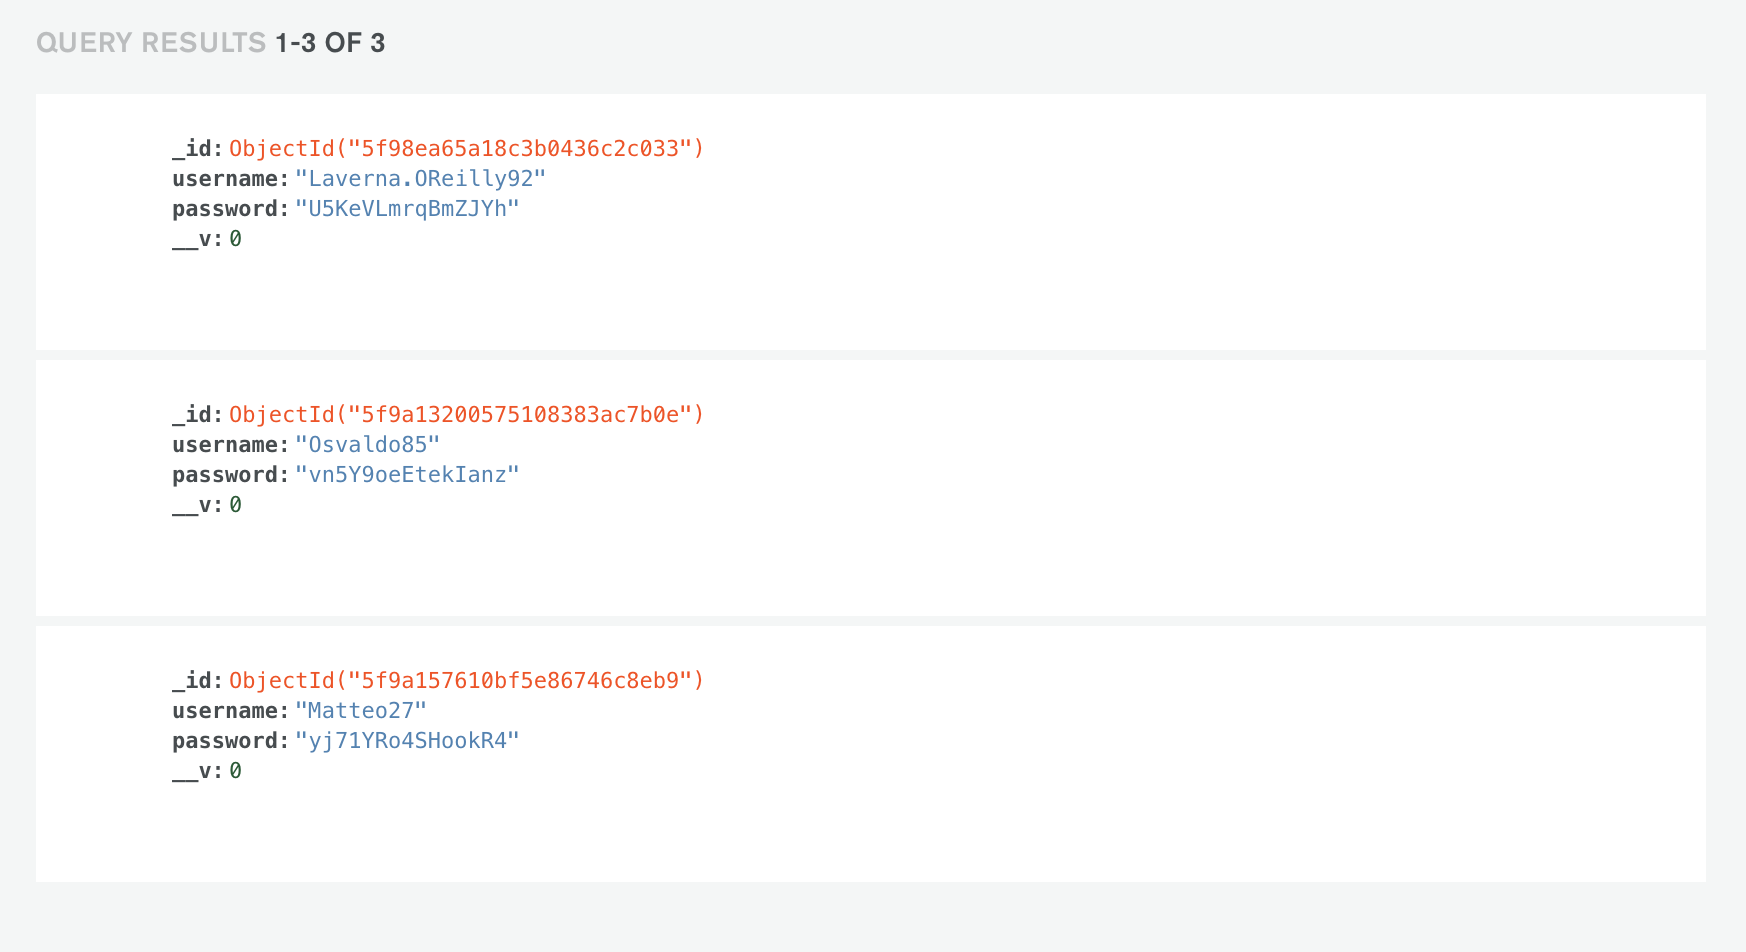
The data is randomly created so your users will have different username and password compared to what you see in the image here.
Step 10
A Mongoose Model is a class. You can use it to construct objects using the new operator:
const user = new User({
username: faker.internet.userName(),
password: faker.internet.password(),
});
console.log(user);
You can then "save" the object in the database (which is connected to mongoose):
user.save((err, user) => {
if (err) console.log(err);
console.log(user);
});
So the Mongoose Model can be used to create objects of certain type in your application, as well as to connect to the database and handle the persistence mechanism.
Aside: I take issue with the design of Mongoose; it seems to violate the "Single Responsibility Principle" as the "data model" is fused with "data access object". At any rate, this is how Mongoose models work. In fact, there are several other methods attached to the "model" that allows you to perform various database queries.
For example, to retrieve all the "users" you can use the find method:
User.find()
.then((users) => console.log(users))
.catch((err) => console.log(err));
Notice find is invoked through User the model we created for constructing user documents (not the object user).
To find a specific user given their ID, you can use findById:
User.findById("5f9a1d156e848f06c458f5f4")
.then((user) => console.log(user))
.catch((err) => console.log(err));
The 5f9a1d156e848f06c458f5f4 is an ID of one of the users in my database. You must use an ID for one of your user documents.
Step 11
To delete a user given their ID, you can use findByIdAndDelete:
User.findByIdAndDelete("5f9a1d156e848f06c458f5f4")
.then((user) => console.log(user))
.catch((err) => console.log(err));
Before you run the above example, you must provide another "option" parameter to the connect method:
const option = {
useNewUrlParser: true,
useUnifiedTopology: true,
+ useFindAndModify: false
};
Once you removed the user, try to find it using findById method; it must return null to you, indicating there is no user with the given ID.
Step 12
In my database, there is currently a user with the following information
{
_id: "5f9a157610bf5e86746c8eb9",
username: "Matteo27",
password: "yj71YRo4SHookR4",
__v: 0
}
To update a user given their ID, you can use findByIdAndUpdate:
User.findByIdAndUpdate("5f9a157610bf5e86746c8eb9", {
username: "username-updated",
})
.then((user) => console.log(user))
.catch((err) => console.log(err));
When I run the query above, it returns the same user as before! This is a little confusing! It happens because findByIdAndUpdate returns the "original" (before update) user document. To change this default behavior, you must pass an option parameter {new: true}:
User.findByIdAndUpdate(
"5f9a157610bf5e86746c8eb9",
{
username: "username-updated-again",
},
{ new: true }
)
.then((user) => console.log(user))
.catch((err) => console.log(err));
Now you will get the "updated" document:
{
_id: "5f9a157610bf5e86746c8eb9",
username: "username-updated-again",
password: "yj71YRo4SHookR4",
__v: 0
}
We have now covered all the CRUD operations we need for the YouNote API. There are several other query methods which you can learn about here.
YouNote API Persisted
In this module we will connect our YouNote API to the MongoDB cluster we have created in the previous module.
The source code for the completed app (which we will build in this module) can be found at this link.
Step 1
We are starting where we left off with refactoring YouNote API.
Install mongoose:
npm install mongoose
As the first step, we will update our model for "note"; open model.Note.js file which currently contains the following:
class Note {
constructor(content, author) {
this.content = content;
this.author = author;
}
}
module.exports = Note;
Update the source code:
const mongoose = require("mongoose");
const Schema = mongoose.Schema;
const NoteSchema = new Schema({
content: { type: String, required: true },
author: { type: String, required: true },
});
const Note = mongoose.model("Note", NoteSchema);
module.exports = Note;
As it can be seen, we are making a schema for notes document and link that schema to a mongoose.model called Note. Note the attribute required: true in the NoteSchema; this attribute will help us with input validation.
Step 2
Open model/NoteDao.js file and reduce it to a skeleton data access object for notes:
const Note = require("./Note");
class NoteDao {
constructor() {
}
create(content, author) {
return null;
}
readAll(author = "") {
return null;
}
read(id) {
return null;
}
update(id, content, author) {
return null;
}
delete(id) {
return null;
}
}
module.exports = NoteDao;
We will implement the above CURD operations one by one.
Step 3
Let's implement NoteDao.create method:
async create(content, author) {
const note = await Note.create({ content, author });
return note;
}
Notice I'm using the Async/Await pattern to deal with asynchronous Note.create operation:
- The
NoteDao.createmethod signature is modified by placing anasynckeyword in front of it. - The
Note.createmethod is called and the call is preceded withawaitoperator.
Notice I have not included the input validation which we had before. The Note.create method takes care of it (well, actually, Mongoose is taking care of it since when we defined the schema for notes, we specified "content" and "author" as "required" attributes).
If anything goes wrong with creating (and saving) the note, the
Note.createwill throw an error, and that error will be propagated in our application. So any program that callsNoteDao.createcan wrap it inside a try-catch block to deal with potential errors.
Also note, the argument to Note.create is an "object" not the parameters "content" and "author".
Step 4
Let's implement the "read" operations:
async readAll(author = "") {
const filter = author ? { author } : {};
const notes = await Note.find(filter);
return notes;
}
async read(id) {
const note = await Note.findById(id);
return note;
}
Notice the same Async/Await pattern is applied here.
The Note.find method takes an optional parameter, a filter, which can be used to search for notes that match the given attribute values. So, for example if we want to search for all notes written by "Bob" we can do this:
const notes = await Note.find({ author: "Bob" });
If we want to receive all notes, we can call Note.find with no argument
const notes = await Note.find();
Or with an empty filter object
const notes = await Note.find({});
If there are no "notes" in the database, or there is no match for the filter we have provided, the Note.find method returns an empty array. On the other hand, if there is no match for the ID we have provided to Note.findById, it will return null. These behaviors are consistent with how we have designed and implement our NoteDao "read" operations.
Step 5
Here is the NoteDao.delete operation:
async delete(id) {
const note = await Note.findByIdAndDelete(id);
return note;
}
The Note.findByIdAndDelete will delete and return the deleted note if id exist in the database. If the id does not exist, it will return null.
Here is the NoteDao.update operation:
async update(id, content, author) {
const note = await Note.findByIdAndUpdate(
id,
{ content, author },
{ new: true, runValidators: true }
);
return note;
}
Notice three parameters are provided to Note.findByIdAndUpdate:
id: the ID of a note in your database to be updated. Ifiddoes not match an existing note, thefindByIdAndUpdatewill returnnull.- An object containing the new attributes (and their values) which are to replace the existing attribute values of the note to be updated.
- An object of parameters:
new: truechanges the default behavior offindByIdAndUpdateto return the updated note (instead of the original note).runValidators: truechanges the default behavior offindByIdAndUpdateto force running validators on new attributes. If validation fails, thefindByIdAndUpdateoperation throws an error.
We are no done with operations of NoteDao. Next we will update the "notes" Router object.
Step 6
When I was writing the notes, I skipped over step 6 and went to step 7! To keep the notes consistent with the commits on the repository for this module, I've left this empty step here!!
Let's use it as a break!

Step 7
Open routes/notes.js file and strip it down to placeholder for route handlers:
const NoteDao = require("../model/NoteDao.js");
const express = require("express");
const { addSampleNotes } = require("../data/notes.js");
const router = express.Router();
const notes = new NoteDao();
addSampleNotes(notes);
router.get("/api/notes", (req, res) => {
});
router.get("/api/notes/:id", (req, res) => {
});
router.post("/api/notes", (req, res) => {
});
router.delete("/api/notes/:id", (req, res) => {
});
router.put("/api/notes/:id", (req, res) => {
});
module.exports = router;
We will implement the route handlers one by one.
Step 8
Here is the handler for the HTTP GET request through /api/notes endpoint:
router.get("/api/notes", (req, res) => {
const author = req.query.author;
notes
.readAll(author)
.then((notes) => res.json({ data: notes }))
.catch((err) => errorHandler(res, 500, err));
});
Notice we are using the Promise pattern for dealing with async operations of notes object (instance of NoteDao).
Also note the use of the helper function errorHandler which is implemented as follows:
function errorHandler(res, status, error) {
res.status(status).json({
errors: [
{
status: status,
detail: error.message || error,
},
],
});
}
The status code 500 means "Internal Server Error"; it indicates that our server encountered an unexpected condition that prevented it from fulfilling the request. This is the only plausible explanation where the simple GET request to read all notes has failed! It must be an issue with our database or the server connecting to the database, etc. (The fault is on our side!)
Similarly, we can implement the handler for the HTTP GET request through /api/notes/:courseId endpoint:
router.get("/api/notes/:id", (req, res) => {
const id = req.params.id;
notes
.read(id)
.then((note) => res.json({ data: note }))
.catch((err) => errorHandler(res, 500, err));
});
Step 9
Here is the handler for the HTTP POST request through /api/notes endpoint:
router.post("/api/notes", (req, res) => {
const content = req.body.content;
const author = req.body.author;
notes
.create(content, author)
.then((note) => res.status(201).json({ data: note }))
.catch((err) => errorHandler(res, 400, err));
});
Notice if any error arises in the process of creating/storing a new note, it will be captured by the "catch" block.
A better implementation for this handler would be one that looks at the err object and distinguishes between issues related to e.g. database connection (which must be reported as "Internal Server Error" with status code of 500) vs. issues related to client's request (which is reported as 400 error: bad request).
Step 10
Here is the handler for the HTTP DELETE request through /api/notes/:courseId endpoint:
router.delete("/api/notes/:id", (req, res) => {
const id = req.params.id;
notes
.delete(id)
.then((note) =>
note
? res.json({ data: note })
: errorHandler(res, 404, "Resource not found")
)
.catch((err) => {
errorHandler(res, 400, err);
});
});
Notice, we account for the case where a given ID does not exist in our database:
- The
notes.deleteoperation will returnnull - We capture this by responding with a
404error:note ? res.json({ data: note }) : errorHandler(res, 404, "Resource not found")
Similarly, here is the handler for the HTTP PUT request through /api/notes/:courseId endpoint:
router.put("/api/notes/:id", (req, res) => {
const id = req.params.id;
const content = req.body.content;
const author = req.body.author;
notes
.update(id, content, author)
.then((note) =>
note
? res.json({ data: note })
: errorHandler(res, 404, "Resource not found")
)
.catch((err) => errorHandler(res, 400, err));
});
We have now implemented all the route handlers.
Step 11
Open data/notes.js, the module that generates sample data for us:
const faker = require("faker");
const NUM_SAMPLES = 4;
function addSampleNotes(notes) {
for (let i = 0; i < NUM_SAMPLES; i++) {
notes.create(faker.lorem.paragraphs(), faker.name.findName());
}
}
module.exports = { addSampleNotes };
We must update this to account for the fact that notes.create is an async operation now. Moreover, we don't want to make sample data every time we run the application. It made sense before since we did not persisted the data but now we have a database. So instead, we will check if and generate sample data only if the database is empty.
const faker = require("faker");
const NUM_SAMPLES = 4;
async function addSampleNotes(notes) {
const data = await notes.readAll();
if (data.length === 0) {
for (let i = 0; i < NUM_SAMPLES; i++) {
await notes.create(faker.lorem.paragraphs(), faker.name.findName());
}
}
}
module.exports = { addSampleNotes };
Note that our sample data generation strategy is not a great one! If a client deletes all their notes (intentionally) and then we reset the server, they will open their application finding four sample notes which they didn't want to have.
Sample data is useful during development but you should not use it when the application goes to production.
Step 12
We are going to have mongoose connect to our MongoDB cluster.
First, we install the dotenv package:
npm install dotenv
Then create a .env file in the root of your application with the following content:
DB_ADMIN_PASSWORD="your-password-goes-here"
Open the .gitignore file and add the following to it, to ensure the .env file is not stored in your git repository:
.env
Create a new file data/db.js with the following content:
require("dotenv").config();
const mongoose = require("mongoose");
const password = process.env.DB_ADMIN_PASSWORD;
const dbname = "younote-db";
const URI = `mongodb+srv://younote-admin:${password}@younote-api.cwpws.mongodb.net/${dbname}?retryWrites=true&w=majority`;
const option = {
useNewUrlParser: true,
useUnifiedTopology: true,
useFindAndModify: false,
};
function connect() {
mongoose.connect(URI, option);
mongoose.connection.on("error", (err) => {
console.log(err);
});
mongoose.connection.on("open", () => {
console.log("Connected to MongoDB!");
});
}
module.exports = { connect };
Step 13
Open index.js and add the following statements to the top of it:
const db = require("./data/db.js");
Next, add the following statement anywhere within the source file:
db.connect();
Save the file and run the API server!
Open your cluster on MongoDB Atlas. You must have a "notes" collection with 4 sample note documents:
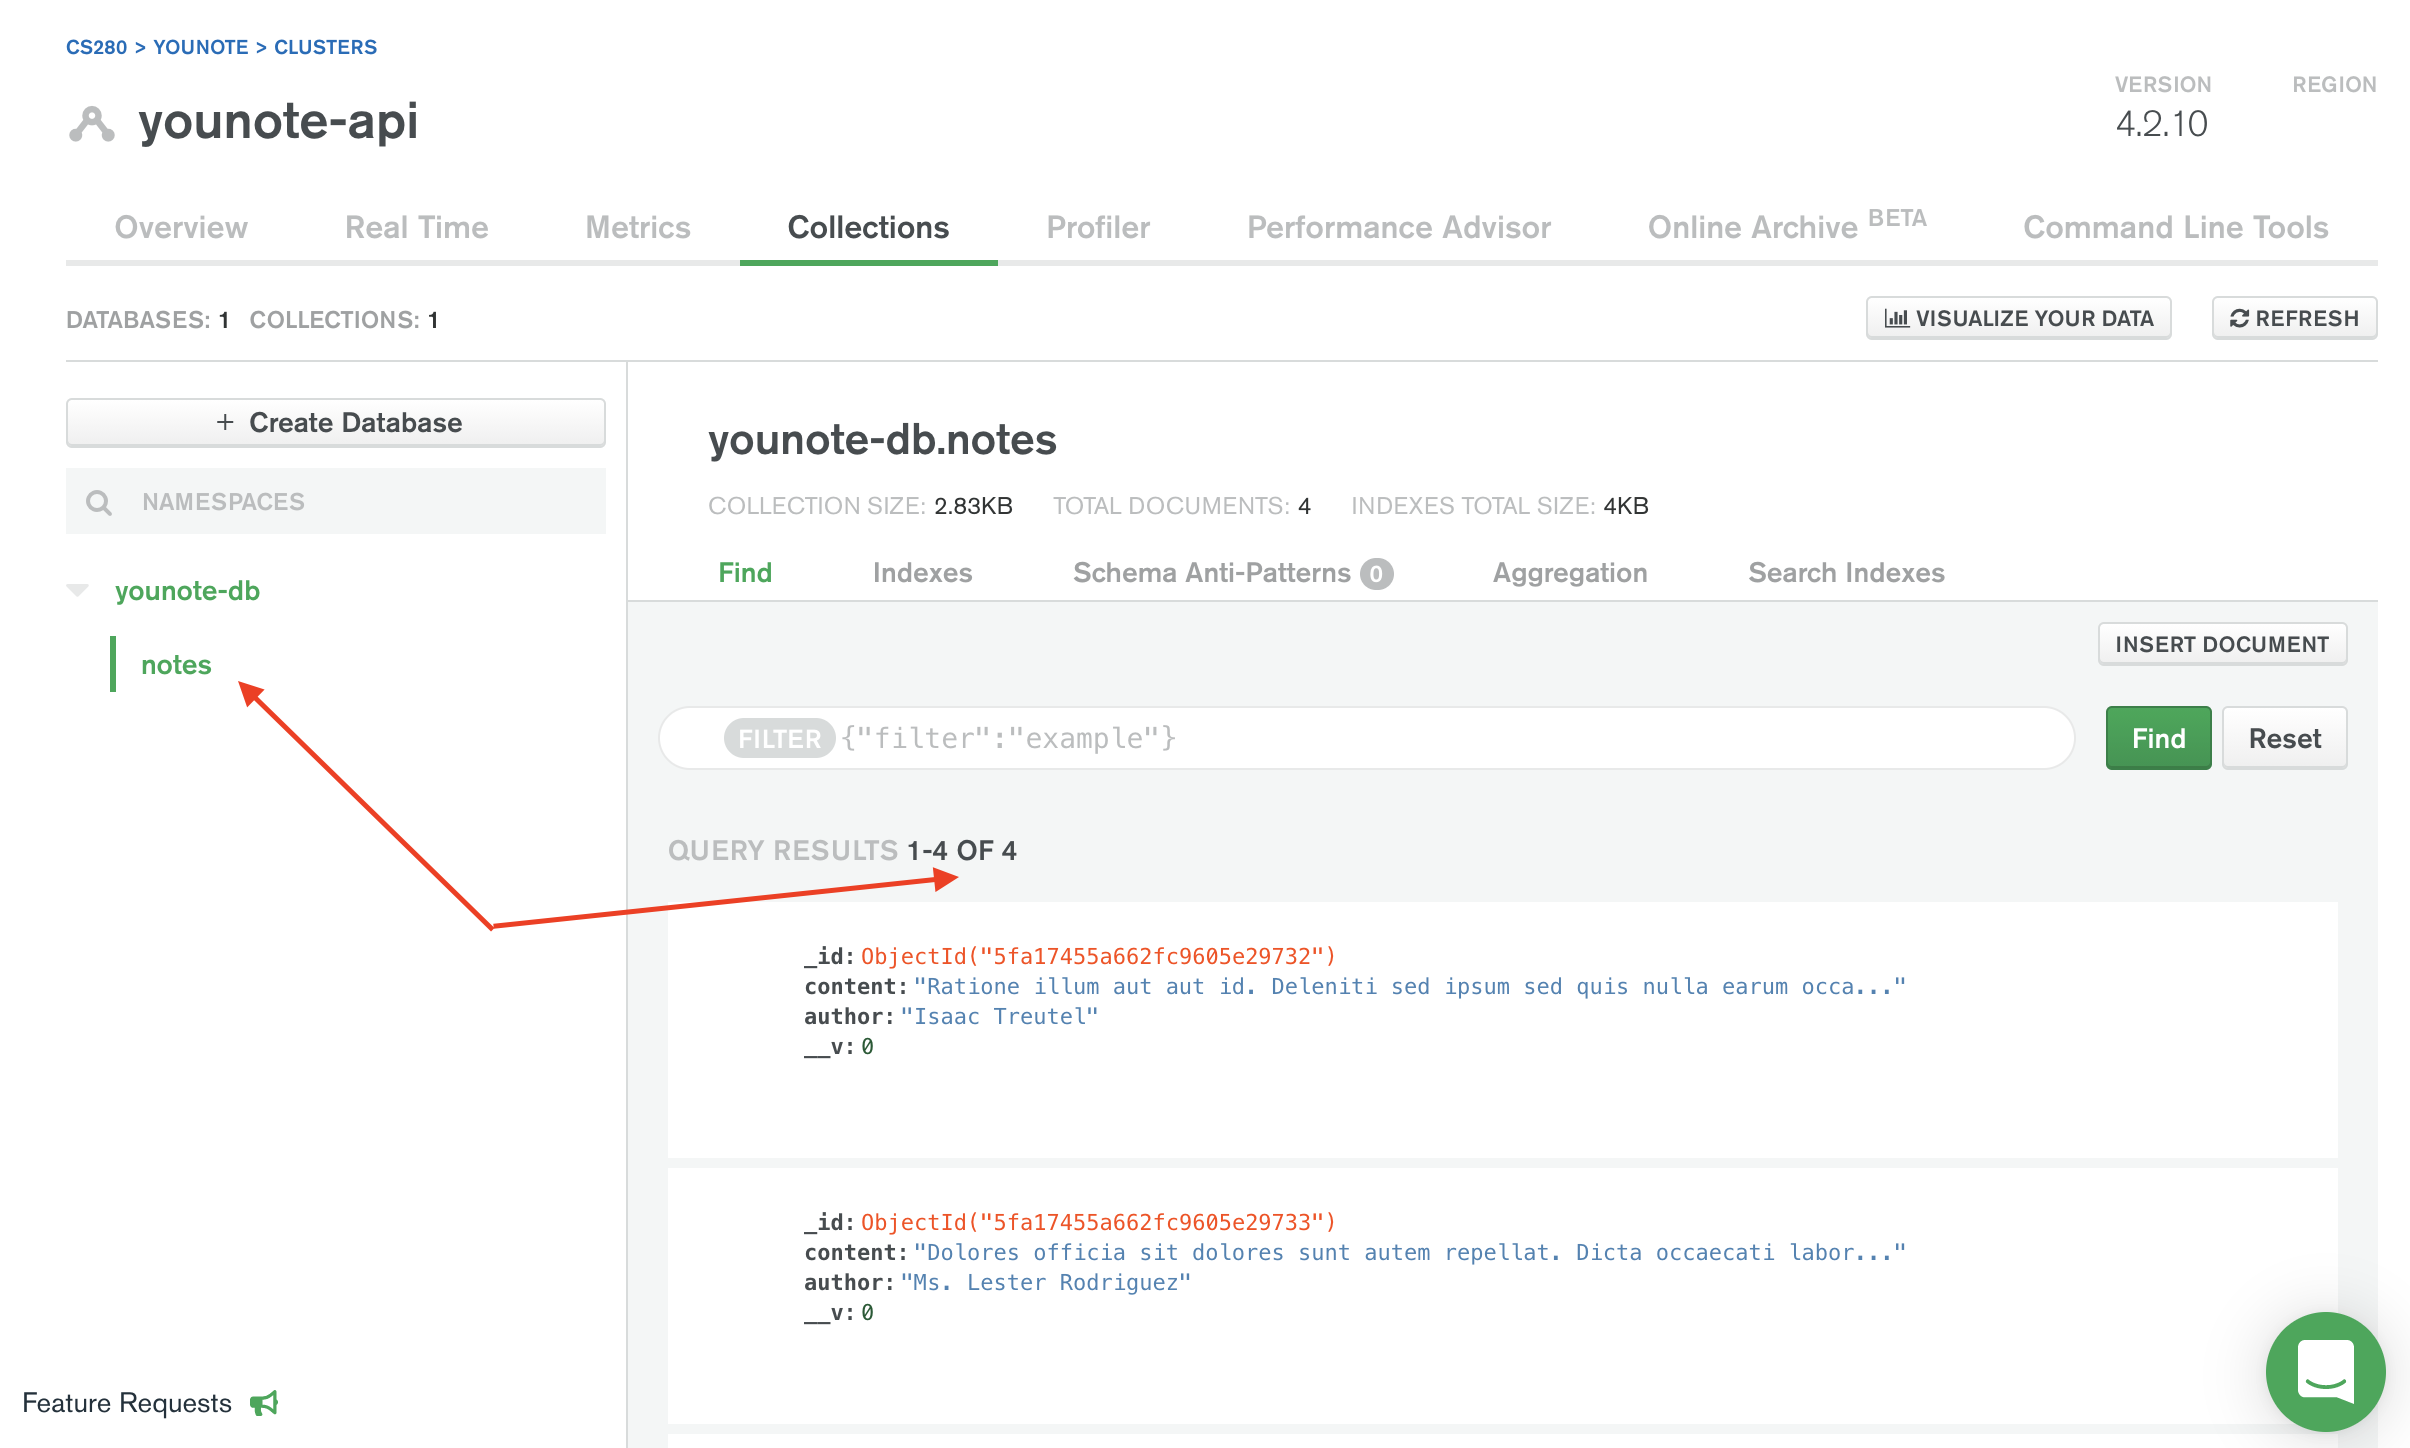
Open Postman and try the API by retrieving all the notes:
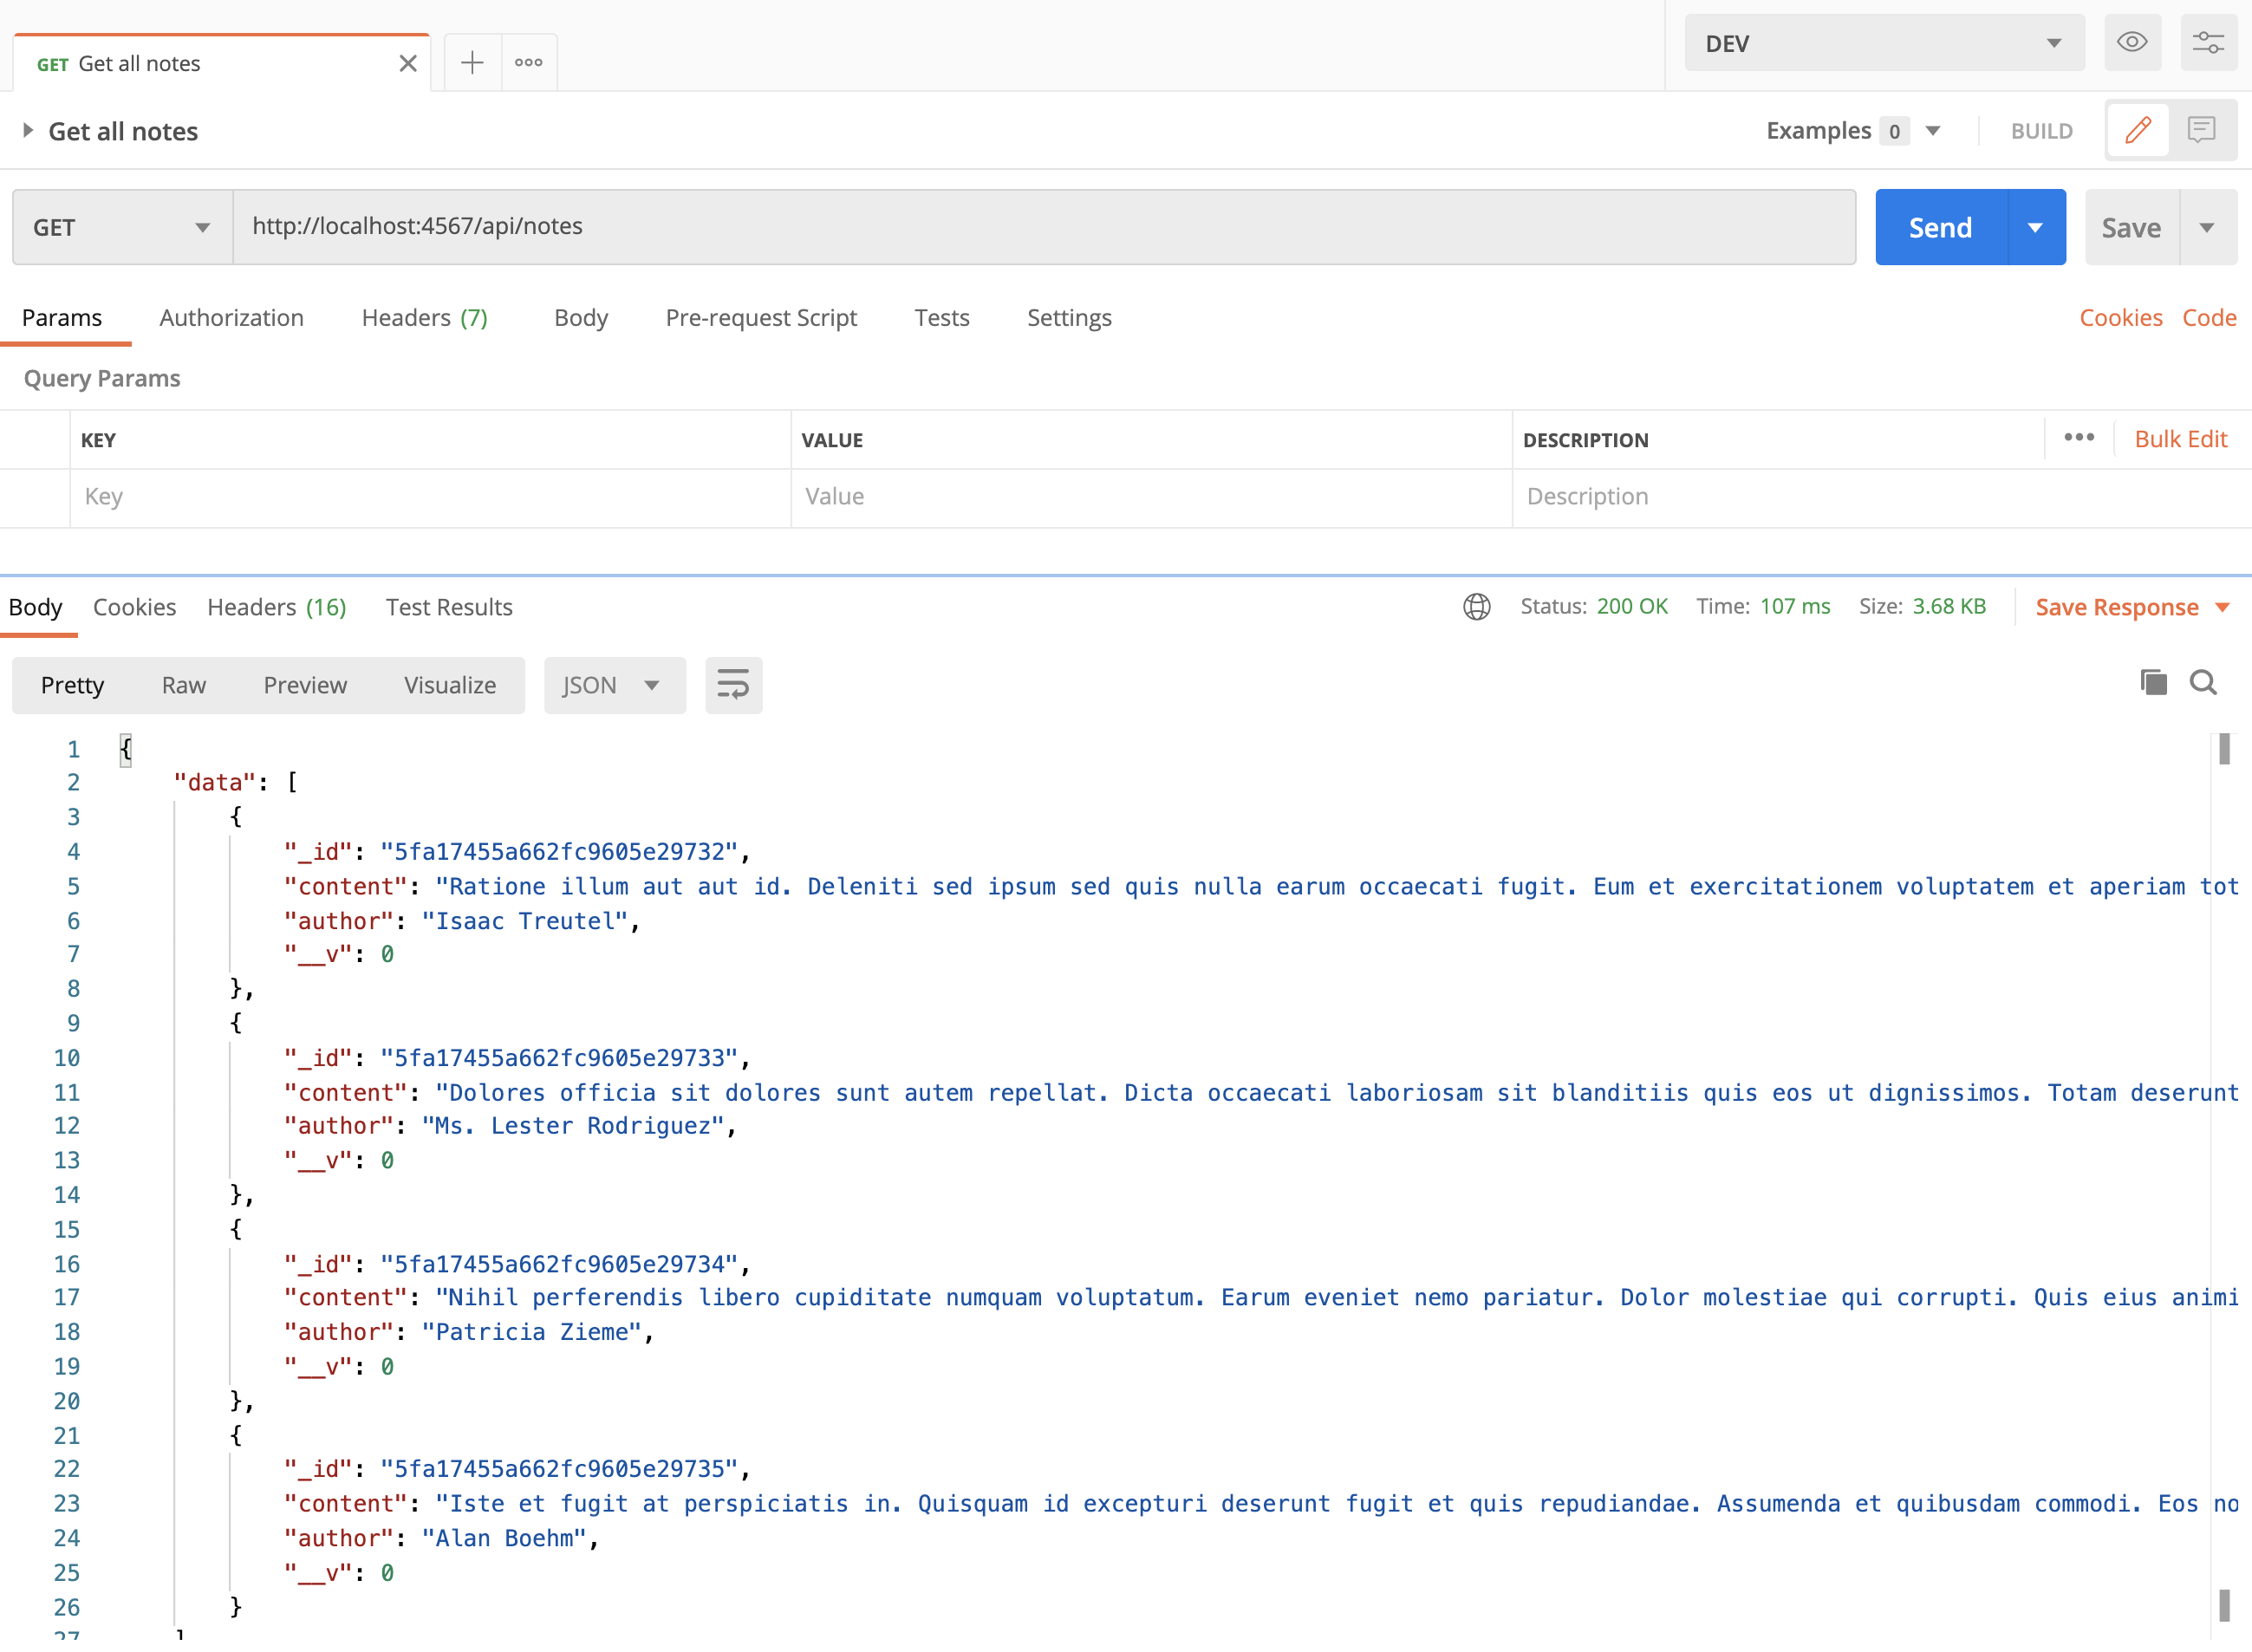
Using Postman, try other API endpoints and make sure the updates are persisted in the database.
YouNote App
Here is the starter code that contains a very simple frontend for the YouNote application.
We will have the frontend app to communicated with the backend (YouNote API server) to retrieve notes for a given user (author).
Moreover, we will deploy the backend to Heroku to gain experience working with the backend server running locally and in the cloud.
Step 1
Open the terminal and change the directory to younote-app-starter folders.
Install the dependencies:
npm install
Run the application:
nodemon .
Open the browser and visit http://localhost:7000/.

Enter a username (any random one will do) and click on "Login":

We have these two views in this simple application.
Step 2
Let's explore the views of this application.
Open the views folder and notice there are three files in there:
base.njkindex.njkdashboard.njk
We will explore these one by one!
base.njk
This template file contains the boilerplate HTML which is the basis of every HTML file that our app will render.
<!DOCTYPE html>
<html lang="en">
<head>
<meta charset="UTF-8">
<meta name="viewport" content="width=device-width, initial-scale=1.0">
<title>YouNote</title>
{% block css %}
<!-- Google Fonts -->
<link rel="stylesheet" href="https://fonts.googleapis.com/css?family=Roboto:300,300italic,700,700italic">
<!-- CSS Reset -->
<link rel="stylesheet" href="https://cdnjs.cloudflare.com/ajax/libs/normalize/8.0.1/normalize.css">
<!-- Milligram CSS -->
<link rel="stylesheet" href="https://cdnjs.cloudflare.com/ajax/libs/milligram/1.4.1/milligram.css">
<!-- Our Style -->
<link rel="stylesheet" href="style.css">
{% endblock %}
</head>
<body>
{% block body %}
{% endblock %}
{% block script %}
{% endblock %}
</body>
</html>
Notice the use of Nunjucks Blocks.
A block defines a section on the template and identifies it with a name.
Blocks are used by Template Inheritance.
Further notice the stylesheets imported here; we are using a minimalist CSS framework called Milligram.
index.njk
This template file contains the homepage view which will be rendered when a user visits the YouNote web app. The template basically contains a form with a field for user to add their username.
{% extends "base.njk" %}
{% block body %}
<div class="container">
<div class="row">
<div class="column column-50">
<h1>YouNote</h1>
<form action="/dashboard">
<label for="uname">username:</label>
<input type="text" id="username" name="uname"><br><br>
<input type="submit" value="Login">
</form>
</div>
</div>
</div>
{% endblock %}
Notice the use of Nunjucks extends to specify template inheritance. The specified template is used as a base template.
The block body overrides the content of the block body declared in the base.njk template.
dashboard.njk
The "dashboard" view is rendered when the user logs in. The dashboard contains
- A welcome message.
- A text area to write notes.
- A section where user's notes are displayed.
{% extends "base.njk" %}
{% block body %}
<div class="container">
<div class="row">
<div class="column column-50">
<h1>Welcome {{ nickname }}!</h1>
<form action="/note">
<textarea name="content">Write your note here.</textarea>
<input type="submit" value="Save!">
</form>
<h2>Your Notes</h2>
{% for note in notes %}
<div class="note">{{ note.content }}</div>
{% else %}
<p>You don't have any notes yet!</p>
{% endfor %}
</div>
</div>
</div>
{% endblock %}
Notice the use of Nunjucks for loop that allows iterating over arrays and dictionaries. It appears the template expects us to inject an array notes which contains the user's notes.
Step 3
Let's take a closer look to the index.js.
In addition to the basic statements to get a NodeJS/Express app up and running (plus static files, and Nunjucks views), we have the following route handlers:
app.get("/", (_req, res) => {
res.render("index.njk", null);
});
app.get("/dashboard", async (req, res) => {
const username = req.query.uname;
const data = {
nickname: username,
notes: []
};
res.render("dashboard.njk", data);
});
Notice the data passed to the dashboard view contains an empty notes array. We will update this to retrieve the notes for a given author (user) from the YouNote API.
Step 4
Open your terminal to the root folder of the YouNote API. (Use the lates version where we have connected the API to a MongoDB cluster in the cloud.)
Run the YouNote API on a port different than that of the YouNote App. If you've been following along, I have the API running on port 4567 and frontend app running on port 7000.
We are going to use a Node package called axios which provides an interface for fetching resources though HTTP requests.
Axios is similar to JavaScript's fetch in functionality, however, it provides a more powerful and flexible feature set. (See e.g. Axios vs. Fetch.)
Stop the frontend app and install axios:
npm install axios
Next, import axios in index.js
const axios = require("axios");
Now update the route handler for "dashboard" view:
app.get("/dashboard", async (req, res) => {
const username = req.query.uname;
const data = {
nickname: username,
};
try {
let response = await axios.get(`http://localhost:4567/api/notes?author=${username}`);
data.notes = response.data.data;
} catch (error) {
console.log(error);
data.notes = [];
}
res.render("dashboard.njk", data);
});
Save the file and run your frontend application. Select a user (author) which you have some notes stored in your younote-db cloud database. The notes must be displayed when you visit the dashboard for that user.

Here is a good tutorial on Axios: How to make HTTP requests like a pro with Axios.
Step 5
We will leave it to you to communicate to the API to save "create" notes, edit/delete notes, etc.
Instead of enhancing the frontend, let's deploy the backed to Heroku. This is especially interesting as we need to create "environment variables" on Heroku.
Go on Heroku and create an application and link it to the GitHub repository of YouNote API.
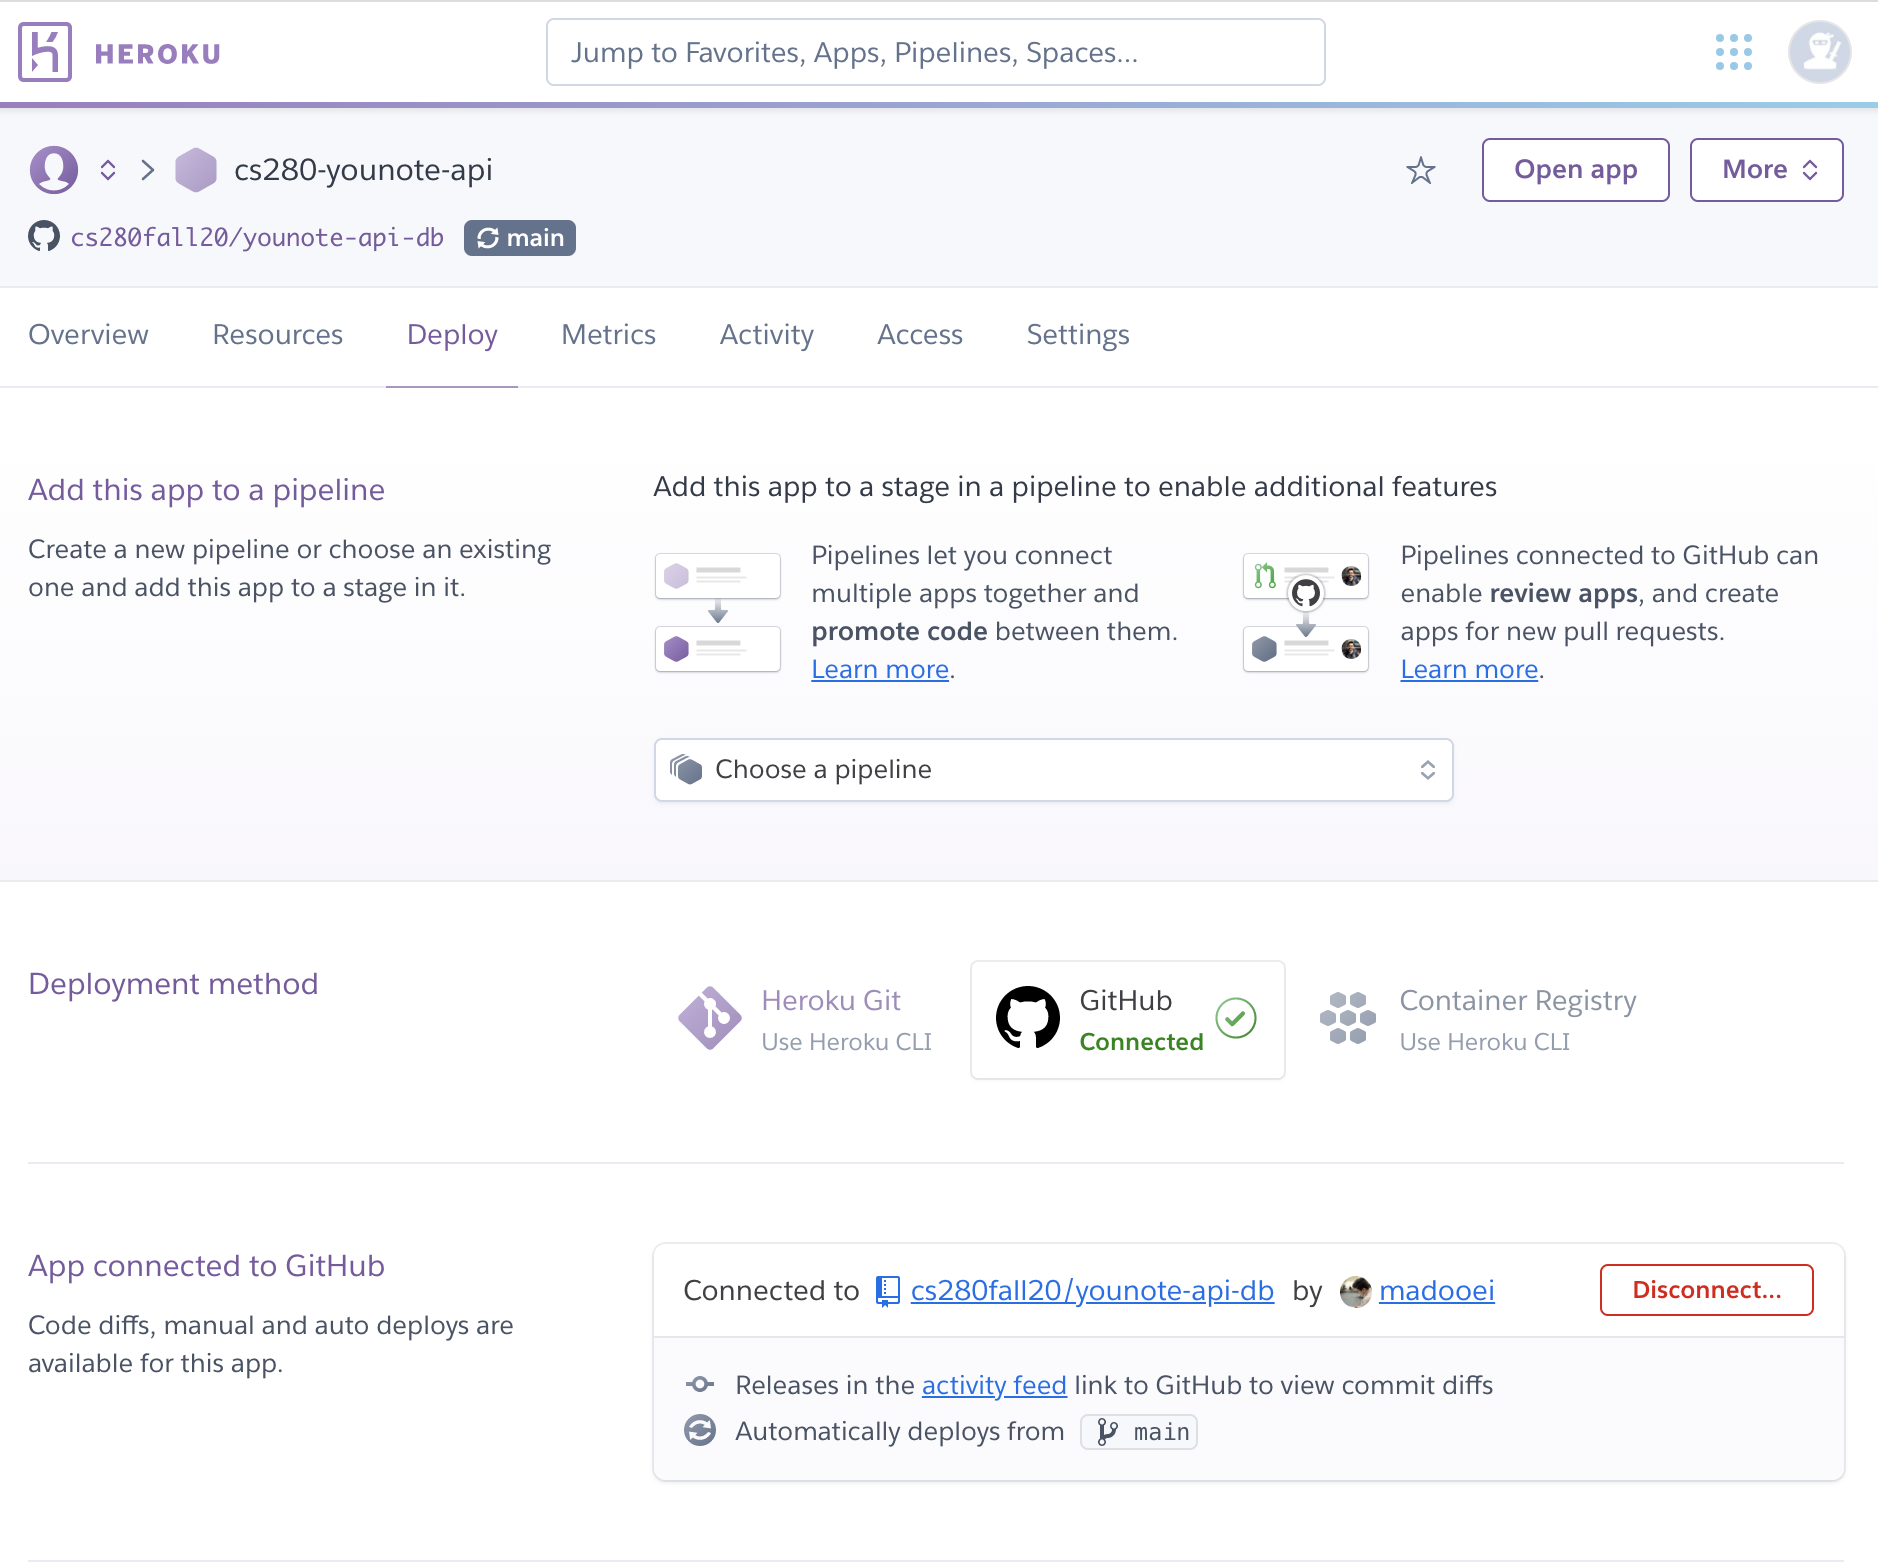
Stop the backend (API) application. Add a Procfile:
web: node ./index.js
Save, commit, and push the changes.
Go to your Heroku app settings and click on "Reveal Config Vars".
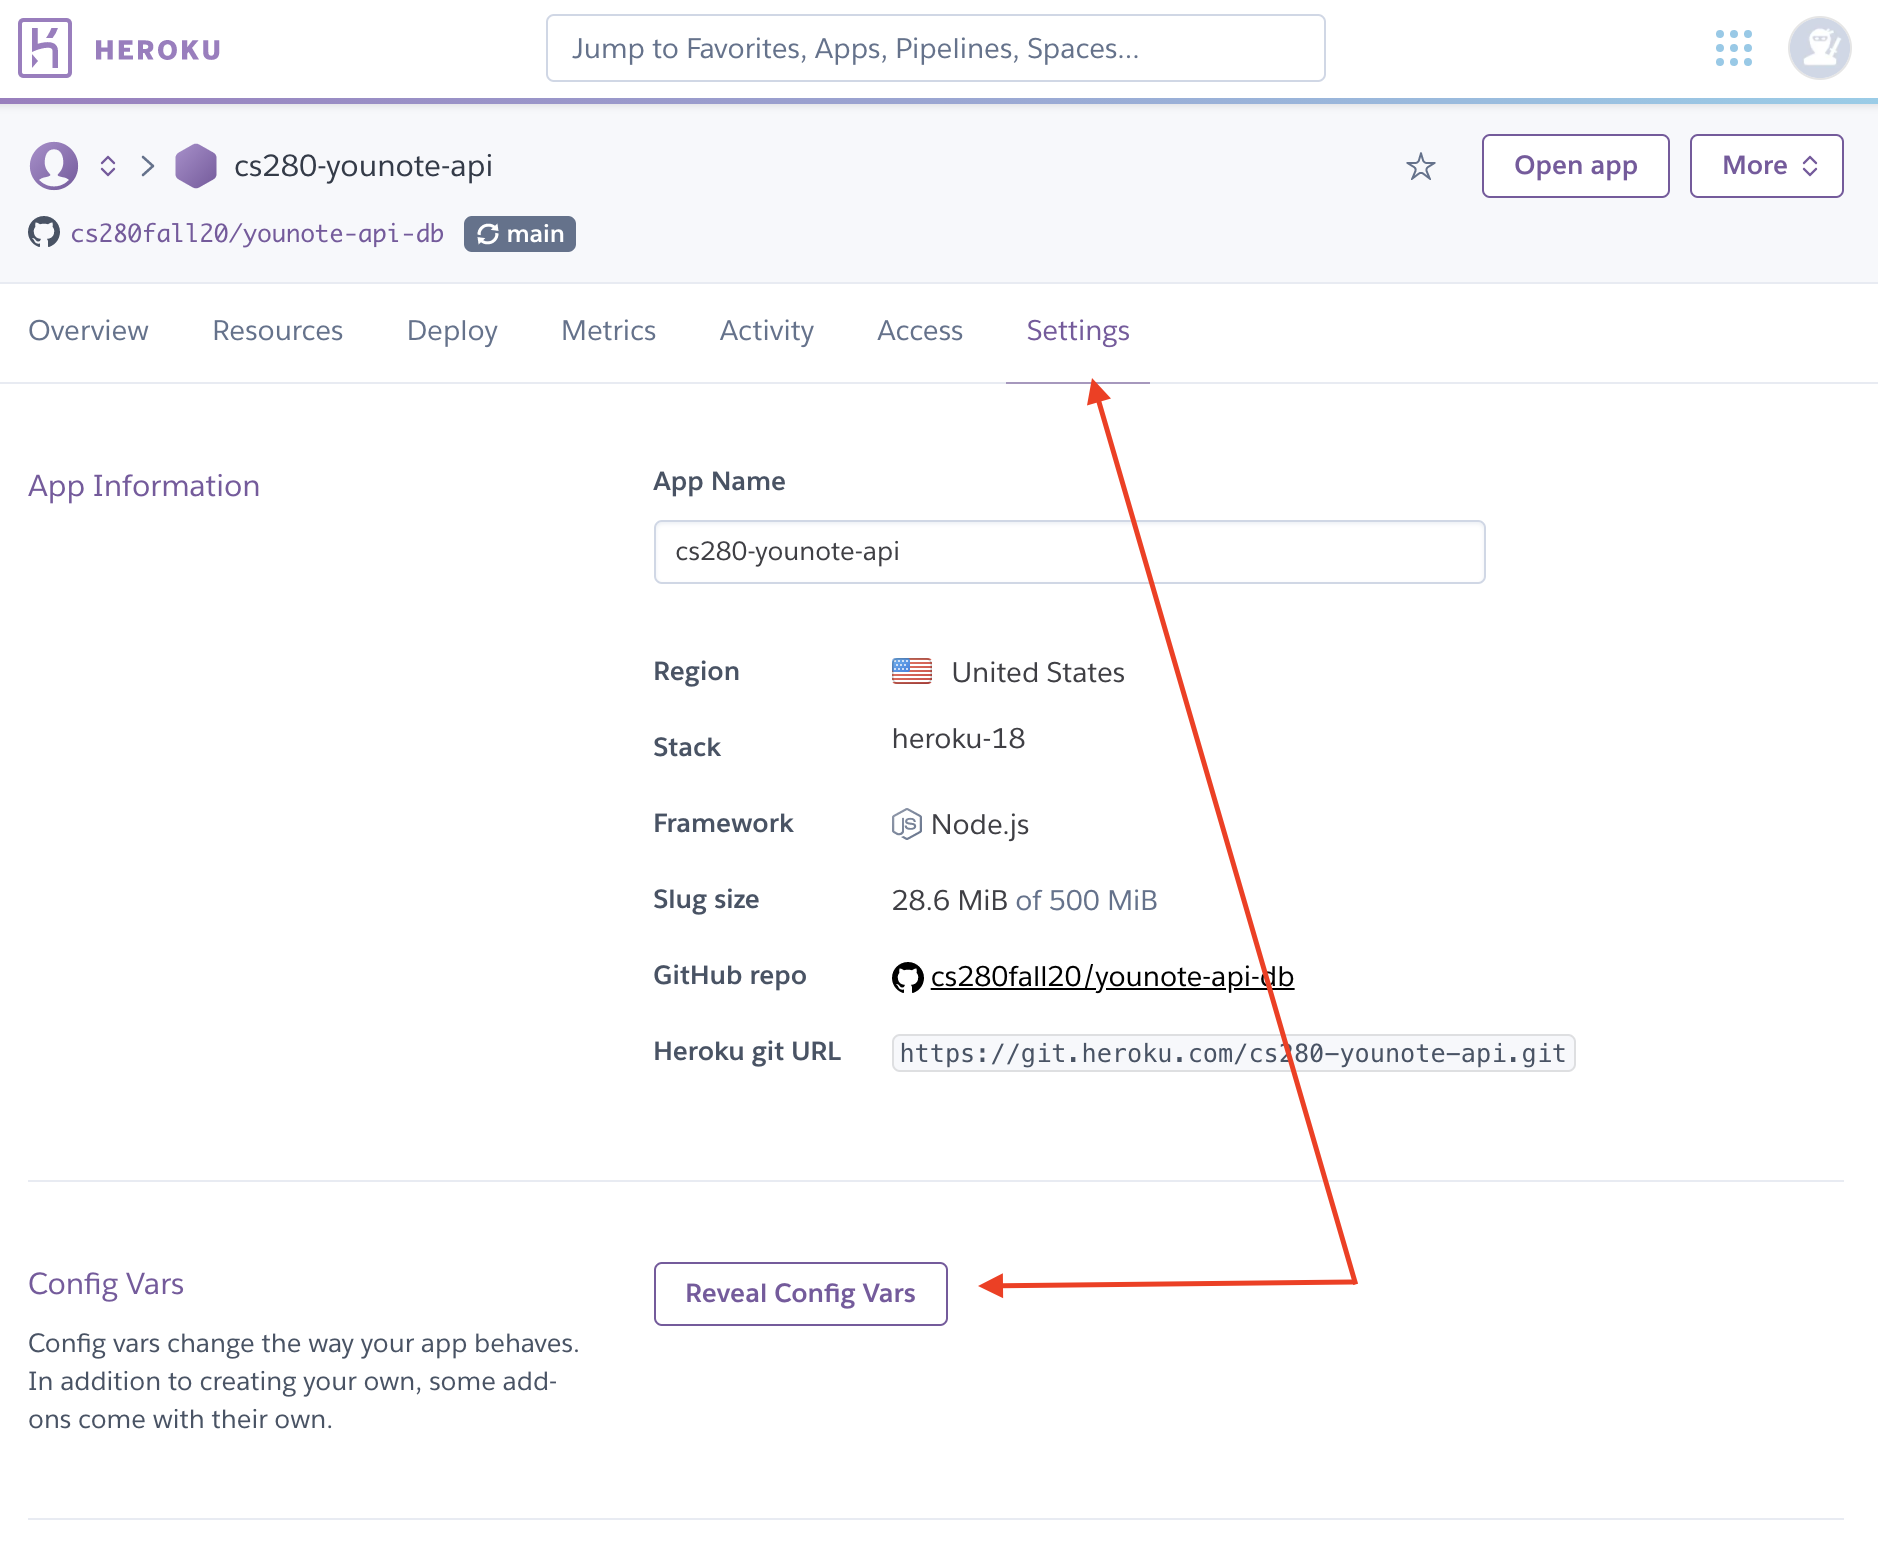
Config vars are the environment variables on Heroku.
Add the environment variable (with its value) that we have used to store the password for our MongoDB user.
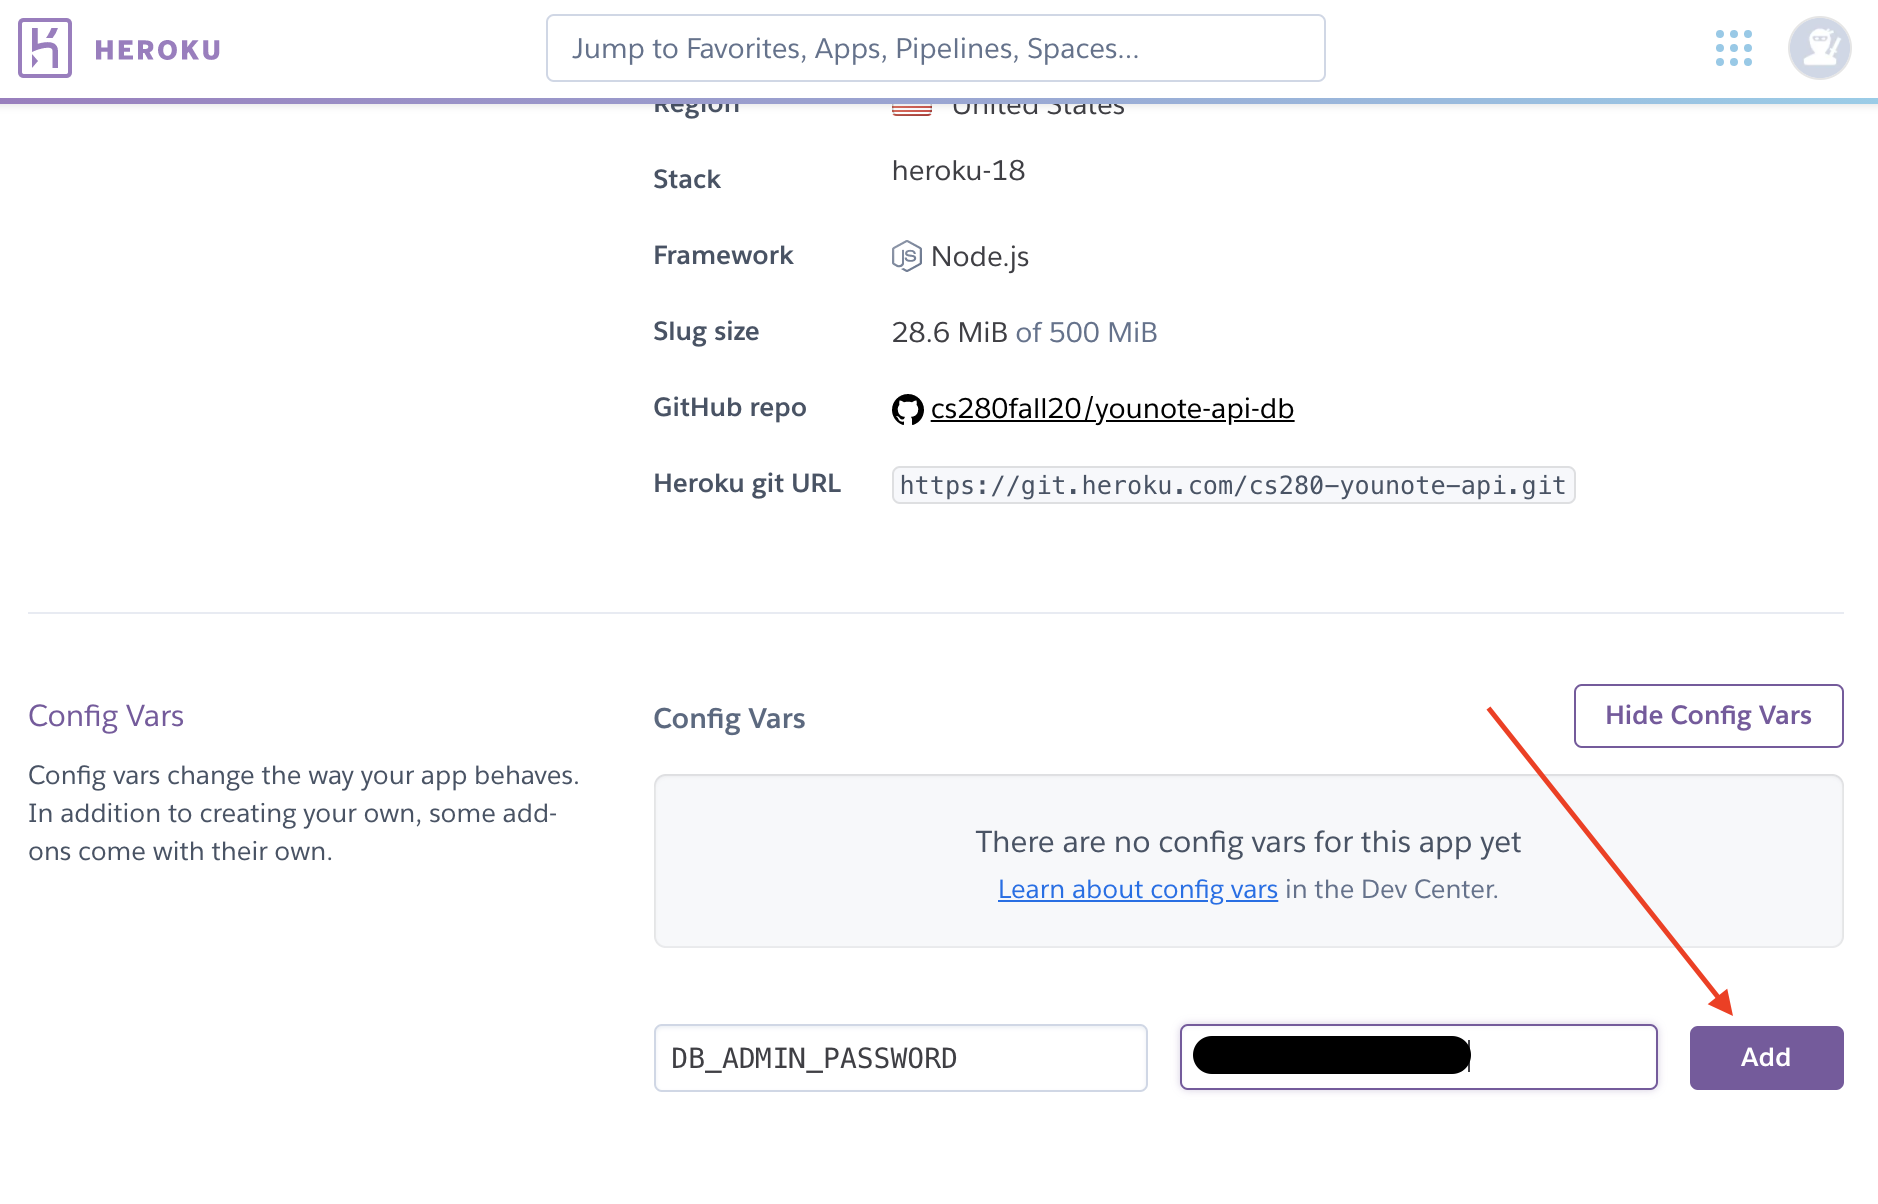
Then restart your Heroku app:
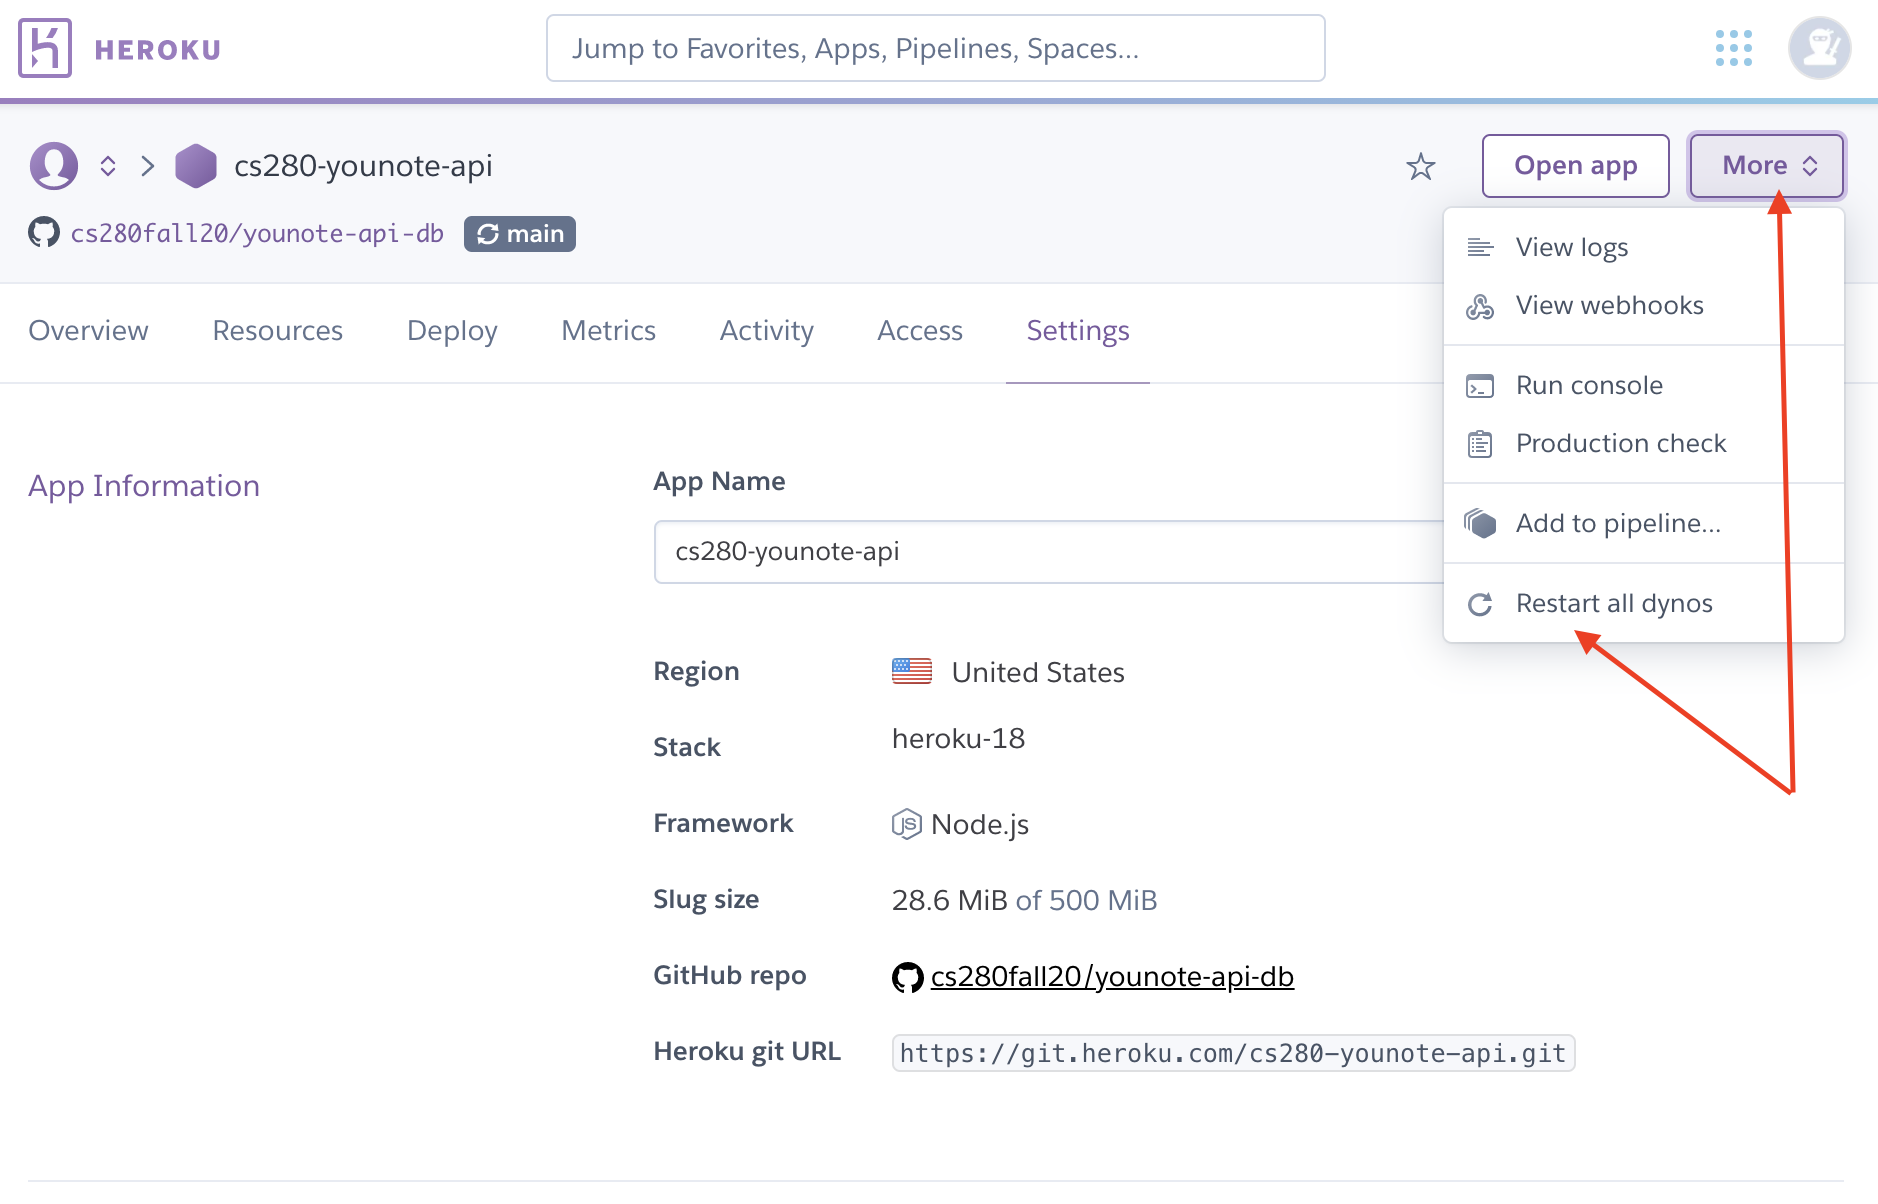
Step 6
Open the index.js file in younote-app-starter folder.
Update the endpoint URL which we have provided to axios.get function:
- let response = await axios.get(`http://localhost:4567/api/notes?author=${username}`);
+ let response = await axios.get(`${API_URL}/api/notes?author=${username}`);
Create a variable API_URL and give it the URL of your Heroku app:
const API_URL = "https://cs280-younote-api.herokuapp.com";
Restart the frontend!
Your frontend app is now connected to the deployed YouNote API.
This repository contains the updated YouNote App.
Users App
In this module (and the next one) we learn how to implement a custom user authentication system that controls users access to web resources using NodeJS, ExpressJS and MongoDB. The system lets users sign up, log in, and log out, limiting access to password-protected resources.
- The starter code is here: https://github.com/cs280fall20/users-app-starter.
- The completed application is here: https://github.com/cs280fall20/users-app.
Step 1
Download (clone) the starter code here.
Open the terminal and change directory to users-app-starter. Install the dependencies:
npm install
Run the application
nodemon .
Open your browser and visit http://localhost:5001.

Add a dummy username and password, and click on "Login" button. You will be redirected to the /dashboard:

Click on "Logout" button. You will be redirected to the homepage. Click on the registration link.

You will be redirected to the registration form.

Add a dummy username and password and click on "Register". You will be redirected to the homepage to login.
Step 2
Let's explore the code organization of the starter app:
.
├── README.md
├── assets
│ └── style.css
├── data
│ └── db.js
├── index.js
├── model
│ └── User.js
├── package-lock.json
├── package.json
└── views
├── alert.njk
├── base.njk
├── dashboard.njk
├── index.njk
└── register.njk
4 directories, 12 files
This is a NodeJS/Express application which uses Nunjucks as template engine. There are three primary views:
index.njkdashboard.njkregister.njk
Feel free to explore these in the views folder.
The application also includes a model and a data folder.
- The
modelfolder includesUser.jswhich exposes amongoose.modelfor representing a "user" in our application as well as performing CRUD operations on users. - The
datafolder containsdb.jswhich encapsulates the logic to connect to our MongoDB instance.
Step 3
Let's connect the application to our MongoDB cluster (the one we have created for the YouNote API).
Open the data/db.js file and notice the URI is read from environment variable:
mongoose.connect(process.env.DB_URI, option);
Go to MongoDB Atlas website and get the connection URI for your cluster. For my MongoDB cloud cluster, the URI is:
mongodb+srv://younote-admin:<password>@younote-api.cwpws.mongodb.net/<dbname>?retryWrites=true&w=majority
- Replace
<password>with your database admin password. For me, this is the password for the useryounote-admin. - Replace the
<dbname>with the desired database name. I will continue to useyounote-dbas eventually I would like to bring the user registration/authentication into the YouNote App and its API.
Create a .env file in the users-app-starter folder with the following content:
DB_URI="YOUR-URI-GOES-HERE"
Open index.js file and import the db module:
const db = require("./data/db.js");
Connect to the database (place the following statement somewhere in index.js before using the app variable).
db.connect();
Save the index.js file and you should see your app is connected to the database:
[nodemon] restarting due to changes...
[nodemon] starting `node .`
Users' App is running at http://localhost:5001
Connected to MongoDB!
Notice the option variable in data/db.js which includes the following parameter:
useCreateIndex: true,
This parameter is included because we want the username attributes of each user to be unique, as it is indicated in mode/User.js:
const UserSchema = new Schema({
username: { type: String, required: true, unique: true },
password: { type: String, required: true },
});
Step 4
Let's explore the routes and the logic to handle client requests.
Open index.js. Notice the following routes:
app.get("/", (req, res) => {
// Homepage- Render login form
});
app.post("/login", (req, res) => {
// check credential then redirect to dashboard
});
app.get("/dashboard", (req, res) => {
// Render dashboard
});
app.post("/logout", (req, res) => {
// Log user out then redirect to homepage
});
app.get("/register", (req, res) => {
// Render registeration form
});
app.post("/register", (req, res) => {
// Register the user then redirect to homepage
});
I've replaced the implementation of each route handler with a comment to briefly describe its job.
We will focus on the user registration process first.
Step 5
Open views/registeration.njk and notice the user registration form:
<form action="/register" method="POST">
<input type="text" name="username" placeholder="username" class="field">
<input type="password" name="password" placeholder="password" class="field">
<input type="submit" value="Register" class="btn">
</form>
In particular notice the action and method attributes for form element. As a client provides their desired username and password, and clicks on "Register" button, the "form" will send a POST HTTP request along with the "username" and "password" data.
Open the index.js and focus on the logic for handling POST request through /register endpoint:
app.post("/register", (req, res) => {
const username = req.body.username;
const password = req.body.password;
console.log(colors.cyan("Register:", { username, password }));
// TODO register the user!
// redirect to the login page
res.redirect("/");
});
Notice we receive the "username and "password" from req.body. This is not possible by default unless you use the following middleware (as it is done in index.js):
app.use(express.urlencoded({ extended: false }));
The express.urlencoded() function is a built-in middleware in Express. We use it in order to parse the body parameter of request that was sent from a "HTML form" on the client application. The extended: false prevents parsing "nested object" (considered a good practice).
Notice I also use the colors package that allows us to get colors in your NodeJS console. This is not needed; I've just added it here for fun!
console.log(colors.cyan("Register:", { username, password }));
Step 6
Let's register a user!
Update route handler for POST /register in index.js:
app.post("/register", async (req, res) => {
const username = req.body.username;
const password = req.body.password;
console.log(colors.cyan("Register:", { username, password }));
try {
// TODO register the user!
const user = await users.create({username, password});
console.log(user);
// redirect to the login page
res.redirect("/");
} catch (err) {
console.log(err);
res.json(err);
}
});
Notice we simply print the error to console and return it to the client. This is not a good strategy to deal with errors! We will leave it for now however to focus on the registration process and good practices.
Also notice, the handler function is decorated with async keyword
app.post("/register", async (req, res) => {
// notice the async keyword!
});
Finally, note you must include the following import statement in index.js
const users = require("./model/User.js");
Save index.js and go to http://localhost:5001/register to register a user:

You must the user object printed to the terminal (once it is created)
{
_id: '5faab2d28853463591a63b4c',
username: 'madooei',
password: '1234',
__v: 0
}
And check your MongoDB database to ensure the data is saved there
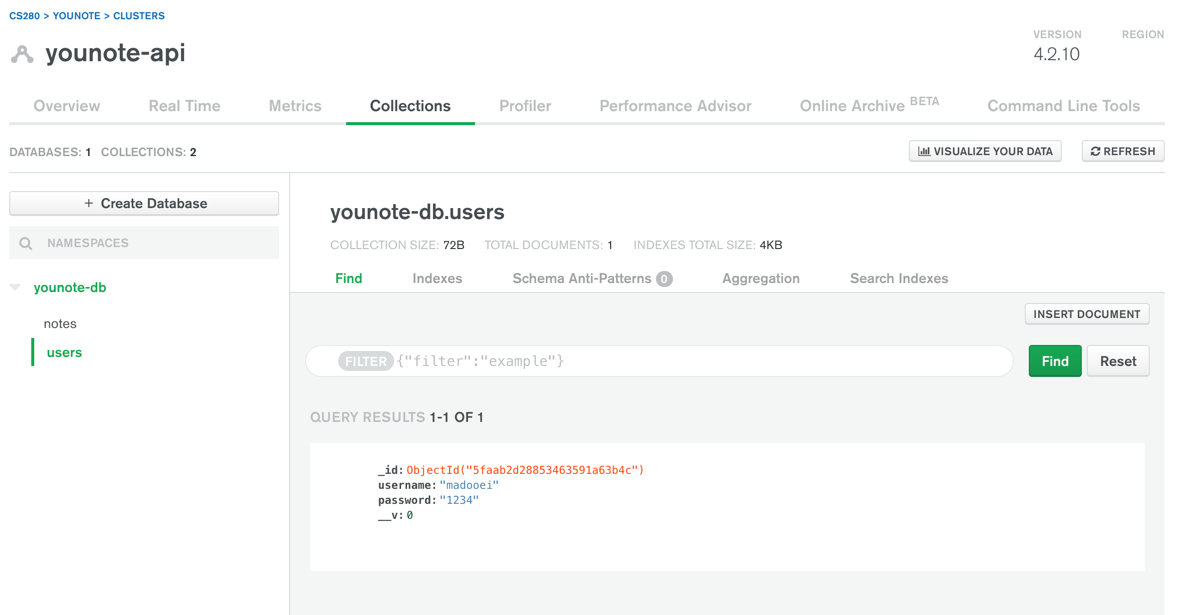
Step 7
Let's check user credentials as they login.
Update route handler for POST /login in index.js:
app.post("/login", async (req, res) => {
const username = req.body.username;
const password = req.body.password;
console.log(colors.cyan("Login using", { username, password }));
try {
// check credential
const user = await users.findOne({ username, password });
if (!user) throw Error("No user found with this username!");
console.log(user);
// redirect to dashboard
res.redirect(`/dashboard?username=${user.username}`);
} catch (err) {
console.log(err);
// redirect to homepage
res.redirect("/");
}
});
Notice if we don't have a user registered in our database with the provided credentials we redirect to the login page. This could be confusing for clients when e.g. they misspell their username or input an incorrect password, there must be an error message shown to them.
Save index.js and try to login using a valid (and then invalid) credentials.
Step 8
Let's try something! Open index.js and update the route handler for GET /:
app.get("/", (req, res) => {
res.render("index.njk", { message: "This is a message!" });
});
Notice I'm passing an object containing a message property to the index.njk template file.
Save index.js and visit http://localhost:5001/:

Notice the message appears at the top of the page and it is dismissible.
How did this happen? Well, open index.njk and notice the body block starts with
{{ super() }}
This statement means include whatever is already defined in the body block inside the base template (base.njk). So open base.njk and notice the content of the body block:
{% block body %}
{% if message %}
{% include "alert.njk" %}
{% endif %}
{% endblock %}
The statement above indicate, if there is a message variable passed to the template, then include the content of alert.njk in that place. So, open alert.njk:
<div class="alert">
<div class="closebtn" onclick="this.parentElement.style.display='none';">×</div>
{{ message }}
</div>
The alert.njk basically contains the dismissible message element that was displayed when you visited the app's homepage.
Step 9
We can use this dismissible message element to inform user about potential error messages or other informations.
For example, update the catch block in the route handler for POST /login in index.js:
catch (err) {
console.log(err);
// redirect to homepage
res.redirect("/?message=Incorrect username or password");
}
Also, update the route handler for GET /:
app.get("/", (req, res) => {
const message = req.query.message;
res.render("index.njk", { message });
});
Save index.js and visit http://localhost:5001/. Enter a username/password that does not exist in the database. You must get the following:

Step 10
Notice the URL for homepage will be appended with the message query parameter:
http://localhost:5001/?message=Incorrect username or password
This is not the most elegant way of achieving the desired behavior. Imagine we have more detailed error messages (and perhaps other properties to pass along the message). The query parameter is not the place to send these messages.
We will now introduce an alternative approach to achieve the same results. This alternative strategy uses web cookies!
Web cookies (or simply cookies) are simple text files that a website can store on your browser.
Stop the application and install the cookie-parser package:
npm install cookie-parser
Open index.js, import the cookie-parser module:
const cookieParser = require("cookie-parser");
Then, add this module as a middleware to your express app:
app.use(cookieParser());
Step 11
Let's update the catch block in the route handler for POST /login in index.js:
} catch (err) {
console.log(err);
// redirect to homepage
res.cookie("message", "Incorrect username or password").redirect("/");
}
Also, update the route handler for GET /:
app.get("/", (req, res) => {
const message = req.cookies.message;
res.render("index.njk", { message });
});
Notice the message is read from the req.cookies and not req.query.
Save index.js and visit http://localhost:5001/. Enter a username/password that does not exist in the database. You must get the "Incorrect username or password" message. But notice the URL is simply http://localhost:5001/. So where does this data come from?
Open the developer tools, go to "Application" tab and look under "Cookies".

Step 12
Let's update the app to use the dismissible messages in other views!
Let's have the logout process to set a message "You have successfully logged out!":
app.post("/logout", (req, res) => {
console.log(colors.cyan("Log out!"));
res.cookie("message", "You have successfully logged out!").redirect("/");
});
Also, let's update the registration process to display appropriate message
app.post("/register", async (req, res) => {
const username = req.body.username;
const password = req.body.password;
console.log(colors.cyan("Register:", { username, password }));
try {
// TODO register the user!
const user = await users.create({ username, password });
console.log(user);
// redirect to the login page
res.cookie("message", "You have successfully registered!").redirect("/");
} catch (err) {
console.log(err);
res.cookie("message", "Invalid username or password!").redirect("/register");
}
});
Also, update the following handler to provide the register and dashboard view with the message when it is available:
app.get("/register", (req, res) => {
const message = req.cookies.message;
res.render("register.njk", { message });
});
app.get("/dashboard", (req, res) => {
const username = req.query.username;
const message = req.cookies.message;
res.render("dashboard.njk", { username, message });
});
Save index.js and visit http://localhost:5001/. Try visiting different routes and test the messaging works as intended.
Step 13
There is a potential issue with the way I have used cookies for passing messages between different views. Let's observe the issue first: open the homepage and enter an invalid user credentials.

You will get the "Incorrect username and password" message. Now click on the "registration" link.

Notice there is again the "Incorrect username and password" message. This is due to the simple fact that the cookie with the error message still exist. So potentially, we will see this message in every view until the cookie is deleted or overwritten.
We must update the program so the (flash) message is only available once, for the next request.
That is if we store a (flash) message in a cookie and render a page, the message is read and displayed but if we render the same (or another) page, the message is not present (it is destroyed).
There are a number of strategies to achieve this desired outcome. I will use this opportunity to show you how we can write our own Express middleware. The middleware we write will destroy the flash message after it is read.
Step 14
Add the following to index.js after app.use(cookieParser()); and before any of the route handlers:
app.use((req, res, next) => {
if (req.cookies.message) {
res.clearCookie("message");
}
next();
});
Recall middleware intercept req and res objects:
- before the
reqgoes to any of the route handlers, we intercept it and check if it contains a "message" cookie. - if there is a "message" cookie, then we call the
clearCookieon the response object, so it will be called in addition to whatever else is done to the "response" in any of the route handlers (and other middleware). - the
next()function is part of the semantic of any middleware; it calls the "next" middleware (if there is any).
Save index.js and try to recreate the issue we observed in the previous section.
Step 15
Notice when we redirect to dashboard, we pass the username as query parameter:
res.redirect(`/dashboard?username=${user.username}`);
We can now change this to instead use a cookie to store username.
res.cookie("username", user.username).redirect(`/dashboard`);
Also, update update the route handler for dashboard so that you read the username from set cookie:
- const username = req.query.username;
+ const username = req.cookies.username;
Save index.js. Go to the application and login. Make sure the dashboard view works as intended.
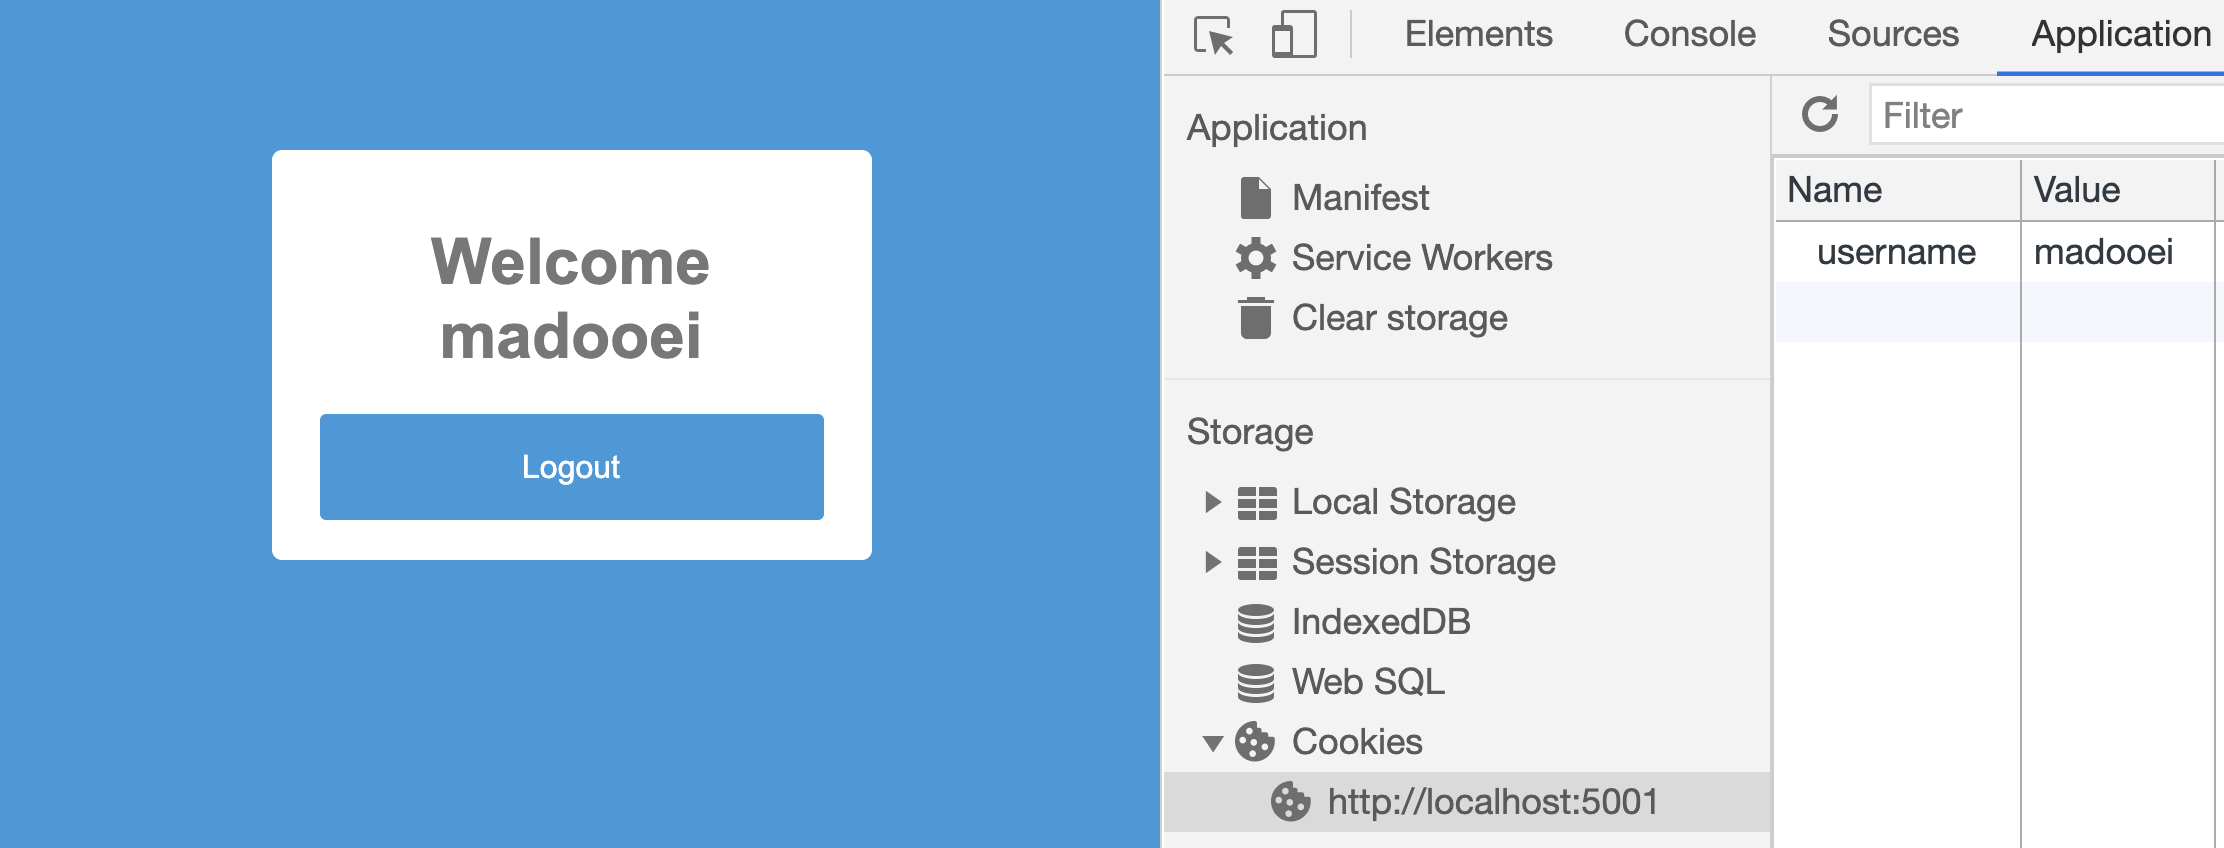
Step 16
The dashboard is a "protected resource". Only a user must be able to access this page. At the moment, we can directly navigate to dashboard: http://localhost:5001/dashboard.
Now that we have a "username" cookie, we can use as an indication to which a user is logged in or not. We can therefore protect the dashboard view:
app.get("/dashboard", (req, res) => {
const username = req.cookies.username;
const message = req.cookies.message;
if (username) {
res.render("dashboard.njk", { username, message });
} else {
res.cookie("message", "Please login first!").redirect("/");
}
});
Save the index.js file. In developer tools, manually delete the "username" cookie: (right click on it and select delete)
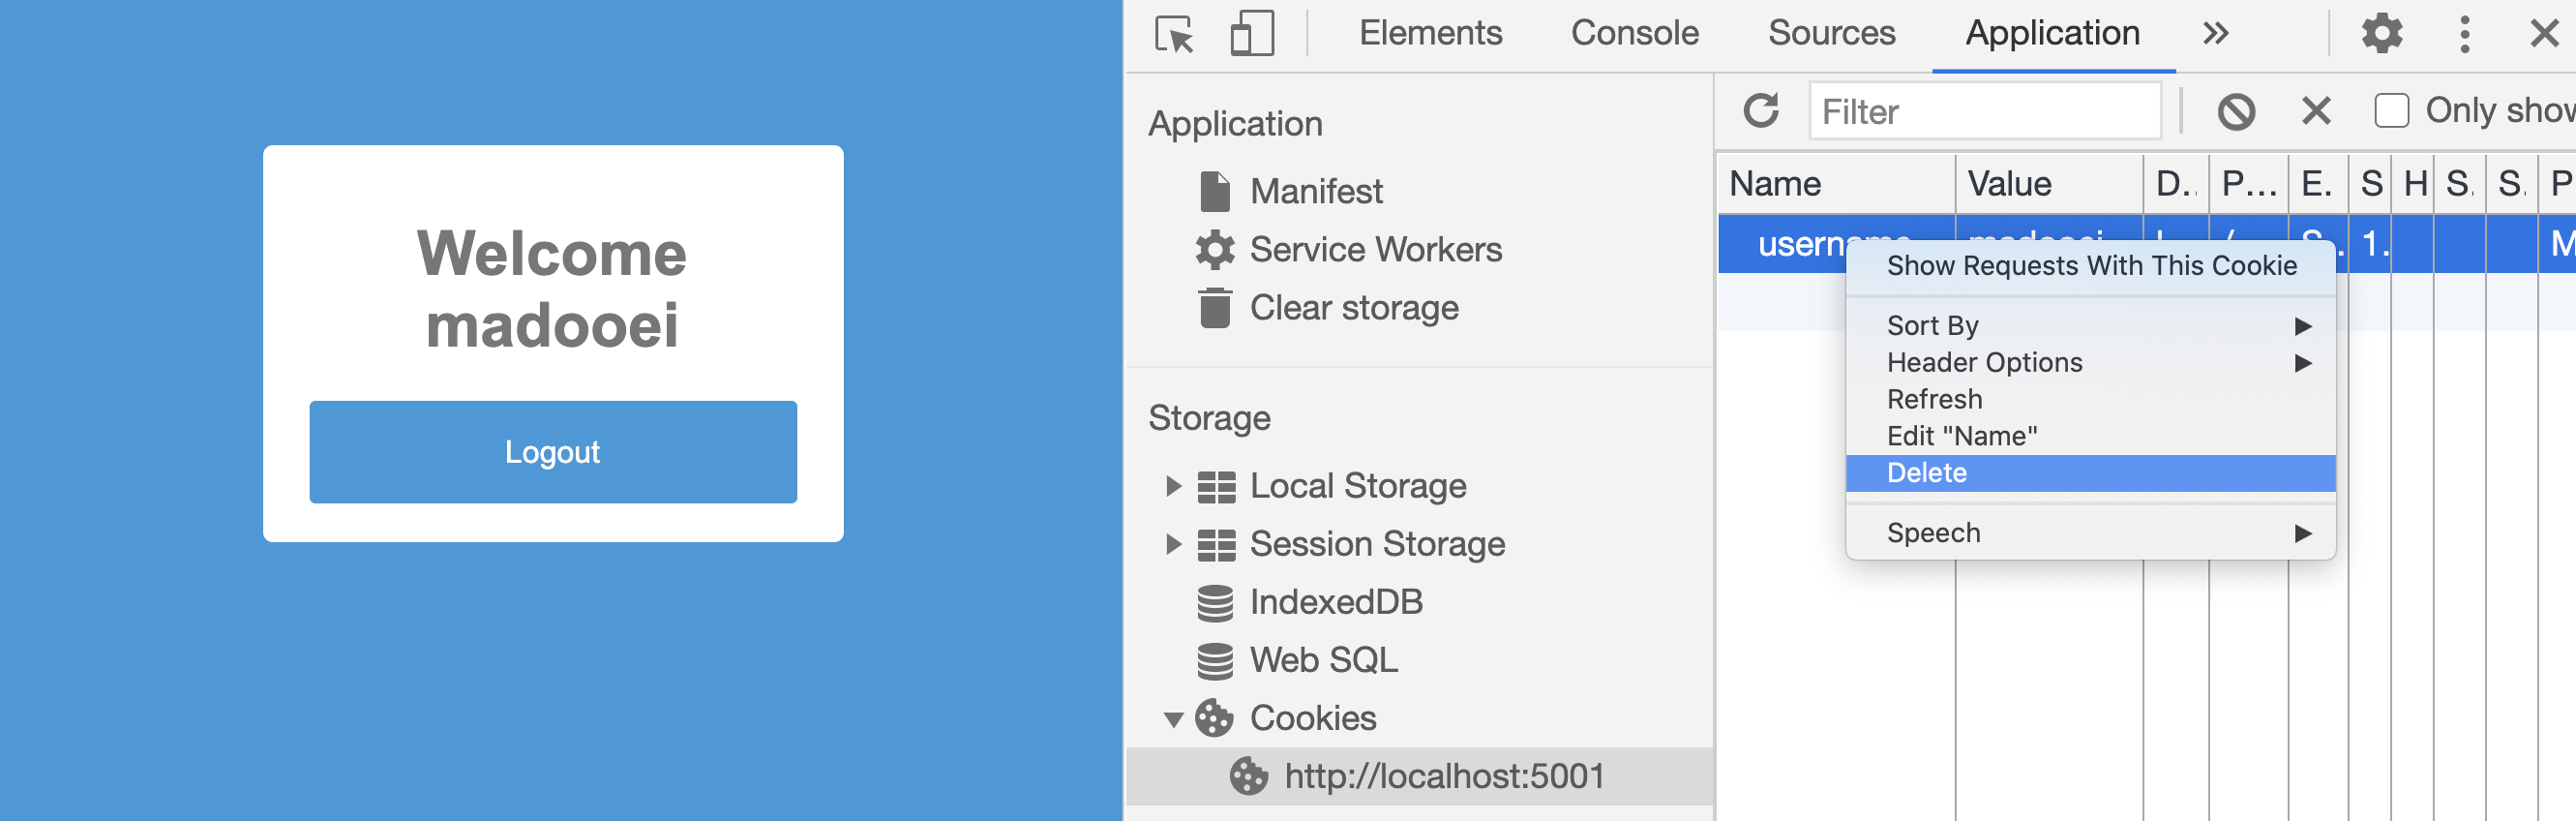
Then refresh the dashboard view; you must be redirected to the homepage!

Step 17
We can apply the same pattern to the homepage! If a user is already logged in, then take them to their dashboard and skip the log in form.
app.get("/", (req, res) => {
const username = req.cookies.username;
const message = req.cookies.message;
if (username) {
res.redirect("/dashboard");
} else {
res.render("index.njk", { message });
}
});
Save the index.js file; visit the homepage and login with a valid credentials. Then, try to visit the homepage again! You must be redirected to dashboard.
Now we can also implement the logout process; we simply remove (clear) the username cookie:
app.post("/logout", (req, res) => {
console.log(colors.cyan("Log out!"));
res
.clearCookie("username")
.cookie("message", "You have successfully logged out!")
.redirect("/");
});
Save the index.js file. Play around with the application; log in and out, try to visit dashboard when you are already logged in or after you have logged out. The app is coming together 😃.
Step 18
Notice that you can edit the value of a cookie in developer tools:
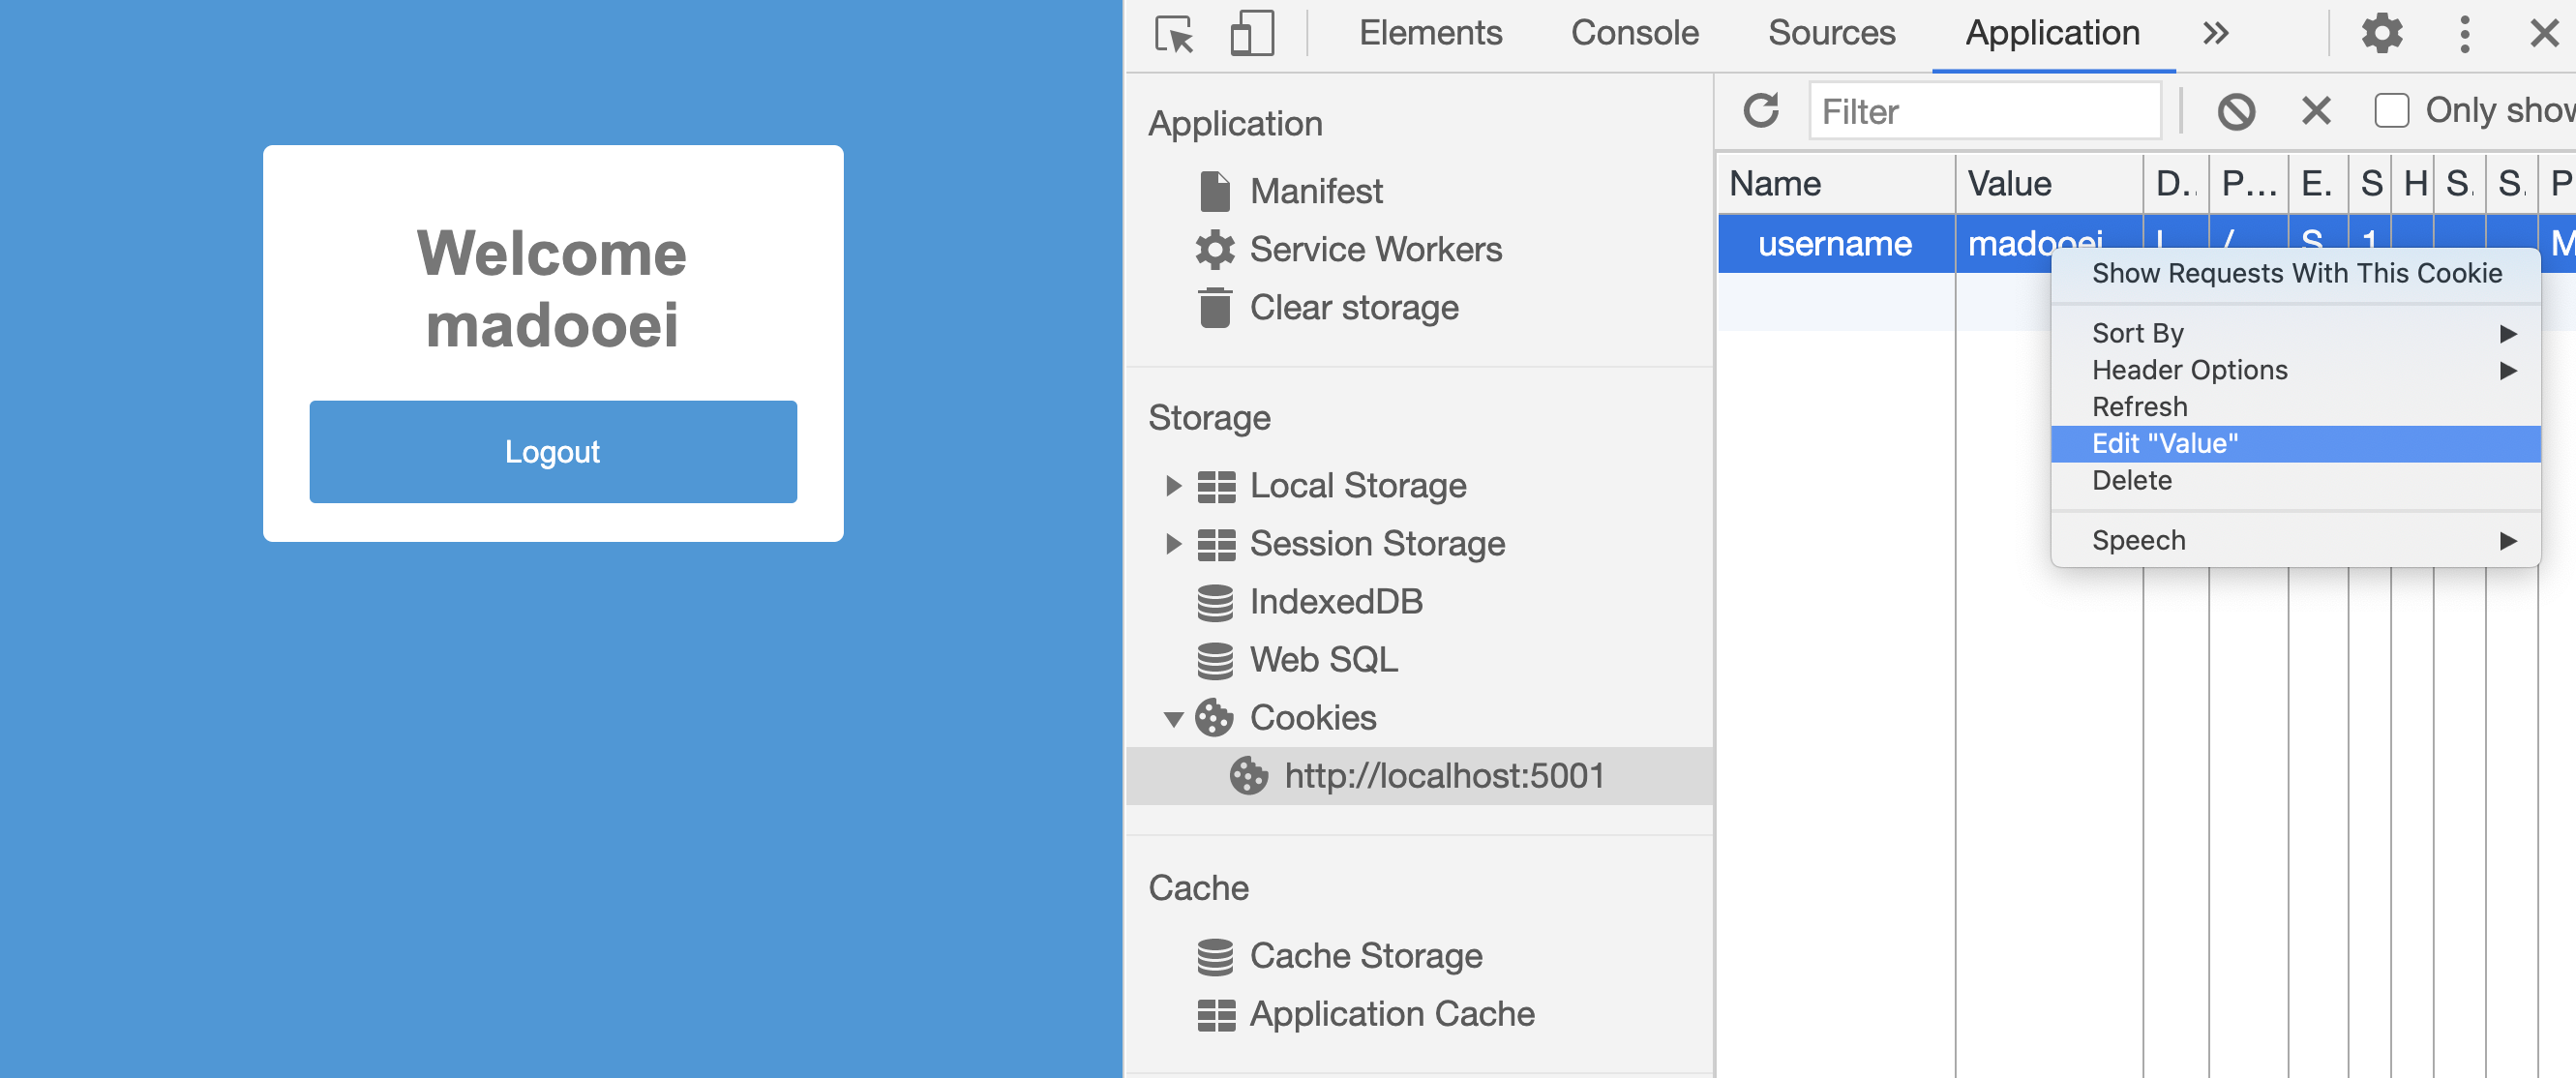
You can even create a cookie, username, and give it a value. That would mean tricking our app to think a user has already logged in.
One strategy to mitigate this issue is to "sign" (encrypt) the "username" cookie.
To make signed (encrypted) cookie, you must first provide an encryption key to the cookieParser function:
app.use(cookieParser(process.env.ENCRYPT_KEY));
Update your .env file and add an ENCRYPT_KEY variable
DB_URI="YOUR-URI-GOES-HERE"
ENCRYPT_KEY="SOME_SECRET_PHRASE"
Next, you must provide an option when you create the "username" cookie to indicate you want this cookie to be signed:
- res.cookie("username", user.username).redirect(`/dashboard`);
+ res
+ .cookie("username", user.username, { signed: true })
+ .redirect(`/dashboard`);
Finally, you must change every instance of reading the "username" cookie, to read it as a signed cookie:
- const username = req.cookies.username;
+ const username = req.signedCookies.username;
Save the index.js file. Log in using a valid credential and then investigate the cookie generated for the user. For example, I've logged in using the user name madooei and this is the content of username cookie on my browser:
s%3Amadooei.M5UVfPbyTAEE65zH1I401zdu4Kty6EQkkoncj1J1qyk
Notice the madooei is still part of the cookie. If I manually change the cookie however, (for example, change the madooei part to ali) and refresh the dashboard, it will recognize that I have tampered with the cookie and take me to the login page.
A better, more secure, strategy to encode your cookies is using Json Web Token (JWT). We will not cover this here but you can read more about it following these resources:
- What are JSON Web Tokens? JWT Auth Tutorial
- JSON Web Tokens (JWTs) in Express.js
- Authentication and Authorization with JWTs in Express.js
- A Practical Guide for JWT Authentication Using Node.js and Express
Step 19
Another useful property of cookies is expiration time. Have you noticed some web services require you to login after certain time has passed since you last logged in? The JHU authentication works this way. Sometimes I need to login several times in a day to access my email through their webmail service (which I find annoying). Other services, like Gmail and YouTube, keep you logged in until you log out.
Update where the username cookie is set:
- res
- .cookie("username", user.username, { signed: true })
- .redirect(`/dashboard`);
+ res
+ .cookie("username", user.username, { signed: true, maxAge: 2000 })
+ .redirect(`/dashboard`);
Save index.js. Login using a valid credential. Give it 2 seconds and then refresh! You must be redirected to login page!!
The maxAge value is in milliseconds. I will set it to 2 hours for this application:
res
.cookie("username", user.username, { signed: true, maxAge: 7200000 })
.redirect(`/dashboard`);
There is so much you can do with cookies. If you want more, you must store information pertaining to user login and visits on the server side (backend). The technical term often used to contrast this alternative strategy from using (Web) cookies, is using (Web) "sessions".
A session can be defined as a server-side storage of information that is desired to persist throughout the user's interaction with the web site or web application.
Cookies are still used with sessions but typically the cookie for an application contains an identifier for a session.
We will not cover web sessions. If you are interested, here are some helpful resources:
- What is a web session?
- How does a web session work?
- Difference between Cookie and Session.
- How to build a simple session-based authentication system with NodeJS from scratch.
- All You Ever Wanted to Know About Sessions In NodeJS.
Step 20
Let's fix a huge security risk in our application!
You should never store users' password in a database! You must encode the password and store the encoded version.
We are going to follow the recommendation made in How To Safely Store A Password which essentially recommends using the bcrypt password-hashing function.
Stop the application and install the bcrypt package:
npm install bcrypt
Import the package in index.js:
const bcrypt = require("bcrypt");
Update where you create and save user:
- const user = await users.create({ username, password });
+ const hash = await bcrypt.hash(password, 10);
+ const user = await users.create({ username, password: hash });
Notice the 10 is the value for "salt round" which is the cost factor in BCrypt algorithm. The cost factor controls how much time is needed to calculate a single BCrypt hash. The higher the cost factor, the more hashing rounds are done. Increasing the cost factor by 1 doubles the necessary time. The more time is necessary, the more difficult is brute-forcing.
Save index.js and run the application again. Go to registration page and create a new user account. I created a user with username ali and password 1234 and this is what is now stored in the database:
{
_id: '5facb6581128743f8c9f7a8c',
username: 'ali',
password: '$2b$10$FGpyplYOqntwbNJNvfKy1efZA1LGSTOn3H9gemDVOVlwf3KqWnIle',
__v: 0
}
When you authenticate user, you need to use the bcrypt package:
- const user = await users.findOne({ username, password });
+ const user = await users.findOne({ username });
if (!user) throw Error("No user found with this username!");
+ const authorized = bcrypt.compare(password, user.password);
+ if (!authorized) throw Error("Invalid password!");
Save index.js and ensure you can login with the credential you have created after adding bcrypt to this application.
Another potential addition to our Users App is a process to validate password complexity to enforce users provide strong passwords. There are node packages that help you with this, for example joi-password-complexity, which I encourage you to explore on your own.
The complete application is here: https://github.com/cs280fall20/users-app.
React
There are many frameworks and libraries that facilitate development of Web application, in particular its front-end component, the user interface, or UI.
Among these, React is perhaps the most popular. It was developed by a group of Facebook engineers, initially at Facebook.
In this module we learn to work with React. As a first step, we will rebuild our good old SleepTime App in React!
React has a great documentation and set of tutorials on its Website. The best place to learn React is there! I also found this article to have a good overview: The Missing Introduction to React.
Here are some other reads you may be interest in:
- Why did we build React?
- Yes, React is taking over front-end development. The question is why.
- Stop Using React for EVERYTHING!
Step 1
There are several different ways to create a React application. Consult the documentation here.
We are going to use NPM's package runner, NPX, for scaffolding our React app using the create-react-app package.
npx create-react-app sleep-time-react
The
create-react-appis a command-line tool that scaffolds a React application.
Using create-react-app, there is no need to install or configure module bundlers like Webpack, or transpilers like Babel. These come preconfigured (and hidden) with create-react-app, so you can jump right into building your app!
Change directory to sleep-time-react. Run the application:
npm run tart
Point your browser to http://localhost:3000/
Step 2
Let's explore the Node project created by create-react-app:
sleep-time-react
├── README.md
├── node_modules
├── package.json
├── .gitignore
├── public
│ ├── favicon.ico
│ ├── index.html
│ ├── logo192.png
│ ├── logo512.png
│ ├── manifest.json
│ └── robots.txt
└── src
├── App.css
├── App.js
├── App.test.js
├── index.css
├── index.js
├── logo.svg
├── serviceWorker.js
└── setupTests.js
We are going to strip down the application to the bare minimum!
Delete everything except for index.html in the public folder. Moreover, update the index.html file to the following minimal content:
<!DOCTYPE html>
<html lang="en">
<head>
<meta charset="utf-8" />
<meta name="viewport" content="width=device-width, initial-scale=1" />
<title>SleepTime App</title>
</head>
<body>
<div id="root"></div>
</body>
</html>
The index.html is a template where UI components will be added to the "root" (<div> element with id="root"). If you recall, the second time we were building SleepTime App, we only had <div id="root"></div> inside index.html file and we created the entire app in script.js. (See here to refresh your memory!) A similar approach is taken by React.
Step 3
Delete everything except for App.js and index.js from the src folder. Moreover, update the index.js and App.js as follows:
// index.js
import ReactDOM from "react-dom";
import App from "./App";
ReactDOM.render(<App />, document.getElementById("root"));
// App.js
function App() {
return <div>Hello React!</div>;
}
export default App;
Save the files. Notice the application running in the browser:

Step 4
Let's take a look at App.js file:
function App() {
return <div>Hello React!</div>;
}
export default App;
This looks like a simple function that returns an HTML element. There are several interesting thing about it though!
First, let's notice the HTML element directly used inside JavaScript file!! You cannot normally do this in JavaScript source file. This works because JavaScript files in a React app are "transpiled" before execution. For instance, the code above will be transpiled into the following:
import React from "react";
function App() {
return React.createElement("div", null, "Hello React!");
}
export default App;
So the <div>Hello React!</div> is not truly a HTML element, it it a React element.
A React element is a JavaScript object describing a DOM node (HTML element) and its properties.
To see this, update the App.js as follows:
import React from "react";
function App() {
const elm = React.createElement("div", null, "Hello React!");
console.log(elm);
return elm;
}
export default App;
Save the file, as the app reloads in the browser, open the Developer Tools and notice the elm printed to the console:
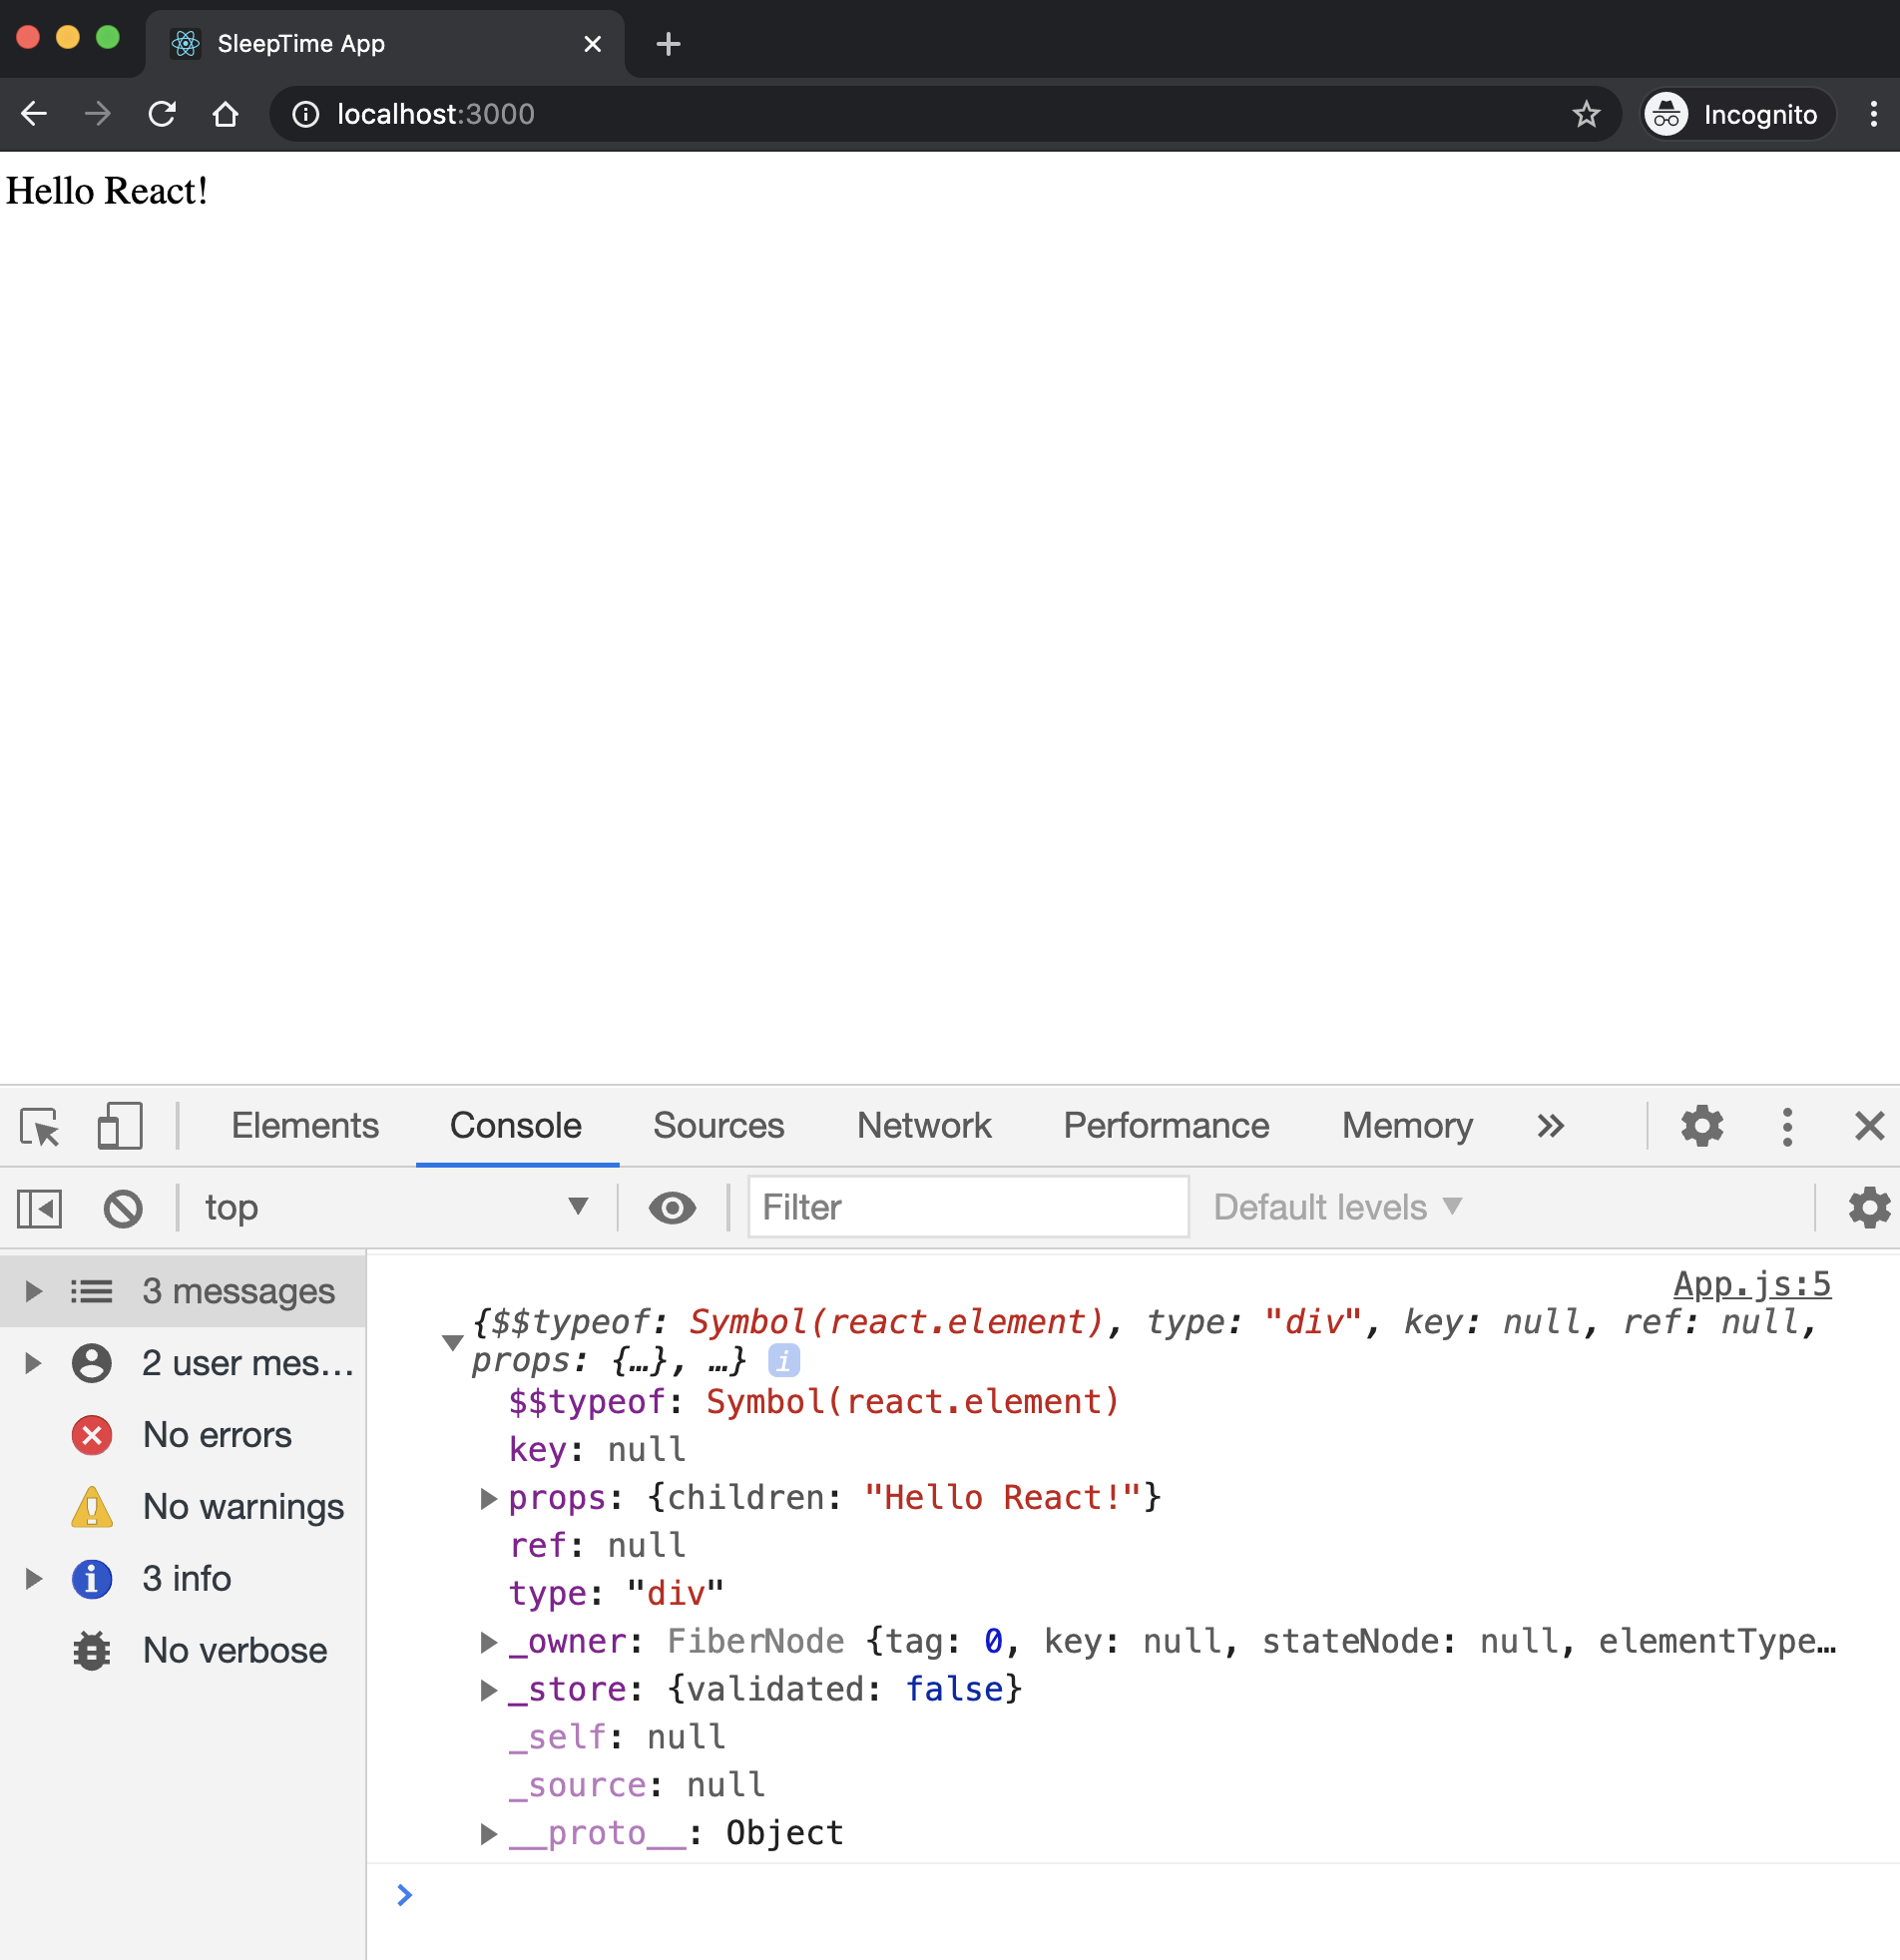
The React element is rendered as an HTML element (DOM node) by the react-dom module. In fact, we can go to the index.js and eliminate the middleman! Simply update the file to the following:
import React from "react";
import ReactDOM from "react-dom";
ReactDOM.render(
React.createElement("div", null, "Hello React!"),
document.getElementById("root")
);
Save the file, as the app reloads in the browser, open the Developer Tools and look at the HTML elements:
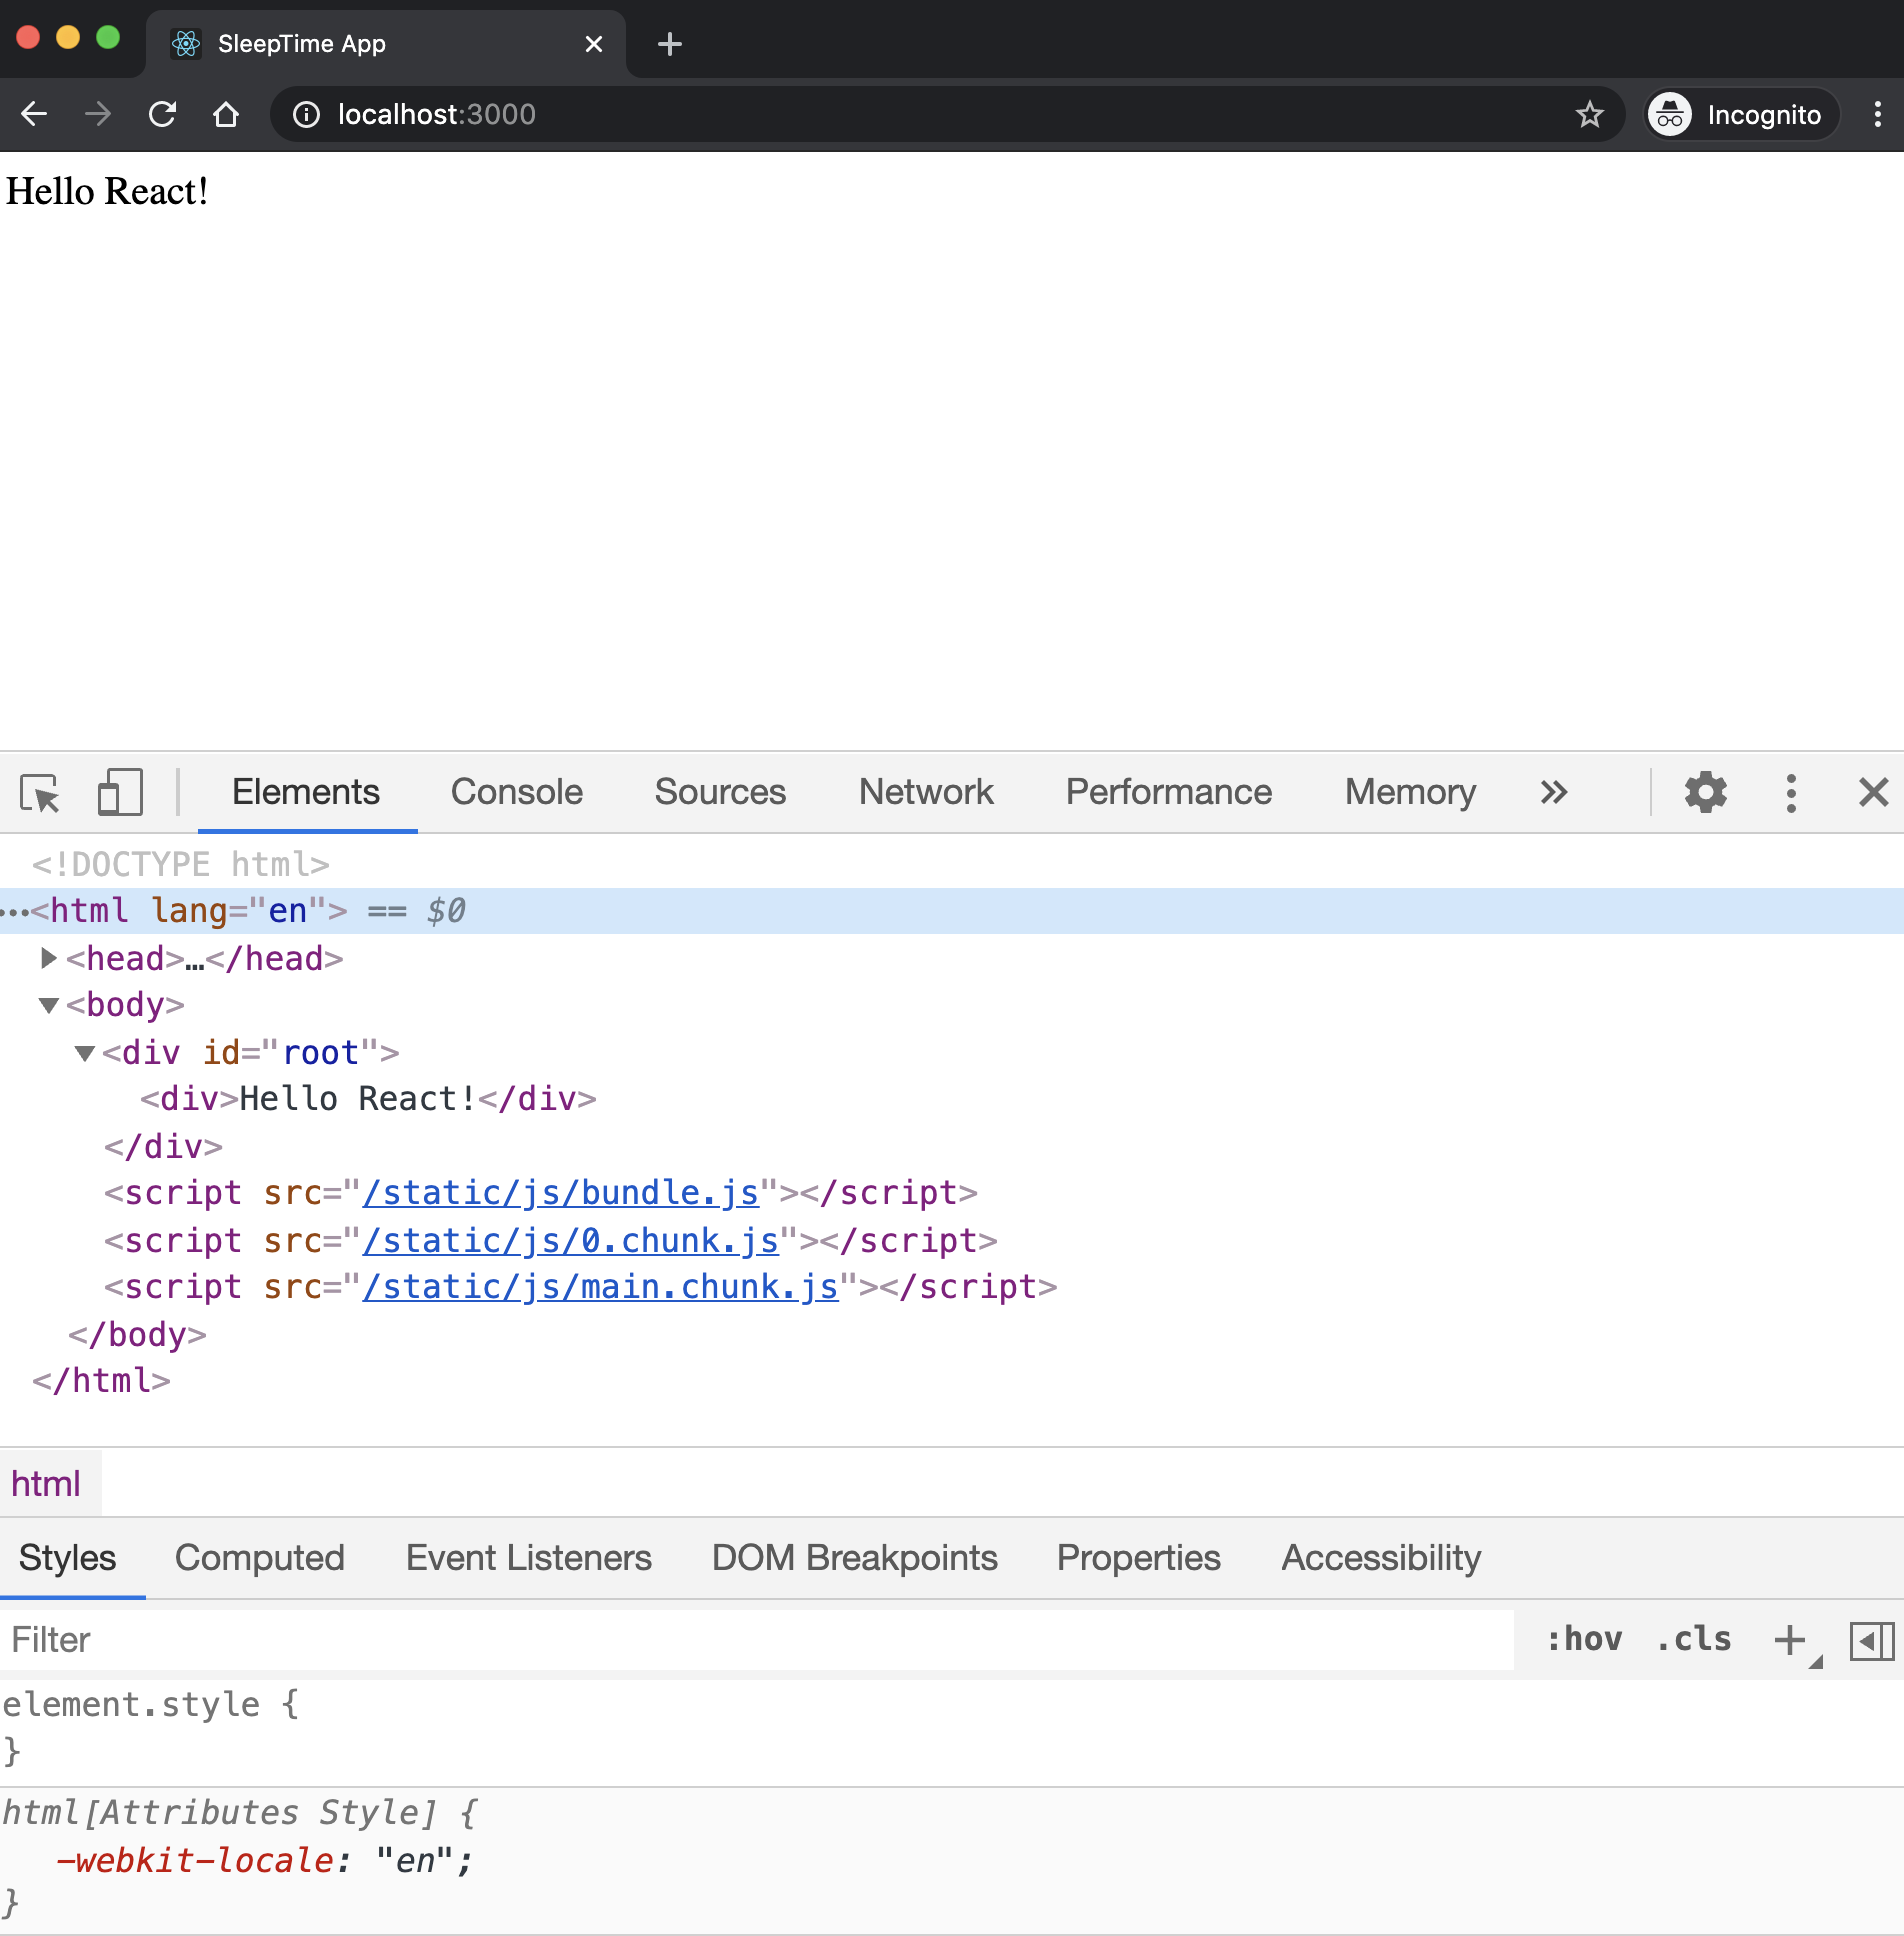
Notice <div>Hello React!</div> is added as a child to <div id="root">.
Aside 1: A React element describes a DOM node (HTML element) but it is a JavaScript object. Some references call this object a Virtual DOM. (Good read: What is the Virtual DOM?)
Aside 2: To create a React element, you can use React's createElement() method. It's syntax is:
React.createElement(/* type */, /* props */, /* content */);
We will, however, use JSX syntax to create React elements (as in <div>Hello React!</div> instead of React.createElement("div", null, "Hello React!")). We will talk about JSX in more details, shortly.
Step 5
Undo the changes we've made to App.js and index.js:
// App.js
function App() {
return <div>Hello React!</div>;
}
export default App;
// index.js
import ReactDOM from "react-dom";
import App from "./App";
ReactDOM.render(<App />, document.getElementById("root"));
Notice we import the App in index.js (and, also notice, we use ES6 modules with import/export statements).
The separation between the App.js and index.js is symbolic!
The philosophy of React is to decouple the process of creating an app and rendering it. So you can create the app and then decide to render it on a server, native devices or even VR environment.
Notice how <App /> looks like an HTML element (with angle brackets and all!). This is a React component.
A Component is a building block in React that is ultimately responsible for returning HTML to be rendered onto a page.
Just as you can compose functions or classes to create more complex solutions/models, you can compose simpler components to create more complex ones.
<Page>
<Sidebar />
<Article />
</Page>
React builds up pieces of a UI using Components.
Components can be classes or functions. This is a function component:
function App() {
return <div>Hello React!</div>;
}
export default App;
Here is the same component as a class:
import React from "react";
class App extends React.Component {
render() {
return <div>Hello React!</div>
}
}
export default App;
Notice the class component is more verbose. It has a render method that returns a react element. A class component allows us to declare state and benefit from inheritance. However, if you don't need those perks, go for function components. Prefer the simplicity of functions.
Step 6
Let's update the App.js:
function App() {
return (
<div>
<p>If you go to bed NOW, you should wake up at...</p>
<button>zzz</button>
<p>It takes the average human fourteen minutes to fall asleep.</p>
<p>
If you head to bed right now, you should try to wake up at one of the
following times:
</p>
<p>11:44 PM or 1:14 AM or 2:44 AM or 4:14 AM or 5:44 AM or 7:14 AM</p>
<p>A good night's sleep consists of 5-6 complete sleep cycles.</p>
</div>
);
}
export default App;
Save the file and reload the app:
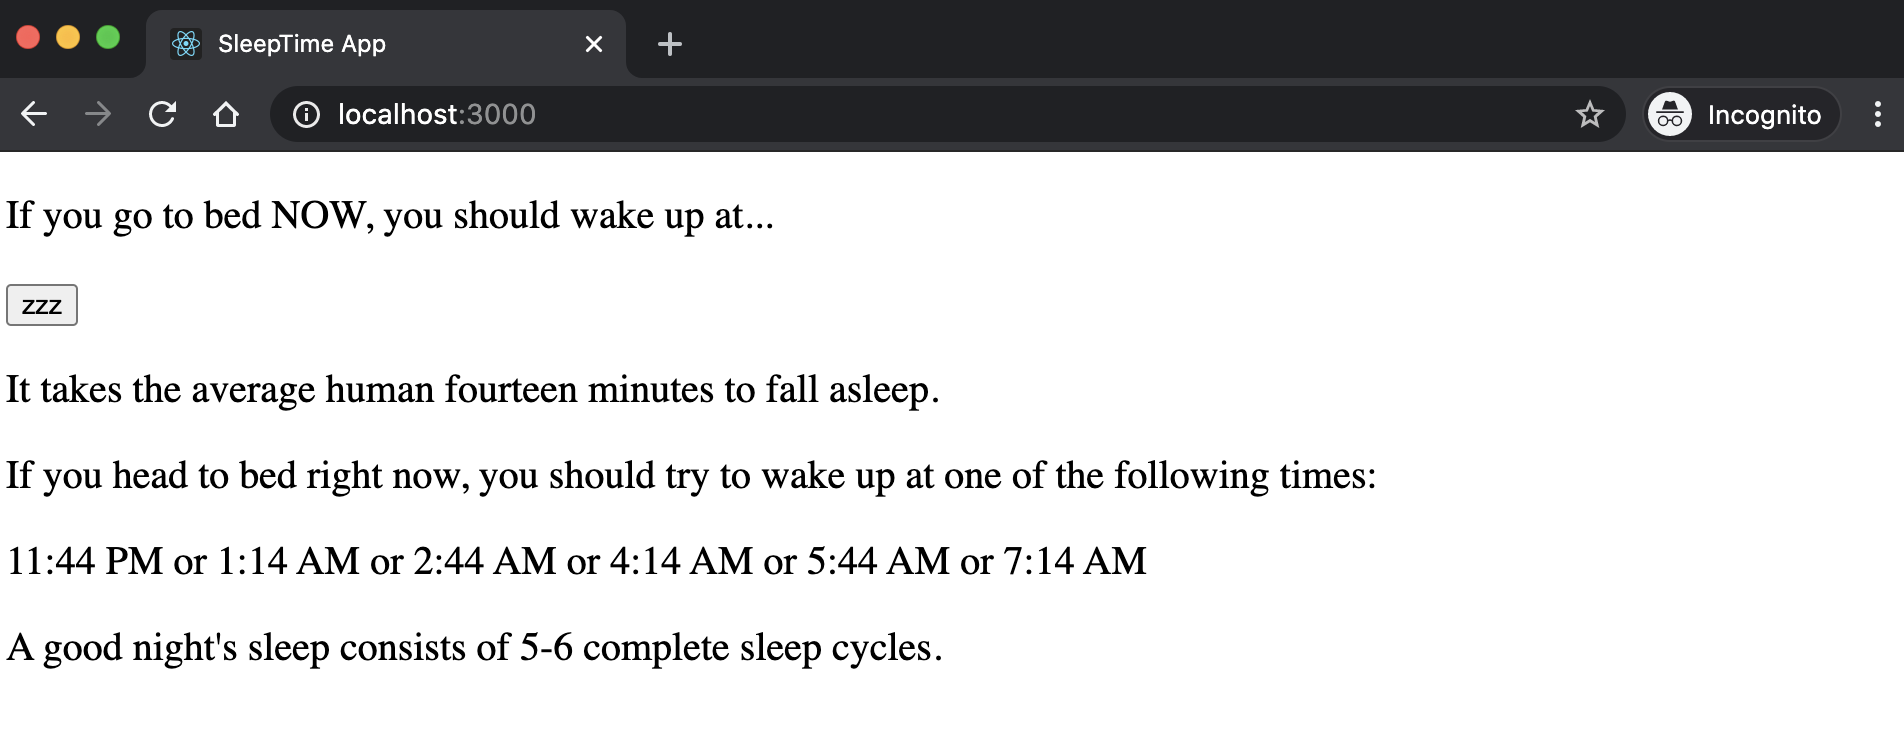
Notice how easy it is to mix HTML and JavaScript! This is possible due to JSX.
JSX is a syntax extension to JavaScript that allows us to mix JavaScript with HTML.
Good reads: Introducing JSX on React Docs, and What the heck is JSX and why you should use it to build your React apps by freeCodeCamp.
We will use JSX with React to describe what the UI should look like.
JSX is, in many ways, like a template language (such as Nunjucks), but it is more versatile as it comes with the full power of JavaScript. (Besides, you don't need to learn a new syntax specifically designed for a template language).
Template languages such as Nunjucks are closer to HTML than JavaScript. JSX, on the other hand, is closer to JavaScript than HTML.
There is a lot that can be done with JSX. There are some gotchas and nuances too! We will explore these as we build React applications. For an impatient reader, I recommend reading JSX in-depth on React Docs.
Step 7
A great mindset to have when building React apps is to think in Components.
Components represent the modularity and reusability of React.
Let's break out the SleepTime App into two components:
- The main app, in
App.js(including the logic to compute sleep cycles). - The output, in
Output.js
Create a file Output.js with this content:
function Output() {
return (
<div>
<p>It takes the average human fourteen minutes to fall asleep.</p>
<p>
If you head to bed right now, you should try to wake up at one of the
following times:
</p>
<p>11:44 PM or 1:14 AM or 2:44 AM or 4:14 AM or 5:44 AM or 7:14 AM</p>
<p>A good night's sleep consists of 5-6 complete sleep cycles.</p>
</div>
);
}
export default Output;
Notice that we must wrap the output elements in a single element (the outer div). Each React component returns a single React element.
Now update App.js as follows:
import Output from "./Output.js";
function App() {
return (
<div>
<p>If you go to bed NOW, you should wake up at...</p>
<button>zzz</button>
<Output />
</div>
);
}
export default App;
Step 8
Let's update the Output.js to dynamically render the sleep cycles:
function Output() {
const cycles = [
"11:44 PM",
"1:14 AM",
"2:44 AM",
"4:14 AM",
"5:44 AM",
"7:14 AM",
];
return (
<div>
<p>It takes the average human fourteen minutes to fall asleep.</p>
<p>
If you head to bed right now, you should try to wake up at one of the
following times:
</p>
<ul>
{cycles.map((cycle) => (
<li>{cycle}</li>
))}
</ul>
<p>A good night's sleep consists of 5-6 complete sleep cycles.</p>
</div>
);
}
export default Output;
Save the file and see the output:
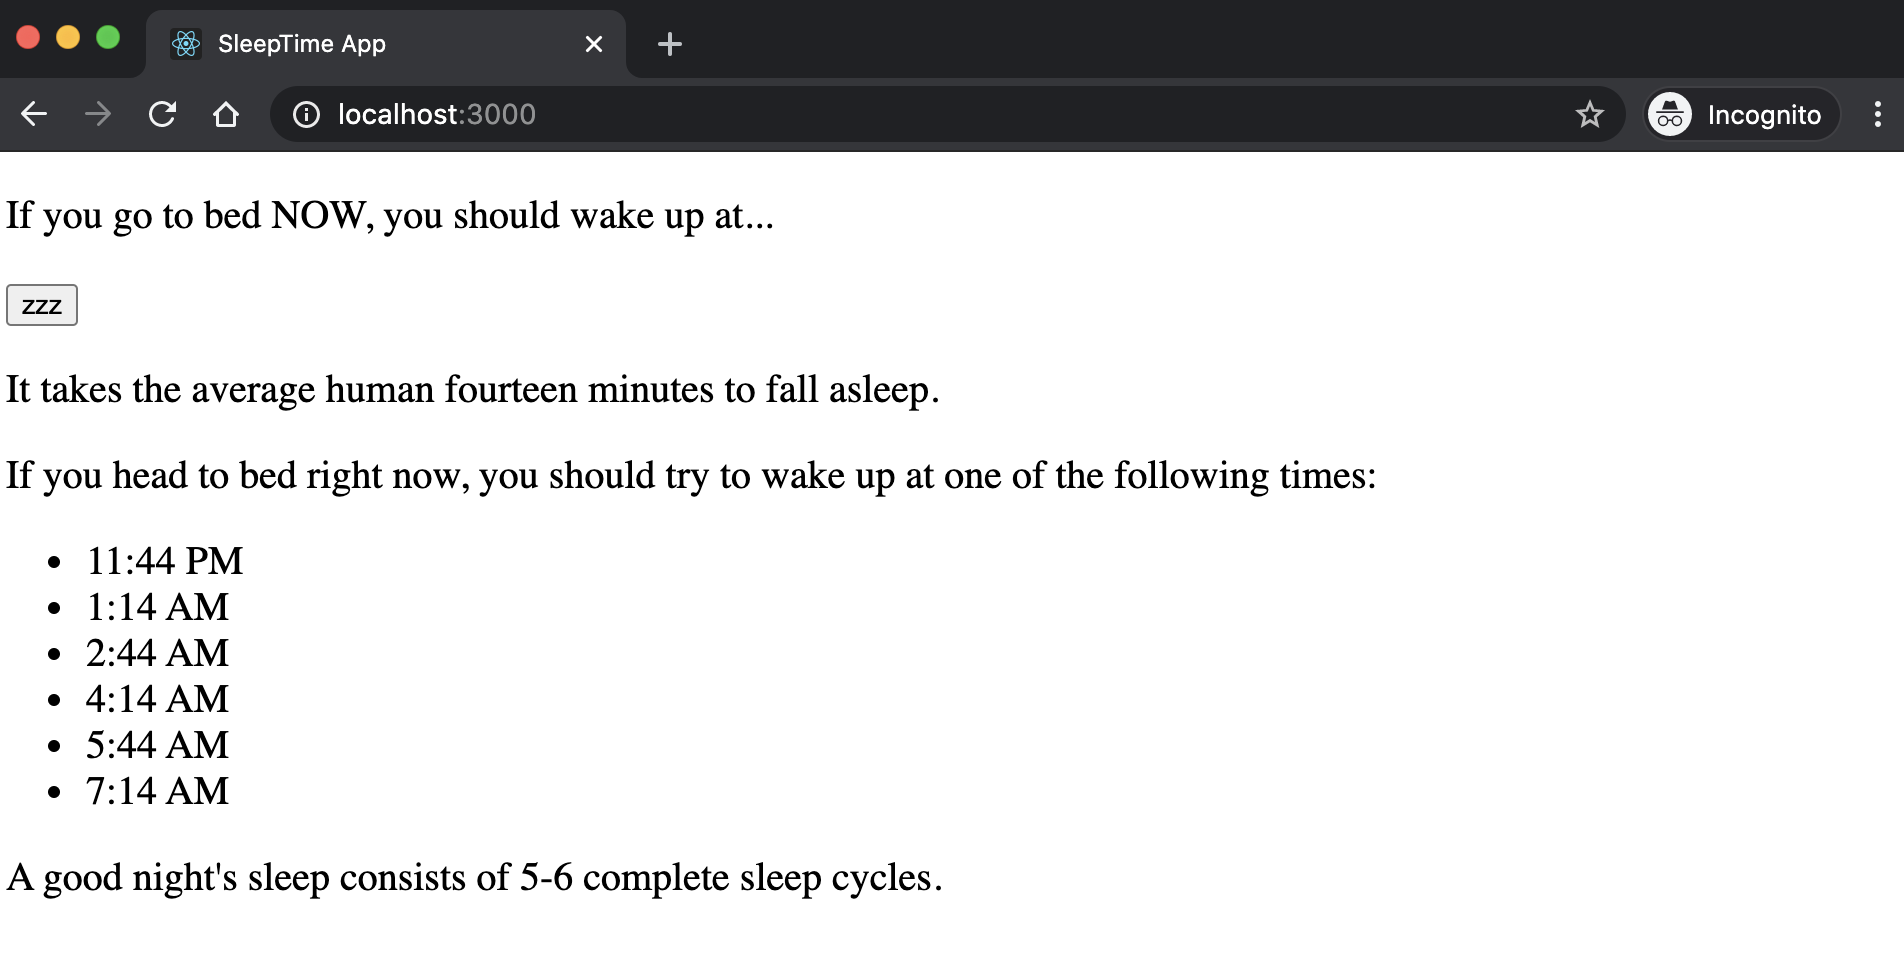
Notice the cycles are displayed in an unordered list. I've made this change so we can work with a slightly more complex JSX syntax:
<ul>
{cycles.map((cycle) => (
<li>{cycle}</li>
))}
</ul>
When we mix JavaScript with HTML in JSX, we must put the JavaScript bits in
{}.
Open the Developer Tool in the browser and notice a warning printed to the terminal:
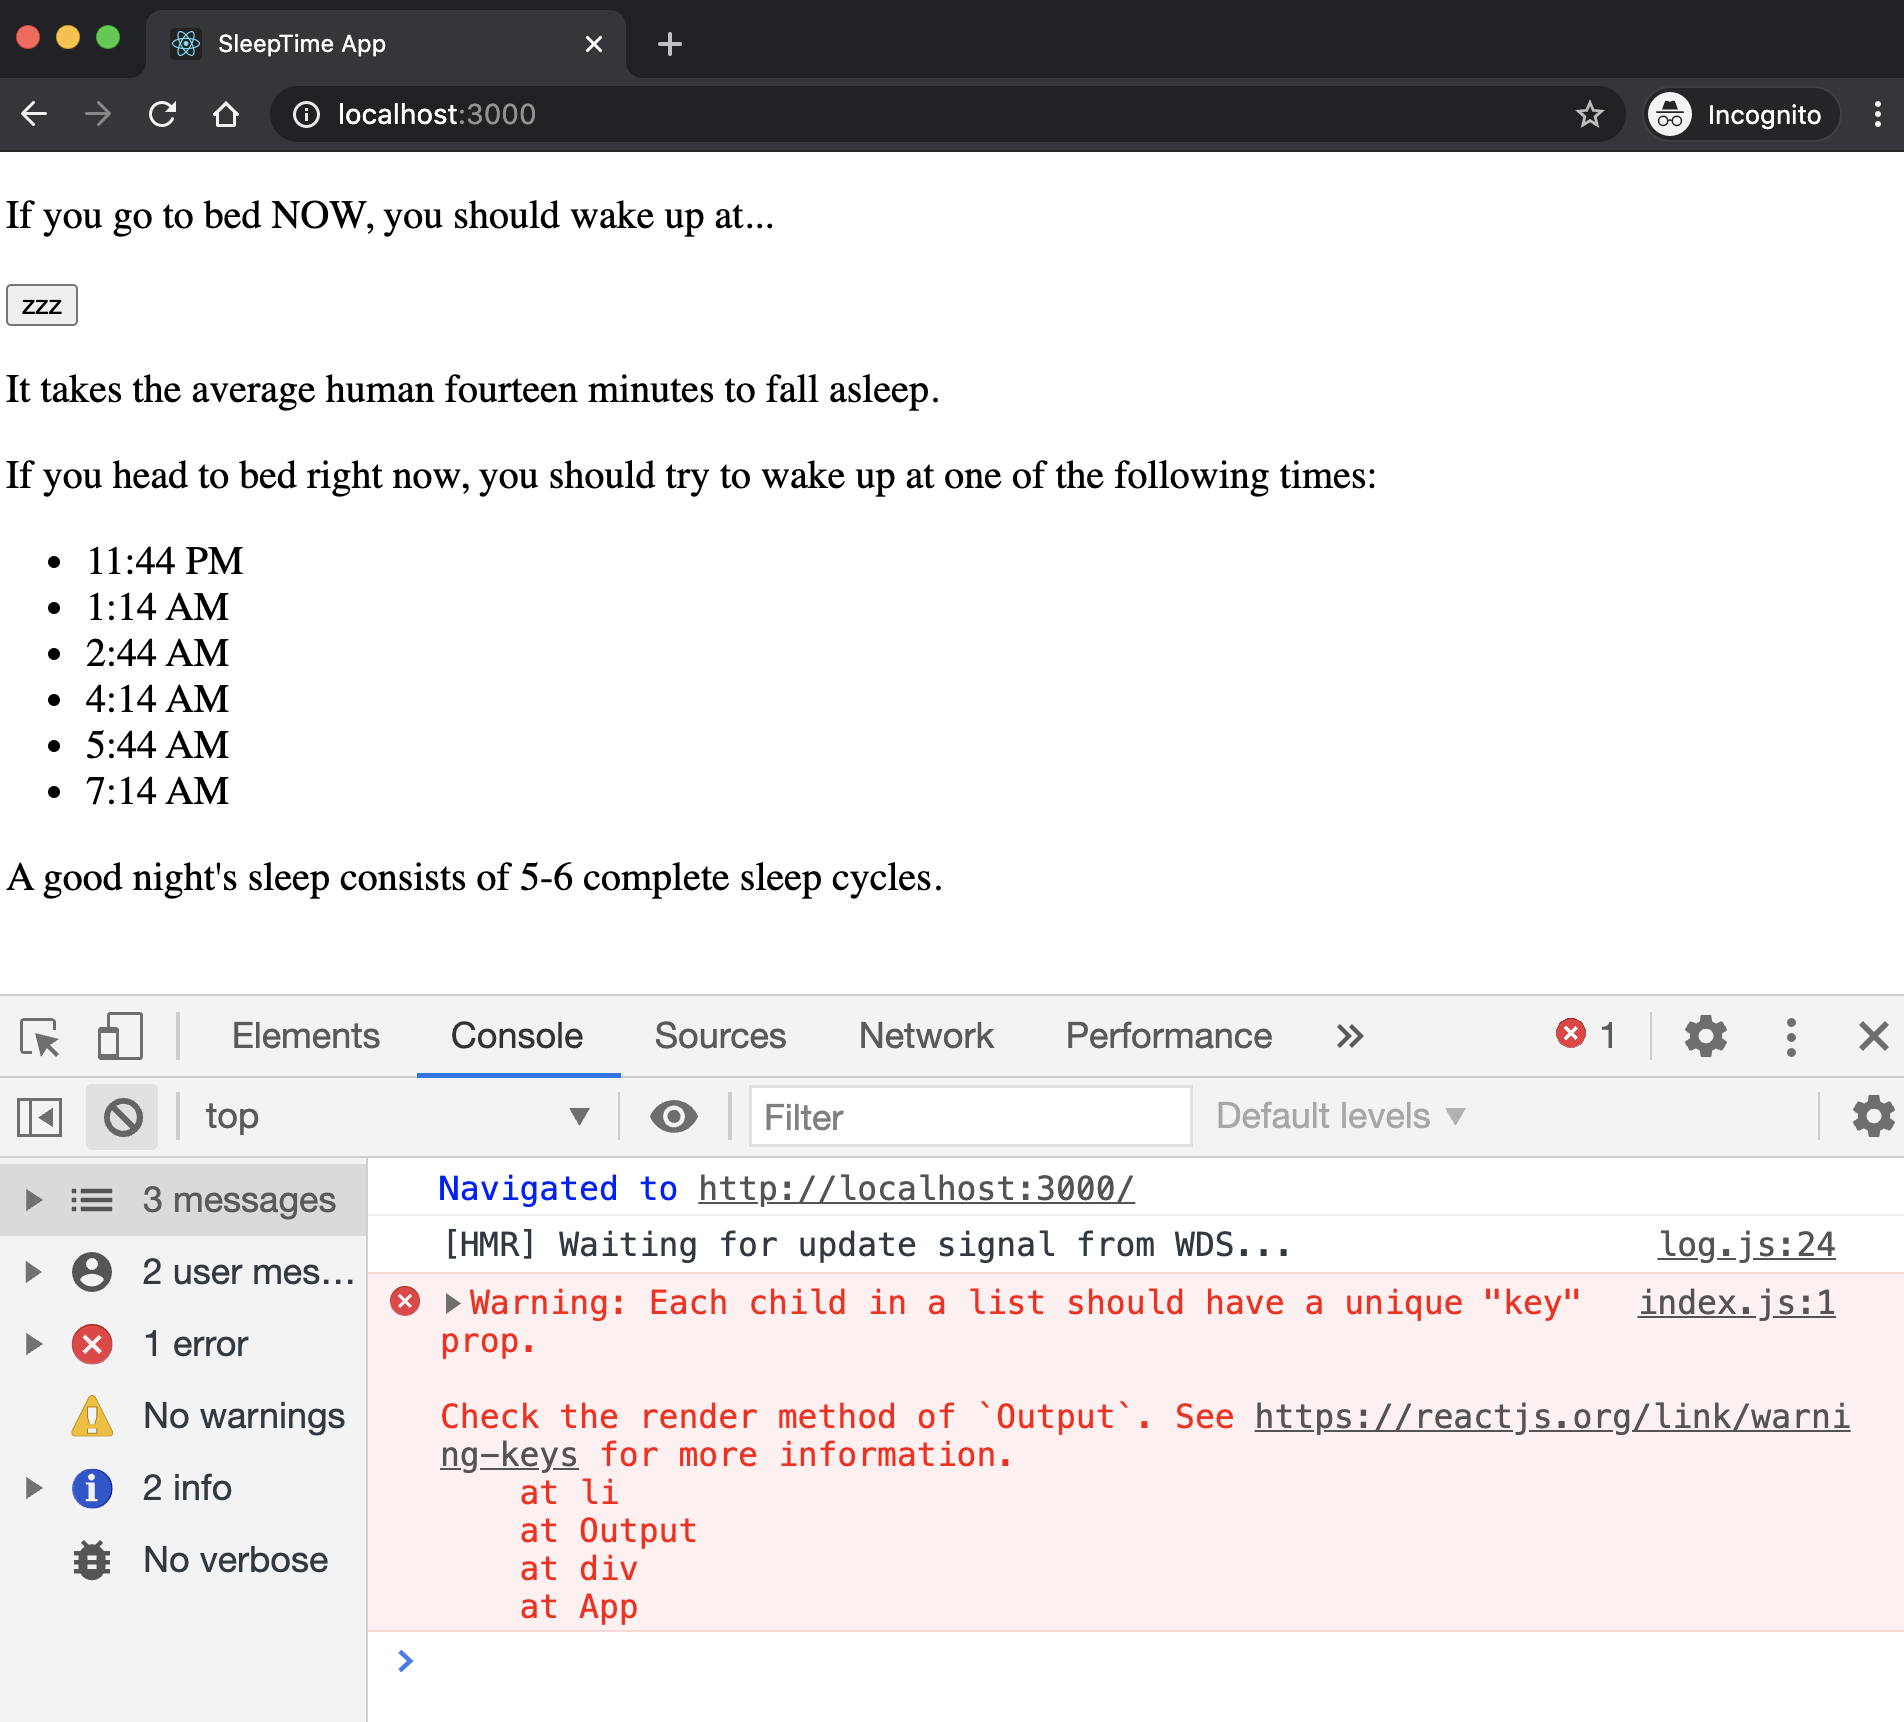
The warning says, each child in a list must have a unique key. The key helps React to track changes in the child elements, as the state changes in the app. Here is a simple fix:
<ul>
{cycles.map((cycle, index) => (
<li key={index}>{cycle}</li>
))}
</ul>
JSX may feel strange and you may be confused when first starting using it. In my experience though, you will quickly get the hang of it, and then it will increase your coding productivity.
Step 9
The Output component does not generate the sleep cycle hours. It must receive it. Let's pass this data from App component to Output component.
Move the cycles from Output.js to App.js:
import Zzz from "./Zzz.js";
import Output from "./Output.js";
function App() {
const cycles = [
"11:44 PM",
"1:14 AM",
"2:44 AM",
"4:14 AM",
"5:44 AM",
"7:14 AM",
];
return (
<div>
<p>If you go to bed NOW, you should wake up at...</p>
<Zzz />
<Output cycles={cycles} />
</div>
);
}
export default App;
Notice how cycles is passed to Output component:
<Output cycles={cycles} />
In React jargons, cycles is called "props". Just like we use arguments to pass data to functions, we use props to pass data to React Components.
A prop is any input that you pass to a React component.
Just like an HTML attribute, a prop is declared as name and value pair when added to a Component. (Props is short for properties - Good read: What is “Props” and how to use it in React?.)
We now update the Output.js:
function Output(props) {
return (
<div>
<p>It takes the average human fourteen minutes to fall asleep.</p>
<p>
If you head to bed right now, you should try to wake up at one of the
following times:
</p>
<ul>
{props.cycles.map((cycle, index) => (
<li key={index}>{cycle}</li>
))}
</ul>
<p>A good night's sleep consists of 5-6 complete sleep cycles.</p>
</div>
);
}
export default Output;
The "props" passed to a Component are collected as name/value properties in one object called props. If you have a function component, the props will be passed to the function as an argument:
function Output(props) {
// to get the "cycles" array use props.cycles
}
Aside: If you use Class component, the props will be passed to its constructor as an argument:
class MyComponent extends React.Component {
constructor(props) {
super(props);
}
// you can use this.props anywhere in this class
// to get the "cycles" array use this.props.cycles
}
Step 10
Let's refactor the App component to a class component:
import { Component } from "react";
import Output from "./Output.js";
class App extends Component {
constructor(props) {
super(props);
this.cycles = [
"11:44 PM",
"1:14 AM",
"2:44 AM",
"4:14 AM",
"5:44 AM",
"7:14 AM",
];
}
render() {
return (
<div>
<p>If you go to bed NOW, you should wake up at...</p>
<button>zzz</button>
<Output cycles={this.cycles} />
</div>
);
}
}
export default App;
Notice the alternative approach to using React.Component class is to directly import the Component class.
Let's add a method to calculate the cycles:
calcCycles() {
// get current time
let now = Date.now(); // in milliseconds
let minute = 60 * 1000; // milliseconds
let cycle = now;
// allow 14 minutes to fall sleep
cycle += 14 * minute;
// calculate 6 sleep cycles (each 90 minutes)
for (let i = 0; i < 6; i++) {
cycle += 90 * minute;
// update the sleep cycles
this.cycles[i] = new Date(cycle).toLocaleTimeString([], {
hour: "2-digit",
minute: "2-digit",
});
}
// print cycles for sanity check
console.log(this.cycles);
}
Now we need to attach this method to the zzz button:
<button onClick={this.calcCycles}>zzz</button>
Save the file and reload the app. Then click on zzz button. Notice you will get an error message!
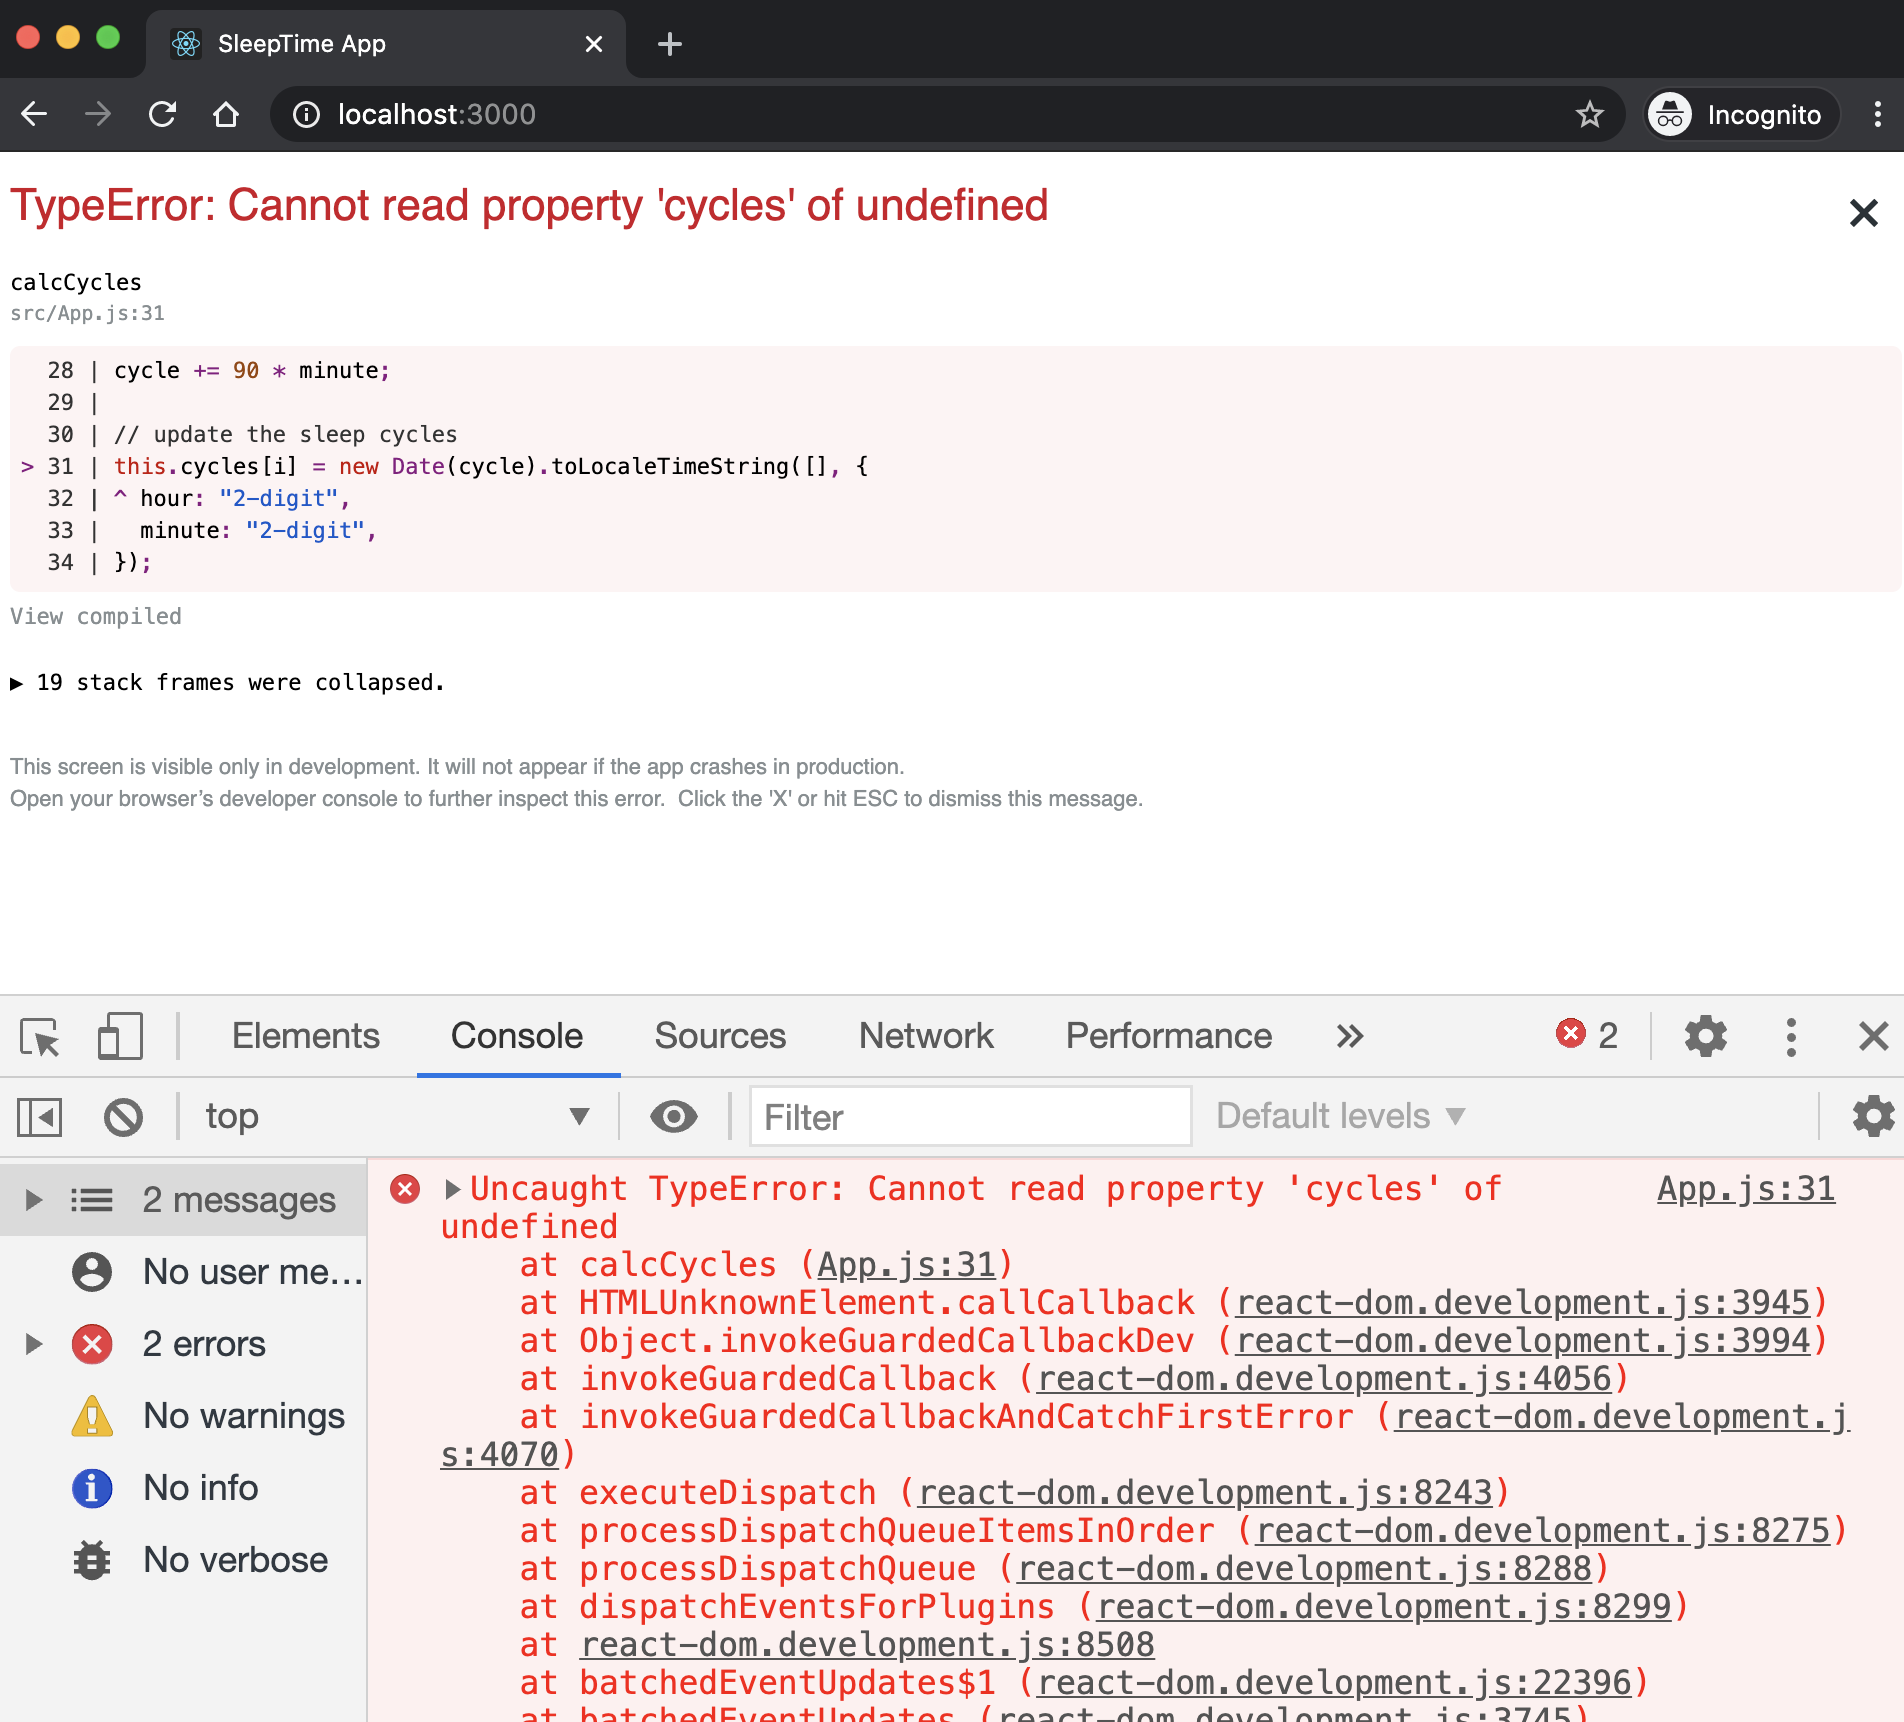
The problem is related to the execution context of calcCycle. The transpiler used in React does not bind the methods to the object of class. To solve this, you can use the bind method as follows:
<button onClick={this.calcCycles.bind(this)}>zzz</button>
If you have a method that you are going to use in multiple places, then you may want to bind it to the class object once, in the class constructor:
constructor(props) {
super(props);
this.cycles = [
"11:44 PM",
"1:14 AM",
"2:44 AM",
"4:14 AM",
"5:44 AM",
"7:14 AM",
];
this.calcCycles = this.calcCycles.bind(this);
}
Another alternative is to use arrow functions for method declaration.
calcCycles = () => {
// get current time
let now = Date.now(); // in milliseconds
let minute = 60 * 1000; // milliseconds
let cycle = now;
// allow 14 minutes to fall sleep
cycle += 14 * minute;
// calculate 6 sleep cycles (each 90 minutes)
for (let i = 0; i < 6; i++) {
cycle += 90 * minute;
// update the sleep cycles
this.cycles[i] = new Date(cycle).toLocaleTimeString([], {
hour: "2-digit",
minute: "2-digit",
});
}
// print cycles for sanity check
console.log(this.cycles);
}
Arrow functions do not bind their own
this, instead, they inherit one from the parent scope, which is called "lexical scoping".
Once you fixed the issue, save the file, reload the app and then click on zzz again!
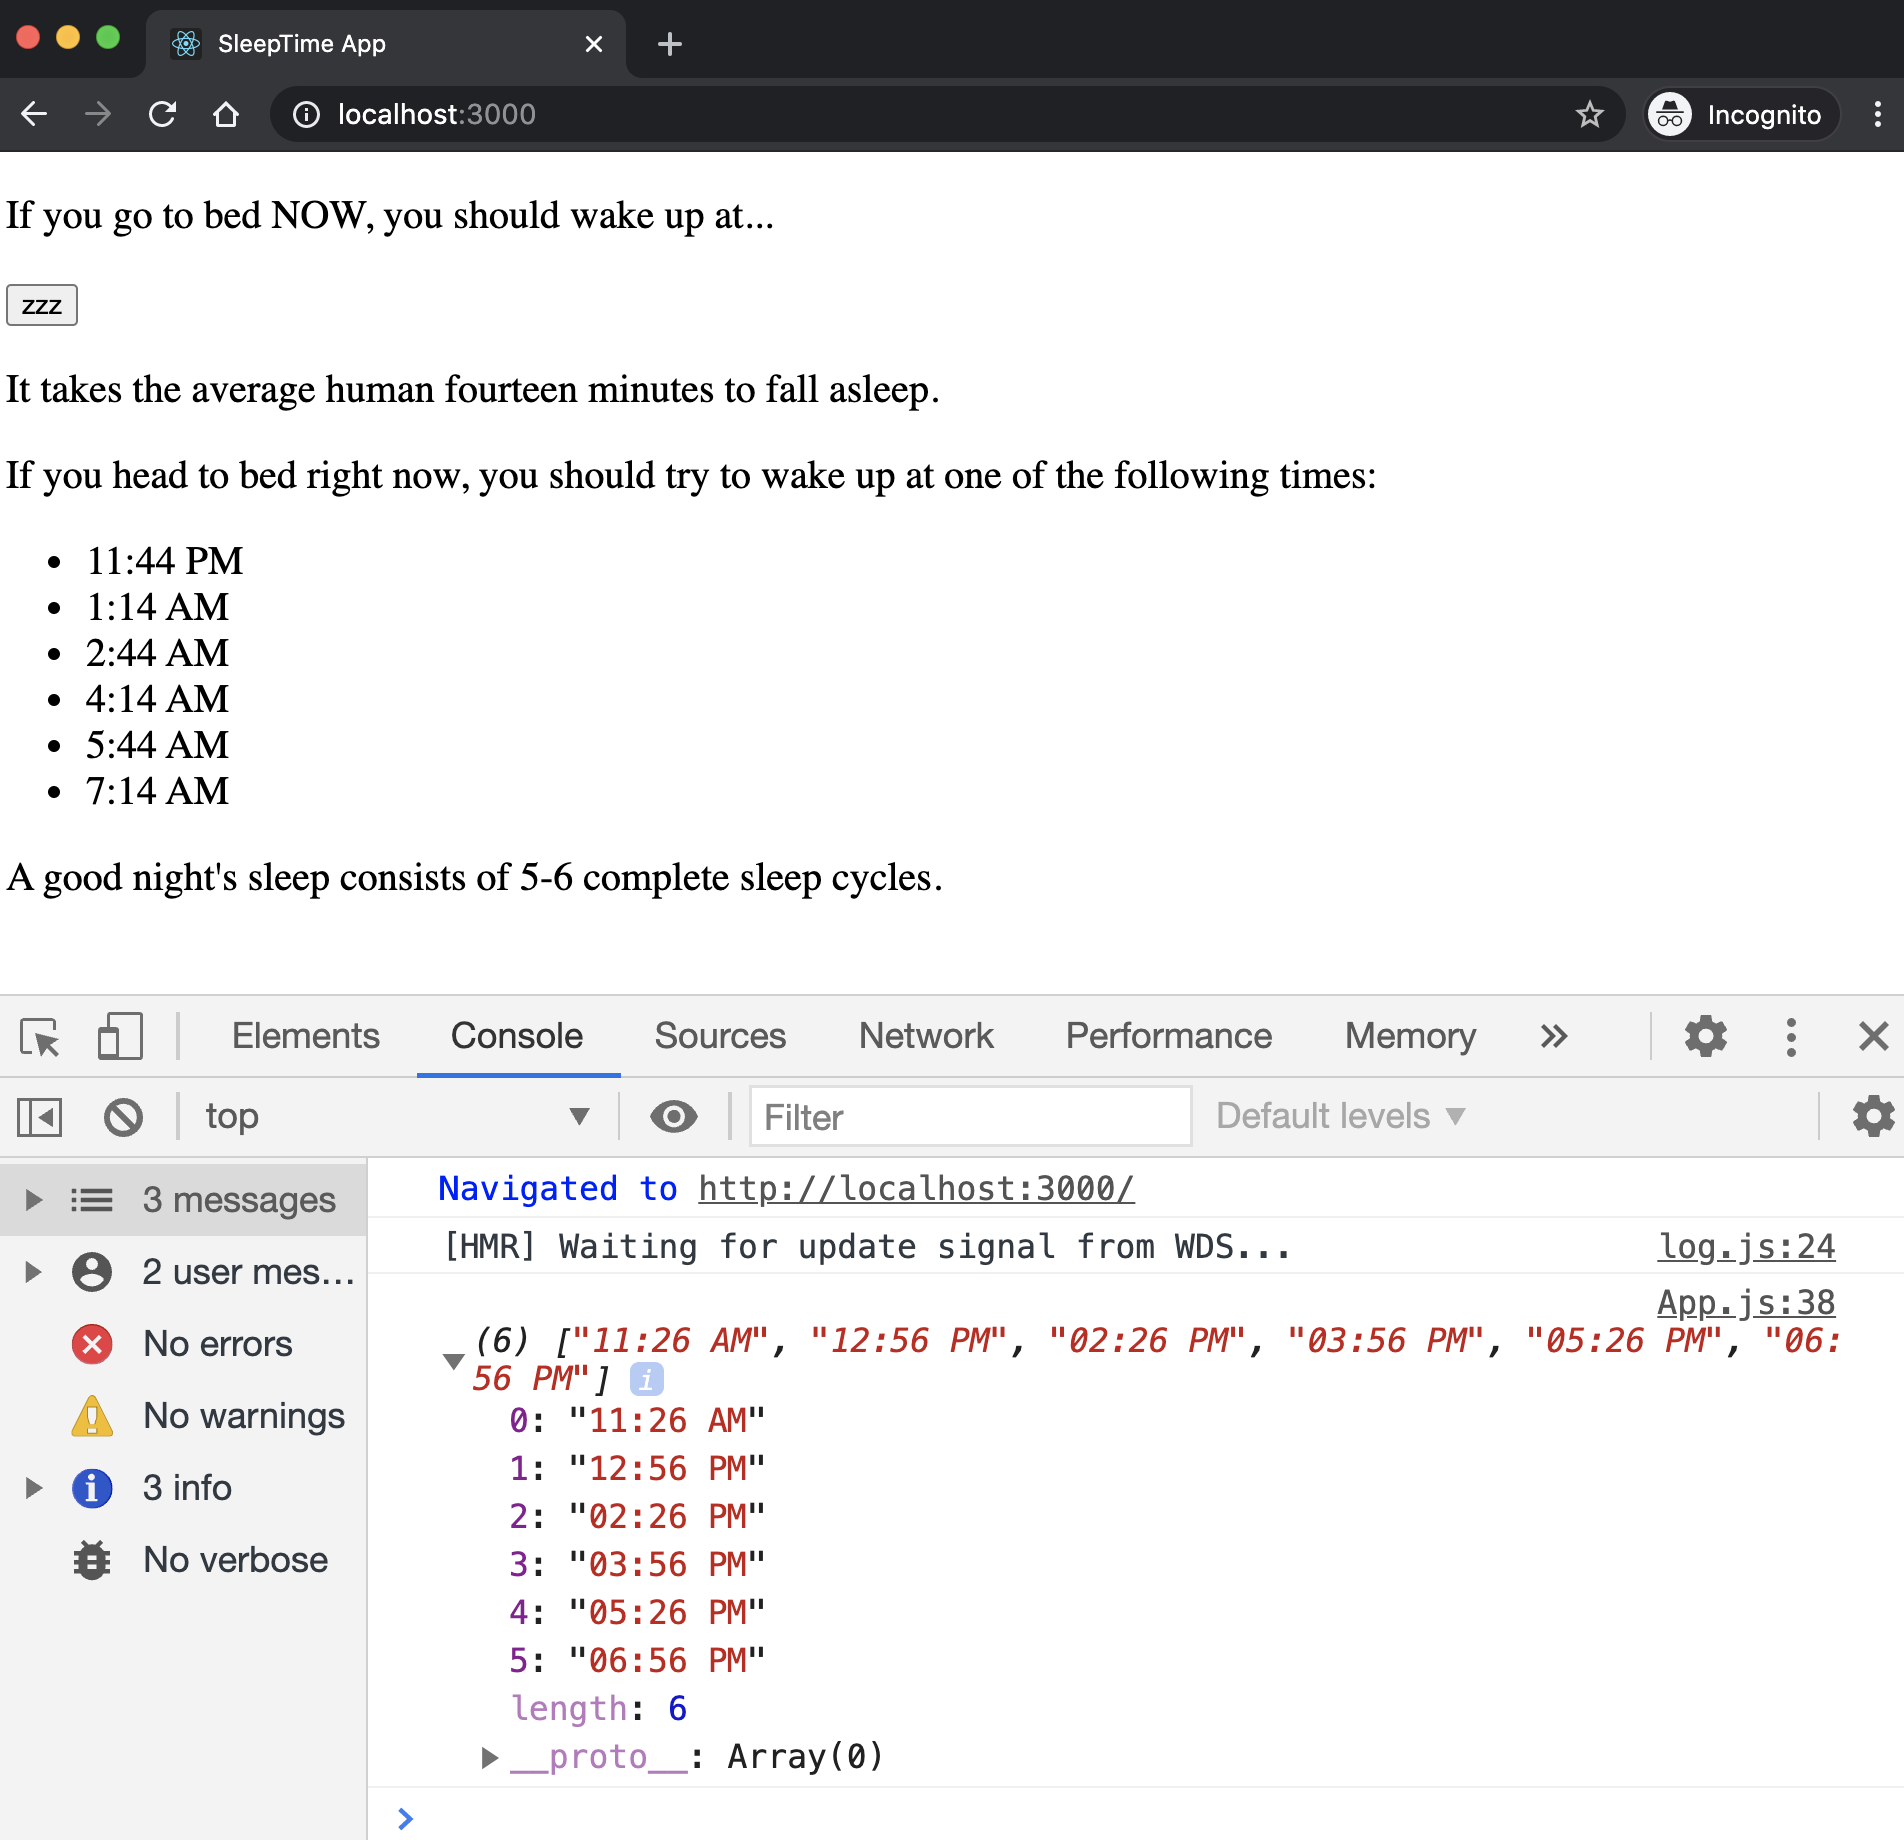
Step 11
We can now generate the cycles but we need to reload (re-render) the Output component to show the new cycles.
This is where "states" come in!
We learned that props refer to data passed from parent components to child components.
The props represent "read-only" data that are meant to be immutable.
So if you are a component, should not modify props that you receive!
A component's state, on the other hand, represents mutable data. The "state" ultimately affects what is rendered on the page.
A component's state is managed internally by the component itself and is meant to change over time, commonly due to user input (e.g., clicking on a button on the page).
By having a component manage its own state, any time there are changes made to that state, React will know and automatically make the necessary updates to the page.
This is one of the key benefits of using React to build UI components:
When it comes to re-rendering the page, we just have to think about updating state.
- We don't have to keep track of exactly which parts of the page changed each time there are updates.
- We don't need to decide how we will efficiently re-render the page.
- React compares the previous state and new state, determines what has changed, and makes these decisions for us.
- This process of determining what has changed in the previous and new states is called Reconciliation.
Update the constructor of App component:
constructor(props) {
super(props);
this.state = {
cycles: [
"11:44 PM",
"1:14 AM",
"2:44 AM",
"4:14 AM",
"5:44 AM",
"7:14 AM",
],
};
}
When you update the state, you must use the function setState (which is inherited from Component class).
We can technically update the
statedirectly, but that way React will not know we have updated it!
The simplest way to use setState is to pass an object to it, and the object will be merged into the current state to form the new state.
this.setState({ cycles: [/* new values */] })
Let's update the calcCycles method to update the state:
calcCycles() {
// get current time
let now = Date.now(); // in milliseconds
let minute = 60 * 1000; // milliseconds
let cycle = now;
const cycles = new Array(this.state.cycles.length);
// allow 14 minutes to fall sleep
cycle += 14 * minute;
// calculate 6 sleep cycles (each 90 minutes)
for (let i = 0; i < 6; i++) {
cycle += 90 * minute;
// update the sleep cycles
cycles[i] = new Date(cycle).toLocaleTimeString([], {
hour: "2-digit",
minute: "2-digit",
});
}
// print cycles for sanity check
console.log(cycles);
// update state
this.setState({ cycles: cycles });
};
Aside: Don't forget to update the props passed to Output component:
- <Output cycles={this.cycles} />
+ <Output cycles={this.state.cycles} />
Save the file and reload the app. Click on the zzz button. The cycles must be updated in the page!
Step 12
Notice I could have created the state in Output component as
this.state = {
cycles: this.props.cycles
}
And then update the state in the Output component.
This is an anti-pattern; when defining a component's initial state, avoid initializing that state with props. Why? because it is error-prone. It also leads to duplication of data, deviating from a dependable "source of truth."
Let's talk a bit about another important feature of React. This has to do with data flow.
Data flow is about managing the state of the app: when data changes in one place it would be reflected every where.
Other popular front-end frameworks like Angular and Ember use Two-way data binding where the data is kept sync throughout the app no matter where it is updated. That means any part of the app could change the data. This solution is hard to keep track of, when app grows large.
React uses an explicit method of passing data down to components:

In React, data only flows in one direction: from parent to child. When data gets updated in the parent, it will pass it again to all the children who use it.
We will talk more about this in future modules. If you are interested in learning more on this, I recommend reading Unidirectional Data Flow in React.
Step 13
Let's hide the output and show it when user clicks on the zzz button.
Add the showOutput variable to the states of App component:
this.state = {
cycles: [
"11:44 PM",
"1:14 AM",
"2:44 AM",
"4:14 AM",
"5:44 AM",
"7:14 AM",
],
showOutput: false,
};
Pass the showOutput as a prop to Output component:
<Output cycles={this.state.cycles} showOutput={this.state.showOutput} />
Update Output component to show the result based on the showOutput:
function Output(props) {
return !props.showOutput ? (
<div></div>
) : (
<div>
<p>It takes the average human fourteen minutes to fall asleep.</p>
<p>
If you head to bed right now, you should try to wake up at one of the
following times:
</p>
<ul>
{props.cycles.map((cycle, index) => (
<li key={index}>{cycle}</li>
))}
</ul>
<p>A good night's sleep consists of 5-6 complete sleep cycles.</p>
</div>
);
}
export default Output;
Update App.calcCycle to flip the showOutput flag:
// update state
- this.setState({ cycles: cycles });
+ this.setState({ cycles: cycles, showOutput: true });
Save the files and reload the app. You must see the app without the output component:
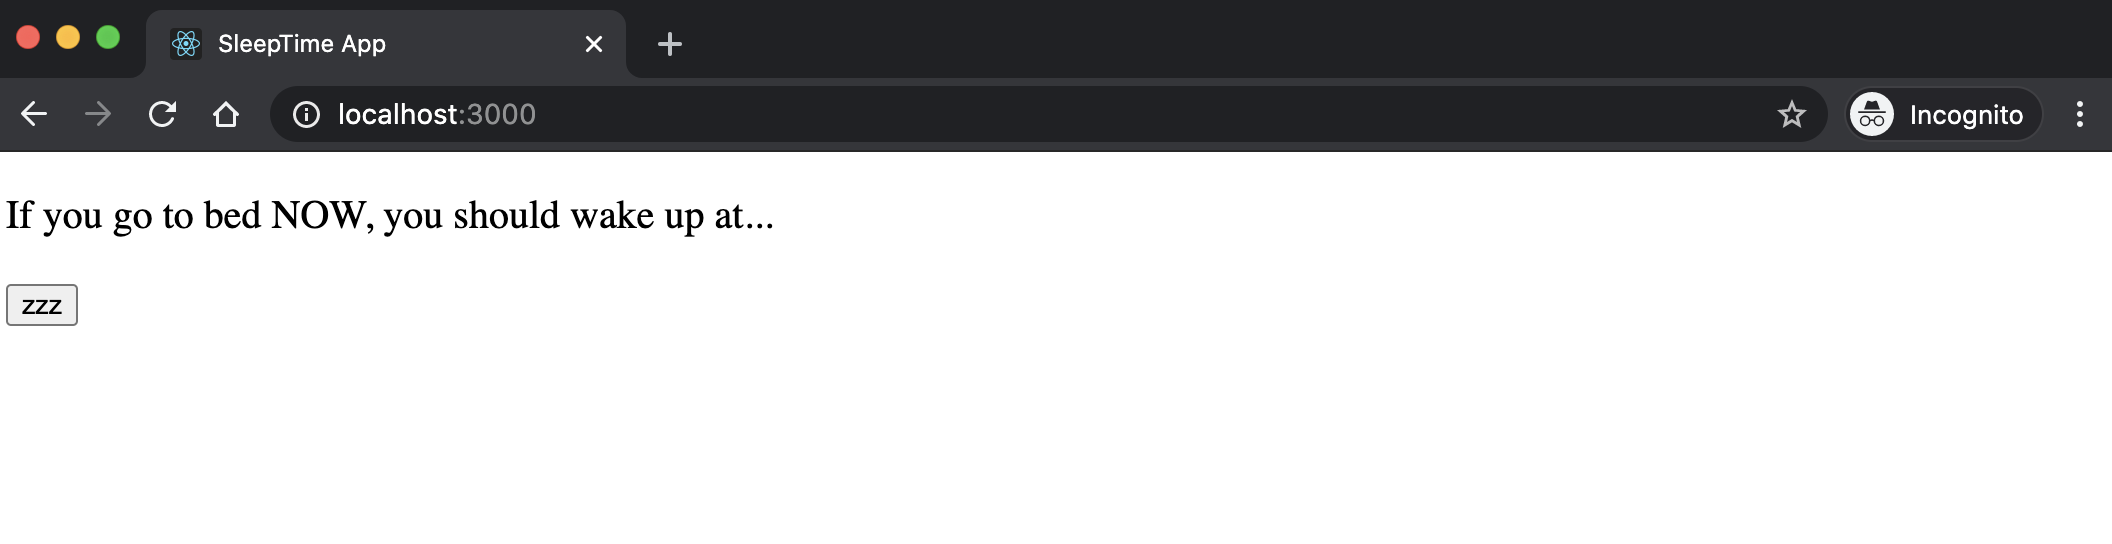
And the output must be displayed once you click on zzz button:
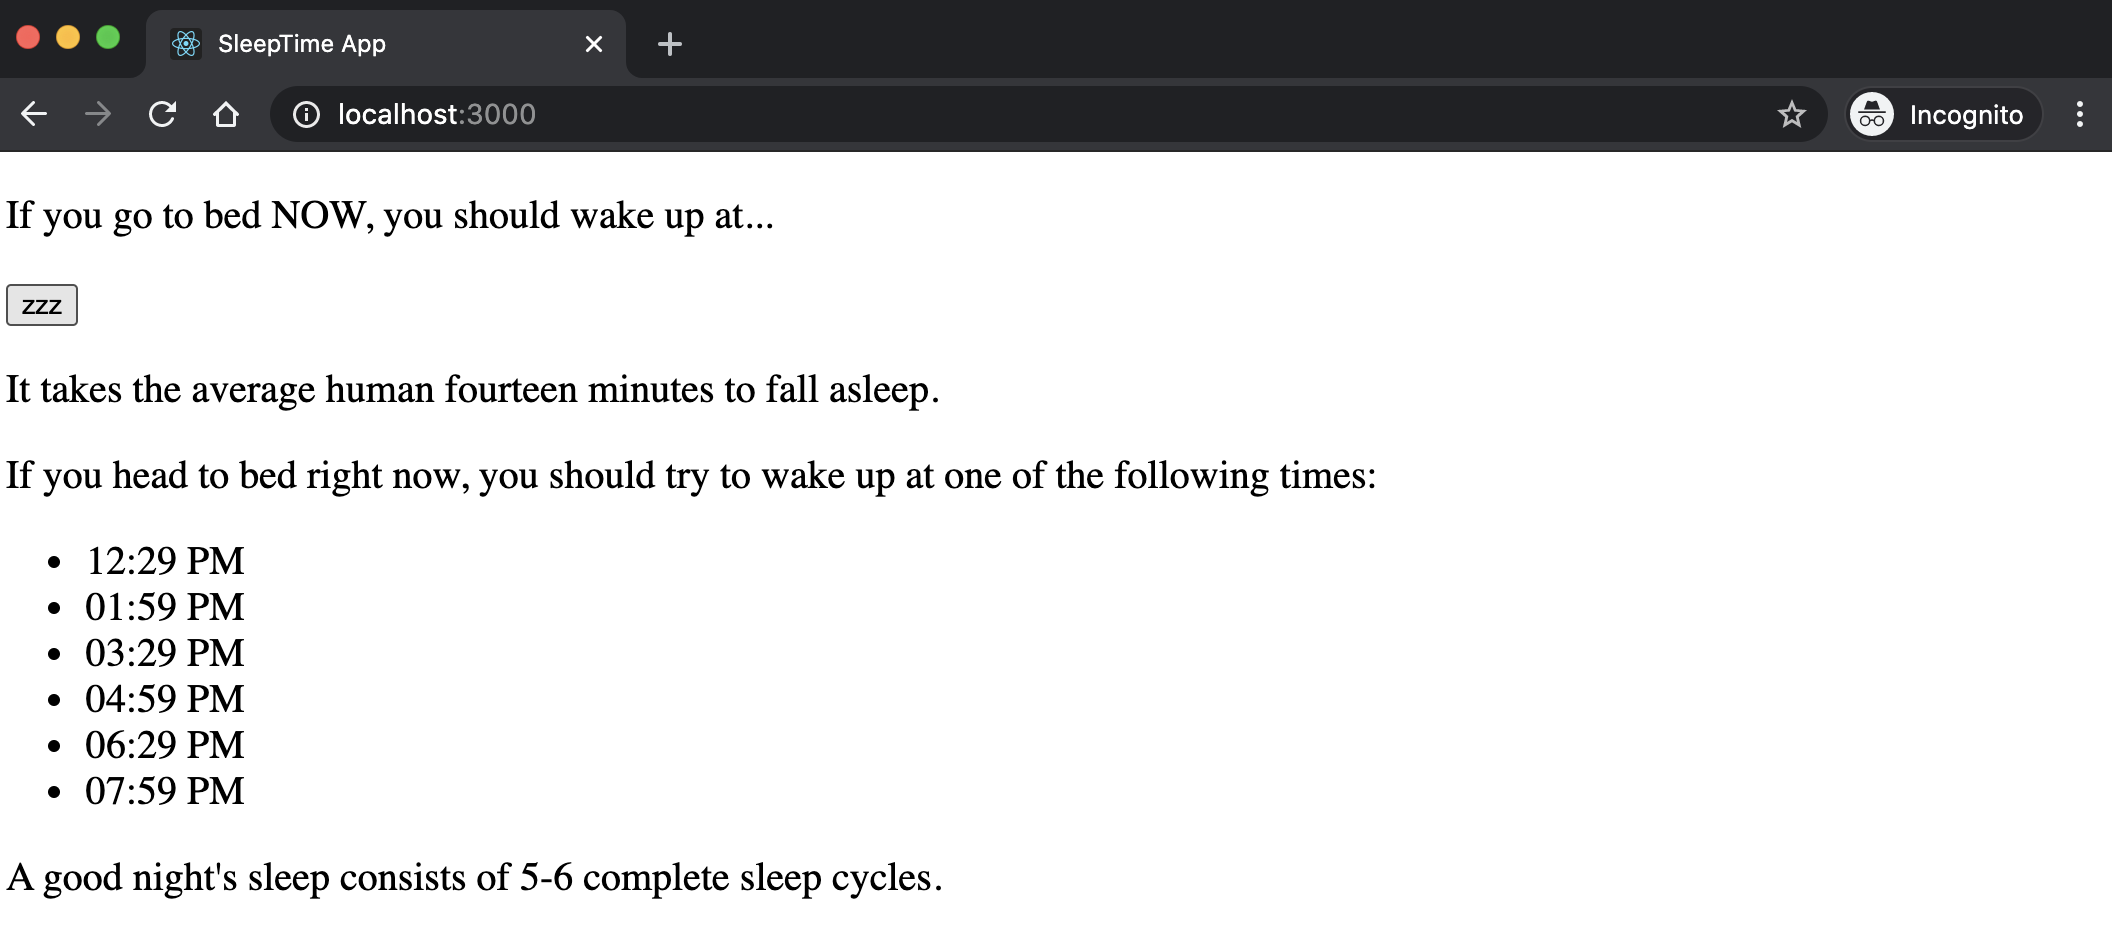
Step 14
Let's add some styling to our app!
Create the following files in the src folder:
/* index.css */
body {
margin: 0;
background-color: #282c34;
color: #ffffff;
font-family: -apple-system, BlinkMacSystemFont, 'Segoe UI', 'Roboto', 'Oxygen',
'Ubuntu', 'Cantarell', 'Fira Sans', 'Droid Sans', 'Helvetica Neue',
sans-serif;
-webkit-font-smoothing: antialiased;
-moz-osx-font-smoothing: grayscale;
}
/* App.css */
.App {
text-align: center;
min-height: 100vh;
display: flex;
flex-direction: column;
align-items: center;
justify-content: center;
font-size: calc(10px + 2vmin);
}
button {
font-family: 'Source Sans Pro', sans-serif;
font-weight: 900;
padding: 1.25rem 2rem;
font-size: 1rem;
border-radius: 3.5rem / 100%;
position: relative;
min-width: 15rem;
max-width: 90vw;
overflow: hidden;
border: 0;
cursor: pointer;
text-transform: uppercase;
letter-spacing: 0.05em;
-webkit-transition: all 330ms;
transition: all 330ms;
}
/* Output.css */
ul {
list-style-type: none;
}
One of the nice features of React is that you can create styling for each component, separately, and associate the component with the corresponding CSS file.
All you need to do, is to import the css file in the corresponding JavaScript file.
So make the following updates:
// index.js
+ import './index.css';
// App.js
+ import './App.css';
// Output.js
+ import './Output.css';
You must also assign a "class" attribute to the <div> element that wraps the entire app! Open the App.js file and update the return statement of the render method:
return (
- <div>
+ <div className="App">
<p>If you go to bed NOW, you should wake up at...</p>
<button onClick={this.calcCycles.bind(this)}>zzz</button>
<Output cycles={this.state.cycles} showOutput={this.state.showOutput} />
</div>
);
Notice, in JSX, to assign class attribute, you must use the attribute name of className instead of class because class is a keyword in JavaScript!.
Save the files and reload the app:
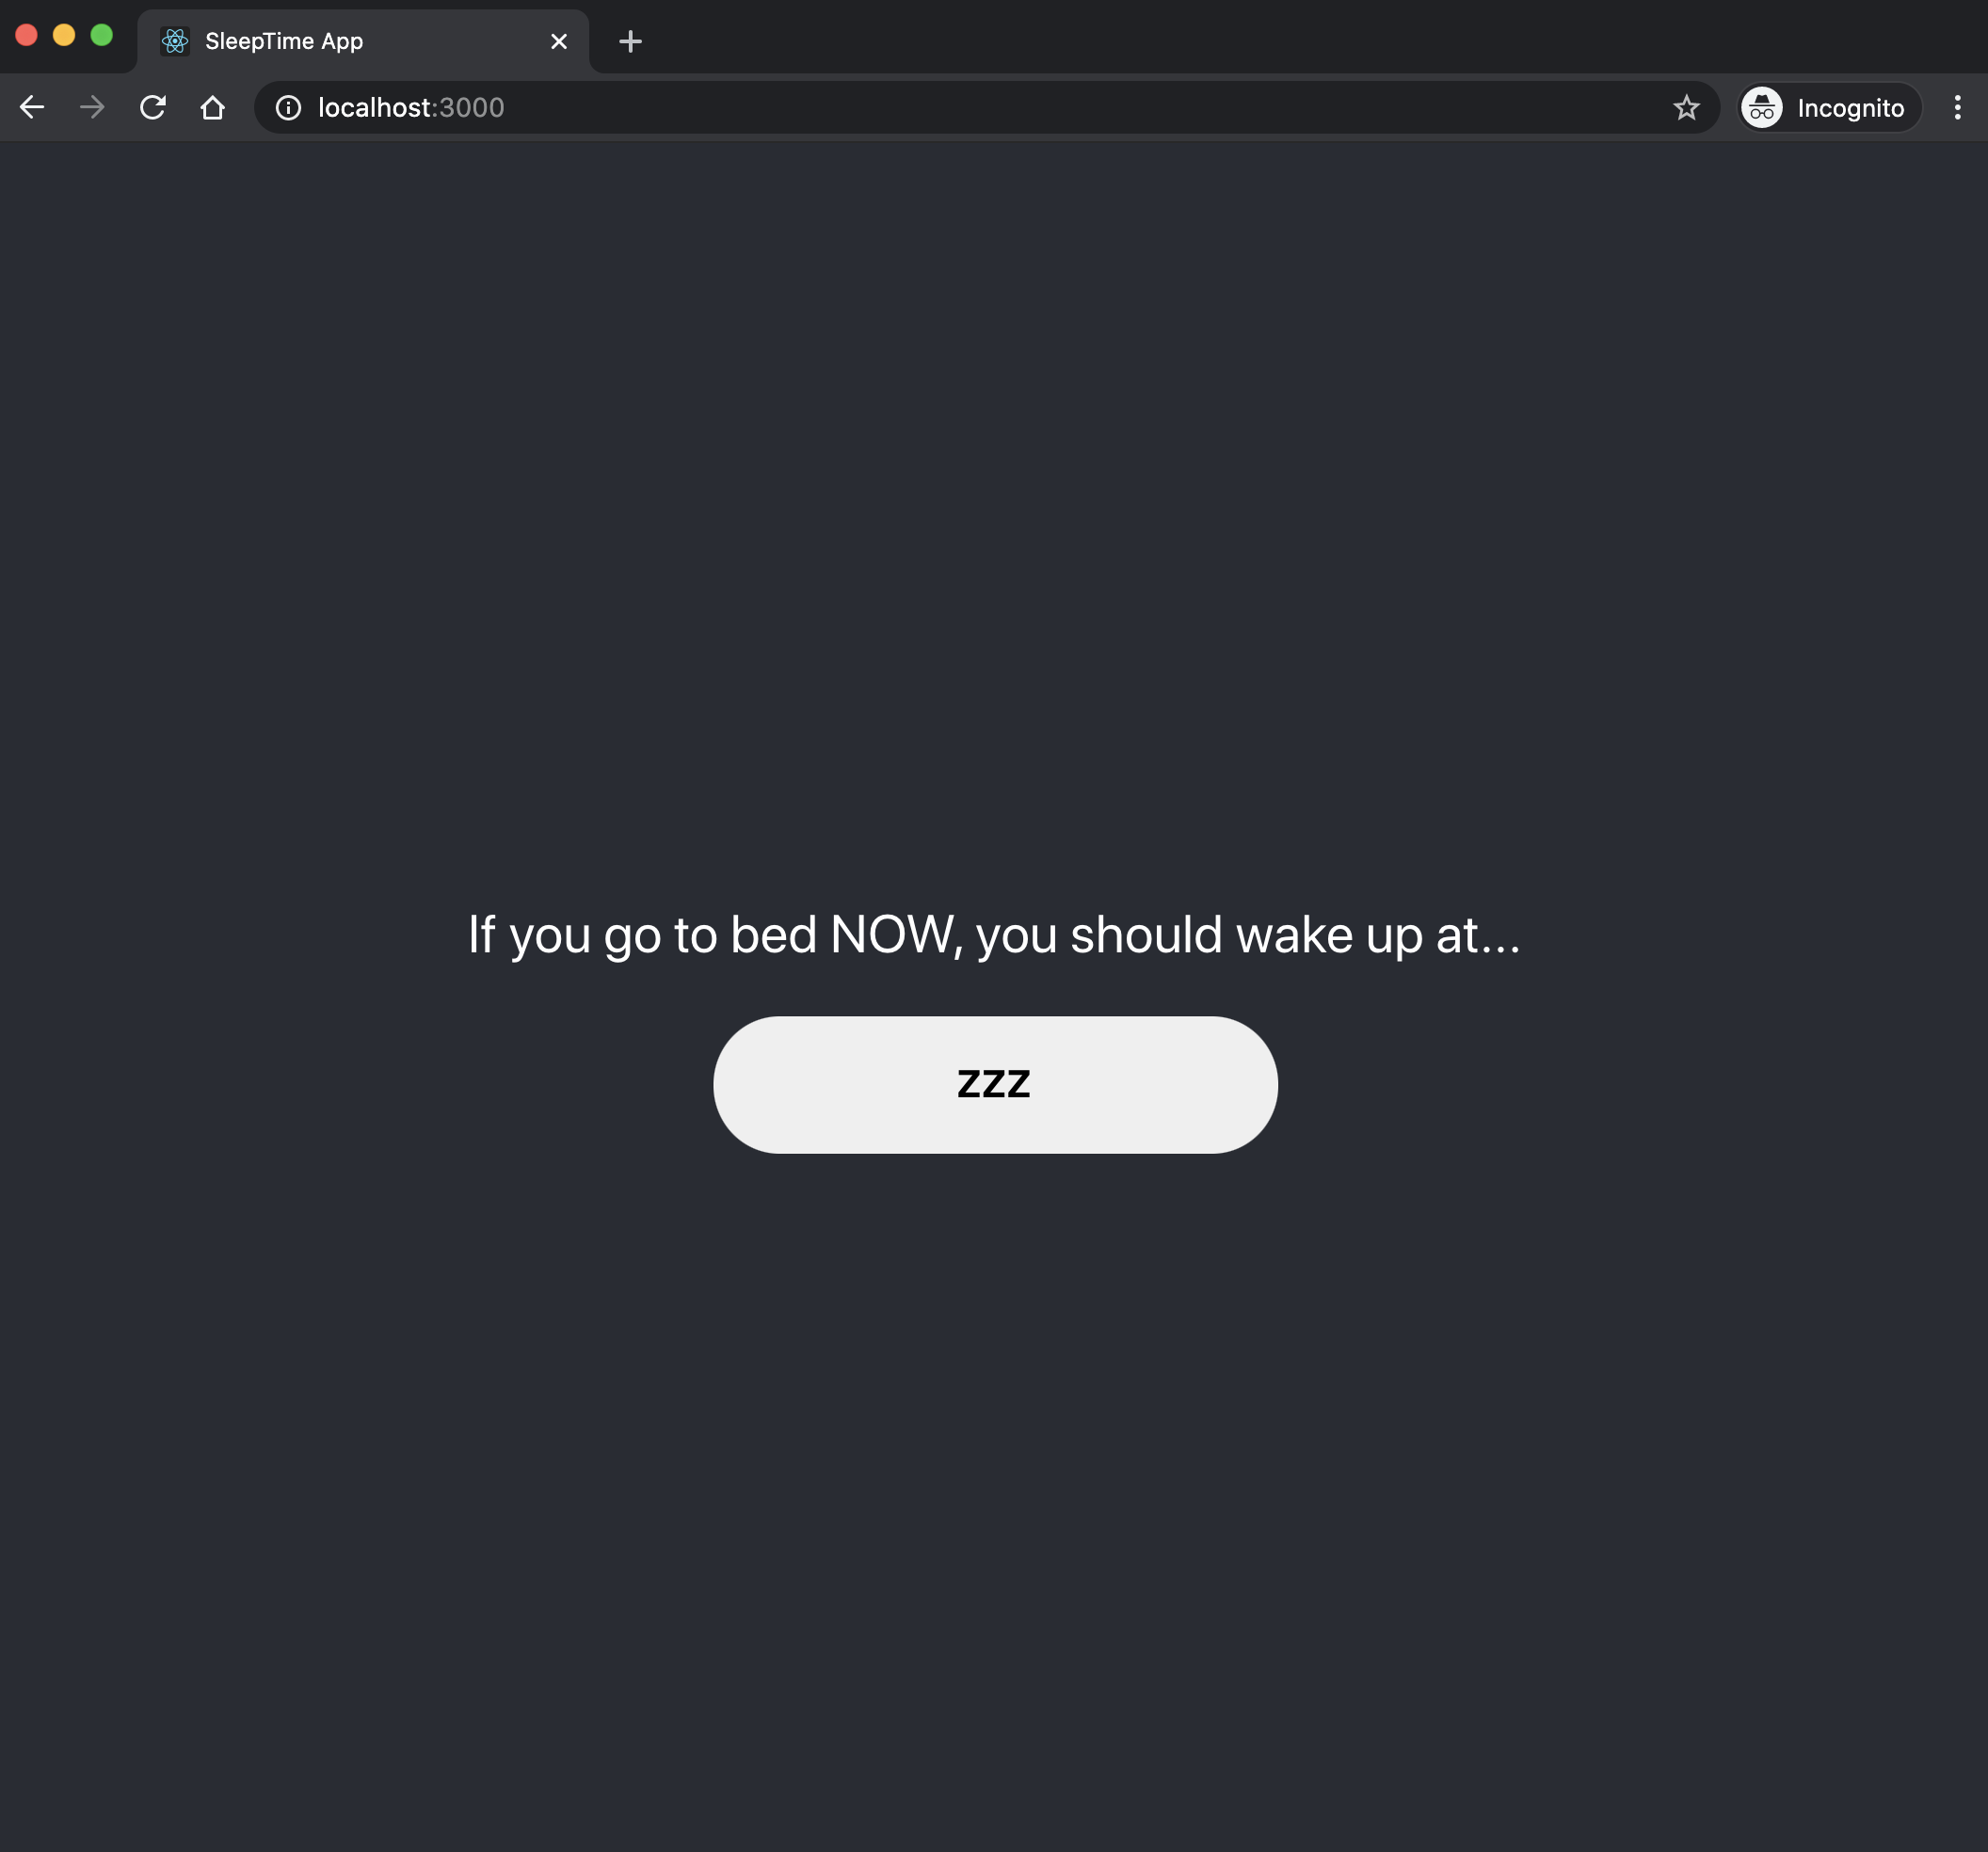
And after clicking on the zzz button, you will get:
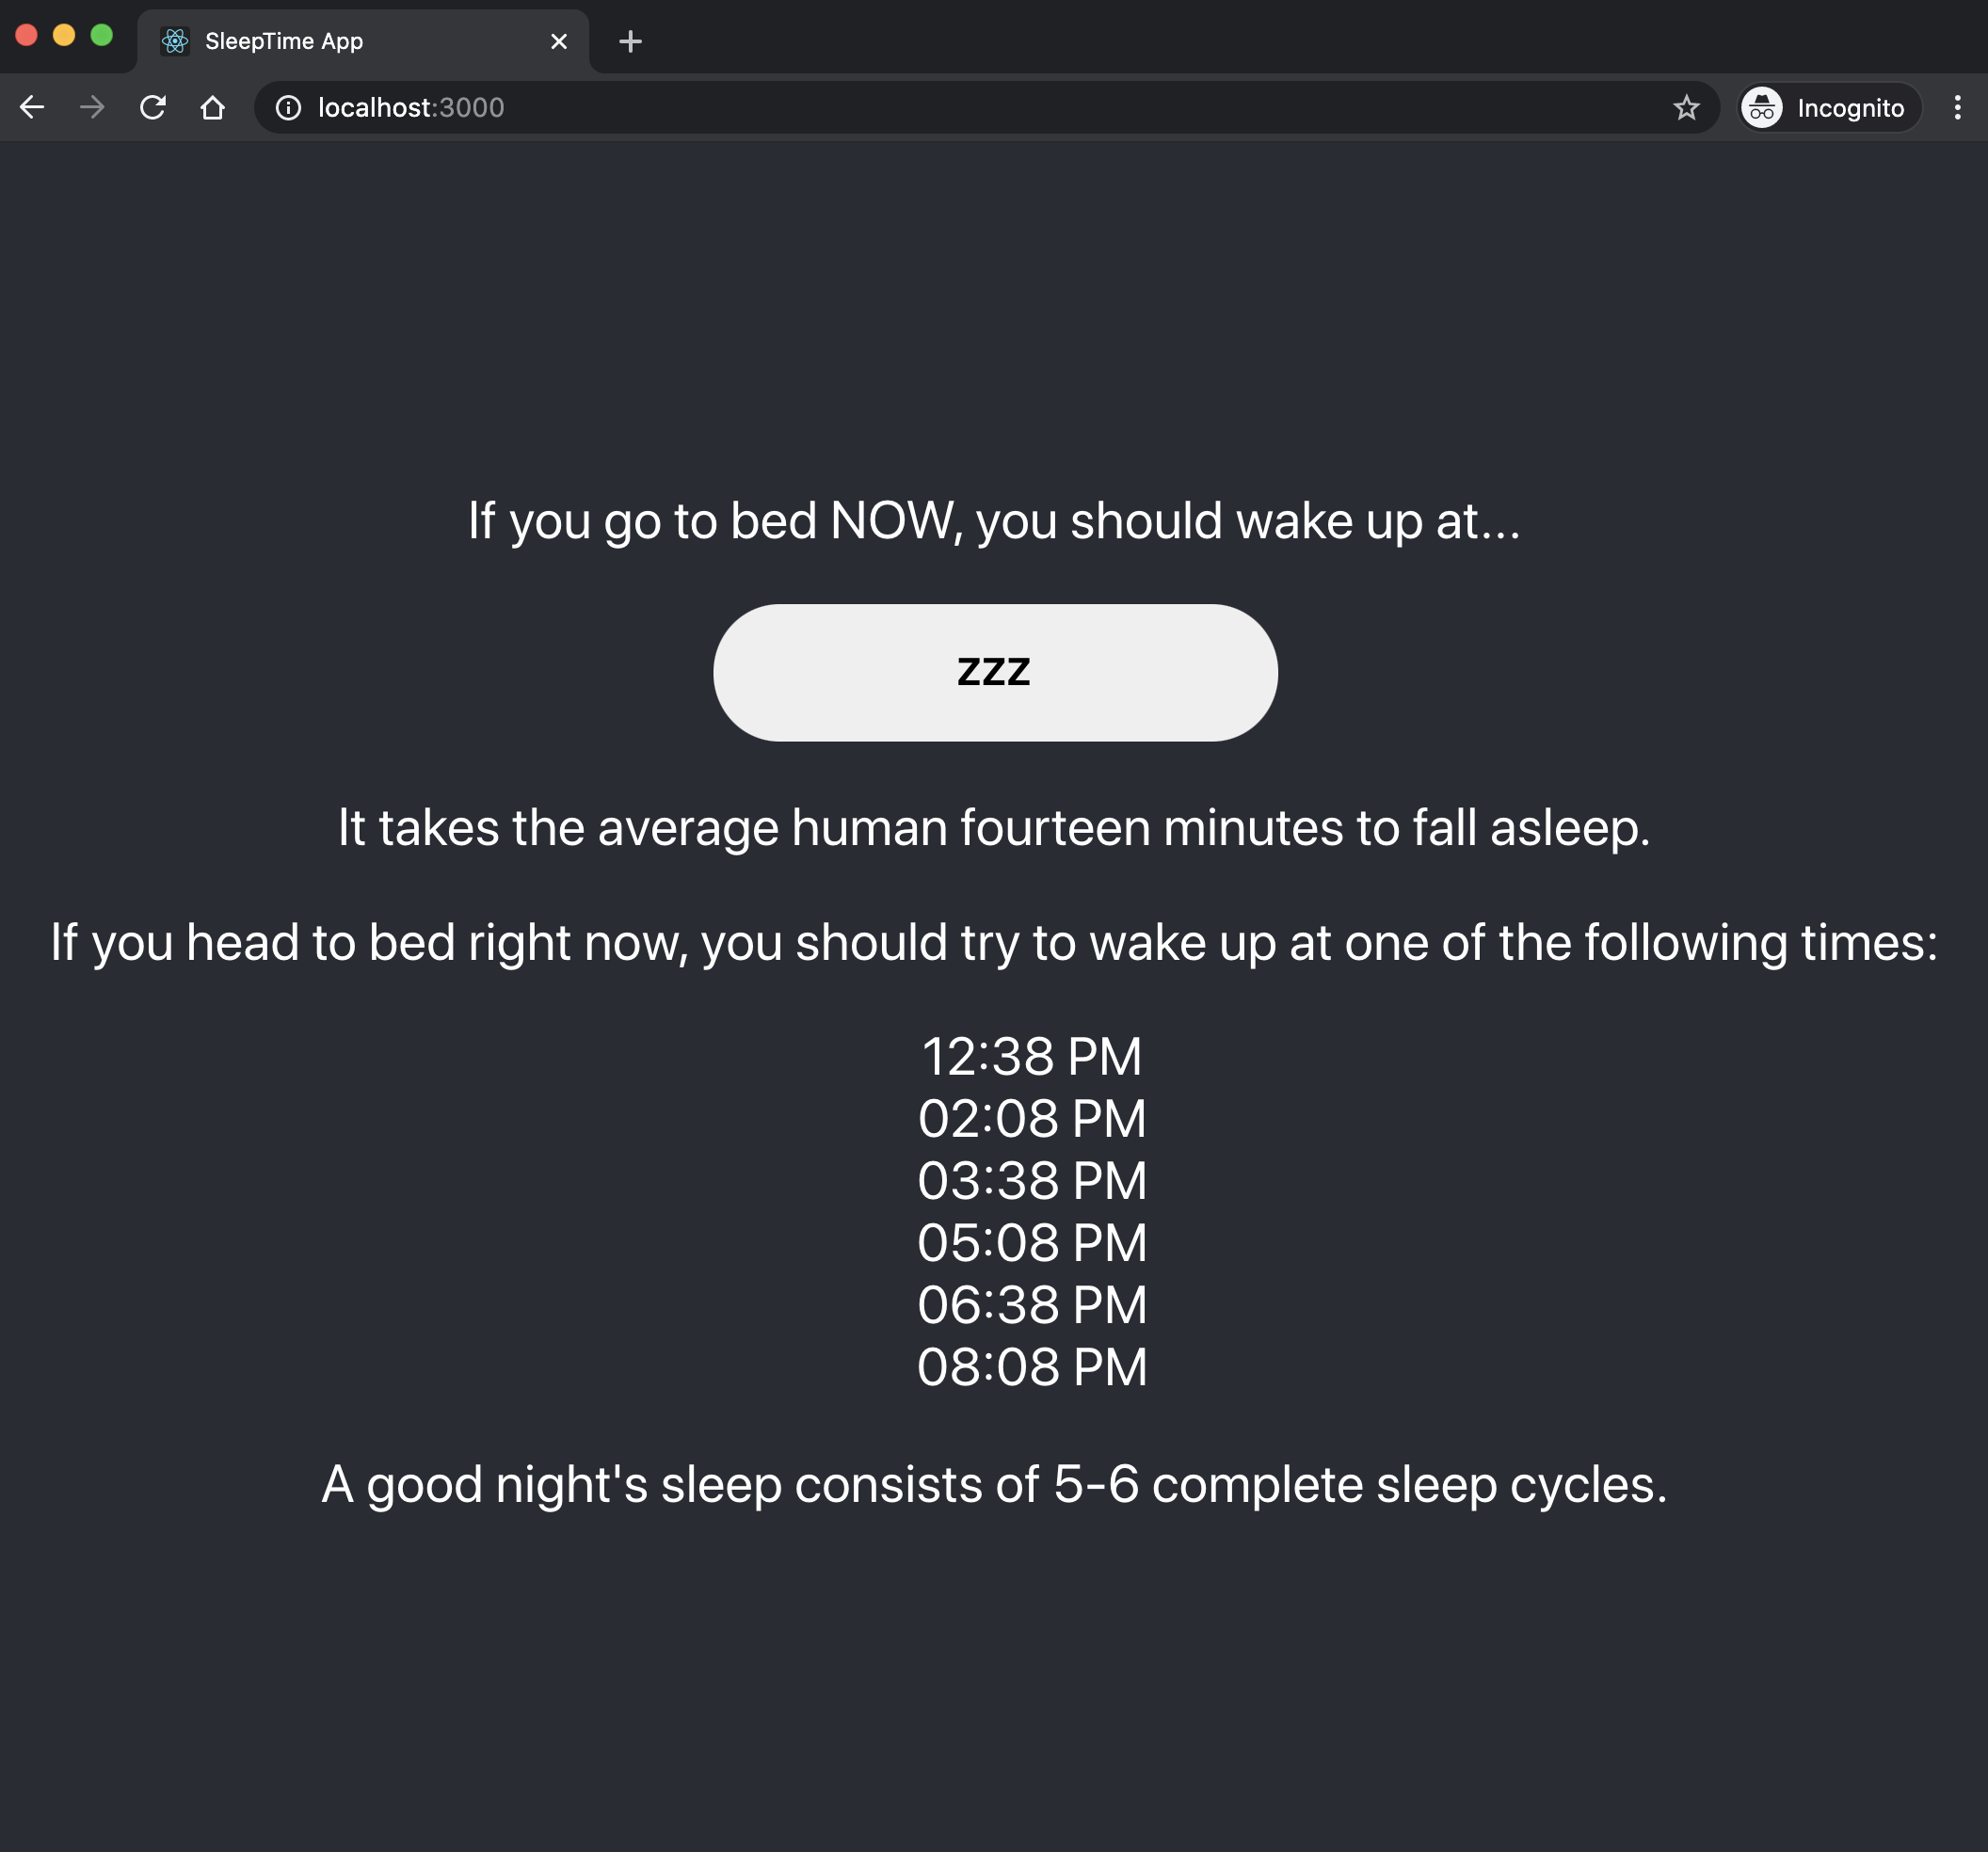
Step 15
Let's make the app look a little fancier!
Add this file to the src folder.
Update the App.js file; first import the image:
import logo from './moon.png';
Then add it to the React element that is returned from the App component:
render() {
return (
<div className="App">
<img src={logo} className="App-logo" alt="logo" />
<p>If you go to bed NOW, you should wake up at...</p>
<button onClick={this.calcCycles.bind(this)}>zzz</button>
<Output cycles={this.state.cycles} showOutput={this.state.showOutput} />
</div>
);
}
Add the following to the App.css file:
.App-logo {
height: 30vmin;
pointer-events: none;
}
Save the files and reload the app:
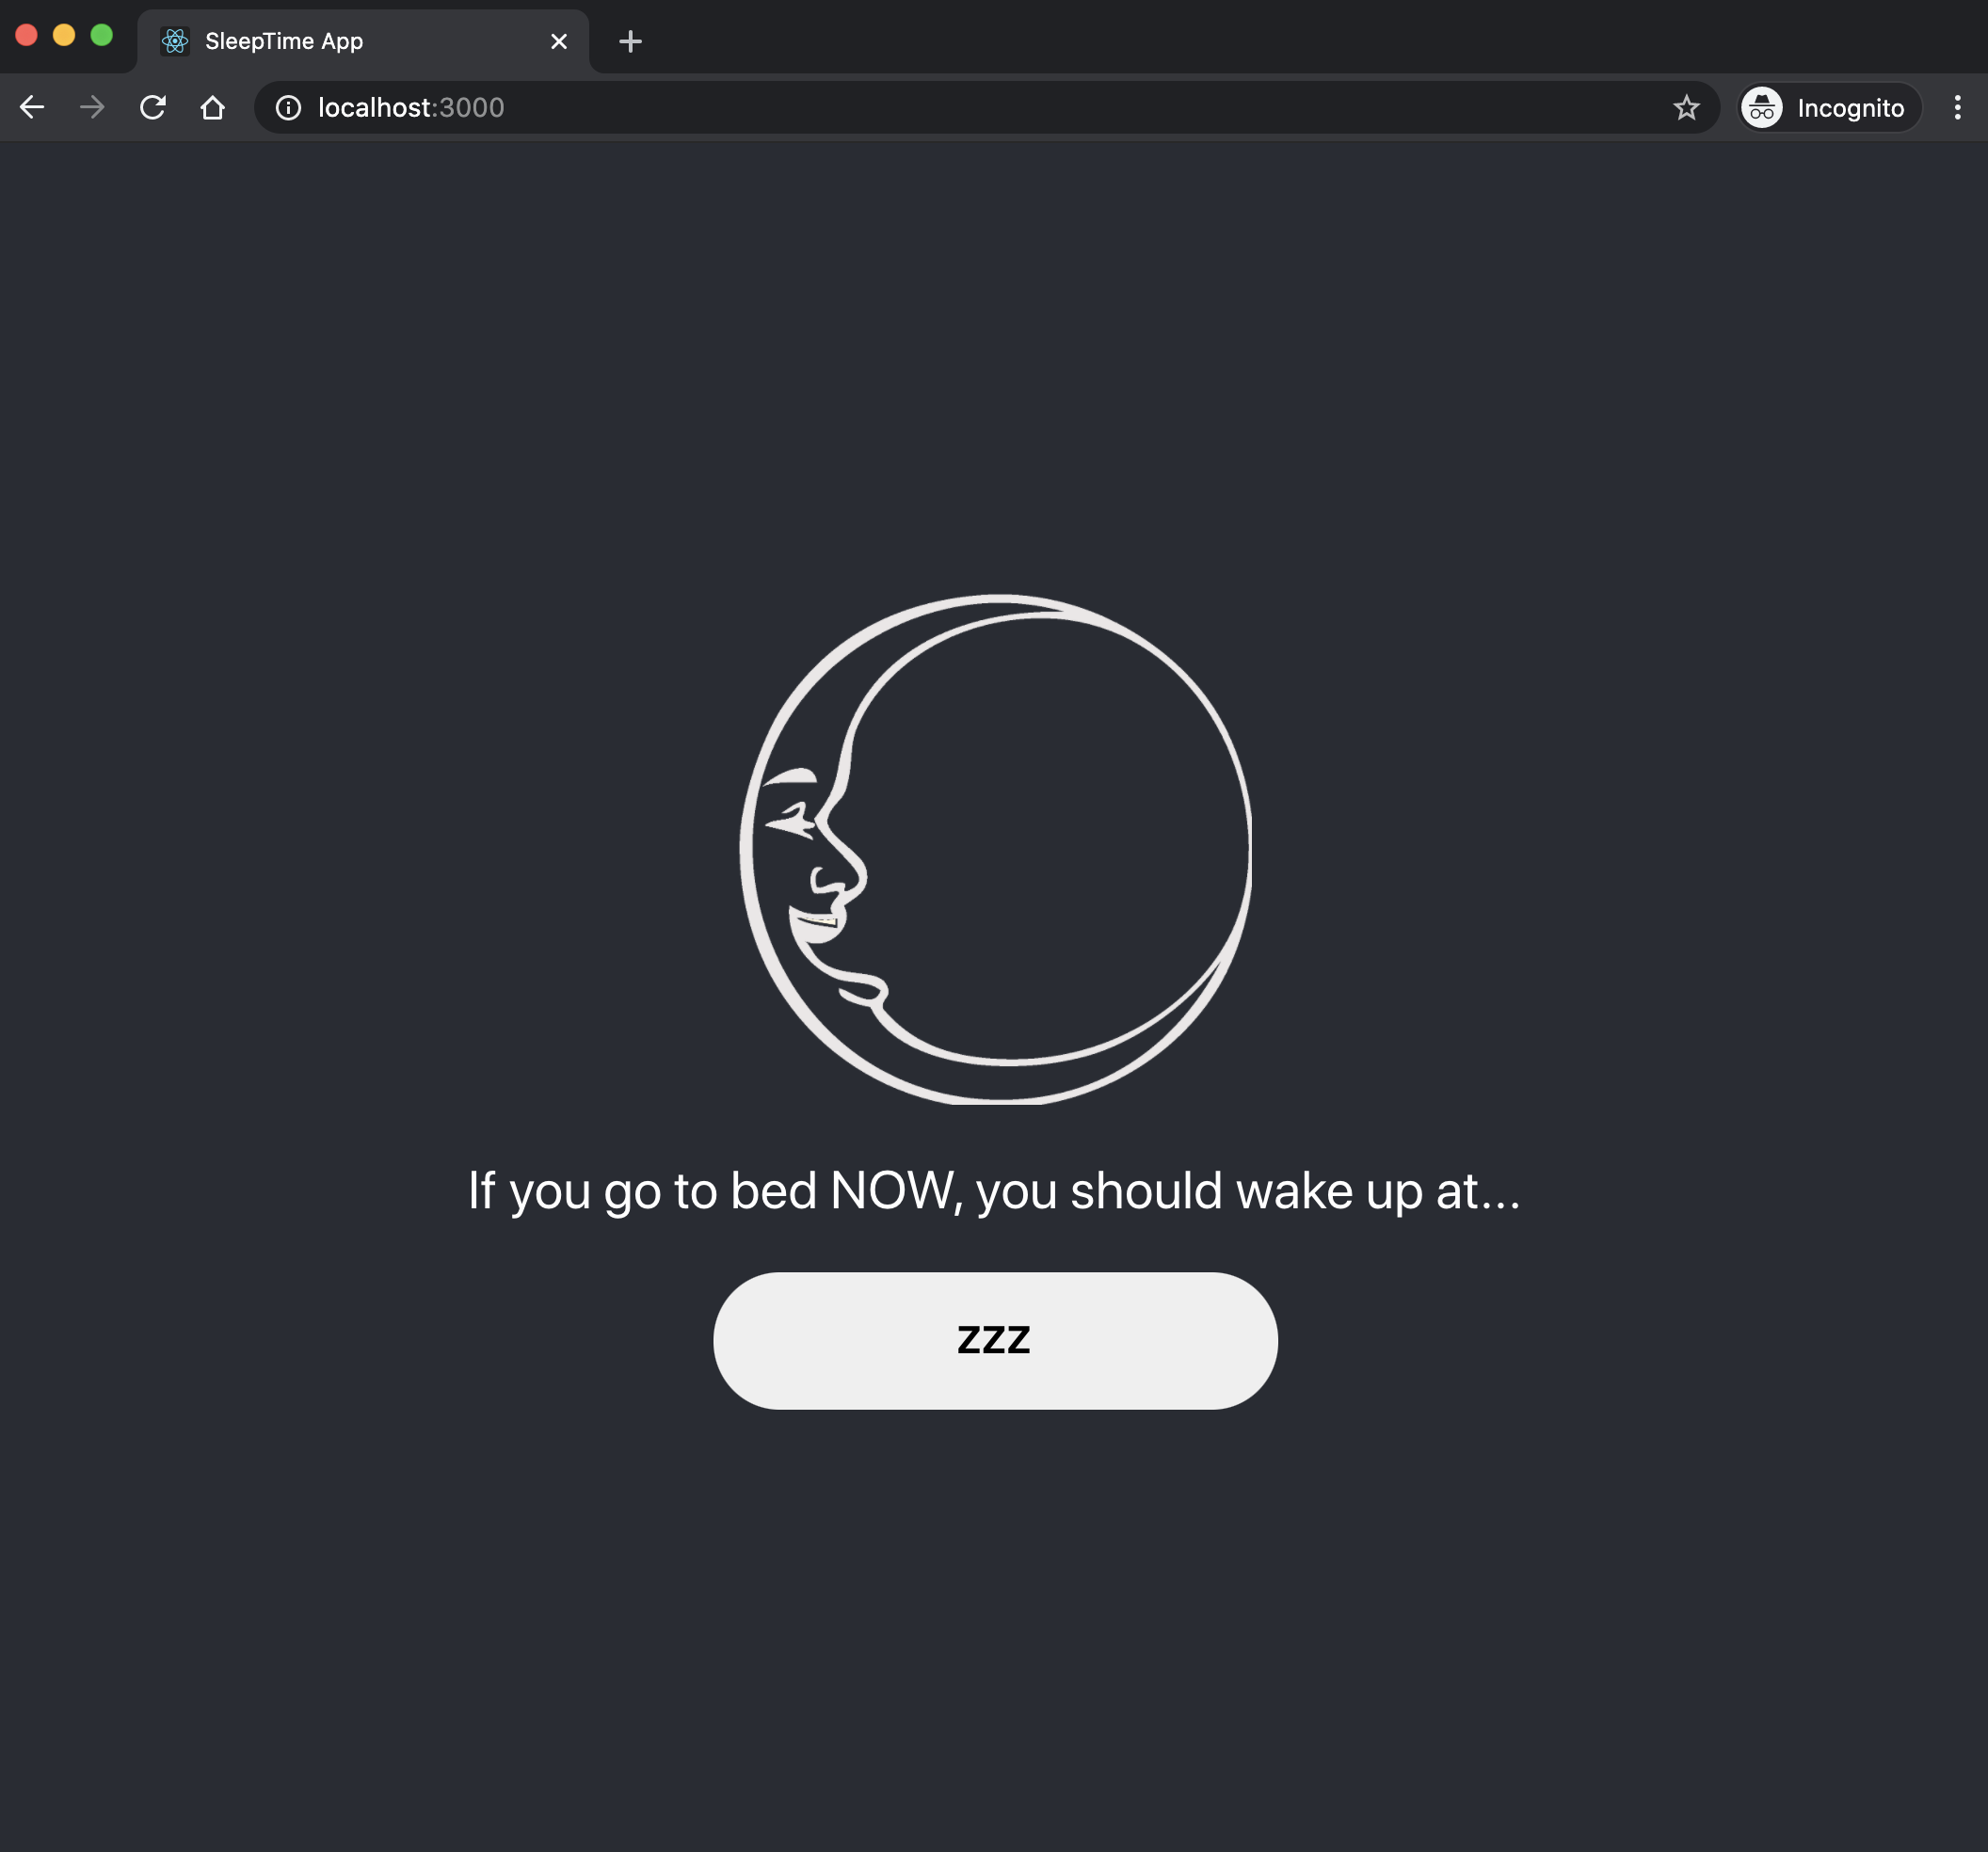
And after clicking on the zzz button, you will get:
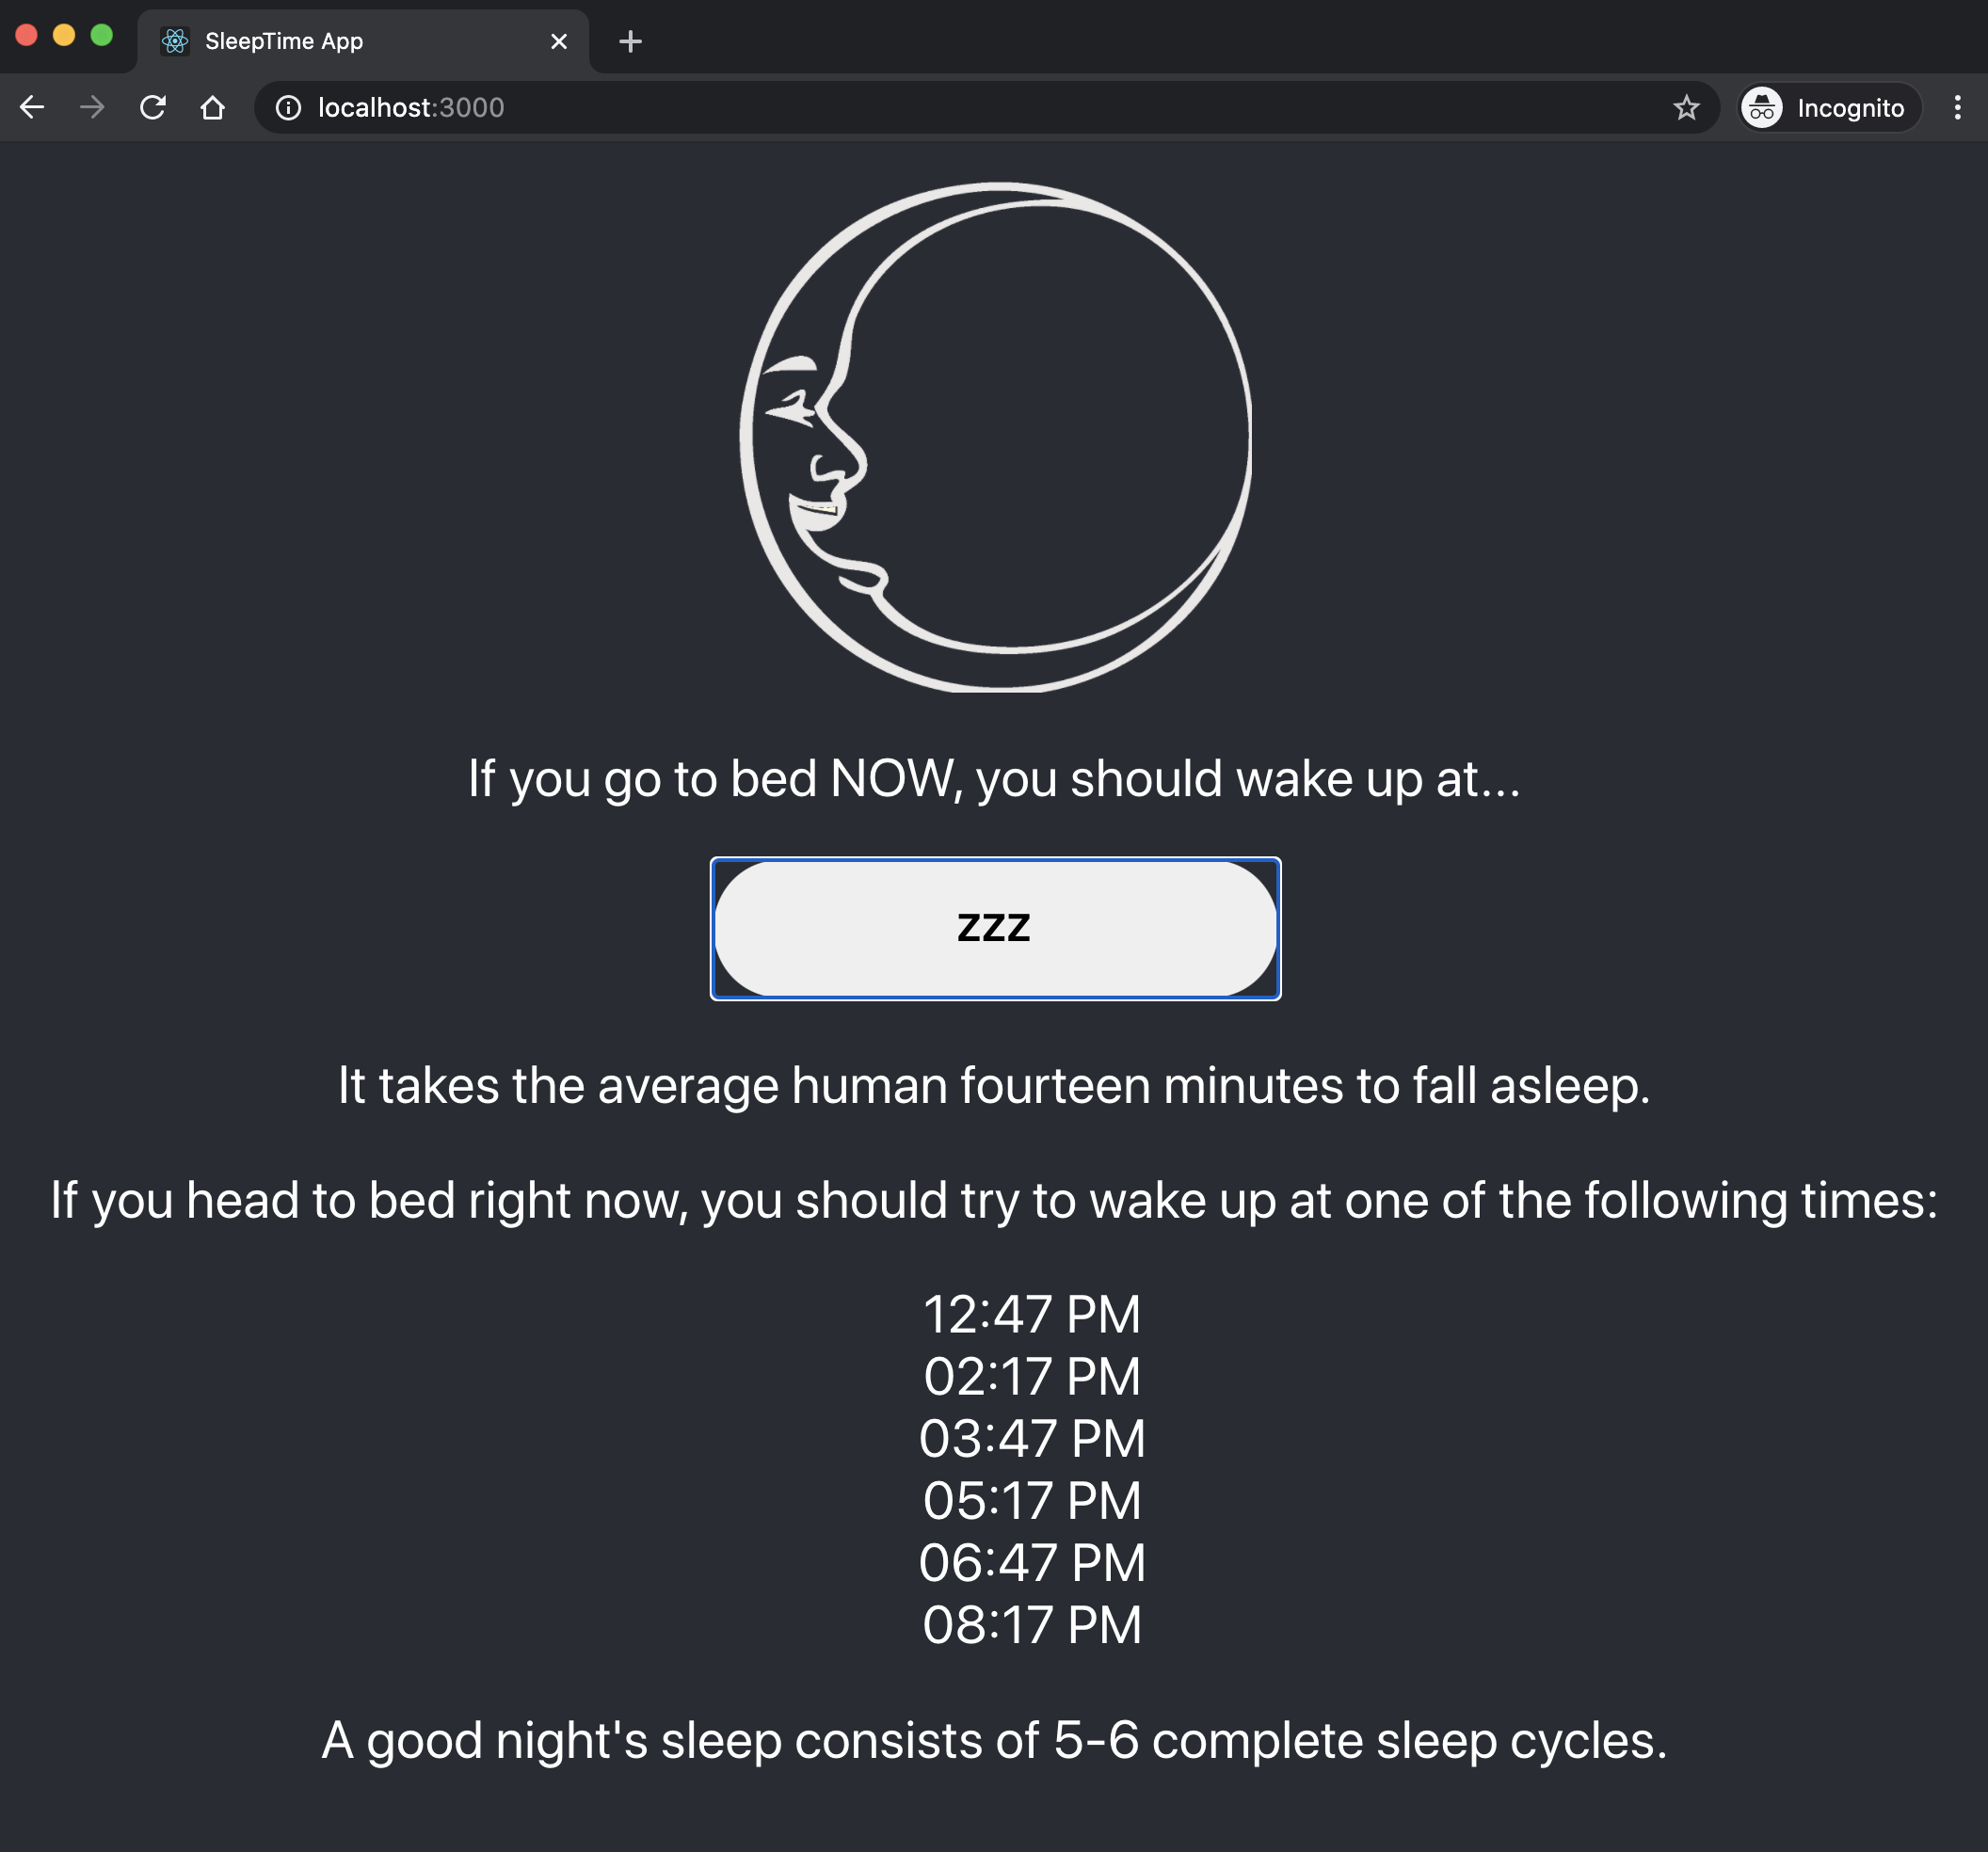
The completed application is here.
Zirectory (Part I)
We will be building an application called "Zirectory" (Zoom Directory) which is a collection of Zoom meeting links for JHU courses. Faculty can add their courses' Zoom link to this directory and students can search to find the links, for fast and easy access to their lectures.
In the first part, we will focus on breaking the UI into a component hierarchy and build each component. In the process, we will revisit the basics of React, using JSX, passing data as props, managing state, etc.
The repository for part-1 (completed) is here.
Step 1
You can find the starter code of this application here
- Clone this repository
- Install dependencies by
npm install - Run in development mode by
npm run start - Open http://localhost:3000 to view it in the browser.
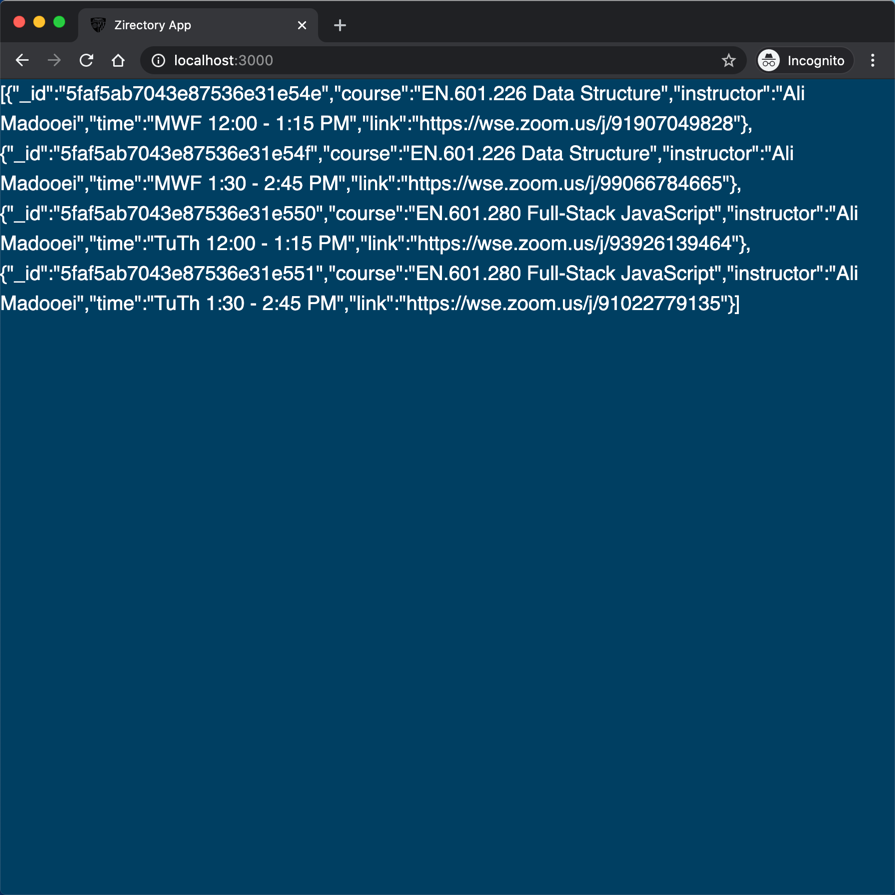
Step 2
This is the wireframe of the UI which we are going to build.
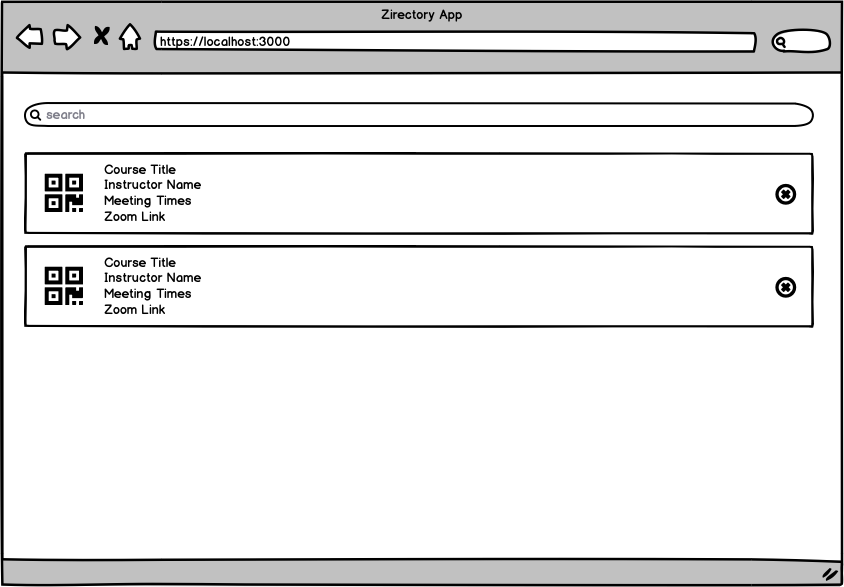
Thinking in React involved breaking the UI into a component hierarchy. I can think of at least three components in the above wireframe:
- A component that represents the search bar
- A component that represents each meeting
- A component that wraps the search bar and meetings; let's call it "list meetings"
We will build these components one at a time!
Step 3
Create the following files with the provided content. Notice that I have already created style sheet for each component to save us time!
Search.js
import "./Search.css";
function Search() {
return <div>Search</div>;
}
export default Search;
Search.css
.search-meetings {
width: 100%;
padding: 20px 20px 20px 60px;
background-image: url("./icons/search.svg");
background-repeat: no-repeat;
background-position: 20px center;
background-size: 1.2em;
font-size: 1.2em;
border: 0;
outline: none;
}
Meeting.js
import "./Meeting.css";
function Meeting() {
return <div>Meeting Information</div>;
}
export default Meeting;
Meeting.css
.meeting-list-item {
padding: 20px;
background: white;
display: flex;
}
@media (min-width: 600px) {
.meeting-list-item {
margin: 20px;
border: 1px solid #d5d8df;
border-radius: 4px;
}
}
.meeting-details {
padding-left: 20px;
border-left: 1px solid #eee;
flex: 1;
overflow: hidden;
display: flex;
flex-direction: column;
justify-content: center;
}
.meeting-details p {
margin: 0;
min-width: 0;
white-space: nowrap;
overflow: hidden;
text-overflow: ellipsis;
}
.meeting-details .title {
font-size: larger;
}
.meeting-details a {
color: #003f62;
font-family: helvetica;
text-decoration: none;
}
.meeting-details a:hover {
text-decoration: underline;
}
.meeting-details a:active {
color: #003f62;
}
.meeting-details a:visited {
color: #003f62;
}
.meeting-remove {
padding-left: 20px;
align-self: center;
width: 32px;
height: 32px;
background-color: transparent;
background-image: url("./icons/cancel.svg");
background-size: 100% 100%;
border: 0;
color: black;
font-size: 0;
vertical-align: middle;
cursor: pointer;
outline: none;
}
ListMeetings.js
import "./ListMeetings.css";
import Search from "./Search.js";
import Meeting from "./Meeting.js";
function ListMeetings() {
return (
<div className="list-meetings">
<div className="list-meetings-top">
<Search />
</div>
<ol className="meeting-list">
<Meeting />
</ol>
</div>
);
}
export default ListMeetings;
ListMeetings.css
.list-meetings {
padding-top: 60px;
}
.list-meetings-top {
position: fixed;
width: 100%;
top: 0;
border-bottom: 1px solid #d5d8df;
display: flex;
}
.meeting-list {
width: 100%;
margin: 0;
padding: 0;
list-style-type: none;
}
Step 4
Let's update the App component to:
- Hold state (meetings data)
- Pass the state down to child components (ListMeetings)
Recall, in this course, we use function components for state-less components. If your component has state, refactor it to a class component.
import { Component } from "react";
class App extends Component {
state = {
meetings: [
{
_id: "5faf5ab7043e87536e31e54e",
course: "EN.601.226 Data Structure",
instructor: "Ali Madooei",
time: "MWF 12:00 - 1:15 PM",
link: "https://wse.zoom.us/j/91907049828",
},
{
_id: "5faf5ab7043e87536e31e54f",
course: "EN.601.226 Data Structure",
instructor: "Ali Madooei",
time: "MWF 1:30 - 2:45 PM",
link: "https://wse.zoom.us/j/99066784665",
},
{
_id: "5faf5ab7043e87536e31e550",
course: "EN.601.280 Full-Stack JavaScript",
instructor: "Ali Madooei",
time: "TuTh 12:00 - 1:15 PM",
link: "https://wse.zoom.us/j/93926139464",
},
{
_id: "5faf5ab7043e87536e31e551",
course: "EN.601.280 Full-Stack JavaScript",
instructor: "Ali Madooei",
time: "TuTh 1:30 - 2:45 PM",
link: "https://wse.zoom.us/j/91022779135",
},
],
};
render() {
return (
<div style={{ color: "white" }}>
{JSON.stringify(this.state.meetings)}
</div>
);
}
}
export default App;
Notice we can store the state directly as a field (no need to use the constructor). Class fields are not yet available in JavaScript but in React you can use them and it will be transpiled to standard JavaScript for you.
Aside: With new versions of React, you can employ Hooks to use state (and other React features) without writing a class. Do not use hooks for your homework!
Step 5
Let's add ListMeetings component to App and pass App's state to it as props.
Fist, import ListMeetings:
import ListMeetings from "./ListMeetings.js";
Next, updated the return statement of the render method:
- return (
- <div style={{ color: "white" }}>
- {JSON.stringify(this.state.meetings)}
- </div>
- );
+ return <ListMeetings meetings={this.state.meetings} />;
Step 6
Let's update the ListMeetings component to iterate over the "meetings" and pass each meeting object to the Meeting component:
return (
<div className="list-meetings">
<div className="list-meetings-top">
<Search />
</div>
<ol className="meeting-list">
{props.meetings.map((meeting, index) => (
<Meeting meeting={meeting} key={index} />
))}
</ol>
</div>
);
}
Notice the use of {} to use JavaScript in JSX!
Also note the use of the key attribute.
Step 7
Let's update the Meeting component to display the information for each meeting (which it receives as props):
function Meeting(props) {
const { meeting } = props;
return (
<li className="meeting-list-item">
<div className="meeting-details">
<p className="title">{meeting.course}</p>
<p>{meeting.instructor}</p>
<p>{meeting.time}</p>
<p>
<a href={meeting.link}>{meeting.link}</a>
</p>
</div>
</li>
);
}
Notice the use of destructuring assignment to get meeting and key values out of the props object.
Save the file and revisit the app in your browser.

Step 8
In the wireframe, there is a QR code next to each meeting.
The QR shall contain the Zoom link for that meeting. Let's add that to our application.
We can now take a break from this app, go spend a few weeks reading about QR, trying to implement it, test it, and then come back here an add it to our application! Alternatively, we can do a Google search for "QR React component" (as I did) and find ready to use component such as qrcode.react on NPM.
Stop the application and install qrcode.react:
npm install qrcode.react
Open Meeting.js and import qrcode.react:
import QRCode from "qrcode.react";
Add a QR to the React element returned from the Meeting component:
return (
return (
<li className="meeting-list-item" key={key}>
+ <div>
+ <QRCode value={meeting.link} />
+ </div>
<div className="meeting-details">
<p className="title">{meeting.course}</p>
<p>{meeting.instructor}</p>
<p>{meeting.time}</p>
<p>
<a href={meeting.link}>{meeting.link}</a>
</p>
</div>
</li>
);
Save the file and run the application. Open http://localhost:3000 to view it in the browser.

Aside: This is why JavaScript is the solution fo rapid software prototyping. It took us a Google search and perhaps 5 minutes of reading to added a QR component to our application!
Step 9
Update the Meeting component to include a "delete" button, next to each meeting:
return (
<li className="meeting-list-item" key={key}>
<div>
<QRCode value={meeting.link} />
</div>
<div className="meeting-details">
<p className="title">{meeting.course}</p>
<p>{meeting.instructor}</p>
<p>{meeting.time}</p>
<p>
<a href={meeting.link}>{meeting.link}</a>
</p>
</div>
+ <button className="meeting-remove"></button>
</li>
);
Save the file and view the app in the browser.
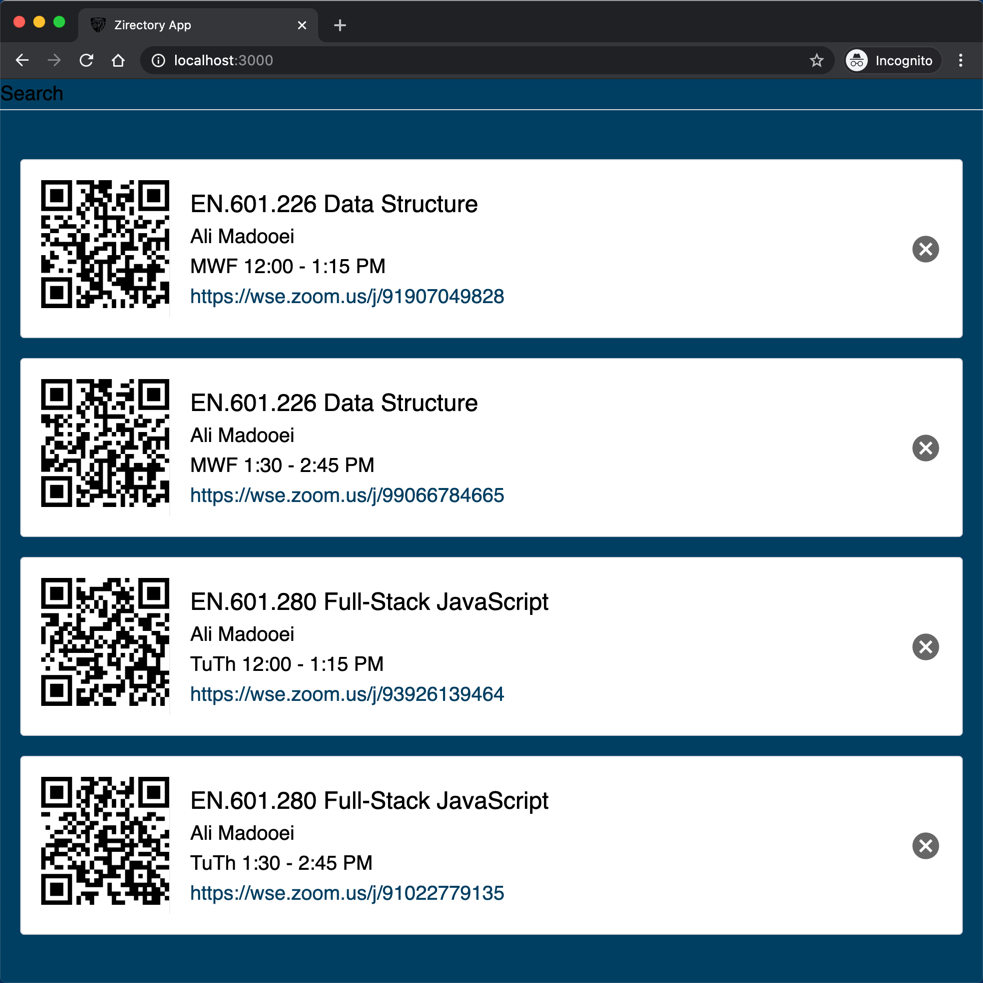
Notice the button does not do anything yet!
Step 10
Let's add functionality to the remove button.
When we remove a meeting, it must be removed from the "state" of the App component. Then, the App component will pass the updated state to all the child component that rely on it so they all get updated (rendered again).
Therefore, the logic for deleting a meeting must exist in the App component. We can create a function (method) for this and pass it down to the Meeting component. The meeting component can then attach this "delete" method to the "onClick" event of the remove button.
Add the following method to App component:
removeMeeting = (meeting) => {
this.setState((state) => {
return {
meetings: state.meetings.filter((m) => m._id !== meeting._id),
};
});
};
Notice setState is called with a function argument. This function receives the "current" state and it will return the "modified" (updated) state.
Let's now pass this method as props to the Meeting component; we must first pass it from App to ListMeetings:
- <ListMeetings meetings={this.state.meetings} />
+ <ListMeetings
+ meetings={this.state.meetings}
+ onDeleteMeeting={this.removeMeeting}
+ />
And then from ListMeetings to Meeting:
- <Meeting meeting={meeting} key={index} />
+ <Meeting
+ meeting={meeting}
+ key={index}
+ onDeleteMeeting={props.onDeleteMeeting}
+ />
Finally, update hook this method to the "onClick" event of the remove button in Meeting component:
- <button className="meeting-remove"></button>
+ <button
+ className="meeting-remove"
+ onClick={() => props.onDeleteMeeting(meeting)}
+ ></button>
Save the file and view the app in the browser.

Step 11
Let's update the Search component:
function Search() {
return <input className="search-meetings" type="text" placeholder="search" />;
}
Save the file and view the app in the browser.

We want to filter the meetings based on the search (query) term which a client provides. We need to
- Store the "query" in a variable.
- Filter the meetings based on the "query".
To store the query, we have several options. I made a design decision to store the query as the state of the ListMeetings component. I did this so I can filter the meetings in the ListMeetings component before iteratively passing each meeting to the Meeting component.
So, let's update the ListMeeting to a class component with state!
import "./ListMeetings.css";
import Search from "./Search.js";
import Meeting from "./Meeting.js";
import { Component } from "react";
class ListMeetings extends Component {
state = {
query: ""
}
render() {
return (
<div className="list-meetings">
<div className="list-meetings-top">
<Search />
</div>
<ol className="meeting-list">
{this.props.meetings.map((meeting, index) => (
<Meeting
meeting={meeting}
key={index}
onDeleteMeeting={this.props.onDeleteMeeting}
/>
))}
</ol>
</div>
);
}
}
export default ListMeetings;
Step 12
Let's add a method to ListMeetings component to update the query:
updateQuery = (query) => {
this.setState({ query });
};
We can now pass the query and the updateQuery method to the Search component:
- <Search />
+ <Search query={this.state.query} updateQuery={this.updateQuery} />
Finally, update the Search component to use the props provided to it:
import "./Search.css";
function Search(props) {
const { query, updateQuery } = props;
return (
<input
className="search-meetings"
type="text"
placeholder="search"
value={query}
onChange={(event) => updateQuery(event.target.value)}
/>
);
}
export default Search;
For sanity check, we can update the updateQuery method to print the updated query to the console:
updateQuery = (query) => {
this.setState({ query });
+ console.log(this.state.query);
};
Save the file and view the app in the browser. Open the Browser Console and type in a query in the search bar.
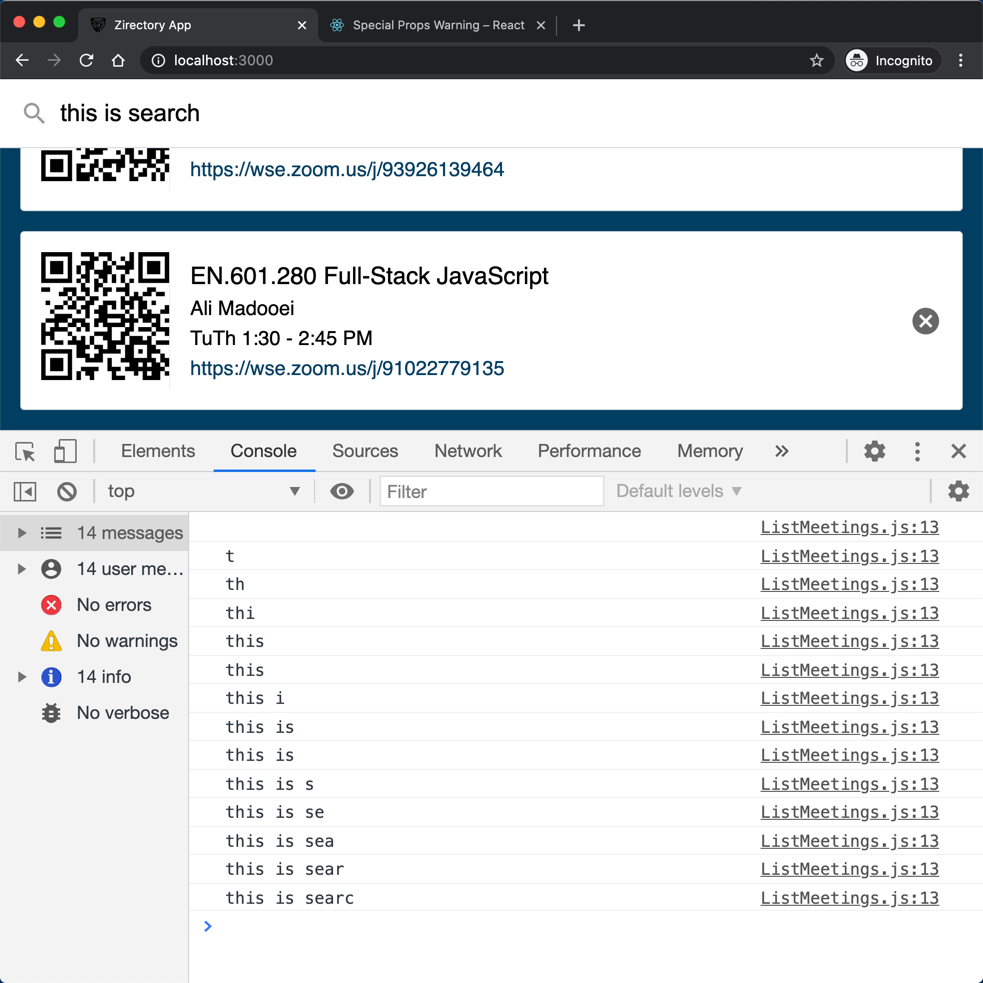
Step 13
Let's filter the meetings based on the search query.
We will use two NPM packages, escape-string-regexp and sort-by, to help us with this.
Stop the app and install the packages.
npm install escape-string-regexp sort-by
Import these packages in the ListMeetings component:
import escapeRegExp from "escape-string-regexp";
import sortBy from "sort-by";
Update the ListMeetings.render method:
render() {
const query = this.state.query.trim();
let meetings = [];
if (query) {
const match = new RegExp(escapeRegExp(query), "i");
meetings = this.props.meetings.filter(
(m) =>
match.test(m.course) || match.test(m.instructor) || match.test(m.time)
);
} else {
meetings = this.props.meetings;
}
meetings.sort(sortBy("course"));
return (
<div className="list-meetings">
<div className="list-meetings-top">
<Search query={this.state.query} updateQuery={this.updateQuery} />
</div>
<ol className="meeting-list">
{meetings.map((meeting, index) => (
<Meeting
meeting={meeting}
key={index}
onDeleteMeeting={this.props.onDeleteMeeting}
/>
))}
</ol>
</div>
);
}
Save the file and view the app in the browser. Type in a query in the search bar!

Read this to understand the code better!
The following statement simply sorts the meetings by the "course" attribute.
meetings.sort(sortBy("course"));
The sort method sorts the elements of an array in place and returns the sorted array. It optionally takes in a function that defines the sort order. This is what sortBy does for us. I have used it to sort the "meeting" objects based on "course" attribute. The sort-by package more generally allows for sorting by multiple properties.
The following code snippet
const match = new RegExp(escapeRegExp(query), "i");
meetings = this.props.meetings.filter(
(m) =>
match.test(m.course) || match.test(m.instructor) || match.test(m.time)
);
We create a "Regular Expression" (regex) object and use that to test if the search query matches information about a meeting.
The regex will not work correctly when a user input (search query) contains inputs such as ? or * because those inputs have special meaning in a regex expression. The escapeRegExp helps us to circumvent this potential issue.
Regular expressions are too complex to get into in this program, but they're incredibly valuable in programming to verify patterns.
Check out what MDN has to say about Regular Expressions. Also, check out how the String .match() method uses Regular expressions to verify patterns of text.
Zirectory (Part II)
Recall "Zirectory" (Zoom Directory) is an application that contains a collection of Zoom meeting links for JHU courses. Faculty can add their courses' Zoom link to this directory and students can search to find the links, for fast and easy access to their lectures.
In this part, we will add a form (controlled component) to allow faculty provide information about their course "meetings". We will use React Router to provide transitions when navigating between different URL locations within our app.
The repository for part-2 (completed) is here.
Step 1
Here are the wireframes of the UI which we are going to build.
We will update the UI for homepage to add a button with + icon to the search bar:
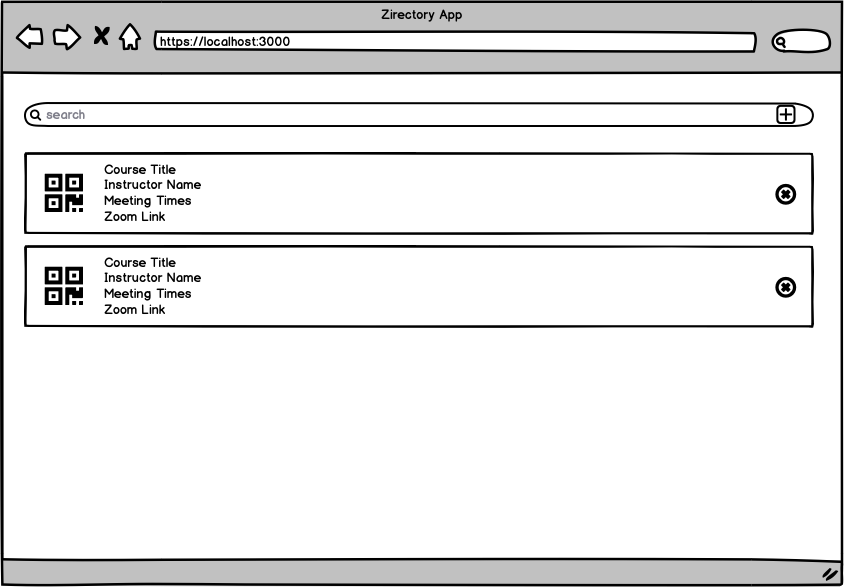
Once a user clicks on the + icon, they will be redirected to the /create endpoint with the following view:

Step 2
Create a file CreateMeeting.js with the following content:
function CreateMeeting() {
return <div>Create Meeting</div>;
}
export default CreateMeeting;
Update ListMeetings.js to include a link to navigate to "create meeting" view!
<div className="list-meetings-top">
<Search query={this.state.query} updateQuery={this.updateQuery} />
+ <a href="/create" className="add-meeting">Add Meeting</a>
</div>
Add the following styling to ListMeeting.css
.add-meeting {
display: block;
width: 73px;
background: white;
background-image: url("./icons/add.svg");
background-repeat: no-repeat;
background-position: center;
background-size: 28px;
font-size: 0;
}
Save the file and revisit the app in your browser. Notice the icon added to the search bar!

Click on the icon; although the URL changes to http://localhost:3000/create, the view does not change!
Step 3
We need to build a (web) server, with NodeJS/Express for instance, to handle routing requests for different endpoints;
when a user visits /create we must response with the HTML file (and associated styling/script files) for "create meeting" view.
In React apps, we can get away by using third-party libraries for routing. A popular choice is react-router which provides a collection of navigational components for React applications.
Stop your application and install react-router and the related package react-router-dom:
npm install react-router react-router-dom
Working with react-router is relatively simple!
Open index.js and import the BrowserRouter from the react-router package:
import { BrowserRouter as Router } from "react-router-dom";
Now wrap the App component:
ReactDOM.render(
<Router>
<App />
</Router>,
document.getElementById("root")
);
Next, open App.js and import the BrowserRouter from the react-router package:
import { Route, Switch } from "react-router";
Update the render method of App component:
render() {
return (
<Switch>
<Route exact path="/">
<ListMeetings
meetings={this.state.meetings}
onDeleteMeeting={this.removeMeeting}
/>
</Route>
<Route path="/create">
<CreateMeeting />
</Route>
</Switch>
);
}
Save the file and run the application. Open http://localhost:3000 to view it in the browser. Click on the add icon to navigate to the "create meeting" view and click on the back button to return to the homepage.

The
react-routerlibrary manipulates and makes use of browser's session history to provide a sense of routing!
Libraries like react-router are "hacking" routing! In my experience, there are many problems with this approach ranging from when you deploy your application to a service like GitHub Pages (where the base URL is not the domain) to issues with revisiting a page after you have updated its state from another view.
There are alternatives to react-router and you can build your own too. I recommend the following readings if you are interested to learn more:
- Build your own React Router
- Build your own React router alternative
- How to build your own React-Router with new React Context Api
- React Router v5: The Complete Guide
Step 4
Let's build the "create meeting" view!
Update the CreateMeeting.js file as follows:
import "./CreateMeeting.css";
function CreateMeeting() {
return (
<div>
<a href="/" className="close-create-meeting">Close</a>
<form className="create-meeting-form">
<div className="create-meeting-details">
<input type="text" name="course" placeholder="Course" />
<input type="text" name="instructor" placeholder="Instructor" />
<input type="text" name="time" placeholder="Meeting Times" />
<input type="url" name="link" placeholder="Meeting Link" />
<button>Add Meeting</button>
</div>
</form>
</div>
);
}
export default CreateMeeting;
And here is the styling CreateMeeting.css
.close-create-meeting {
display: block;
width: 60px;
height: 60px;
background-image: url("./icons/arrow-back.svg");
background-position: center;
background-repeat: no-repeat;
background-size: 30px;
font-size: 0;
color: white;
}
.create-meeting-form {
background-color: white;
padding: 40px 40px 20px 20px;
max-width: 500px;
margin: 0 auto;
display: flex;
}
.create-meeting-details {
margin-left: 20px;
}
.create-meeting-details input {
width: 100%;
padding: 5px 10px;
margin-bottom: 10px;
font-size: inherit;
background: transparent;
border: none;
border-bottom: 1px solid #ccc;
outline: 0;
}
.create-meeting-details button {
margin-top: 20px;
background: #ccc;
padding: 10px;
text-transform: uppercase;
font-size: inherit;
border: none;
outline: 0;
}
Save the file and revisit the app in your browser. Visit the "create meeting" view at http://localhost:3000/create:

Step 5
HTML form elements naturally keep some internal state and update it based on user input. In React, mutable state is kept in the state property of components, and only updated with setState(). We should combine the two by making the React state be the "single source of truth".
An input form element whose value is controlled by React is called a controlled component.
This means the React component that renders a form also controls what happens in that form on subsequent user input.
So, let's update the CreateMeeting component to be a class component with state:
import { Component } from "react";
import "./CreateMeeting.css";
class CreateMeeting extends Component {
constructor(props) {
super(props);
this.state = {
course: "",
instructor: "",
time: "",
link: "",
};
}
render() {
return (
<div>
<a href="/" className="close-create-meeting">
Close
</a>
<form className="create-meeting-form">
<div className="create-meeting-details">
<input type="text" name="course" placeholder="Course" />
<input type="text" name="instructor" placeholder="Instructor" />
<input type="text" name="time" placeholder="Meeting Times" />
<input type="url" name="link" placeholder="Meeting Link" />
<button>Add Meeting</button>
</div>
</form>
</div>
);
}
}
export default CreateMeeting;
Step 6
To ensure the form elements use the component state, we will make a two-way integration so that
- the form element "value" is always the value stored in component state
- the component state is updated when the form value changes (as a result of user interaction)
For each HTML form, update value and onChange attributes; for example for input element for "course" make the following changes
<input
type="text"
name="course"
placeholder="Course"
+ value={this.state.course}
+ onChange={this.handleChange}
/>
Since the value attribute is set on our form element, the displayed value will always be this.state.course, making the Component state the source of truth. The handleChange (which we have not implemented yet) will run on every keystroke to update the Component state as the user types.
Here is the complete updated render method
render() {
return (
<div>
<a href="/" className="close-create-meeting">
Close
</a>
<form className="create-meeting-form">
<div className="create-meeting-details">
<input
type="text"
name="course"
placeholder="Course"
value={this.state.course}
onChange={this.handleChange}
/>
<input
type="text"
name="instructor"
placeholder="Instructor"
value={this.state.instructor}
onChange={this.handleChange}
/>
<input
type="text"
name="time"
placeholder="Meeting Times"
value={this.state.time}
onChange={this.handleChange}
/>
<input
type="url"
name="link"
placeholder="Meeting Link"
value={this.state.link}
onChange={this.handleChange}
/>
<button>Add Meeting</button>
</div>
</form>
</div>
);
}
We must now implement the handleChange method:
handleChange(event) {
this.setState({ [event.target.name]: event.target.value });
console.log(this.state);
}
The console.log is for sanity check during development. We will remove it after testing that the method behaves as expected. Don't forget to bind the method to the CreateMeeting class; add the following statement to its constructor:
this.handleChange = this.handleChange.bind(this);
Save the file and revisit the app in your browser.
With a controlled component, the input's value is always driven by the Component's state. This may seem unnecessary to you but notice we can now pass the values in out form element to other UI elements too, or reset it from other event handlers.
Step 7
We must now handle the "form submission", that is when user clicks on "ADD MEETING".
Add the following method to CreateMeeting component:
handleSubmit(event) {
alert("A meeting was added: " + JSON.stringify(this.state));
event.preventDefault();
}
This method, add the moment, only shows an alert that form is submitted.
Note: A form has the default HTML form behavior of browsing to a new page when the user submits the form. Here the
handleSubmit"prevents" the default behavior and gives you more control on what data to be submitted to what endpoint. We will update thehandleSubmitto "create" a new meeting (save it to the state of the App).
Make sure to bind handSubmit to CreateMeeting; add the following to the constructor:
this.handleSubmit = this.handleSubmit.bind(this);
Finally, add onSubmit attribute to the form element:
- <form className="create-meeting-form" >
+ <form className="create-meeting-form" onSubmit={this.handleSubmit}>
Save the file and revisit the app in your browser, and try to add a meeting.

You can learn more on using HTML forms in React application by reading the React Documentations: Forms. There are also third-party React components, such as formik, that you can use in place of plain forms.
Step 8
We need to add the meeting to the state of App (similar to how we removed a meeting from it).
Open App.js and add the following method to the App class:
addMeeting = (meeting) => {
this.setState({
meetings: this.state.meetings.concat(meeting),
});
};
Pass this method as a prop to CreateMeeting component:
- <CreateMeeting />
+ <CreateMeeting onCreateMeeting={this.addMeeting} />
Update the handleSubmit method in CreateMeeting:
handleSubmit(event) {
- alert("A meeting was added: " + JSON.stringify(this.state));
+ this.props.onCreateMeeting(this.state)
event.preventDefault();
+ this.props.history.push("/");
}
The last statement allows us to "redirect" to the homepage. It does so using the history object in react-router library (which is based on the browser history API).
The history object is not passed as props, by default. To do so, you must wrap the CreateMeeting component in the withRouter higher-order component from the react-router package:
- Import
withRouterinCreateMeeting.jsimport { withRouter } from "react-router"; - Update the export statement in
CreateMeeting.jsexport default withRouter(CreateMeeting);
Save the file and revisit the app in your browser, and try to add a meeting.

Step 9
The Zirectory application is complete in terms of its functionality. We will now polish the source code by changing/adding a few things.
First, let's replace anchor elements (HTML <a> element) with react-router-dom Link component.
The Link component allows you to pass query parameters or link to specific parts of a page. It also allows you to pass "state" to the Component which you want to navigate to.
Open ListMeetings.js and import the Link component:
import { Link } from "react-router-dom";
Now update the anchor element to a Link component
- <a href="/create" className="add-meeting">Add Meeting</a>
+ <Link to="/create" className="add-meeting" />
Notice the href attribute on a element is changed to to props on the Link component.
Open CreateMeetings.js, import the Link component, and update the anchor element to a Link component:
- <a href="/" className="close-create-meeting">Close</a>
+ <Link to="/" className="close-create-meeting" />
Save the file and revisit the app in your browser; everything must look and function as before!
Step 10
Notice that react bundles all input data to a Component into an object called props. It is difficult to keep track of (and validate) the props that a component receives. To mitigate this shortcoming, the folks who created React also created a package called prop-types.
Stop the application and install prop-types:
npm install prop-types
Open the ListMeetings.js and import prop-types:
import PropTypes from "prop-types";
If you look inside App.js you will find we send two props to ListMeetings component
<ListMeetings
meetings={this.state.meetings}
onDeleteMeeting={this.removeMeeting}
/>
Add the following to the end of ListMeetings.js:
ListMeetings.propTypes = {
meetings: PropTypes.array.isRequired,
onDeleteMeeting: PropTypes.func.isRequired
};
Save the file and run the app; go to App.js and comment out onDeleteMeeting={this.removeMeeting}. Save the file and check out the browser console.
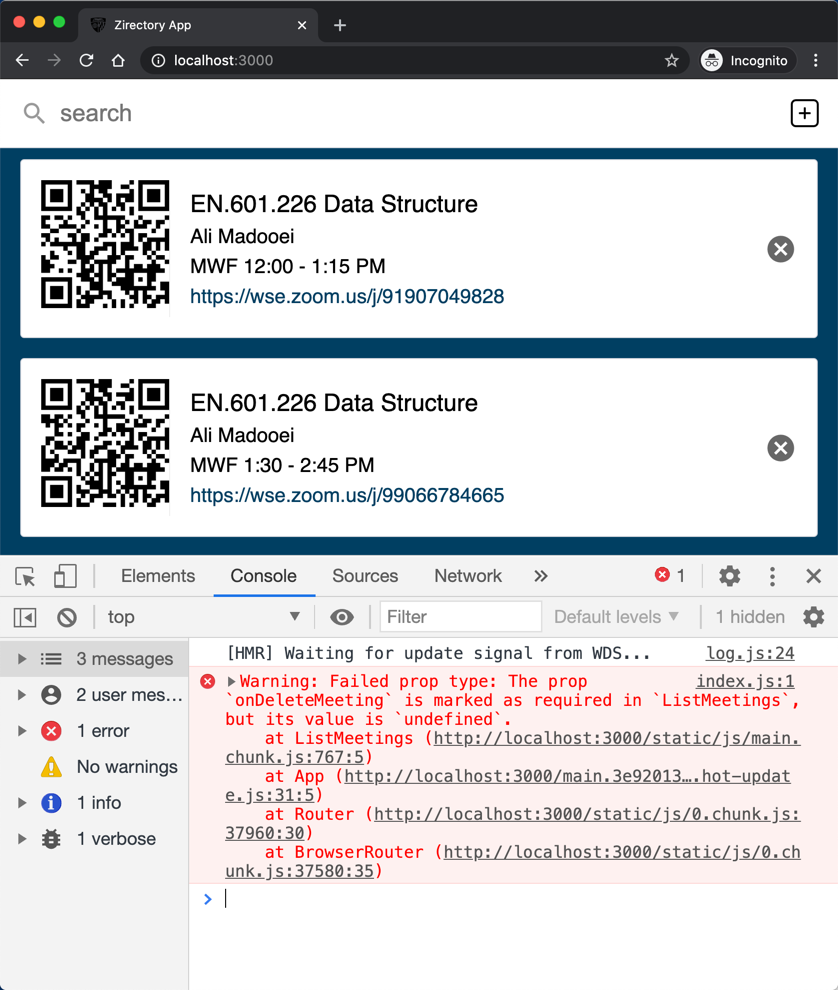
Notice how the PropTypes package gives you a warning.
PropTypes is made to "type check" the props. As an added advantage, you can use it as a documentation of the props which your component receives.
PropTypes can be made to check the nested structure of your props:
ListMeetings.propTypes = {
meetings: PropTypes.arrayOf(
PropTypes.shape({
_id: PropTypes.string,
course: PropTypes.string.isRequired,
instructor: PropTypes.string.isRequired,
time: PropTypes.string.isRequired,
link: PropTypes.string.isRequired,
})
).isRequired,
onDeleteMeeting: PropTypes.func.isRequired,
};
You can learn more about PropTypes here.
Step 11
Let's add PropTypes to other components as well.
Open Meetings.js and import PropType:
import PropTypes from "prop-types";
Looking at the ListMeetings component, the Meeting component receives two props that it uses; the key is used for React's reconciliation algorithm.
<Meeting
meeting={meeting}
key={index}
onDeleteMeeting={this.props.onDeleteMeeting}
/>
Add the following to the end of Meetings.js file:
Meeting.propTypes = {
meeting: PropTypes.shape({
_id: PropTypes.string,
course: PropTypes.string.isRequired,
instructor: PropTypes.string.isRequired,
time: PropTypes.string.isRequired,
link: PropTypes.string.isRequired,
}).isRequired,
onDeleteMeeting: PropTypes.func.isRequired,
};
Open Search.js and import PropType. Add the following to the end of this file:
Search.propTypes = {
query: PropTypes.string,
updateQuery: PropTypes.func.isRequired,
};
Open CreateMeeting.js and import PropType. Add the following to the end of this file:
CreateMeeting.propTypes = {
onCreateMeeting: PropTypes.func.isRequired,
};
Save the file and revisit the app in your browser; everything must look and function as before!
Step 12
As the final step, I want to bring your attention to React Developer Tools, a browser extention that adds React debugging tools to the Chrome Developer Tools.
Install it. Run the a and open the browser Developer Tools.

Notice there are two new tabs: Components and Profiler. You can use these tabs to navigate through the React components (viewing their props, state, etc) or profile the performance of your application.
To learn more about this, I recommend reading How to use the React Developer Tools.
Zirectory (Part III)
Recall "Zirectory" (Zoom Directory) is an application that contains a collection of Zoom meeting links for JHU courses. Faculty can add their courses' Zoom link to this directory and students can search to find the links, for fast and easy access to their lectures.
In this part, we will connect the app to a backend that provides persistence, and then deploy the application.
The repository for part-3 (completed) is here.
Step 1
I have created the backend (API + persistence mechanism) for the Zirectory App. You can find it here.
- Clone the repository.
- Open the terminal and change directory to
zirectory-api. - Install the dependencies:
npm install - Create a
.envfile with the following content:DB_URI="YOUR_MONGODB_URI"- You must have a MongoDB cluster running in the cloud.
- If not, create one, then obtain its URI to connect to it.
- Make sure to replace
<password>with your database admin password. - And, replace the
<dbname>with the desired database name.
- Run the backend using
nodemon .(It will run at http://localhost:4567) - You can download this minimal Postman request collection to test the API.
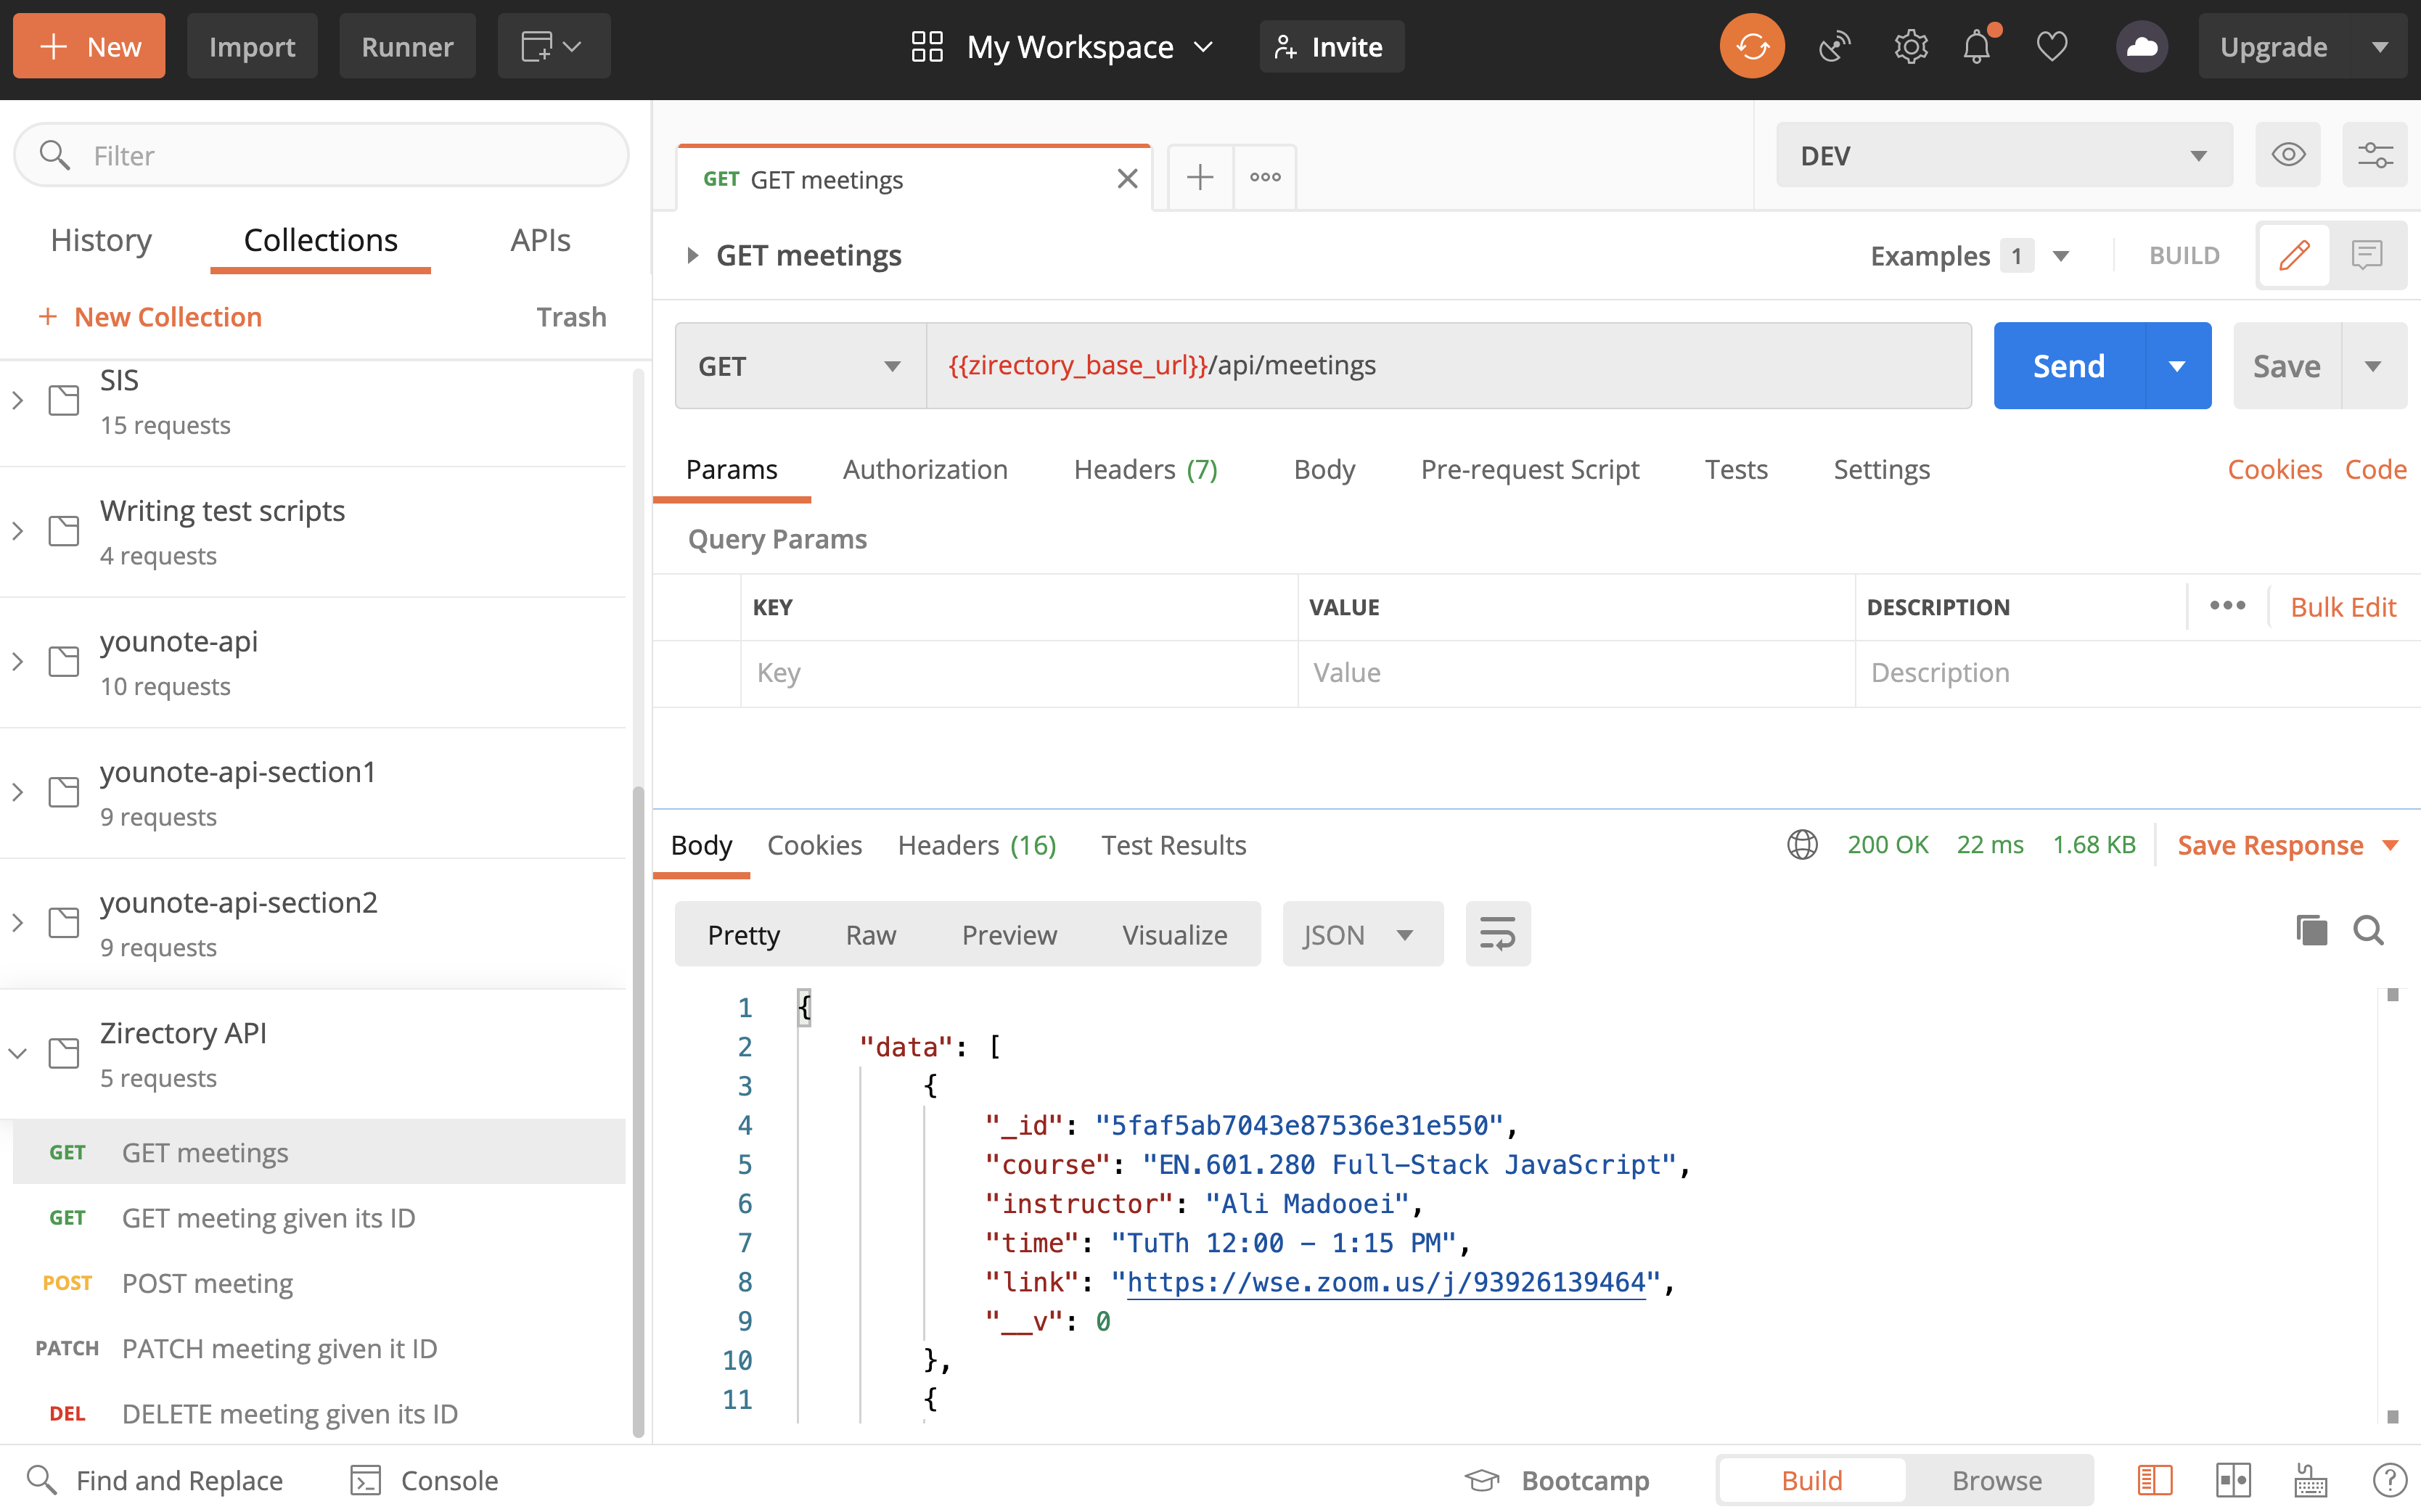
Step 2
Run the Zirectory App alongside the backend server.
Open the App.js file. Notice we initialized the state with sample meetings. Let's delete these!
class App extends Component {
state = {
meetings: [],
};
// other methods not shown
}
We must now read the meetings data from the backend. The API endpoint to GET the meetings is
http://localhost:4567/api/meetings
We can easily get the data using axios; let's stop the app and install it:
npm install axios
To make a GET request to our backend, we can use axios.get:
axios.get("http://localhost:4567/api/meetings")
.then(response => this.setState({ meetings: response.data.data }))
.catch(err => console.log(err));
The question is: where should we put the above statement? In the constructor of App? In App.render()?
Step 3
There are several special methods declared in the React Component class that are called Lifecycle Methods.
React (automatically) calls the lifecycle methods at certain times during the "life" of a Component.
Here are the most commonly used ones (but there are more):
componentWillMount(): invoked immediately before the component is inserted into the DOM.componentDidMount(): invoked immediately after the component is inserted into the DOM.componentWillUnmount(): invoked immediately before a component is removed from the DOM.componentWillReceiveProps(): invoked whenever the component is about to receive brand new props.
In fact, the constructor and the render methods are also considered lifecycle methods!
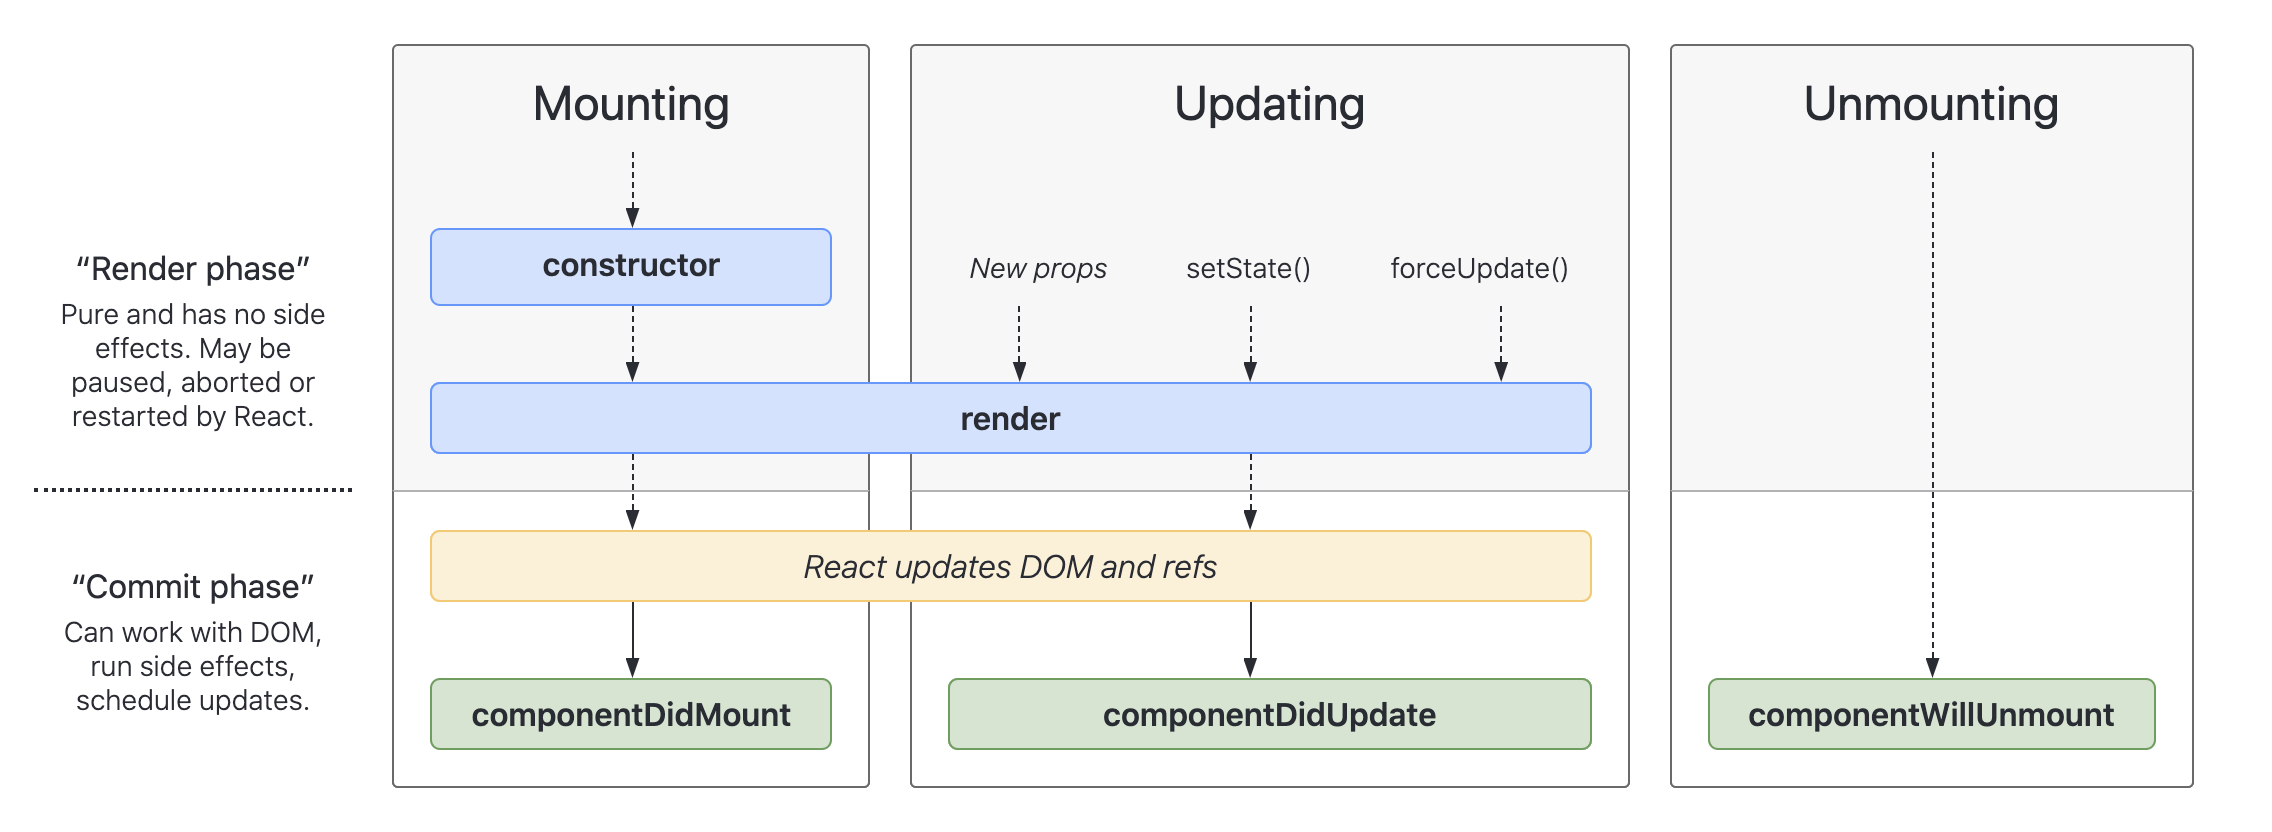
The image above is a screenshot from interactive react lifecycle methods diagram.
The componentDidMount() is the (lifecycle) method which is commonly used to read data from an external API.
Override componentDidMount() in App:
componentDidMount() {
axios
.get("http://localhost:4567/api/meetings")
.then((response) => this.setState({ meetings: response.data.data }))
.catch((err) => console.log(err));
}
Save the file and revisit the app in your browser; everything must look and function as before! You must see the sample meetings data but this time they are retrieved from the backend.
Read The React Component Lifecycle on Medium to learn more about it. There is also a section on React's documentation called State and Lifecycle which I recommend reading.
Caution: After introduction of "Hooks" in React, some consider lifecycle methods as legacy approach which should be replaced with use of hooks. Here is a good read on that topic: Replacing Lifecycle methods with React Hooks.
Step 4
When we delete a meeting, we must send a DELETE request to the backend to keep it in sync with the state of the app.
removeMeeting = (meeting) => {
this.setState((state) => {
return {
meetings: state.meetings.filter((m) => m._id !== meeting._id),
};
});
axios
.delete(`http://localhost:4567/api/meetings/${meeting._id}`)
.catch((err) => console.log(err));
};
Save the file and revisit the app in your browser. Delete a meeting and then refresh the app. The deleted meeting must be gone for good!
Step 5
When we add a meeting, we must send a POST request to the backend to keep it in sync with the state of the app.
addMeeting = (meeting) => {
axios
.post("http://localhost:4567/api/meetings", meeting)
.then((response) =>
this.setState({
meetings: this.state.meetings.concat(response.data.data),
})
)
.catch((err) => console.log(err));
};
Notice that I first create the meeting on the backend and then add the created meeting to the state. I do this to get the "ID" of the created meeting. Without the ID, we will not be able to delete the meeting.
Save the file and revisit the app in your browser. Add a meeting and then refresh the app. The added meeting must be there after the refresh!
Aside: There is a handy Axios cheat-sheet here.
Step 6
The App component now contains the logic for retrieving the data from the backend. This violates the Single Responsibility Principle. Let's refactor the code to separate the responsibilities.
Create a file ZirectoryApi.js with the following content:
import axios from "axios";
const BASE_URL = "http://localhost:4567";
async function getAll() {
try {
const response = await axios.get(`${BASE_URL}/api/meetings`);
return response.data.data;
} catch (err) {
console.log(err);
return [];
}
}
async function remove(id) {
try {
const response = await axios.delete(`${BASE_URL}/api/meetings/${id}`);
return response.data.data;
} catch (err) {
console.log(err);
return null;
}
}
async function add(meeting) {
try {
const response = await axios.post(`${BASE_URL}/api/meetings`, meeting);
return response.data.data;
} catch (err) {
console.log(err);
return null;
}
}
export { getAll, remove, add };
Step 7
Let's update the App component to use the functions defined in ZirectoryApi.
First, import the functions:
import * as ZirectoryApi from "./ZirectoryApi.js";
Next, update componentDidMount():
componentDidMount() {
ZirectoryApi
.getAll()
.then((meetings) => this.setState({ meetings }));
}
Then, update removeMeeting:
removeMeeting = (meeting) => {
this.setState((state) => {
return {
meetings: state.meetings.filter((m) => m._id !== meeting._id),
};
});
ZirectoryApi.remove(meeting._id);
};
Finally, update addMeeting:
addMeeting = (meeting) => {
ZirectoryApi.add(meeting).then((m) =>
this.setState({
meetings: this.state.meetings.concat(m),
})
);
};
As the result of refactoring, the logic for working with the backend API is taken out of the App component and its operations are now simplified.
Save the file and revisit the app in your browser; everything must look and function as before! You must see the sample meetings data and be able to add/remove meetings.
Step 8
When you finally ready to deploy your React app (as we are right now), you can create a production bundle using the following command:
npm run build
This will generate an optimized build of your React application, ready to be deployed. The generated artifacts will be placed in the build.
To check it out locally, you should serve the content of the build folder (so don't directly open index.html). One of the easiest way to do this is to install serve and let it handle the rest:
npm install -g serve
Notice that I installed this package "globally".
After installation, serve your static site using the following command:
serve -s build
Note that you must be in the root of your application (zirectory-app folder) to run the above command.
By default,
serveruns your site on port5000.
The port can be adjusted using the -l or --listen flags:
serve -s build -l 4000
For more information, consult the documentation of serve.
Step 9
We have created a production bundle for our application. It is time to deploy it.
There are many options available to deploy your React app, from GitHub Pages to Heroku. Some of these are enumerated in the article 10 ways to deploy a React app for free by LogRocket. A more general discussion of the topic can be found in create-react-app documentation on deployment.
I found Netlify a good option for deploying React applications. Netlify is a service for deploying JAMStack applications. (If you are wondering what is JAMStack, read What (the Hell) Is the JAMstack?!)
Netlify has an article, Deploy React Apps in less than 30 Seconds, which we will follow here with some adjustments.
First, you need to sign up for a free account on Netlify.
Next, install Netlify CLI:
npm install -g netlify-cli
Then, connect your Netlify CLI to your Netlify account using the following command in the terminal:
netlify login
The command will open up your browser and take you to Netlify to grant permission.
Finally, deploy your React app using Netlify CLI. You must first change directory to zirectory-app folder:
netlify deploy
The command above will present you with a number of prompts.
Notice, when you are asked for "deploy path", you must answer "build" which is the folder that contains your optimized React app ready for production.
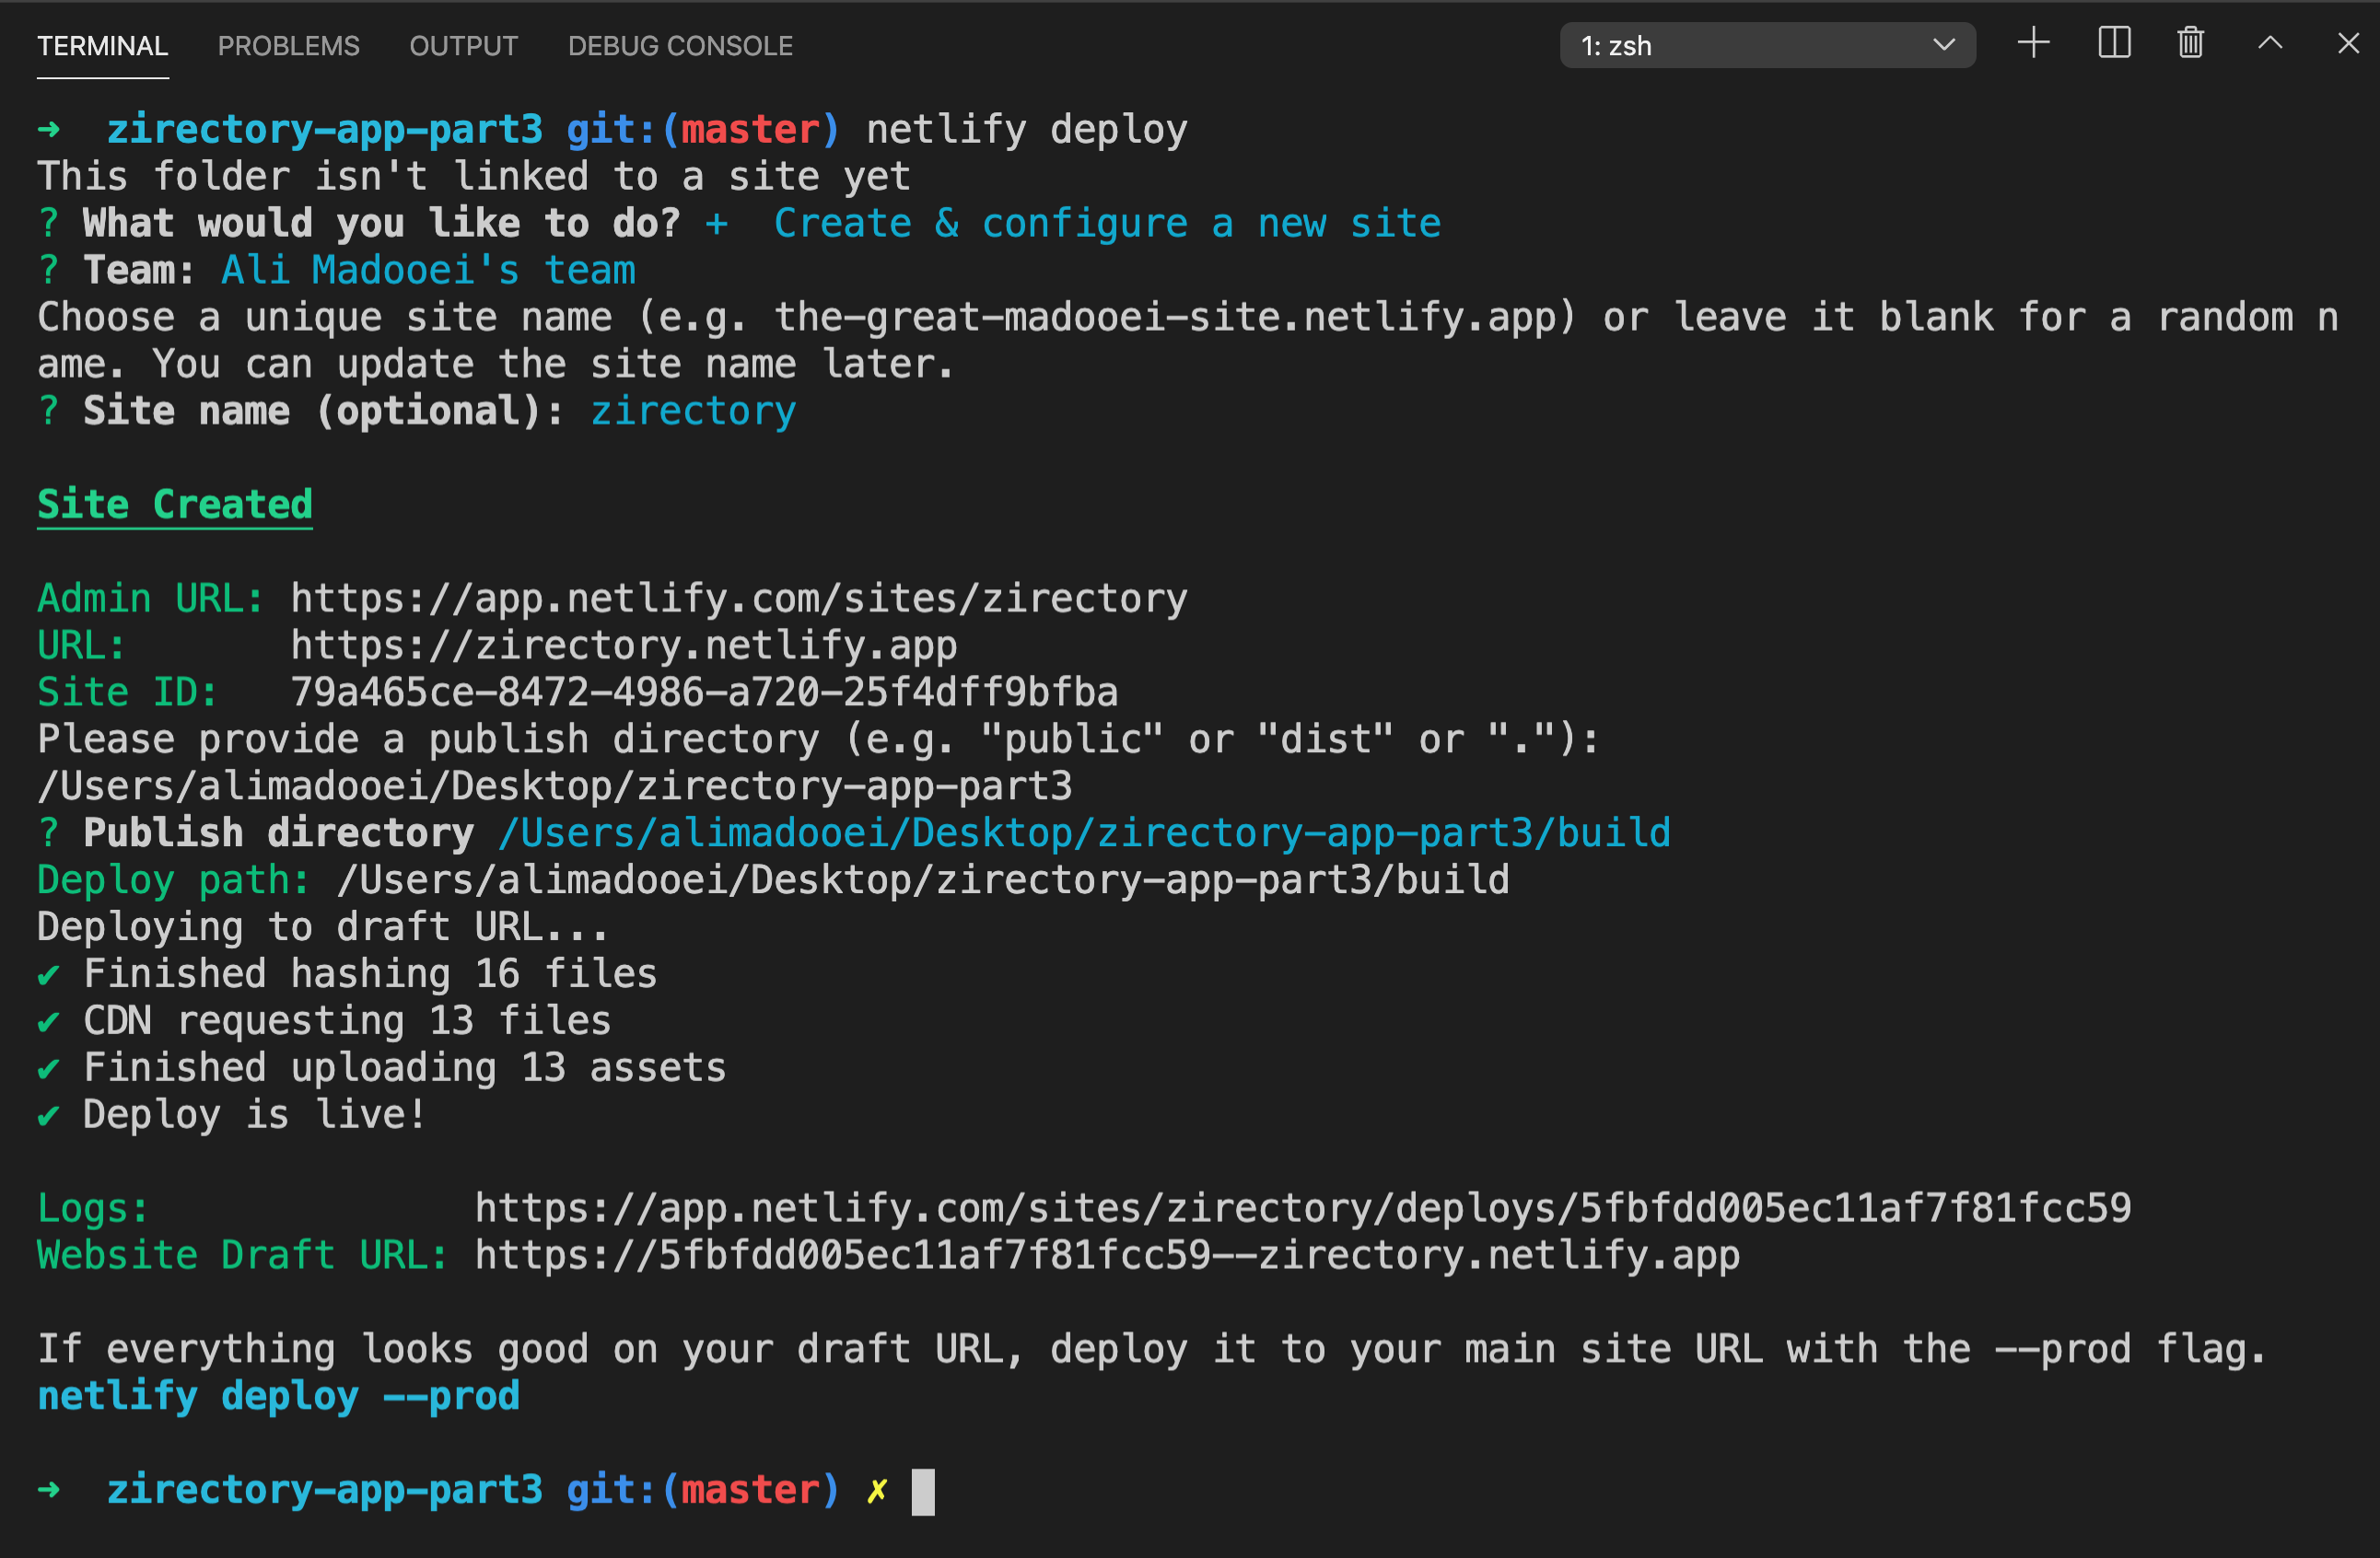
This is going to create a website and deploy it to a draft URL first which you can view at the provided URL. The draft URL is like a staging environment for previewing and testing your app. Once you are happy with the deployed app, you can take it live by the following command:
netlify deploy --prod
This will ask one more time for the "deploy path" which you must answer with "build" (to point to the build folder). It then deploys the app and gives you two URLs:
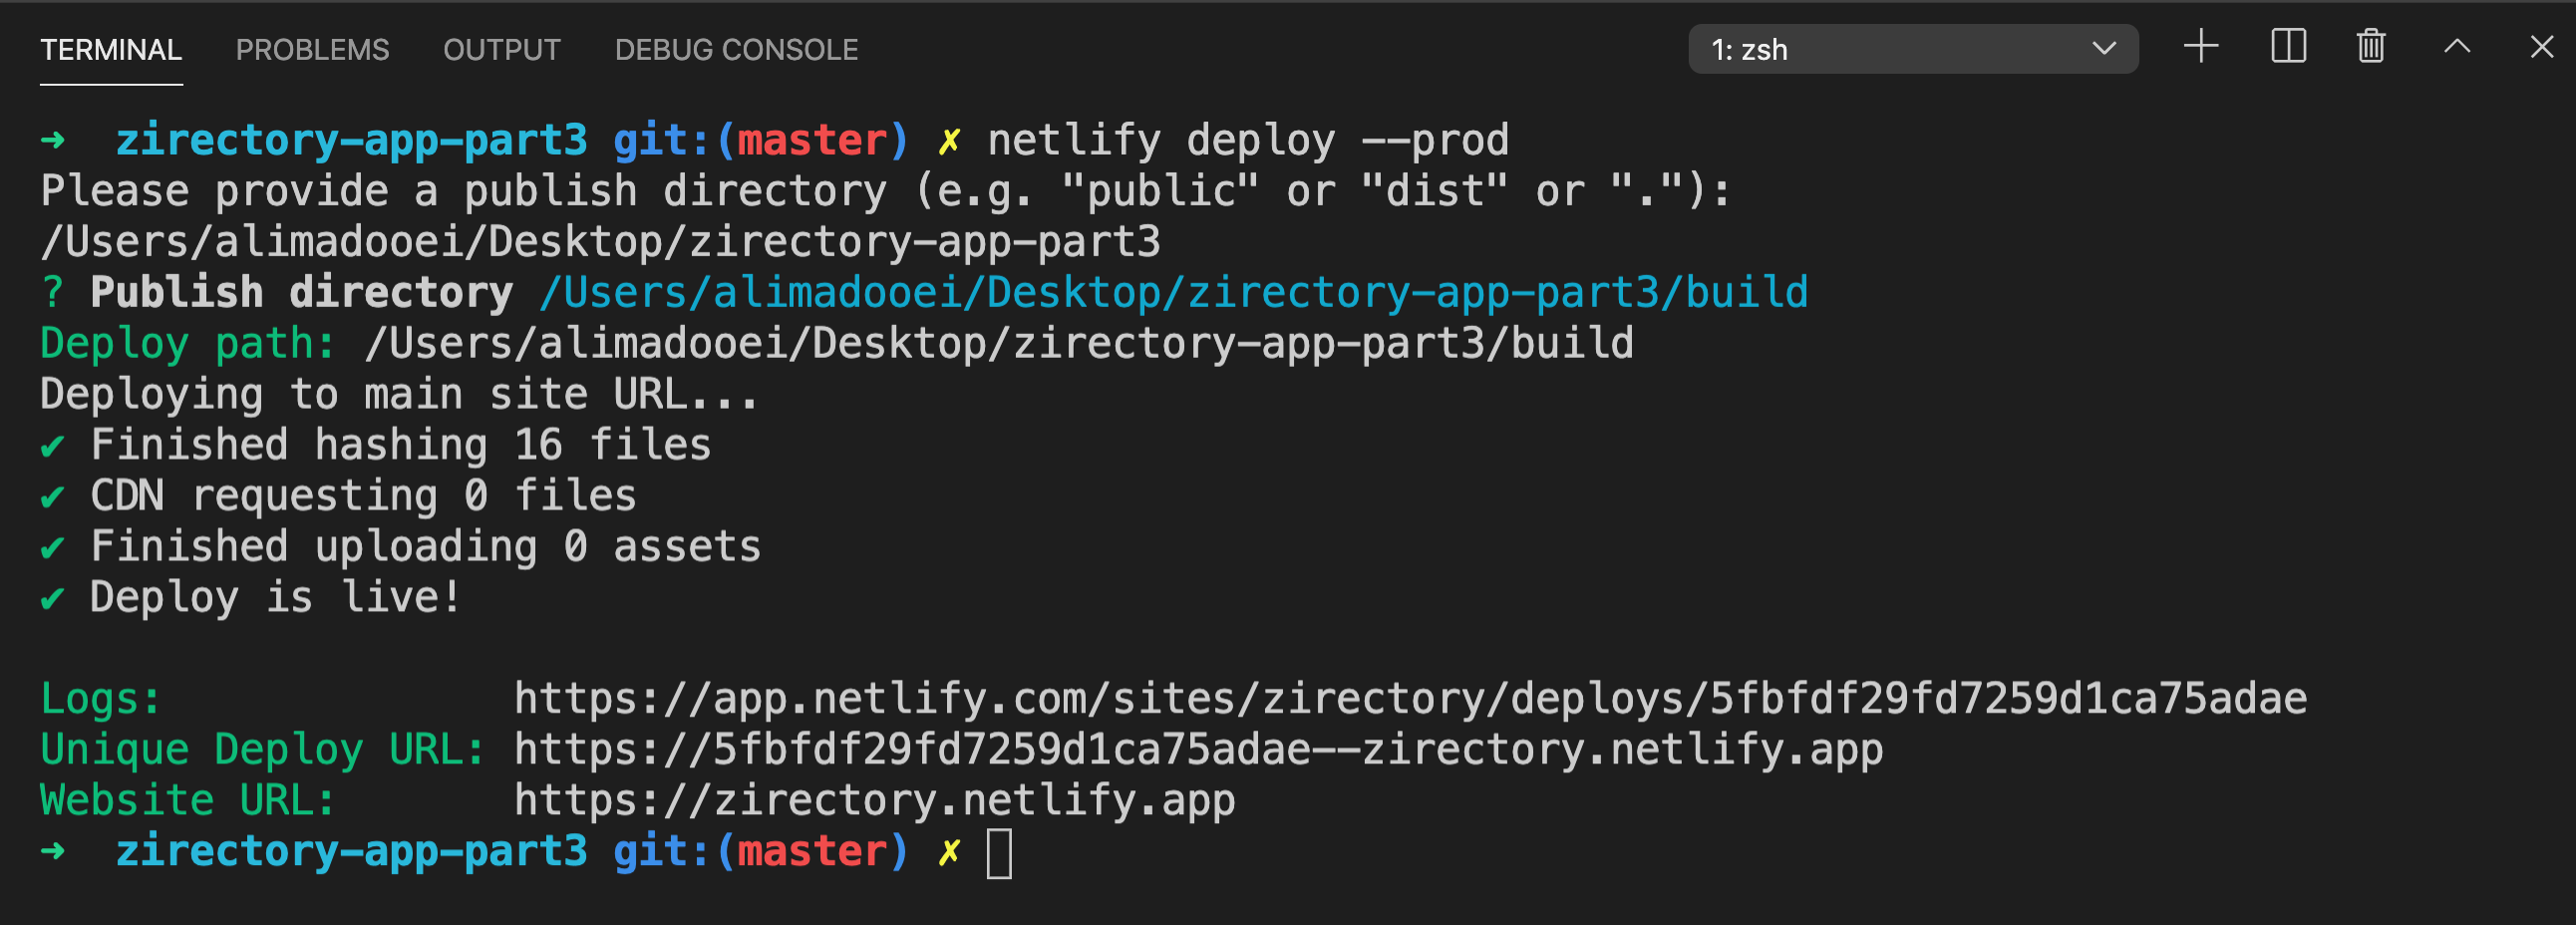
I get two URLs: a Unique Deploy URL which represents the unique URL for each individual deployment and a Live URL which always displays your latest deployment.
Each time you update your site and deploy it with Netlify deploy, you're going to get a unique URL for that deployment.
So if you deploy your app multiple times, you will have multiple unique URLs so that you can point users to specific versions of your app. But the live URL always displays your latest changes at the same URL. This is one of the features that I really like about Netlify!
Another thing I like about Netlify is that it automatically secures your site over HTTPS at no cost.
Step 10
If you're publishing a React app that uses a router that is based on HTML5 History API (like react-router, as we do), you'll need to configure redirects and rewrite rules for your URLs. To understand the issue, read Serving Apps with Client-Side Routing on create-react-app documentation.
Netlify makes configuring redirects and rewrite rules for your URLs really easy. You'll need to add a file inside the built folder of your app named, _redirects. Inside the file, include the following rewrite rule.
/* /index.html 200
Then, run the deploy command again and follow the prompt:
netlify deploy
Step 11
I have deployed the backed on Heroku and updated the frontend to use the deployed backed instead of the local backend. In doing so, I decided to read the BASE_URL variable for the API server from environment variables.
React actually uses the dotenv library under the hood. You can work with environment variables this way:
- create
.envfile in the root of the project - set environment variables starting with
REACT_APP_ - access the variable by
process.env.REACT_APP_...in components
For example, I created a .env file with the following content:
REACT_APP_BASE_URL=http://localhost:4567
And, updated ZirectoryApi.js file:
- const BASE_URL = "http://localhost:4567";
+ const BASE_URL = process.env.REACT_APP_BASE_URL;
Running the backend and frontend locally, this will work. For deployment, changed the REACT_APP_BASE_URL to the deployed backend and then build the frontend again (with npm run build). Finally, deploy the frontend using netlify deploy command (don't forget to include the _redirects file in the build folder, first).
Feel free to visit the deployed app at https://zirectory.netlify.app:

Appendix
Recorded Lectures
| Lecture | Topics | Notes | Code |
|---|---|---|---|
| 9/1 | Course Overview, SleepTime App | 1.1 - 2.7 | repl.it |
| 9/3 | SleepTime App, JavaScript Basics | 2.8 - 3.5 | repl.it |
| 9/8 | JavaScript Basics, Git/GitHub | 3.6 - 4.4 | |
| 9/10 | Git/GitHub, Control Flow | 4.5 - 5.1 | GitHub |
| 9/15 | Control Flow, TicTacToe | 5.2 - 6.8 | GitHub |
| 9/17 | Functions | 7.1 - 7.14 | |
| 9/22 | Brick Breaker | 8.1 - 8.17 | GitHub |
| 9/24 | Class (HW1 out) | 9.1 - 8.11 | |
| 9/29 | SIS API & Fetch | 10.1 - 10.17 | GitHub |
| 10/1 | Asynchronous Programming | 11.1 - 10.12 | |
| 10/6 | Modules, NodeJS | 12.1 - 13.5 | |
| 10/8 | NodeJS, Express | 13.6 - 14.7 | GitHub |
| 10/13 | Express, Heroku | 14.8 - 15.2 | GitHub |
| 10/15 | YouNote API | 16.1 - 16.9 | GitHub |
| 10/20 | YouNote API Refactored | 16.10 - 17.4 | GitHub |
| 10/29 | YouNote Refactor, MongoDB | 17.5 - 18.6 | GitHub |
| 11/3 | MongoDB, YouNote Persisted | 18.7 - 19.3 | GitHub |
| 11/5 | YouNote API Persisted & App | 19.4 - 20.4 | GitHub |
| 11/10 | YouNote App & Users App | 20.5 - 21.9 | GitHub |
| 11/12 | Users App | 21.10 - 21.20 | GitHub |
| 11/17 | React: The basics | 22.1 - 22.8 | |
| 11/19 | React: The basics | 22.9 - 22.15 | GitHub |
| 12/1 | Zirectory (Part I) | 23.1 - 23.12 | GitHub |
| 12/3 | Zirectory (Part II) | 23.13 - 24.6 | GitHub |
| 12/8 | Zirectory (Part III) | 24.7 - 25.11 | GitHub |
HTML
HTML (HyperText Markup Language) is used to lay out the structure of a webpage.
HTML is made up of tags.
- Tags generally come in pairs, with data being in between the tags.
- Tags are indented to help visualize their hierarchy, but any indentation is purely stylistic.
- Tags can also have attributes, which are data fields, sometimes required and sometimes optional, that provide additional information to the browser about how to render the data.
We will explore some common tags below.
Basic structure
<!DOCTYPE html>is placed at the start of an HTML file to indicate to the browser that HTML5 is being used.<html></html>: contents of website<head></head>: metadata about the page that is useful for the browser when displaying the page<title></title>: title of the page<body></body>: body of the page
<!DOCTYPE html>
<html lang="en">
<head>
<meta charset="UTF-8">
<meta name="viewport" content="width=device-width, initial-scale=1.0">
<title>Document</title>
</head>
<body>
</body>
</html>
Basic tags
Explore the CodePen below for basic HTML tags and their effect.
See the Pen HTML Basic tags by Ali Madooei (@madooei) on CodePen.
Lists
<ul></ul>: unordered list<ol></ol>: ordered list<li></li>: list item (must be inside either<ul></ul>or<ol></ol>)
See the Pen HTML List tags by Ali Madooei (@madooei) on CodePen.
Link and Image
<a href="path/to/hello.html">Click here!</a>: link tohello.html, some URL, or some other content marked byidby passing#idtohref<img src="path/to/img.jpg" height="200" width="300">: image stored atsrcattribute, which can also be a URL- note that this is a single tag without an end tag
- both
heightandwidthare optional (if one is omitted, the browser will auto-size the image), and can also take a percentage:height=50%to automatically scale the image to a certain portion of the page
See the Pen HTML img tag by Ali Madooei (@madooei) on CodePen.
Table
<table></table>: table<tr></tr>: table row (must be inside<table></table>)<th></th>: table header (must be inside<td></td>)<td></td>: table data (cell) (must be inside<td></td>)
See the Pen HTML table tag by Ali Madooei (@madooei) on CodePen.
Forms
You can create forms in HTML to collect data; we will explore this later. Here is a CodePen for illustration of some basic form tags:
See the Pen HTML Basic form tags by Ali Madooei (@madooei) on CodePen.
div and span
Two special tags allow us to break up a our webpage into sections:
<div></div>: vertical division of a webpage<span></span>: section of a webpage inside, for example, text
Both <div></div> and <span></span> don't really do much by themselves, but they allow for the labelling of sections of a webpage.
Different sections of a webpage can be referenced with the
idandclassattributes.ids uniquely identify elements, but there can be an arbitrary number of elements with a givenclass.
DOM
The Document Object Model is a way to conceptualize webpages by representing them as a interconnected hierarchy of nodes. In HTML, the nodes of the DOM would be the different tags and their contained data, with the <html></html> tag being at the very top of the tree. While this might seem a little unintuitive at first, this model will become very useful in the future.
See the Pen HTML DOM by Ali Madooei (@madooei) on CodePen.
You will find a wealth of resources on HTML (and Web Development in general) at MDN Web Docs and W3School.
CSS
CSS (Cascading Style Sheets) is a language used to interact with and style HTML, changing the way it looks according to a series of rules. CSS is what makes websites look nice.
CSS can be applied to HTML in a variety of ways:
-
The inline
styleattribute:See the Pen Inline CSS by Ali Madooei (@madooei) on CodePen.
-
The internal style defined inside
<style></style>tags, inside the<head>section of HTML.See the Pen Internal CSS by Ali Madooei (@madooei) on CodePen.
The CodePen above is styled with the following:
<style> div { color: blue; } #danger { color: red; } .highlight { background-color: yellow; } </style> -
A separate
.cssfile:- add
<link rel="stylesheet" href="path/to/styles.css">to the header, - move the CSS code (same format as used inside the
<style></style>tags.
This is often an even better paradigm because it separates two distinctly different things: structure (HTML) and style (CSS), while also being easier to manage and read.
- add
CSS Selectors
CSS selectors are used to select different parts of an HTML page to style in particular ways. In the above example, div, #danger and .highlight are CSS selectors (to select all div elements, the element with id="danger and all elements with class="highlight", respectively.)
Here are some fancier ways to work with the selectors:
-
Select
h1andh2elementsh1, h2 { color: blue; } -
Select all
pelements inside an element withclass="note".note p { color: blue; } -
Select all
inputfields with the attributetype=textinput[type=text] { color: blue; }
Here it gets even fancier:
-
Add two
#before allh2elements:h2::before { content: "##"; }beforeis called a pseudo-element! -
Change the color of a button when the cursor is hovering over it.
button:hover { background-color: gray; }hoveris called a pseudo-class!
CSS Properties
Here are some common CSS properties:
background-color: teal;
color: blue; /* sets the content (text) color */
/* color can be one of ~140 named colors, or a hexadecimal value that represents an RGB value */
text-align: left; /* other possible values are center, right, or justify */
height: 150px; /* sets the height of an area */
width: 150px; /* sets the width of an area */
/* arguments in pixels often can take a percentage or relative values too */
margin: 30px; /* sets the margin around all four sides of an area */
/* margin also be broken up into "margin-left", "margin-right", "margin-top", and "margin-bottom" */
padding: 20px; /* sets the padding around text inside an area */
/* padding be broken up the same way as "margin" */
border: 3px solid blue; /* sets a border around an area */
font-family: Arial, sans-serif; /* sets the font family to be used */
font-size: 28px; /* sets the font size */
font-weight: bold; /* sets the font weight to quality, a relative measure ("lighter"), or a number ("200") */
There are lots of CSS properties that can be used in a lot of different ways. Check out the wonderfully extensive documentation for more information.
Git & GitHub
Jargons
-
Repository: A collection of files tracked by Git. For example, the files that make up the content of this website is kept in a Git repository.
-
Remote: Any version of a repository that is not stored locally on a device is called a "remote". (So, GitHub is a service for you to host remote repositories). "Origin" is used to refer to the "remote" from which the local repository was originally downloaded from.
-
Commit: Git does not save any changes made to the files within your repository until you "commit" it. So, as a verb, it is the action of storing a new snapshot of the repository's state in the Git history. When "commit" is used as a noun, it refers to a single point in the Git history.
-
Staging: Let's explain this one with an example; assume you made changes to 4 files within your repository, but you only want to commit 2 of them because the other 2 are buggy or not complete yet. How do you commit only 2? Well, you put them in the "staging area" after which you commit. So, staging a file means that you have marked it for a commit.
Summary of useful commands
git init: create an empty Git repository in a directory.git add <filename(s)>: add files to the staging area to be included in the next commitgit add .: adds all files
git commit -m "message": take a snapshot of the repository and save it with a message about the changesgit commit -am "message": add files and commit changes all in one
git status: print what is currently going on with the repositorygit log: print a history of all the commits that have been madegit log --pretty=oneline: list commit history in a compact format
git diff <commit> <commit>: show the changes made between the two commits (identified by their IDs)git checkout <commit>: revert the repository back to a given commit. Use it if you want to discard changes to un-staged file/s.git reset --hard <commit>: reset the repository to a given commit. Use it if you want to undo staging of a modified file.git clone <url>: take a repository stored on a server (like GitHub) and downloads itgit clone <url> folder-name: clone tofolder-namegit clone -b <branch> <url>: clone a specific branch
git push: push any local changes (commits) to a remote server- push only after you staged and committed the changes
git fetch: download all of the latest commits from a remote to a local devicegit pull: pull any remote changes from a remote server to a local computergit branch: list all the branches currently in a repositorygit branch <name>: create a new branch callednamegit checkout <name>: switch current working branch tonamegit merge <name>: merge branchnameinto current working branch (normallymaster)git merge origin/master: mergeorigin/master, which is the remote version of a repository normally downloaded withgit fetch, into the local, preexistingmasterbranchgit remote set-url origin https://github.com/USERNAME/REPOSITORY.git: changing a remote's URL
Here is a two-page PDF containing the most useful Git commands.
Learn More!
There are many resources to learn more about Git and GitHub. Check out javinpaul's article My Favorite Free Courses to Learn Git and Github — Best of Lot.
Not a fan of the Terminal!
If you don't like working with terminal to manage your git repository, you are in luck!
- Most editors/IDEs have built in tools for working with Git/GitHub. For example, if you are using VSCode, checkout this article: Working with GitHub in VS Code.
- There are also several great software that provide a graphical user interface (GUI) for using Git/GitHub. You may want to checkout gitkaraken, sourcetree, or gittower.
Styling Guidelines
There are many opinions on the "ideal" style in the world of Software Development. Therefore, in order to reduce the confusion on what style students should follow, we urge you to refer to this style guide.
General Formatting Rules
Trailing Whitespace
Remove trailing white spaces.
Trailing white spaces are unnecessary and can complicate diffs.
Example
const name = "John Smith";__
Recommended:
const name = "John Smith";
Indentation
Indentation should be consistent throughout the entire file. Whether you choose to use tabs or spaces, or 2-spaces vs. 4-spaces - just be consistent!
Encoding
Use UTF-8.
Make sure your editor uses UTF-8 as character encoding, without a byte order mark.
General Meta Rules
Comments
Use comments pragmatically. The code must explain itself. Add comments when further clarification is needed.
Action Items
Mark todos and action items with TODO:.
Highlight todos by using the keyword TODO only, not other formats like @@. Append action items after a colon like this: TODO: action item.
Example
Recommended:
// TODO: add other fruits
JavaScript Language Rules
Variable Declaration
Declare your variables with const, first. If you find that you need to reassign the variable later, use let. There isn't a good reason to use the var keyword anymore for variable declaration.
Semicolons
Always use semicolons.
Relying on implicit insertion can cause subtle, hard to debug problems. Semicolons should be included at the end of function expressions, but not at the end of function declarations.
Example
Not Recommended:
const foo = () => {
return true // Missing semicolon
} // Missing semicolon
function foo() {
return true;
}; // Extra semicolon
Recommended:
const foo = () => {
return true;
};
function foo() {
return true;
}
Wrapper Objects for Primitive Types
There's no reason to use wrapper objects for primitive types. However, type casting is okay.
Example
Not Recommended:
const x = new Boolean(0);
if (x) {
alert("hi"); // Shows 'hi' because typeof x is truthy object
}
Recommended:
const x = Boolean(false);
if (x) {
alert("hi"); // Show 'hi' because typeof x is a falsey boolean
}
Closures
Yes, but be careful.
The ability to create closures is one the most useful (and often overlooked) feature in JavaScript. One thing to keep in mind, however, is that a closure keeps a pointer to its enclosing scope. As a result, attaching a closure to a DOM element can create a circular reference and thus, a memory leak.
Example
Not Recommended:
function foo(element, a, b) {
element.onclick = function() { /* uses a and b */ }
}
Recommended:
function foo(element, a, b) {
element.onclick = bar(a, b);
}
function bar(a, b) {
return function() { /* uses a and b */ }
}
Array and Object Literals
Use Array and Object literals instead of Array and Object constructors.
Example
Not Recommended:
const myArray = new Array(x1, x2, x3);
const myObject = new Object();
myObject.a = 0;
Recommended:
const myArray = [x1, x2, x3];
const myObject = {
a: 0
};
JavaScript Style Rules
Naming
In general, functionNamesLikeThis, variableNamesLikeThis, ClassNamesLikeThis, methodNamesLikeThis, CONSTANT_VALUES_LIKE_THIS and filenameslikethis.js (unless the file contains a class in which case ClassNameLikeThis.js).
Code Formatting
Because of implicit semicolon insertion, always start your curly braces on the same line as whatever they're opening.
Example
Recommended:
if (something) {
// Do something
} else {
// Do something else
}
Not Recommended:
if (something)
{
// Do something
}
else
{
// Do something else
}
Array/Object literals
Single-line array and object initializers are recommended when they fit on one line. Otherwise use multiline initializers.
Example
There should be no spaces after the opening bracket or before the closing bracket:
const array = [1, 2, 3];
const object = {a: 1, b: 2, c: 3};
Multiline array and object initializers are indented one-level, with the braces on their own line, just like blocks:
const array = [
"Joe <joe@email.com>",
"Sal <sal@email.com>",
"Murr <murr@email.com>",
"Q <q@email.com>"
];
const object = {
id: "foo",
class: "foo-important",
name: "notification"
};
Parentheses, Brackets
Use them, even when you can get away with not using them. They generally make for a more readable code.
String literal
For consistency double-quotes (") are preferred over single-quotes (").
Use template literal for multiline strings.
Conditional Ternary Operator
The conditional ternary operator is recommended, although not required, for writing concise code.
Example
Not Recommended:
if (val) {
return foo();
} else {
return bar();
}
Recommended:
return val ? foo() : bar();
&& and ||
These binary boolean operators are short-circuited and evaluate to the last evaluated term. They are often used for purposes other than boolean expression.
Example
The || has been called the default operator because you can write this:
const foo = (name) => {
const theName = name || 'John';
};
instead of:
const foo = (name) => {
const theName;
if (name) {
theName = name;
} else {
theName = 'John';
}
};
Using the boolean operators in capacity other than creating boolean expression is discouraged. There are usually better alternatives.
Example
You can do this for default argument:
const foo = (name = "John") => {
const theName = name || 'John';
};
Quiz
Take-home assessments are popular these days considering the logistical challenges of remote teaching with many of our students in distant time zones. We will employ the same strategy for your Quiz. Essentially, we are replacing the Quiz with a tiny homework, so let's call it quiz-homework (or do you prefer the term take-home exam?).
- On Tue, Oct 27, at 9:00 AM ET, we will release the quiz-homework.
- The format will be similar to other homework (you will have a GitHub repository, you will link it to CodeGrade, etc.)
- It is expected to take a prepared student no more than 75 minutes to finish the quiz-homework.
- However, we will give you a window of 36 hours (to account for all sort of individual challenges you may be facing: time difference, other classes/homework/exams, etc.) to submit it.
- So, the deadline will be Wed, Oct 28, at 9:00 PM ET.
- Much like other homework, the quiz-homework will be open-book. You are allowed (and encouraged) to refer to your notes and other course materials/resources.
- However, unlike homework, you are not going to have any help from the course staff.
- Moreover, you must work alone on the quiz-homework. Do not discuss it with other students.
- More to that point, you should not post any question about quiz-homework on Campuswire unless you have logistical issues or you need to ask any clarifying question. In such cases, please make a private (only visible to instructor and TAs) question on Campuswire.
- Any violation of above-stated policies will be dealt with as a case of Academic Misconduct & Dishonesty.
You may not use a late-day towards the quiz-homework.
You may not ask for extension except under extenuating circumstances.
Examples of extenuating circumstances are illness, accidents or serious family problems. The assumption is that, during the 36 hours window, you will be able to put about 75 minutes of work into completing the quiz-homework.
We will not have a lecture on Tue, Oct 27, so you can put the lecture time towards working on the quiz-homework.
Grading and feedback: We will grade your submission similar to homework and release the grade/feedback once we are done grading all submissions.
Topics: The quiz covers the topic from lecture-1 (Course Overview, SleepTime App) up to and including lecture-15 (YouNote API (Refactored)).
JHU SSO
This tutorial explains how to use JHU SSO (Johns Hopkins University's Single Sign On) for user authentication in your web applications.
Introduction: Terms & Jargons
JHU uses Shibboleth which is an open source software product that implements SAML (Security Assertion Markup Language) for user authorization and authentication.
-
Single Sign On (SSO): Any system where a single authentication provides access to multiple applications. For instance, you access Blackboard, SIS (Student Information System), JHU Email and several other JHU online services using the same credentials, though the same sing-in page.

-
Security Assertion Markup Language (SAML): A framework, and XML schema, for implementing Single Sign On.
-
Principal: The user who is attempting to gain access to our application.
-
Assertions: Data about the principal which are included as part of the SAML response.
-
Service Provider (SP): This is the application, or system, that the user is attempting to access; the app we are building is the service provider.
-
Protected Resource: A resource (typically a webpage) on SP that is identified by its URL. When a user accesses a protected resource, the SP will intercept the request and redirect the user to authenticate first to verify it has access to the protected resource.
-
Identity Provider (IdP): This is a remote application, or system, that authenticates the user and returns data back to the service provider. In our case, JHU is the identity provider. (Well, to be accurate, JHU has an internal IdP which we will use to authenticate our users.)
-
Globally Unique Identifier: A value that the IdP will use to identify an SP.
How does SSO work?
-
When a user attempts to gain access to a protected resource on SP, she will be redirected to SSO software solution to login.
-
User enters their username/password they have for SSO.
-
The SSO requests authentication from its internal IdP to verify user identity.
-
If authentication succeeds, SSO redirects the user back to the SP and passes assertions to the SP (the assertions never includes user's password).
How does SAML work?
SAML is an XML-based framework for implementing SSO:
-
The SP will send an authentication request to IdP in XML format (visit https://www.samltool.com/generic_sso_req.php to see examples of what this XML looks like).
-
The IdP sends its response back to SP in XML format (visit https://www.samltool.com/generic_sso_res.php to see examples of what this XML looks like).
-
Before authentication between an IdP and an SP occurs, a trust must be created between the two systems. This trust occurs through a metadata file exchange. The metadata file is also in XML format. For example, JHU SSO metadata is here: https://idp.jh.edu/idp/shibboleth.
The metadata file contains the configuration data used to define how and on what URLs SP and IdP will communicate with each other. Both the SP and the IdP have their own metadata file that need to be shared with the other component.
Creating these XML files with all the requires information and proper formatting according to SAML standard is a tedious task. As a developer, you often use a library for SAML-based SSO that provides an interface to abstract away much of this work.
SAML v2.0 OASIS Standard set (PDF format) and schema files are available at https://www.oasis-open.org/standards#samlv2.0.
The Demo App: Setup
We will build a server application in NodeJS using Express framework.
The app is striped down to minimally required components; it must not be taken as an example of good practices. Namely, there is no persistence; this is deliberate to keep things simple.
-
Install NodeJS, the JavaScript runtime environment, for your operating system (if not already installed). The installer will also install NPM (node package management) tool. You can verify the installation by opening the terminal and checking the version of
nodeandnpmnode -v npm -v -
Create a folder where you want to store the source code of this demo app. I'm going to call this folder
app-folder. Open the terminal, change directory toapp-folder. Type in the following commandnpm init -yThe command will create a file
package.jsonin yourapp-folder. Feel free to checkout the content of this file. -
Next, key in the following command to install ExpressJS as a dependency of your app.
npm install --save expressExpress is a minimalist web framework for NodeJS.
-
Create a file
index.jsin yourapp-folderand copy the following code snipped into itconst express = require("express"); // Initialize express. const app = express(); // Set up port. const port = process.env.PORT || 7000; // Set up homepage route app.get("/", (req, res) => { res.send("Test Home Page!"); }); // Start the server. app.listen(port, () => { console.log(`Listening on http://localhost:${port}/`); });The code is self explanatory (if you have created web servers before); it sets up a server that listens to requests on
localhostport7000. -
Head over to the terminal and run the server
node index.jsYour app must be running at http://localhost:7000/.
Passport-SAML Library
We will be using Passport-SAML to configure SSO for our application. There are alternatives such as SAML2-JS and SamlifyJS which we could use.
There are libraries that assist with SAML-based SSO in other programming languages. There is, for instance, Pack4j for servers running on Java, flask-saml2 for servers running on Python and Flask, etc.
Go to terminal and run the following command to add Passport-SAML as a dependency to our app
npm install --save passport passport-saml
Login Route
Open index.js and add the following to the top of the file
const passport = require("passport");
Now create a login route
app.get(
"/jhu/login",
(req, res, next) => {
next();
},
passport.authenticate("samlStrategy")
);
As you see, I've decided to use /jhu/login/ as the login route. It means, when a user tries to access a protected resource, I will redirect them to this route. Here, we must again redirect the user to JHU SSO (send the authentication XML request along with it). Normally, it would look like this:
app.get("/jhu/login", (req, res) => {
// build the authentication request XML
// redirect the user to JHU SSO with the request XML
});
But instead we are delegating that process to passport library by calling next() in the first callback function where next is the "next" callback: passport.authenticate("samlStrategy").
Diff
diff --git a/code/index.js b/code/index.js
index f2c2481..acb9c69 100644
--- a/code/index.js
+++ b/code/index.js
@@ -1,4 +1,5 @@
const express = require("express");
+const passport = require("passport");
// Initialize express.
const app = express();
@@ -11,6 +12,15 @@ app.get("/", (req, res) => {
res.send("Test Home Page!");
});
+// login route
+app.get(
+ "/jhu/login",
+ (req, res, next) => {
+ next();
+ },
+ passport.authenticate("samlStrategy")
+);
+
// Start the server.
app.listen(port, () => {
console.log(`Listening on http://localhost:${port}/`);
Callback Route
Once JHU SSO has authenticated a user, it will send back a POST request to the SP (our app) with user data (assertions). It is up to us what that POST endpoint will be (but we shall let JHU IdP know about it through our metadata file).
app.post(
"/jhu/login/callback",
(req, res, next) => {
next();
},
passport.authenticate("samlStrategy"),
(req, res) => {
// the user data is in req.user
res.send(`welcome ${req.user.first_name}`);
}
);
Diff
diff --git a/code/index.js b/code/index.js
index acb9c69..826206b 100644
--- a/code/index.js
+++ b/code/index.js
@@ -21,6 +21,19 @@ app.get(
passport.authenticate("samlStrategy")
);
+// callback route
+app.post(
+ "/jhu/login/callback",
+ (req, res, next) => {
+ next();
+ },
+ passport.authenticate("samlStrategy"),
+ (req, res) => {
+ // the user data is in req.user
+ res.send(`welcome ${req.user.first_name}`);
+ }
+);
+
// Start the server.
app.listen(port, () => {
console.log(`Listening on http://localhost:${port}/`);
The SAML Strategy
You may have noticed we used the following middleware in both login and callback routes:
passport.authenticate("samlStrategy"),
Passport-SAML library allows us to configure the samlStrategy object.
Open index.js and add the following to the top of the file
const saml = require("passport-saml");
// Setup SAML strategy
const samlStrategy = new saml.Strategy(
{
// config options here
},
(profile, done) => {
return done(null, profile);
}
);
// Tell passport to use the samlStrategy
passport.use("samlStrategy", samlStrategy);
The saml.Strategy() accepts two arguments:
- The first is a configuration object, which I left blank for the moment.
- The second is a function which processes the user.
- The first argument into the function is a
profileobject, and the second isdone, a callback. - For our purposes, we are just executing the callback and sending it the profile object unchanged.
- If we needed to do more, such as load application specific permissions from a database, this could be done here.
- The first argument into the function is a
Diff
diff --git a/code/index.js b/code/index.js
index 826206b..4eb9a33 100644
--- a/code/index.js
+++ b/code/index.js
@@ -1,5 +1,19 @@
const express = require("express");
const passport = require("passport");
+const saml = require("passport-saml");
+
+// Setup SAML strategy
+const samlStrategy = new saml.Strategy(
+ {
+ // config options here
+ },
+ (profile, done) => {
+ return done(null, profile);
+ }
+);
+
+// Tell passport to use the samlStrategy
+passport.use("samlStrategy", samlStrategy);
// Initialize express.
const app = express();
The configuration options
Here are the configuration options we will use
entryPoint
entryPoint: JHU_SSO_URL,
where JHU_SSO_URL is declared as
const JHU_SSO_URL =
"https://idp.jh.edu/idp/profile/SAML2/Redirect/SSO";
The entryPoint is an endpoint provided by the SSO software solution where we will send our request to in order to let the user authenticate. This endpoint is provided in the IdP metadata XML.
Looking at JHU SSO metadata XML at https://idp.jh.edu/idp/shibboleth, you'll find they allow for several options (including using a POST endpoint) but the entity with Binding of urn:oasis:names:tc:SAML:2.0:bindings:HTTP-Redirect is what gives the familiar login (and sign-off) page that students are used to.
callbackUrl
callbackUrl: `${BASE_URL}/jhu/login/callback`,
The callbackUrl is a POST endpoint in SP (our application) where the IdP will post back the assertions after a successful user authentication.
When you develop your server locally, the BASE_URL is going to be localhost (e.g. http://localhost:7000/). However, JHU does not accept a locally running server as a trusted SP. So, you need to deploy your server! For example, I have deployed this demo app on Heroku and it runs on https://glacial-plateau-47269.herokuapp.com. Therefore, I've set the BASE_URL as:
const BASE_URL =
"https://glacial-plateau-47269.herokuapp.com";
issuer
issuer: SP_NAME,
The issuer is a globally unique identifier for an SP. This is basically our app's name. It is common practice to user your app's domain name in here. So, I've set SP_NAME as:
const SP_NAME = "glacial-plateau-47269";
Putting it all together
This is how the code snippet for configuration of SAML strategy looks like right now:
const saml = require("passport-saml");
const JHU_SSO_URL = "https://idp.jh.edu/idp/profile/SAML2/Redirect/SSO";
const SP_NAME = "glacial-plateau-47269";
const BASE_URL = "https://glacial-plateau-47269.herokuapp.com";
// Setup SAML strategy
const samlStrategy = new saml.Strategy(
{
// config options here
entryPoint: JHU_SSO_URL,
issuer: SP_NAME,
callbackUrl: `${BASE_URL}/jhu/login/callback`,
},
(profile, done) => {
return done(null, profile);
}
);
// Tell passport to use the samlStrategy
passport.use("samlStrategy", samlStrategy);
Diff
diff --git a/code/index.js b/code/index.js
index 4eb9a33..70c4a15 100644
--- a/code/index.js
+++ b/code/index.js
@@ -2,10 +2,17 @@ const express = require("express");
const passport = require("passport");
const saml = require("passport-saml");
+const JHU_SSO_URL = "https://idp.jh.edu/idp/profile/SAML2/Redirect/SSO";
+const SP_NAME = "glacial-plateau-47269";
+const BASE_URL = "https://glacial-plateau-47269.herokuapp.com";
+
// Setup SAML strategy
const samlStrategy = new saml.Strategy(
{
// config options here
+ entryPoint: JHU_SSO_URL,
+ issuer: SP_NAME,
+ callbackUrl: `${BASE_URL}/jhu/login/callback`,
},
(profile, done) => {
return done(null, profile);
Generate the XML file!
Recall: before authentication between an IdP and an SP occurs, a trust must be created between the two systems. This trust occurs through a metadata file exchange.
JHU SSO SAML metadata XML file is here: https://idp.jh.edu/idp/shibboleth.
We can have PassportJS to generate a metadata file for us.
app.get("/jhu/metadata", (req, res) => {
res.type("application/xml");
res.status(200);
res.send(samlStrategy.generateServiceProviderMetadata());
});
Run the app (using node index.js) and point your browser to http://localhost:7000/jhu/metadata to see the content of the metadata.
You need to send the metadata XML file to
enterpriseauth@jhmi.edualong with your request for your app to be added as a trusted SP.
Once your app is deployed, you can point JHU SSO admins to the metadata route instead of sending an actual file. Keep in mind though, if you make a change to this file, you must resend it to JHU SSO admins (the file is manually uploaded and it will not be linked to your applications metadata route).
Diff
diff --git a/code/index.js b/code/index.js
index 70c4a15..8e59655 100644
--- a/code/index.js
+++ b/code/index.js
@@ -55,6 +55,13 @@ app.post(
}
);
+// route to metadata
+app.get("/jhu/metadata", (req, res) => {
+ res.type("application/xml");
+ res.status(200);
+ res.send(samlStrategy.generateServiceProviderMetadata());
+});
+
// Start the server.
app.listen(port, () => {
console.log(`Listening on http://localhost:${port}/`);
Public-key cryptography
In SAML-based SSO, it is common to use end-to-end encryption using PKC, Public-key cryptography.
The Public-key cryptography employs a pair of public and private keys. Having a friend's public key allows you to encrypt messages to them. Your private key is used to decrypt messages encrypted to you.
In this scheme, when JHU sends user attributes to our app, it would encrypt it using our app's public key. (We would have to let them know of our public key through the metadata file). Our app then uses its private key to decrypt the encrypted data. So, we must:
- create a pair of private and public keys
- share the public key with IdP (i.e. include it in our metadata XML file)
The generation of public/private keys is done using cryptographic algorithms. There are different algorithms and standards for this. The standard used by SAML is X.509.
My preferred way of generating the encryption keys is using a little CLI tool called OpenSSL which can be obtained and installed here: https://www.openssl.org/.
Using OpenSSL Tool
Once OpenSSL is installed, open terminal and execute the following commands
mkdir certs
openssl req -x509 -newkey rsa:4096 -keyout certs/key.pem -out certs/cert.pem -nodes -days 365
This will create a folder certs and add two files key.pem (the private key) and cert.pem (the public key) to it.
Note: before the keys are generated, OpenSSL will prompt you to provide pertinent information. For the purposes of this demo, the information you provide need not to be accurate (e.g. just put something as organization name).
You must keep the certs folder in the app-folder. However, you should not upload it to a public repository like on GitHub (thus the folder is not included in the repository for this demo app).
Using the generated keys
Add this to index.js
const fs = require("fs");
const PbK = fs.readFileSync(__dirname + "/certs/cert.pem", "utf8");
const PvK = fs.readFileSync(__dirname + "/certs/key.pem", "utf8");
Add the following key-value pair to the SAML strategy config options object
decryptionPvk: PvK,
Add the public key to your metadata by passing it as an argument to generateServiceProviderMetadata function:
app.get("/jhu/metadata", (req, res) => {
res.type("application/xml");
res.status(200);
res.send(samlStrategy.generateServiceProviderMetadata(PbK));
});
Now run the server and head over to http://localhost:7000/jhu/metadata. Notice the <KeyDescriptor use="encryption"> element which is added to metadata XML.
Diff
diff --git a/code/index.js b/code/index.js
index 8e59655..468616d 100644
--- a/code/index.js
+++ b/code/index.js
@@ -1,6 +1,10 @@
const express = require("express");
const passport = require("passport");
const saml = require("passport-saml");
+const fs = require("fs");
+
+const PbK = fs.readFileSync(__dirname + "/certs/cert.pem", "utf8");
+const PvK = fs.readFileSync(__dirname + "/certs/key.pem", "utf8");
const JHU_SSO_URL = "https://idp.jh.edu/idp/profile/SAML2/Redirect/SSO";
const SP_NAME = "glacial-plateau-47269";
@@ -13,6 +17,7 @@ const samlStrategy = new saml.Strategy(
entryPoint: JHU_SSO_URL,
issuer: SP_NAME,
callbackUrl: `${BASE_URL}/jhu/login/callback`,
+ decryptionPvk: PvK,
},
(profile, done) => {
return done(null, profile);
@@ -59,7 +64,7 @@ app.post(
app.get("/jhu/metadata", (req, res) => {
res.type("application/xml");
res.status(200);
- res.send(samlStrategy.generateServiceProviderMetadata());
+ res.send(samlStrategy.generateServiceProviderMetadata(PbK));
});
// Start the server.
Reuse the generated keys
Another common practice in SAML-based SSO is to certify request/response XML objects by including XML_Signature. Typically, one reuses the public key for encryption for certification as well. You can generate a new set of keys for this purpose too.
Add the following key-value pair to the SAML strategy config options object
privateCert: PvK,
Add the public key as a signing certificate to your metadata by passing it as the second argument to generateServiceProviderMetadata function:
app.get("/jhu/metadata", (req, res) => {
res.type("application/xml");
res.status(200);
res.send(samlStrategy.generateServiceProviderMetadata(PbK, PbK));
});
Now run the server and head over to http://localhost:7000/jhu/metadata. Notice the <KeyDescriptor use="signing"> element which is added to metadata XML.
Diff
diff --git a/code/index.js b/code/index.js
index 468616d..25c43d4 100644
--- a/code/index.js
+++ b/code/index.js
@@ -18,6 +18,7 @@ const samlStrategy = new saml.Strategy(
issuer: SP_NAME,
callbackUrl: `${BASE_URL}/jhu/login/callback`,
decryptionPvk: PvK,
+ privateCert: PvK,
},
(profile, done) => {
return done(null, profile);
@@ -64,7 +65,7 @@ app.post(
app.get("/jhu/metadata", (req, res) => {
res.type("application/xml");
res.status(200);
- res.send(samlStrategy.generateServiceProviderMetadata(PbK));
+ res.send(samlStrategy.generateServiceProviderMetadata(PbK, PbK));
});
// Start the server.
Middlewares: Passport library needs more!
We now need to add a few other thing to our application. These are entirely related to how PassportJS library work and have nothing to do with the SAML-based SSO.
Open the terminal and install the following dependencies:
npm install --save express-session body-parser
Add the dependency modules to the top of index.js
const session = require("express-session");
const bodyParser = require("body-parser");
// Middleware
app.use(bodyParser.urlencoded({ extended: false }));
app.use(
session({ secret: "use-any-secret", resave: false, saveUninitialized: true })
);
app.use(passport.initialize({}));
app.use(passport.session({}));
I briefly explain the above statements:
Use bodyParser
const bodyParser = require("body-parser");
app.use(bodyParser.urlencoded({ extended: false }));
- The
bodyParsercan turn the body of a URL request into a simple object for us to access. - The
urlencoded()command will handleapplication/x-www/form-urlencodedvalues. Passport needs this when handling the IdP response that is directed to our callback POST endpoint.
Use express-session
const session = require("express-session");
app.use(
session({ secret: "use-any-secret", resave: false, saveUninitialized: true })
);
- The
sessionstore user information on the server side (and session ID on client-side using cookies). - The
secretvalue is used to sign a sessionID cookie. The sessionID will reference the server-side session. We can use any value we want for the secret key. - The
resavevalue determines whether to save the session value back into the session store after every request, even if it was not changed. - The
saveUninitailizedvalue is set totrue. This means that a session is always saved after it was created even if it did not change.
Setting passport in action
app.use(passport.initialize({}));
app.use(passport.session({}));
The two statements are needed to set passport in action.
Declaring your middleware (all the statements that start with
app.use) must be done before declaring the routes (statement that start withapp.getorapp.post).
Diff
diff --git a/code/index.js b/code/index.js
index 25c43d4..7b66e7c 100644
--- a/code/index.js
+++ b/code/index.js
@@ -1,6 +1,8 @@
const express = require("express");
const passport = require("passport");
const saml = require("passport-saml");
+const session = require("express-session");
+const bodyParser = require("body-parser");
const fs = require("fs");
const PbK = fs.readFileSync(__dirname + "/certs/cert.pem", "utf8");
@@ -34,6 +36,14 @@ const app = express();
// Set up port.
const port = process.env.PORT || 7000;
+// Middleware
+app.use(bodyParser.urlencoded({ extended: false }));
+app.use(
+ session({ secret: "use-any-secret", resave: false, saveUninitialized: true })
+);
+app.use(passport.initialize({}));
+app.use(passport.session({}));
+
// Set up homepage route
app.get("/", (req, res) => {
res.send("Test Home Page!");
Final touches: Pre & Post process User object
Passport requires that we add functions to serialize and deserialize the user:
// Serialize and deserialize user for paqssport
passport.serializeUser(function (user, done) {
done(null, user);
});
passport.deserializeUser(function (user, done) {
done(null, user);
});
The serializeUser/deserializeUser pre and post process the user object:
- The first argument into the function is a
userobject, and the second isdone, a callback. - For our purposes, we are just executing the callback and sending it the
userobject unchanged. - If we needed to do more with the
userobject (e.g. check it agains our database, etc), this could be done here.
These functions are default functions that just output the user to the console, which is a great debugging tool.
Diff
diff --git a/code/index.js b/code/index.js
index 7b66e7c..da2f90b 100644
--- a/code/index.js
+++ b/code/index.js
@@ -30,6 +30,15 @@ const samlStrategy = new saml.Strategy(
// Tell passport to use the samlStrategy
passport.use("samlStrategy", samlStrategy);
+// Serialize and deserialize user for paqssport
+passport.serializeUser(function (user, done) {
+ done(null, user);
+});
+
+passport.deserializeUser(function (user, done) {
+ done(null, user);
+});
+
// Initialize express.
const app = express();
Deploy: The final application!
Here is what the index.js looks like:
const express = require("express");
const passport = require("passport");
const saml = require("passport-saml");
const session = require("express-session");
const bodyParser = require("body-parser");
const fs = require("fs");
const PbK = fs.readFileSync(__dirname + "/certs/cert.pem", "utf8");
const PvK = fs.readFileSync(__dirname + "/certs/key.pem", "utf8");
const JHU_SSO_URL = "https://idp.jh.edu/idp/profile/SAML2/Redirect/SSO";
const SP_NAME = "glacial-plateau-47269";
const BASE_URL = "https://glacial-plateau-47269.herokuapp.com";
// Setup SAML strategy
const samlStrategy = new saml.Strategy(
{
// config options here
entryPoint: JHU_SSO_URL,
issuer: SP_NAME,
callbackUrl: `${BASE_URL}/jhu/login/callback`,
decryptionPvk: PvK,
privateCert: PvK,
},
(profile, done) => {
return done(null, profile);
}
);
// Tell passport to use the samlStrategy
passport.use("samlStrategy", samlStrategy);
// Serialize and deserialize user for paqssport
passport.serializeUser(function (user, done) {
done(null, user);
});
passport.deserializeUser(function (user, done) {
done(null, user);
});
// Initialize express.
const app = express();
// Set up port.
const port = process.env.PORT || 7000;
// Middleware
app.use(bodyParser.urlencoded({ extended: false }));
app.use(
session({ secret: "use-any-secret", resave: false, saveUninitialized: true })
);
app.use(passport.initialize({}));
app.use(passport.session({}));
// Set up homepage route
app.get("/", (req, res) => {
res.send("Test Home Page!");
});
// login route
app.get(
"/jhu/login",
(req, res, next) => {
next();
},
passport.authenticate("samlStrategy")
);
// callback route
app.post(
"/jhu/login/callback",
(req, res, next) => {
next();
},
passport.authenticate("samlStrategy"),
(req, res) => {
// the user data is in req.user
res.send(`welcome ${req.user.first_name}`);
}
);
// route to metadata
app.get("/jhu/metadata", (req, res) => {
res.type("application/xml");
res.status(200);
res.send(samlStrategy.generateServiceProviderMetadata(PbK, PbK));
});
// Start the server.
app.listen(port, () => {
console.log(`Listening on http://localhost:${port}/`);
});
I have deployed the app on Heroku and it is available at https://glacial-plateau-47269.herokuapp.com. Feel free to experiment with it:
- Go to https://glacial-plateau-47269.herokuapp.com/jhu/login
- It must redirect you to JHU SSO sign-in page
- Enter your credential and login
- It must redirect back to https://glacial-plateau-47269.herokuapp.com/jhu/login/callback
- You must see a welcome message!
Assertion attributes
The IdP response includes a list of user attributes (assertions). You need to specify, in your correspondence with enterpriseauth@jhmi.edu, what attributes you need so they send it your way.
Here are some of the attributes you can receive (which will be accessible through req.user object in the callback route):
- Username:
req.user.username(your JHED ID) - Affiliation:
req.user.user_field_affiliation(eitherSTUDENT,FACULTYorSTAFF) - Job title:
req.user.user_field_job_title(e.g. mine comes up asLECTURER) - Last name:
req.user.last_name - First name:
req.user.first_name - Given name:
req.user.given_name - Email:
req.user.email